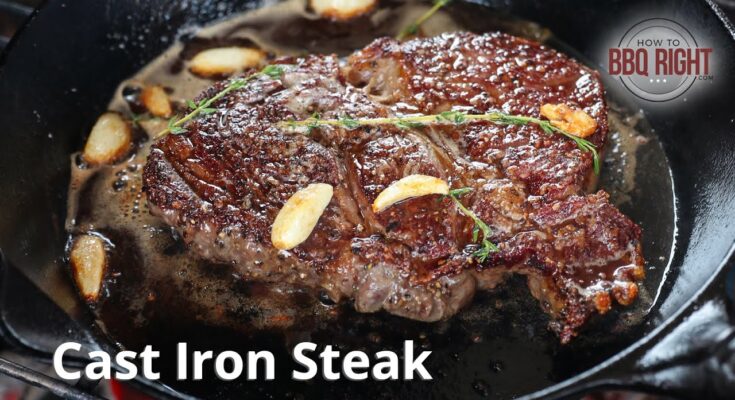
Cast Iron Steak Recipe: You know that sizzling sound when a juicy steak hits a hot pan? That’s the magic moment—especially when you’re using a cast iron skillet. If you’re craving a steakhouse-quality dinner but don’t want to spend a fortune, you’re in for a treat. Cooking a steak in a cast iron pan is one of the best ways to achieve a golden-brown crust with a tender, juicy interior. This guide walks you through every step to turn your kitchen into a steak haven.
But why cast iron? Unlike other pans, cast iron retains and evenly distributes heat like a pro. This creates the perfect sear—the kind of golden crust you dream about. And the best part? It’s simple enough for beginners but rewarding for seasoned cooks. Whether you’re cooking for a date night, family dinner, or just treating yourself, this cast iron steak recipe will leave you wondering why you ever ordered steak out.
So grab your skillet, tie on that apron, and let’s dive into the world of sizzling, buttery, cast iron steak perfection.
Ingredients You’ll Need
Before you light the stove, you’ve got to gather your culinary soldiers. Great steak starts with great ingredients. The beauty of this recipe? It’s simple. You don’t need a long shopping list or fancy marinades—just a few high-quality ingredients that work together to let the steak shine.
Basic Ingredients:
- 1 ribeye, New York strip, or filet mignon (1 to 1.5 inches thick)
- Kosher salt
- Freshly ground black pepper
- 1–2 tablespoons of high smoke point oil (canola, avocado, or grapeseed oil)
- 2 tablespoons of unsalted butter
Optional Flavor Enhancers:
- 2–3 cloves of garlic (crushed)
- Fresh rosemary or thyme sprigs
- A pinch of crushed red pepper for a little kick
Simple, right? But don’t underestimate the power of these ingredients. Each one plays a key role in building layers of flavor—from the sear on the steak to the aromatic butter bath at the end. Trust us, once you try it this way, there’s no going back.
Tools and Equipment
You can’t make magic without the right tools, and when it comes to steak, using the correct equipment makes all the difference. The goal is a perfectly seared crust and a juicy inside, and that’s impossible without heat and control.
Must-Have Tools:
- Cast iron skillet (10 or 12-inch recommended)
- Tongs (metal, not silicone)
- Instant-read meat thermometer
- Paper towels (to pat steak dry)
- Stove and oven (optional for finishing the steak)
Why a Cast Iron Skillet?
Here’s the secret: cast iron holds heat like a champ. Unlike thinner pans that cool down when the steak hits, cast iron stays scorching hot, locking in all the juices with a powerful sear. It’s basically the steakhouse experience in your kitchen. The skillet also transitions seamlessly from stovetop to oven, making it easy to finish thicker cuts without drying them out.
If you don’t have one yet, it’s worth the investment. A good cast iron skillet lasts for generations and only gets better with time.
Choosing the Right Cut of Steak
Not all steaks are created equal. Choosing the right cut makes or breaks your dish. While almost any cut can be cooked in a cast iron pan, some do better than others when it comes to pan-searing.
Best Cuts for Cast Iron Cooking:
- Ribeye: Rich marbling and tons of flavor
- New York Strip: Leaner but still flavorful with a good texture
- Filet Mignon: Super tender, great for a more delicate steak
- Sirloin: Budget-friendly and tasty if cooked right
The key here is thickness. Aim for a cut that’s at least 1 inch thick, preferably 1.5 inches. This ensures that you can sear the outside without overcooking the inside.
How to Pick the Best Steak at the Store:
- Look for marbling: Those tiny white streaks of fat mean flavor.
- Bright red color: Indicates freshness.
- Firm to the touch: Good texture is everything.
Remember, you’re only as good as your ingredients. Investing in a good steak pays off big time in flavor and texture.
Preparing the Steak
Here’s where a lot of people go wrong—right before they even hit the pan. Proper prep isn’t optional; it’s essential. The more attention you give your steak before it cooks, the better it turns out.
Step 1: Let It Rest
Take the steak out of the fridge and let it come to room temperature—about 30 minutes. This helps it cook evenly. If it’s too cold, the inside will stay raw while the outside overcooks.
Step 2: Pat It Dry
This step is a game changer. Use paper towels to pat the steak bone dry. Moisture is the enemy of a good sear. If the steak is wet, it will steam instead of sizzle.
Step 3: Season Generously
Don’t be shy with salt and pepper. Use kosher salt and freshly ground black pepper. The salt draws out moisture and enhances flavor, while pepper gives it a subtle heat. Season both sides and even the edges.
Pro Tip:
If you want to go gourmet, you can dry-brine the steak by salting it and letting it sit uncovered in the fridge for a few hours. This draws out moisture and concentrates the flavor.
Ready for the sizzle? We’re just getting started.
Searing the Steak
Now comes the fun part—searing your steak to perfection. This is where your cast iron skillet gets to show off its power. The goal here is to create that golden-brown crust that locks in all the juicy flavor.
Step-by-Step Searing Guide:
- Preheat the skillet – Place your cast iron skillet on the stove over high heat. Give it about 5 minutes to heat up thoroughly. You want it smoking hot—literally. If a drop of water dances and evaporates instantly, it’s ready.
- Add oil – Pour in 1–2 tablespoons of a high smoke point oil like avocado or grapeseed oil. Swirl it around to coat the pan evenly.
- Place the steak – Using tongs, lay the steak down gently. Press it lightly to ensure even contact. Don’t move it around! Let it sit undisturbed for 2–3 minutes.
- Flip it – Turn the steak over and sear the other side for another 2–3 minutes. You should see a beautifully crusted exterior.
This is where it starts to smell like a steakhouse. That sizzle, that aroma—it’s everything.
Quick Tips for the Perfect Sear:
- Don’t overcrowd the pan. One steak at a time unless the skillet is huge.
- Use a splatter guard if you want to keep the mess to a minimum.
- Turn on your exhaust fan—things can get smoky!
Adding Flavor with Butter Basting
Once the steak is seared, it’s time to add some gourmet-level flavor with a butter baste. This technique not only adds richness but also gives the steak a shiny, savory glaze.
How to Butter Baste:
- Add butter – After you flip the steak, toss in 2 tablespoons of unsalted butter.
- Aromatics – Throw in a few crushed garlic cloves and some fresh rosemary or thyme sprigs.
- Tilt and baste – Tilt the skillet slightly so the butter pools on one side. Use a spoon to scoop and drizzle the melted butter over the steak repeatedly for about 1–2 minutes.
Why It Works:
Butter basting infuses the steak with the flavors of garlic and herbs, and keeps it juicy. Plus, the butter helps finish off that deep brown crust we all love.
Finishing the Steak in the Oven (Optional)
If you’re working with a thick cut, it might not reach your desired doneness just from searing. This is where your oven comes into play. The cast iron skillet is oven-safe, so it’s easy to move it right into the oven to finish cooking.
How to Do It:
- Preheat your oven – Set it to 400°F (200°C).
- Transfer the skillet – Once seared on both sides, place the skillet with the steak in the oven.
- Bake to desired doneness – Use an instant-read thermometer to check the internal temp:
- Rare: 125°F
- Medium Rare: 130°F
- Medium: 140°F
- Medium Well: 150°F
- Well Done: 160°F
Time Guide (after searing):
- For 1-inch thick steak: 3–5 minutes in oven
- For 1.5–2 inches: 5–8 minutes
Be sure to monitor closely; overcooking happens fast!
Letting the Steak Rest
This step is often skipped—but it’s arguably just as important as searing. Resting lets the juices redistribute, so you don’t end up with a dry steak and a juicy plate.
How to Rest Properly:
- Transfer steak to a cutting board.
- Tent it loosely with foil.
- Let it rest for 5–10 minutes before slicing.
Why It Matters:
If you slice into it too soon, all those flavorful juices will spill out. Give it time. Trust the process.
Resting Tip:
While the steak rests, use this time to finish up your sides, toast some bread, or just savor the incredible aroma floating through your kitchen.
Slicing and Serving Your Steak
You made it! The steak is cooked, rested, and now it’s time to serve. But hold up—there’s an art to slicing, too.
How to Slice Steak Like a Pro:
- Cut against the grain – This shortens the muscle fibers, making each bite more tender.
- Use a sharp knife – Don’t saw back and forth; one clean slice is all you need.
- Serve on a warm plate – Helps keep the steak warm longer.
Serving Ideas:
- Pair with roasted garlic mashed potatoes or grilled asparagus.
- Add a knob of compound butter on top.
- Drizzle some leftover pan juices over the steak.
Presentation matters—especially when you’ve put in this kind of love.
Ideal Sides to Pair with Cast Iron Steak
A great steak deserves an equally mouthwatering partner on the plate. The perfect side dish can take your cast iron steak from delicious to unforgettable. You don’t need to get fancy—think simple, flavorful, and complementary.
Classic Side Dishes:
- Garlic Mashed Potatoes – Creamy, buttery, and just the right amount of garlicky. Perfect for soaking up steak juices.
- Grilled Asparagus – Light and crunchy with a charred bite that balances the richness of the steak.
- Creamed Spinach – A steakhouse classic that brings in a velvety texture and earthy flavor.
- Roasted Vegetables – Carrots, bell peppers, and Brussels sprouts seasoned and oven-roasted to crispy perfection.
- Caesar Salad – Crisp romaine, creamy dressing, and crunchy croutons give a refreshing contrast to your rich main course.
Something Extra:
- Buttered Corn on the Cob
- Crispy Sweet Potato Fries
- Baked Mac and Cheese
- Sautéed Mushrooms with Thyme
Mix and match according to your taste or what’s in your pantry. A perfectly cooked steak deserves an equally impressive sidekick—or two!
Common Mistakes to Avoid
Even experienced home cooks can make errors that affect the final outcome of a steak. Here’s how to dodge those pitfalls and keep your cast iron steak game strong.
1. Not Preheating the Skillet
A cold or lukewarm skillet will ruin your sear. The pan must be smoking hot before the steak hits it. Otherwise, it’ll just steam—and who wants a steamed steak?
2. Using the Wrong Oil
Butter burns fast. That’s why we only use it for basting after the sear. For cooking, always go with a high smoke point oil like canola or avocado oil.
3. Under- or Over-Seasoning
Salt and pepper may seem basic, but they’re powerful. Don’t overdo it, but don’t be stingy either. The goal is a flavorful crust, not a salt bomb.
4. Constant Flipping
Once the steak is down, leave it alone. One flip is all it needs. Too much flipping disrupts the crust formation and saps the heat from the pan.
5. Skipping the Rest
Resting isn’t just a suggestion—it’s mandatory. Skip this step and you risk letting all the juices leak out onto your cutting board.
Tips for Cooking Steak to Your Preferred Doneness
Everyone has a preference when it comes to steak doneness, and the good news is, cast iron gives you complete control. Whether you like it bleeding rare or well-done (we won’t judge), here’s how to hit the mark every time.
Use a Thermometer
Don’t play the guessing game. An instant-read thermometer is your best friend. Insert it into the thickest part of the steak for the most accurate reading.
Internal Temperature Guide:
| Doneness | Temperature (°F) | Look & Texture |
|---|---|---|
| Rare | 120–125°F | Cool, red center |
| Medium Rare | 130–135°F | Warm, red center |
| Medium | 140–145°F | Warm, pink center |
| Medium Well | 150–155°F | Slightly pink center |
| Well Done | 160°F+ | No pink, firm throughout |
Pro Tip:
Take the steak off the heat about 5°F before your target. It’ll continue cooking during the rest period—called “carryover cooking.”
Storing and Reheating Leftovers
Got leftovers? Lucky you! Steak can be just as tasty the next day if you store and reheat it properly.
Storing Tips:
- Let the steak cool to room temp.
- Wrap tightly in foil or place in an airtight container.
- Store in the fridge for up to 3 days.
Reheating Methods:
- Skillet Reheat (Best):
- Heat a bit of oil in a skillet over medium-low.
- Add steak slices and cook gently, flipping occasionally.
- Add a splash of beef broth or butter for moisture.
- Oven Reheat:
- Preheat oven to 275°F.
- Place steak on a wire rack over a baking sheet.
- Heat for 15–20 minutes or until warmed through.
- Avoid the Microwave:
- Microwaving zaps moisture and flavor. Use only if desperate.
Repurpose leftovers into steak salads, sandwiches, or tacos for a whole new meal!
FAQs about Cast Iron Steak Recipe
1. What’s the best cut of steak for cast iron cooking?
Ribeye is often considered the best due to its marbling, but New York strip and filet mignon also work wonderfully.
2. Do I need to finish the steak in the oven?
Only if the steak is thick and hasn’t reached your desired internal temp after searing.
3. Can I use olive oil for searing steak?
Avoid extra virgin olive oil due to its low smoke point. Use oils with high smoke points like avocado or canola oil.
4. How do I know when my skillet is hot enough?
Flick a drop of water into the pan. If it sizzles and evaporates immediately, it’s ready.
5. Can I reuse the butter and herbs after cooking?
Yes! Drizzle it over your steak for extra flavor, or use it to sauté some veggies on the side.
Conclusion
Cooking steak in a cast iron skillet is more than just a method—it’s a culinary ritual. With the right prep, tools, and a little patience, you can create a steak that rivals any restaurant. You get that irresistible crust, juicy inside, and flavor that’ll make you forget about takeout forever.
Whether you’re a beginner trying this for the first time or a seasoned home cook looking to elevate your skills, this cast iron steak recipe has you covered. From picking the perfect cut to nailing the butter baste and pairing it with killer sides, this guide ensures your steak nights will never be the same again.


