Caramelized Onion Recipe: Caramelized onions are like kitchen magic. Start with a simple, sharp raw onion, and through the power of heat and time, you transform it into something rich, sweet, and utterly addictive. They’re the kind of ingredient that can instantly level up just about any dish—think burgers, pizzas, grilled cheeses, pastas, or even a simple bowl of rice. And here’s the best part? They’re ridiculously easy to make.
We’re talking about a process so low-effort and budget-friendly that once you master it, you’ll wonder why you ever settled for sautéed onions. This guide will walk you through every step—so grab a pan, a few onions, and let’s make magic happen.
Ingredients You’ll Need
To get started, you really don’t need a lot. The ingredients are simple, but the transformation they go through is where the real culinary power lies. Here’s what you need:
Basic Ingredients:
- 2 to 3 large onions (yellow or sweet preferred)
- 2 tablespoons of butter or olive oil (or a mix)
- Pinch of salt
- Optional: 1 tsp sugar (if your onions aren’t sweet)
Flavor Add-Ins (Optional):
- Balsamic vinegar for a tangy finish
- A splash of white wine or broth for depth
- Fresh herbs like thyme or rosemary
- A bit of garlic added in the last few minutes
That’s it. No fancy pantry raid required.
Best Onions for Caramelizing
You can technically caramelize any kind of onion, but some are definitely better than others. If you’re aiming for a deep, sweet flavor and rich texture, the type of onion you use can make all the difference.
Yellow Onions
These are the go-to for most caramelized onion recipes. They have a balanced flavor and high sugar content, which makes them perfect for the job.
White Onions
Milder in flavor and a bit sharper when raw, they can still caramelize beautifully but might not get as sweet as yellow or sweet onions.
Red Onions
These caramelize fine, but their flavor leans more tangy than sweet. They’re great if you want a twist, especially for pairing with bold flavors like goat cheese or balsamic vinegar.
Sweet Onions (like Vidalia or Walla Walla)
These are sugar bombs in the best way possible. They caramelize quickly and end up tasting almost like onion jam. Just keep an eye on them—they can burn faster due to their high sugar content.
Equipment Checklist
Before you start, let’s make sure you’ve got the right tools. While you don’t need a fancy setup, the right gear can make your job a whole lot easier and deliver better results.
Essential Tools:
- Cutting board & sharp knife: For even slices
- Heavy-bottom skillet or sauté pan: Cast iron or stainless steel is best for even heat
- Wooden spoon or silicone spatula: For gentle stirring and deglazing
- Measuring spoons: If you’re adding sugar, vinegar, or wine
- Lid (optional): Helps soften onions quicker in early stages
Avoid nonstick pans if possible—they don’t develop the same fond (those browned bits) that adds to the rich flavor of caramelized onions.
Step-by-Step Caramelization Process
Now, let’s get into the heart of it. Here’s how you go from raw onion to glorious, golden-brown caramelized perfection.
Step 1: Slice the Onions
First things first—cut those onions. The way you slice them actually impacts how they cook and how sweet they end up.
How to Cut:
- Trim off the ends, peel the onions, and slice them in half lengthwise.
- Lay each half flat and cut thin slices (about 1/8 to 1/4 inch thick).
- Keep slices uniform for even cooking.
Whether you cut with or against the grain will change the texture. Cutting with the grain gives you longer, softer strands. Against the grain gives you smaller pieces with a bit more bite. Either works—it’s just a matter of preference.
Step 2: Choose Your Pan Wisely
Use a wide, heavy-bottom skillet. A larger surface area means more onions touch the heat and brown evenly.
Why It Matters:
- Cast iron: Holds heat and browns onions like a dream.
- Stainless steel: Also great—lets you scrape up fond for extra flavor.
- Nonstick: Avoid if you can. They don’t develop the same caramelization.
The right pan doesn’t just cook your onions—it helps build that deep, sweet flavor we’re after.
Step 3: Add Fat – Butter vs Oil
Fat helps onions cook evenly and gives them that signature silky texture. But should you use butter, oil, or both?
Butter:
- Adds rich, savory flavor
- Can burn if the heat is too high
Olive Oil:
- Has a higher smoke point
- Lighter flavor
Pro Tip:
Use a combo! Butter for flavor, oil to keep it from burning. Two tablespoons per 2-3 onions is a good start.
Step 4: Cook Low and Slow
This is where the magic happens. Don’t rush it. The key to perfect caramelized onions is cooking them low and slow over medium-low heat.
Process:
- Add sliced onions to the pan once the butter/oil is hot.
- Sprinkle a pinch of salt—it draws out moisture.
- Cook uncovered, stirring every few minutes.
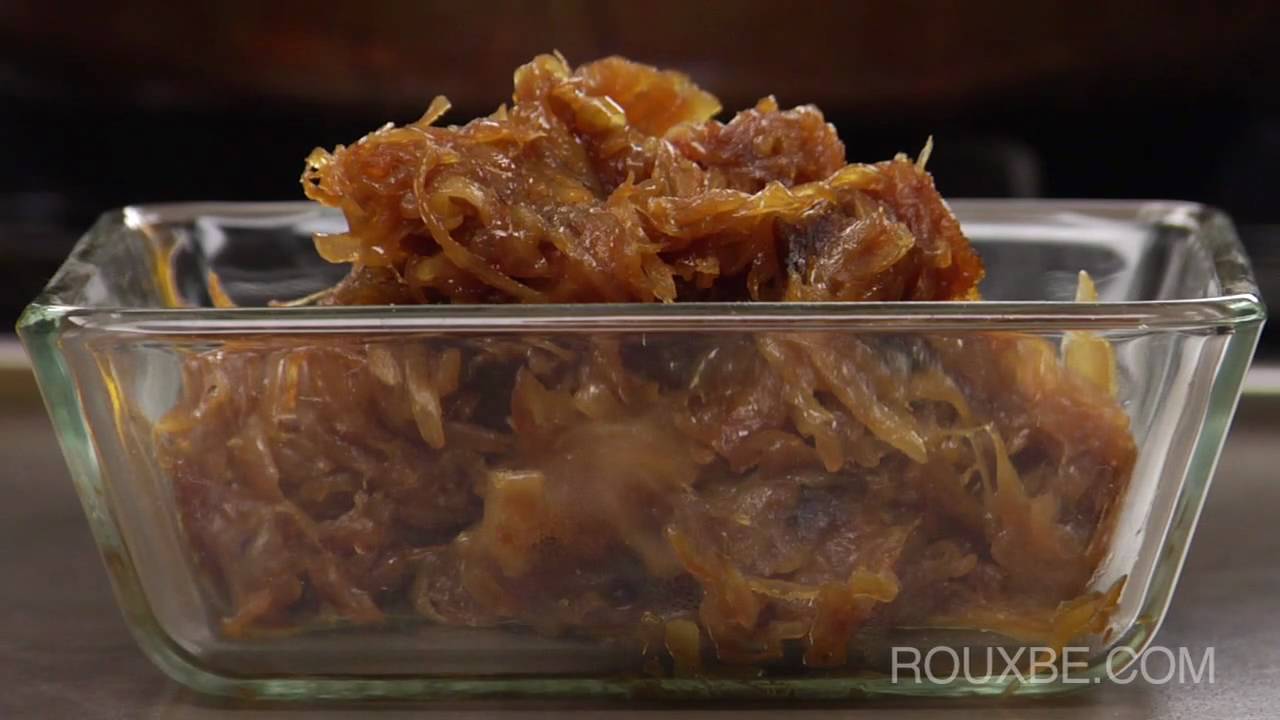
At first, they’ll sweat and go soft. Then they’ll start to brown. Eventually, they turn a deep, jammy gold. This takes 30-45 minutes, depending on the amount.
Rushing = burning. Be patient—it’s worth it.
Step 5: Stir with Patience
Stirring too much can slow down the browning. Not stirring enough can lead to burnt bits.
Best Practice:
- Stir every 5–7 minutes.
- Scrape up brown bits from the bottom.
- If onions start to stick, reduce heat or add a splash of water.
You want browning, not burning. If you see blackened onions, your heat is too high.
Step 6: Deglaze the Pan (Optional but Recommended)
Deglazing isn’t required, but wow—it takes your caramelized onions to the next level. You know those browned bits stuck to the bottom of the pan? That’s flavor gold. Deglazing helps lift those up and mix them right into the onions.
What to Use for Deglazing:
- A splash of water (basic and easy)
- Balsamic vinegar for tangy sweetness
- White wine for a subtle depth
- Broth (chicken or vegetable) for savory richness
How to Do It:
- Once your onions are deep golden and nearing the finish line, pour in 1-2 tablespoons of your chosen liquid.
- Stir and scrape the bottom of the pan with your spoon or spatula.
- Let it reduce for a minute or two until the liquid evaporates.
You’ll be left with an even richer, deeper flavor that coats every single strand of onion.
Common Mistakes to Avoid
Even though caramelized onions are simple, there are a few pitfalls that can mess things up. Here’s what to steer clear of:
1. Using High Heat
We get it—you’re hungry. But cranking up the heat will burn the onions before they have a chance to release their sugars and caramelize properly. Medium-low heat is your best friend here.
2. Not Stirring Enough (Or Too Much)
There’s a balance. Stir too often, and your onions won’t brown well. Stir too little, and they might burn. Check and stir every 5-7 minutes for the perfect middle ground.
3. Skipping the Salt
Salt draws out moisture, helping the onions soften faster. Don’t skip it—even just a pinch makes a big difference.
4. Using the Wrong Pan
Nonstick pans don’t allow for proper browning. Cast iron or stainless steel is the way to go if you want those rich, flavorful results.
5. Not Cooking Long Enough
Caramelization takes time—at least 30-45 minutes. If your onions are still pale or taste sharp, keep cooking.
How to Store Caramelized Onions
You just spent 45 minutes crafting the perfect caramelized onions—don’t let them go to waste. Here’s how to keep them fresh and flavorful.
In the Fridge:
- Store in an airtight container or mason jar.
- Keeps well for up to 5 days.
- Reheat in a skillet with a splash of water or oil.
In the Freezer:
- Portion into ice cube trays or small containers.
- Freeze for up to 3 months.
- Thaw overnight in the fridge or directly reheat from frozen.
Pro Tip:
Make a big batch on the weekend and freeze in small portions. You’ll thank yourself on a busy weeknight when your dinner suddenly tastes restaurant-level good.
Delicious Ways to Use Caramelized Onions
So you’ve got a batch of gorgeous, golden caramelized onions. What now? Here are some mouth-watering ways to put them to good use:
1. On Burgers
Level up your backyard BBQ game—these add sweet-savory depth to any beef or veggie burger.
2. In Grilled Cheese
Add a spoonful between two slices of bread with melted cheese… instant gourmet.
3. On Pizza
Use as a topping, either solo or with goat cheese, mushrooms, sausage, or arugula.
4. In Pasta
Mix into creamy pasta sauces or toss with buttered noodles and Parmesan.
5. On Steaks or Chicken
Caramelized onions make a fantastic finishing touch on grilled meats.
6. In Quiches and Tarts
Add them to egg bakes or savory pies for sweet complexity.
7. With Eggs
Fold into scrambled eggs or layer on an omelet for a breakfast win.
8. In Sandwiches or Wraps
From roast beef to hummus wraps, caramelized onions bring the flavor.
9. With Mashed Potatoes
Swirl in for a comforting twist on a classic side.
10. Straight From the Spoon
Honestly, they’re that good.
FAQs About Caramelized Onion Recipe
1. How long does it take to caramelize onions?
It usually takes 30 to 45 minutes over low heat. Don’t rush it—low and slow is the key to deep flavor and golden-brown perfection.
2. Can I caramelize onions faster?
Technically, yes. You can add a pinch of baking soda to speed up browning, but it may alter the texture. For best flavor, patience wins.
3. What type of onion is best for caramelizing?
Yellow onions are the most popular, but white, red, and even sweet onions work beautifully. Each offers a unique flavor twist.
4. Should I use oil or butter?
You can use either, or a mix of both. Butter adds richness, while oil prevents burning—the combo gives the best of both worlds.
5. Can I store caramelized onions?
Absolutely! Keep them in an airtight container in the fridge for up to 5 days, or freeze them for longer shelf life.
6. Are caramelized onions healthy?
Yes, in moderation. They’re just onions cooked down—low in calories but rich in flavor. Just watch your oil or butter quantity.
7. Can I caramelize onions in advance?
Yep, meal prep friendly! Make a batch, store, and reheat as needed. They get even better after resting.
8. Why are my onions not caramelizing properly?
Too much heat or crowding the pan could be the culprit. Make sure there’s enough space and stir occasionally to avoid burning.
Conclusion
Caramelized onions might take a bit of time, but the payoff is absolutely worth it. They’re proof that a little patience in the kitchen can turn basic ingredients into something spectacular. Whether you’re topping a burger, dressing up a grilled cheese, or just savoring them straight from the pan, these onions are a culinary secret weapon every home cook should master.
Once you try this step-by-step guide, you’ll never look at onions the same way again. So grab a pan, set the heat to low, and get ready to fall in love with one of the most magical transformations in cooking.