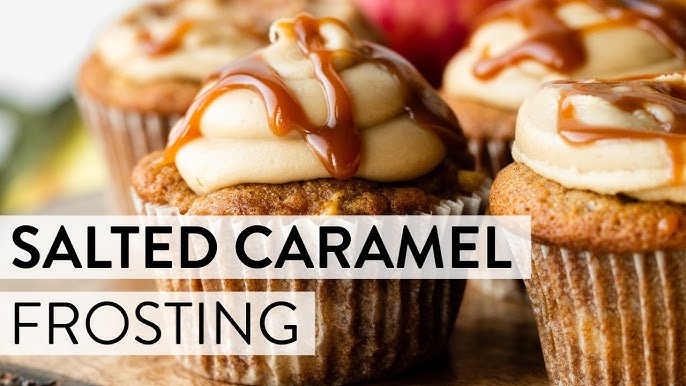
Caramel Frosting Recipe: Caramel frosting is one of those classic toppings that can turn any ordinary cake or cupcake into a decadent masterpiece. With its rich, buttery flavor and smooth, creamy texture, it’s no wonder this frosting is a favorite for many. Whether you’re baking for a special occasion or just want to treat yourself, this caramel frosting recipe is going to be your new go-to. It strikes the perfect balance between sweet and savory, with a deep caramelized flavor that’s downright irresistible.
But why do people love caramel frosting so much? Well, it’s probably because it has a nostalgic charm that reminds many of home-baked goods and family gatherings. Plus, the combination of sugar, butter, and cream is simply unbeatable. The rich golden color also adds a visual appeal that makes your baked goods look as good as they taste.
Why Caramel Frosting is a Crowd Favorite
What makes caramel frosting so universally loved? First off, it’s versatile. It pairs beautifully with a variety of cakes—think apple spice, chocolate, vanilla, banana, and even pumpkin. The contrast of sweet caramel with something like a dark chocolate cake creates a taste explosion you won’t forget anytime soon.
Another reason for its popularity is that caramel frosting adds a luxurious texture. It’s thick enough to stay on cupcakes and layer cakes, but still soft enough to melt in your mouth. It’s the kind of frosting that makes people go back for seconds (or thirds!).
Perfect Occasions for Caramel Frosting
There’s no wrong time to make caramel frosting, but there are definitely moments when it shines the brightest. Birthdays? Absolutely. Holidays like Thanksgiving and Christmas? You bet. It adds a touch of warmth and sweetness that fits right in with festive treats. Even a casual weekend bake can become something special when topped with a swirl of this golden goodness.
And let’s not forget about fall-themed parties and rustic weddings. Caramel frosting fits perfectly with that cozy, inviting aesthetic. Its color and flavor make it a seasonal favorite, especially in cooler months when everyone’s craving comfort food.
Essential Ingredients for Caramel Frosting
Getting your ingredients right is half the battle when making caramel frosting. Thankfully, most of what you need is probably already in your kitchen.
Common Pantry Ingredients Needed
Here’s a breakdown of what you’ll need for a basic caramel frosting recipe:
- Granulated sugar – This is the base of your caramel. It gets melted down to create that deep, rich flavor.
- Unsalted butter – Adds richness and helps give the frosting its creamy consistency.
- Heavy cream or milk – This helps to thin out the caramel slightly and makes the final frosting smooth and spreadable.
- Vanilla extract – A dash of vanilla enhances the caramel flavor and rounds out the taste.
- Salt – Just a pinch brings out the sweetness and adds depth. If you’re going for a salted caramel vibe, you can add a bit more.
These basic ingredients come together in a way that’s nothing short of magical. Each one plays a crucial role in achieving that perfect balance of flavor and texture.
Optional Add-ins to Elevate Flavor
If you want to take things up a notch, consider these optional add-ins:
- Sea salt flakes – For a gourmet salted caramel frosting.
- Maple syrup or bourbon – Adds complexity and a unique twist.
- Cinnamon or nutmeg – For a warm, spiced version of the frosting.
- Brown sugar – Swap out part of the granulated sugar for a richer, molasses-like flavor.
These additions can give your frosting a signature taste, setting it apart from the usual recipes and making your baked goods truly memorable.
Tools You’ll Need
Having the right tools on hand can make the process smoother and more enjoyable. Trust me, caramel can be a little finicky, so preparation is key.
Basic Kitchen Tools for Success
- Heavy-bottom saucepan – Helps distribute heat evenly to prevent burning the sugar.
- Wooden spoon or silicone spatula – Perfect for stirring the caramel as it cooks.
- Measuring cups and spoons – Accuracy is important when it comes to caramel.
- Mixing bowl – To combine and beat the final frosting mixture.
These are all standard tools you probably already have in your kitchen. No need for anything too fancy!
Recommended Equipment for Perfect Texture
- Candy thermometer – Not 100% necessary, but really helpful for beginners to hit the right caramel stage.
- Electric mixer or hand mixer – Once the caramel is ready, this helps beat everything together into a smooth frosting.
- Fine mesh strainer (optional) – To remove any lumps if your caramel gets a bit grainy.
Using the right tools can make the difference between a smooth, dreamy frosting and a clumpy, overcooked mess. If you’re serious about getting it right, these tools will serve you well.
Step-by-Step Caramel Frosting Recipe
Step 1 – Preparing the Ingredients
Before you even turn on the stove, gather and measure all your ingredients. Caramel moves quickly once it starts cooking, and you won’t have time to measure in the middle of it. Chop your butter into small cubes, measure out your cream, and keep the vanilla and salt nearby. Trust me, mise en place is your best friend here.
Step 2 – Making the Caramel Base
In a heavy-bottomed saucepan over medium heat, add the sugar. Stir constantly as it melts and begins to caramelize. Watch closely—this is the critical point. The sugar will first clump, then slowly melt into a smooth, amber-colored liquid. Don’t walk away or it might burn.
Once the sugar is fully melted and reaches a rich golden brown color, carefully add the butter. It will bubble vigorously, so stand back slightly. Stir until the butter is completely melted and combined.
Step 3 – Blending in the Butter and Sugar
Once the caramelized sugar and butter are fully combined, it’s time to add the cream. Slowly pour the heavy cream into the mixture while stirring continuously. The mixture will bubble up again—don’t panic, this is totally normal. Stir vigorously until everything is smooth and well-mixed.
After that, add a splash of vanilla extract and a pinch of salt. The vanilla adds depth and rounds out the flavor, while the salt balances the sweetness and enhances the caramel notes. At this stage, the mixture should be glossy and slightly thick but still pourable.
If you’re making a stovetop frosting, allow this mixture to simmer for a minute or two more to thicken up slightly. For those aiming for a thicker frosting suitable for piping, let the caramel cook a bit longer until it reaches a thicker, paste-like consistency. Be careful not to overcook it—it will thicken more as it cools.
Step 4 – Achieving the Perfect Consistency
Now comes the magic: transforming this rich caramel sauce into a fluffy frosting. Remove the caramel from heat and let it cool slightly—about 10 minutes. You want it to be warm but not hot when you mix in the remaining ingredients, or else you risk melting your frosting instead of whipping it.
Transfer the caramel to a mixing bowl. Using a hand mixer or stand mixer on medium speed, begin beating in additional butter (if the recipe calls for it) or powdered sugar to thicken it up. This step is crucial for achieving that smooth, creamy texture that spreads beautifully on cakes and cupcakes.
If the frosting feels too runny, add more powdered sugar in small increments until the desired consistency is reached. On the flip side, if it’s too thick, a splash of milk or cream can loosen it up. The goal is a silky, spreadable frosting that holds its shape but isn’t stiff or dry.
Step 5 – Cooling and Storing the Frosting
Once your frosting is smooth and at the perfect consistency, let it cool completely at room temperature. This allows it to firm up just enough to become pipeable or spreadable without sliding off your baked goods.
You can use the frosting immediately, or store it in an airtight container in the fridge for up to a week. If refrigerating, allow it to come to room temperature and re-whip it slightly before using to regain its fluffy texture.
For longer storage, caramel frosting can be frozen for up to two months. Just make sure it’s well-sealed. Thaw in the fridge overnight and whip again before using. This makes it super convenient for planning ahead for parties or events.
Tips and Tricks for Flawless Caramel Frosting
Avoiding Common Mistakes
Making caramel can be a little intimidating, but avoiding a few common mistakes can make all the difference. First, resist the urge to stir the sugar too much once it starts melting. Stirring too often can cause crystallization, leading to a gritty texture instead of a smooth caramel.
Always use a heavy-bottomed pan to avoid scorching the sugar. Keep a close eye on the color—it can go from golden to burnt in seconds. And when adding cream or butter, always do it slowly and carefully to prevent splattering or curdling.
Lastly, don’t rush the cooling process. Hot caramel will not whip properly and can ruin the consistency of your frosting. Be patient—your reward will be a smooth, luxurious frosting that spreads like a dream.
Adjusting Texture for Different Desserts
Depending on what you’re frosting, you might want to tweak the consistency. For cupcakes, a slightly thicker frosting holds its shape better for piping beautiful swirls. If you’re icing a sheet cake or layer cake, a looser consistency spreads more easily and gives a beautiful glossy finish.
Want to drizzle it over cookies or pour it between cake layers? Just stop whipping a bit earlier for a pourable texture. The beauty of caramel frosting is its versatility. With a few adjustments, it can fit almost any dessert need.
FAQs about Caramel Frosting Recipe
Can I use brown sugar instead of white?
Absolutely! Brown sugar adds a deeper, more molasses-like flavor that can enhance the richness of your caramel frosting. Just keep in mind that it may change the texture slightly, making it a bit more moist and dense.
How long does caramel frosting last?
When stored in an airtight container in the refrigerator, caramel frosting can last up to a week. Be sure to bring it to room temperature and re-whip it before using to get that creamy, spreadable consistency back.
Can I freeze caramel frosting?
Yes, you can freeze caramel frosting for up to two months. Just place it in an airtight container or freezer bag. Thaw overnight in the fridge, then let it come to room temperature and beat it lightly before using.
What desserts go best with caramel frosting?
Caramel frosting is a perfect match for a variety of desserts. Some top pairings include chocolate cake, apple spice cake, pumpkin cupcakes, banana bread, and even cookies. Its rich flavor complements both sweet and slightly savory treats.
Can I make this frosting dairy-free?
You can! Substitute the butter with vegan butter or margarine and use full-fat coconut milk or a non-dairy cream alternative instead of heavy cream. The flavor will be slightly different, but still delicious and suitable for those avoiding dairy.
Conclusion
The best part? It’s surprisingly easy to make once you get the hang of it. With a bit of patience and the right technique, anyone can master this recipe and make bakery-quality caramel frosting right at home. And because it pairs so well with a variety of flavors—chocolate, apple, vanilla, pumpkin—you’ll find endless opportunities to use it.
Remember to experiment with different add-ins and textures to make it your own. Want a salted caramel kick? Add a touch of sea salt. Want something a bit spicier for fall? Try adding a hint of cinnamon or nutmeg. The possibilities are endless.
So go ahead, whip up a batch of this delicious frosting, spread it generously, and enjoy the sweet satisfaction of homemade caramel magic.


