Caramel Apple Pie Recipe: Caramel apple pie is one of those desserts that feels like a warm hug in every bite. Imagine the sweet, gooey richness of caramel blending perfectly with the tartness of apples, all wrapped in a buttery, flaky crust. It’s not just pie—it’s comfort food at its finest. Whether you’re making it for a holiday, a family dinner, or simply because you want to treat yourself, this pie brings joy to every table it graces.
Why Caramel Apple Pie is a Classic Dessert
Apple pie has always been an American favorite, but when you drizzle caramel into the mix, it takes things to an entirely new level. The caramel enhances the natural sweetness of the apples while adding a creamy texture that contrasts beautifully with the flaky crust. It’s a dessert that balances sweet and tart, soft and crunchy, indulgent yet comforting.
Think of caramel apple pie as the love child of two classic treats: caramel apples from fall carnivals and the timeless apple pie. Together, they create a dessert that’s not only delicious but also nostalgic.
The Perfect Occasions to Serve It
Caramel apple pie is versatile—it works for almost any occasion. You can serve it at Thanksgiving, Christmas, or any holiday where dessert is a must. It’s also perfect for fall gatherings, backyard barbecues, or cozy winter nights. And let’s be real: you don’t need a reason to make this pie. Even on an ordinary Tuesday, caramel apple pie can turn the day around.
Ingredients You’ll Need
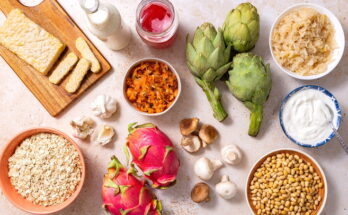
Before diving into the baking process, let’s gather all the ingredients. A great pie starts with quality ingredients, and since this recipe calls for fresh produce, dairy, and pantry staples, it’s important to use the best you can find.
Fresh Produce and Fruits
- 6–7 medium apples (Granny Smith, Honeycrisp, or a mix for balance)
- 1 tablespoon lemon juice (to prevent browning and add brightness)
Pantry Essentials
- 1 cup granulated sugar
- ½ cup light brown sugar (packed)
- 3 tablespoons all-purpose flour (for thickening the filling)
- 1 teaspoon ground cinnamon
- ¼ teaspoon ground nutmeg
- ¼ teaspoon ground cloves (optional, for warmth)
- 1 teaspoon vanilla extract
- 1 tablespoon cornstarch (optional, for extra thick filling)
Dairy and Refrigerated Items
- ½ cup unsalted butter (for the caramel and crust)
- 1 large egg (for egg wash)
- 2 tablespoons heavy cream (for caramel sauce)
- Pre-made or homemade pie crust (top and bottom layers)
Optional Garnishes and Toppings
- Vanilla ice cream (classic pairing)
- Whipped cream (light and airy contrast)
- Extra caramel drizzle (because more caramel is never too much)
Pro tip: If you want to elevate this dessert even more, sprinkle a little sea salt over the top before serving—it creates the perfect sweet-salty balance.
Kitchen Tools and Equipment
The right tools make baking easier and more fun. While you don’t need a professional bakery setup, having a few essential gadgets will ensure your caramel apple pie turns out perfect every time.
Baking Tools You’ll Need
- 9-inch pie dish
- Rolling pin (if making homemade crust)
- Mixing bowls (various sizes for filling and caramel sauce)
- Wooden spoon or silicone spatula
- Measuring cups and spoons
- Pastry brush (for egg wash)
- Aluminum foil or pie crust shield (to prevent over-browning)
Time-Saving Gadgets
- Apple corer and slicer (makes prepping apples quick and consistent)
- Food processor (if making crust from scratch)
- Mandoline slicer (for perfectly even apple slices)
Investing in these small tools not only saves time but also helps your pie look professional and taste amazing.
Preparing the Ingredients
Preparation is key to a flawless pie. From picking the right apples to prepping them correctly, this step sets the foundation for the rich flavors and textures that define caramel apple pie.
Selecting the Best Apples for Pie
Not all apples are created equal, especially when it comes to baking. For caramel apple pie, a mix of tart and sweet apples works best. Granny Smith apples are tart and hold their shape well during baking, while Honeycrisp or Fuji apples bring natural sweetness. Combining two or three varieties creates a balanced filling that’s neither too sweet nor too sour.
Prepping the Apples Properly
After choosing your apples, wash, peel, core, and slice them thinly. Aim for slices about ¼ inch thick. Thicker slices may stay too firm, while thinner ones could turn mushy. Toss the apple slices with lemon juice to keep them fresh and add a hint of tanginess.
Making Homemade Caramel Sauce (Optional but Recommended)
You can use store-bought caramel sauce, but making it at home adds an unbeatable freshness and flavor. To make it:
- Melt ½ cup butter in a saucepan.
- Stir in 1 cup granulated sugar until it turns golden brown.
- Slowly add ½ cup heavy cream while stirring continuously.
- Cook until smooth and thickened.
- Let it cool slightly before drizzling over the apple filling.
Homemade caramel takes only about 15 minutes and transforms your pie from delicious to unforgettable.
Step-by-Step Guide to Baking Caramel Apple Pie
This is where the magic happens. Baking caramel apple pie is a process, but it’s not as intimidating as it sounds. Follow these steps, and you’ll have a bakery-worthy dessert cooling on your counter in no time.
Step 1 – Preparing the Pie Crust
Whether you use homemade or store-bought crust, the key is to keep it cold. Roll out the bottom crust and place it into your pie dish, letting the edges hang slightly over. Prick the bottom lightly with a fork to prevent bubbling. Refrigerate while preparing the filling.
Step 2 – Making the Apple Filling
In a large bowl, mix the sliced apples with sugar, brown sugar, flour, cinnamon, nutmeg, and vanilla extract. Toss until the apples are evenly coated. This mixture will release juices, which is fine—it’s part of what makes the filling juicy and flavorful.
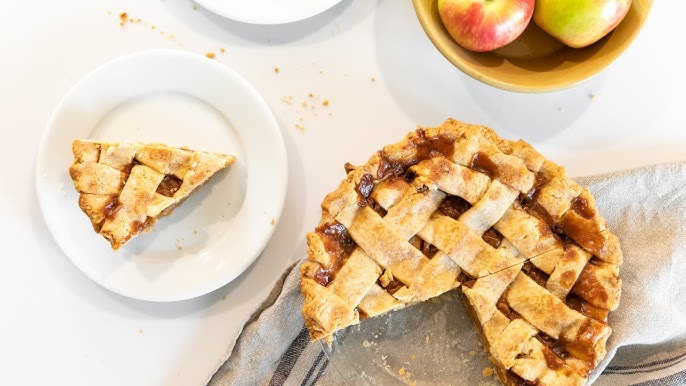
Step 3 – Assembling the Pie
Now that your crust and filling are ready, it’s time to put everything together. Start by spooning the apple mixture evenly into the prepared pie crust. Don’t forget to drizzle some of that luscious homemade caramel sauce over the apples—it’s the secret to that gooey, irresistible center. Spread the filling gently so that it’s evenly distributed.
Next, roll out the top crust. You can either go for a traditional full top crust or make a lattice design for a rustic, bakery-style look. If you’re doing a lattice, cut the dough into strips about ½ inch wide and weave them over the apples. The lattice not only looks gorgeous but also allows steam to escape while baking, preventing a soggy crust.
Once the top is in place, trim the overhanging dough, leaving about an inch around the edges. Fold the edges under and crimp with your fingers or a fork for a neat finish. Finally, brush the top with an egg wash (a beaten egg with a splash of water or milk). This gives your pie a beautiful golden shine.
For extra indulgence, sprinkle a little coarse sugar on top. It adds a sweet crunch and makes your pie look bakery-perfect.
Step 4 – Baking the Pie to Perfection
Preheat your oven to 375°F (190°C). Place the pie on the center rack and bake for 50–60 minutes. Keep an eye on the crust; if the edges start to brown too quickly, cover them with aluminum foil or a pie crust shield.
You’ll know your pie is done when the filling is bubbling and the crust is golden brown. The bubbling ensures the cornstarch or flour has thickened the juices properly, preventing a runny filling. Resist the temptation to take it out too early—a fully baked pie is worth the wait.
The aroma at this stage is heavenly—warm apples, cinnamon, and caramel wafting through your kitchen like a cozy blanket. If autumn had a smell, this would be it.
Step 5 – Cooling and Serving
Patience is key here. Once your pie comes out of the oven, let it cool for at least 2–3 hours. Cooling allows the filling to set, making it easier to slice without turning into a gooey mess. If you cut it too soon, the filling will spill out, and all your hard work will be wasted.
When it’s finally time to serve, pair a slice with a scoop of vanilla ice cream or a dollop of whipped cream. For a finishing touch, drizzle extra caramel sauce over the top. The combination of warm pie and cold ice cream is pure magic—it’s like yin and yang on a dessert plate.
If you want to impress guests, garnish with a sprinkle of cinnamon or a few candied pecans. It not only tastes great but also looks Instagram-worthy.
Tips for the Best Caramel Apple Pie
Even the simplest recipes can benefit from a few pro tips. These tricks will help you avoid common pitfalls and ensure your pie comes out perfect every time.
How to Avoid a Soggy Bottom
Nobody likes a soggy crust. To avoid this, you can:
- Blind bake the bottom crust for 10 minutes before adding the filling.
- Sprinkle a thin layer of breadcrumbs or crushed graham crackers on the bottom before adding apples—this absorbs excess juices.
- Make sure your oven is fully preheated so the crust starts cooking immediately.
Balancing Sweetness and Tartness
Caramel apple pie should never be overly sweet. To strike the right balance:
- Use a mix of tart and sweet apples.
- Don’t overdo the caramel—let the apples shine.
- Taste your filling before baking. If it’s too sweet, add a splash of lemon juice for balance.
With these tips, you’ll have a pie that’s both flavorful and perfectly textured.
Variations of Caramel Apple Pie
One of the best things about this dessert is how versatile it is. Once you master the basic recipe, you can try out different variations to suit your taste or occasion.
Mini Caramel Apple Hand Pies
Perfect for parties or grab-and-go treats, these handheld versions are made by cutting circles of pie dough, filling them with caramel-coated apples, and sealing them into little pockets. They bake faster than a full pie and are ideal for portion control.
Caramel Apple Crumble Pie
Instead of a top crust, add a crumbly streusel topping made of flour, butter, and brown sugar. This version has a lovely crunchy texture and pairs beautifully with the gooey caramel apple filling.
Gluten-Free and Vegan Options
For a gluten-free version, use a gluten-free flour blend for the crust and filling thickener. For a vegan option, substitute butter with vegan butter and use coconut cream instead of heavy cream for the caramel. With these swaps, you can make the recipe accessible without sacrificing flavor.
Storage and Make-Ahead Instructions
One of the best parts about caramel apple pie is that it can be made ahead of time or stored for later without losing its flavor. If anything, the flavors deepen over time, making it even more delicious the next day.
Storing Leftovers
If you have leftovers (which is rare because this pie usually disappears fast), cover the pie loosely with foil or plastic wrap and store it at room temperature for up to 2 days. For longer storage, refrigerate it for up to 5 days. Keep in mind that refrigeration can firm up the crust slightly, so reheating before serving is highly recommended.
When reheating, warm slices in the oven at 325°F (163°C) for about 10 minutes. This keeps the crust crisp while gently warming the filling. Microwaving works too, but it can make the crust a little soggy.
Freezing Instructions
Caramel apple pie also freezes beautifully. You can freeze it either before baking or after:
- Before Baking: Assemble the pie, wrap it tightly in plastic wrap and foil, and freeze for up to 3 months. When ready to bake, place it directly into the oven from frozen—just add 15–20 extra minutes to the baking time.
- After Baking: Let the pie cool completely, wrap it well, and freeze for up to 3 months. To reheat, thaw in the refrigerator overnight, then warm in the oven before serving.
These make-ahead options are lifesavers during the holidays when your oven is already working overtime.
Serving Suggestions
The beauty of caramel apple pie is that it pairs well with so many flavors and textures. Here’s how to take your serving game to the next level.
Best Pairings for Caramel Apple Pie
- Classic Vanilla Ice Cream: The warm pie and cold ice cream combo never fails.
- Whipped Cream: Light, fluffy, and just enough sweetness to balance the richness of the caramel.
- Cheddar Cheese: Yes, cheese! A slice of sharp cheddar alongside apple pie is a tradition in some regions, and the salty-savory combo is unexpectedly delicious.
- Coffee or Hot Apple Cider: These warm drinks complement the pie’s cozy flavors.
Creative Ways to Present It
If you’re serving this pie at a special occasion, presentation matters. Try:
- Drizzling caramel sauce in a zigzag pattern over each slice.
- Garnishing with candied pecans or walnuts for crunch.
- Serving in individual mini cast-iron skillets for a rustic touch.
Small details like these make your pie look professional while adding extra flair to the experience.
Nutritional Information
Desserts aren’t exactly diet food, but it’s always good to know what you’re enjoying. Here’s a general breakdown for one slice (based on a 9-inch pie, cut into 8 slices).
Calories per Serving
- Calories: ~420
- Fat: 20g
- Carbohydrates: 60g
- Sugar: 35g
- Protein: 4g
Keep in mind that these numbers will vary depending on the crust, caramel, and apples you use.
Healthier Substitutes
If you’d like to make your pie a bit lighter without sacrificing flavor, consider:
- Using less sugar in the filling since caramel already adds sweetness.
- Opting for whole-wheat pie crust for added fiber.
- Replacing heavy cream in caramel with coconut milk for a dairy-free option.
- Reducing butter by substituting part of it with applesauce in the crust.
While caramel apple pie will never be a “light” dessert, these tweaks make it easier to enjoy without guilt.
Common Mistakes and How to Avoid Them
Even seasoned bakers sometimes run into pie troubles. Here are some of the most common mistakes and how to steer clear of them:
- Soggy Crust: Always preheat your oven fully and consider blind baking the bottom crust for a crisp base.
- Runny Filling: Use enough thickener (flour or cornstarch) and let the pie cool fully so the juices can set.
- Overly Sweet Pie: Balance caramel’s richness with tart apples like Granny Smith.
- Burned Edges: Use foil or a crust shield halfway through baking to protect the outer rim.
- Undercooked Apples: Slice apples evenly to ensure they cook through at the same rate.
By avoiding these pitfalls, you’ll bake a pie that’s golden, gooey, and absolutely irresistible.
FAQs about Caramel Apple Pie Recipe
1. Can I use store-bought caramel sauce?
Yes! Store-bought caramel sauce works fine, but homemade caramel adds a richer, fresher flavor that takes the pie to the next level.
2. Which apples are best for caramel apple pie?
Granny Smith, Honeycrisp, and Fuji are excellent choices. Mixing tart and sweet apples gives the best balance.
3. How do I keep the crust from getting soggy?
Blind baking the bottom crust, using a thickener in the filling, and preheating the oven properly will help keep your crust crisp.
4. Can I make this pie ahead of time?
Absolutely! You can prepare it a day before serving or even freeze it for up to 3 months.
5. What’s the best way to reheat caramel apple pie?
Reheat in the oven at 325°F for about 10 minutes to warm the filling and keep the crust flaky.
Conclusion
Caramel apple pie is more than just dessert—it’s a celebration of flavors and textures that warm the heart. The tender apples, rich caramel, and flaky crust come together in perfect harmony, creating a treat that feels both nostalgic and indulgent. Whether you’re baking it for a holiday table, a family gathering, or just because you crave comfort food, this pie never disappoints.
The best part? Once you’ve mastered the basic recipe, you can experiment with variations, garnishes, and creative presentations to make it your own. With a little patience and love, you’ll be pulling a golden, bubbling caramel apple pie out of the oven that everyone will rave about.
So go ahead—grab those apples, whip up some caramel, and let your kitchen smell like heaven. Your taste buds will thank you!