California Burrito Recipe: The California burrito is not just a burrito—it’s a full-blown experience. Imagine tender carne asada, crispy golden fries, melted cheese, and fresh toppings all wrapped up in a warm flour tortilla. It’s rich, bold, comforting, and totally satisfying.
Whether you’re missing your favorite taco shop or just looking to spice up your dinner game, this California burrito recipe is everything you need.
What Is a California Burrito?
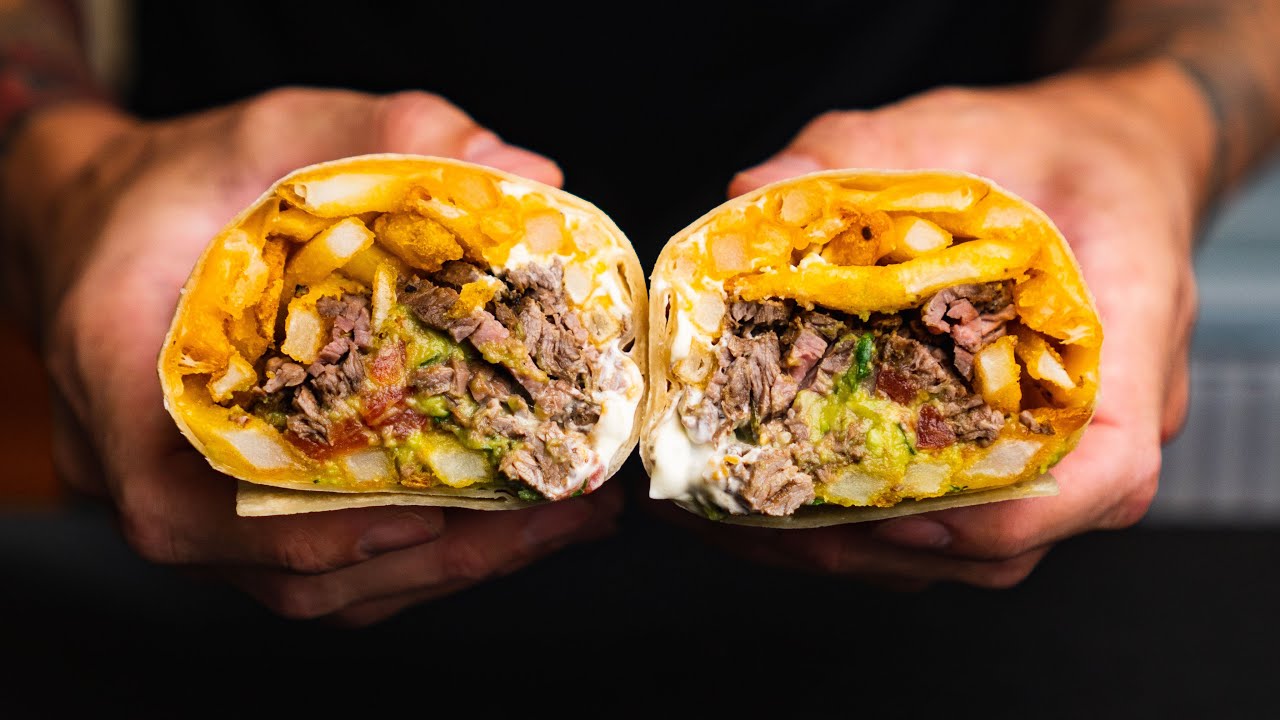
A California burrito is a large, overstuffed burrito that originated in San Diego, California. Unlike your average burrito that may have rice and beans, the California burrito replaces them with crispy French fries. Yup, you read that right—fries inside the burrito. Add marinated carne asada (grilled steak), cheese, sour cream, salsa, and guacamole, and you’ve got the holy grail of West Coast eats.
This isn’t your everyday Tex-Mex fare. It’s a mashup of surf city attitude and Mexican-American flavors, and it’s beloved for a reason. You’ll find it on food truck menus and in taquerías all over Southern California—but now, you’ll be able to make it right at home.
Why Is It So Popular?
So, what’s the big deal about stuffing fries into a burrito? A lot, actually.
The popularity of the California burrito boils down to its genius combination of flavors and textures. You get the meaty, juicy savoriness of carne asada, the crunchy and soft texture of fries, the creamy melt of cheese, and the fresh kick of salsa and guacamole. It’s the best of all worlds—comfort food, Mexican street food, and American fast food—in one tight wrap.
And let’s be honest, who doesn’t love a good food mashup? Especially one that tastes this good.
The Unique Twist That Sets It Apart
Here’s the twist: most burritos fill you up with rice and beans. Not the California burrito. Instead, it delivers that salty, crispy bite of fries that contrasts beautifully with the tender steak and gooey cheese.
Think of it like a carne asada fry taco rolled into a burrito. That one substitution completely changes the flavor profile. You’ll notice more umami, a crispier mouthfeel, and a richer overall bite. Plus, it’s ridiculously satisfying, like late-night diner food meets Mexican grill.
What Makes It Different from a Regular Burrito?
Let’s break it down:
| Feature | California Burrito | Regular Burrito |
|---|---|---|
| Carbs | Fries instead of rice | Typically includes rice |
| Protein | Carne asada (most common) | Chicken, beans, beef, etc. |
| Size | Often bigger and heavier | Varies |
| Texture | Crunchy and creamy | Soft and steamy |
| Toppings | Guac, cheese, sour cream | Salsa, cheese, lettuce |
So when you crave something bolder and more indulgent, the California burrito is the clear winner.
Essential Tips Before You Start Cooking
Before we dive into the recipe, let’s set you up for success:
- Use fresh ingredients – The fresher the meat and toppings, the better the burrito.
- Marinate your steak overnight – It brings out more flavor in the carne asada.
- Don’t overstuff – As tempting as it is, overloading your burrito can cause it to tear.
- Crisp your fries properly – Limp fries will make the burrito soggy.
- Warm the tortilla – A warm tortilla wraps better and won’t crack.
Follow these tips, and you’re halfway to burrito glory.
List of Ingredients You’ll Need
Let’s break this into sections so you can prep everything in order.
For the Carne Asada
- 1½ lbs flank steak or skirt steak
- ¼ cup orange juice
- ¼ cup lime juice
- 2 tbsp olive oil
- 4 cloves garlic, minced
- 1 tsp ground cumin
- 1 tsp chili powder
- Salt and pepper to taste
- Fresh cilantro (chopped, optional)
For the Fries
- 3–4 large russet potatoes (or use frozen fries for shortcut)
- Vegetable oil for frying
- Salt to season
For the Burrito Filling
- 4 large flour tortillas (12-inch)
- 1½ cups shredded cheddar cheese or Mexican blend
- ½ cup sour cream
- ½ cup guacamole
- ½ cup fresh salsa or pico de gallo
Optional Toppings and Sides
- Pickled jalapeños
- Diced onions
- Hot sauce
- Lettuce (if you must)
- Extra lime wedges
Kitchen Tools You’ll Need
- Cast iron skillet or grill pan
- Large frying pan or deep fryer
- Mixing bowls
- Sharp knife
- Cutting board
- Tongs or spatula
- Aluminum foil (for wrapping)
- Paper towels (for draining fries)
Step-by-Step Guide to Making a California Burrito
Ready to start cooking? Let’s roll—pun intended.
Step 1: Prepare the Carne Asada
Marinate flank or skirt steak with lime juice, olive oil, minced garlic, cumin, salt, pepper, and chopped cilantro. Let it sit for at least 30 minutes, then grill or pan-sear until browned and juicy. Slice thinly against the grain for tender, flavorful pieces.
Step 2: Make the Fries (Crispy and Golden!)
Cut russet potatoes into fries, rinse, and pat them dry. Fry or air-fry until golden and crisp, then sprinkle lightly with salt. The fries add that signature California twist!
Step 3: Warm the Tortillas
Use large flour tortillas and heat them on a dry skillet or over an open flame until soft and flexible.
Step 4: Assemble Your Burrito Like a Pro
Layer carne asada, fries, shredded cheese, sour cream, guacamole, and pico de gallo neatly down the tortilla’s center.
Step 5: Roll It Up and Toast It
Fold the sides, roll tightly, and toast the burrito seam-side down until lightly crisp. Slice and serve hot—cheesy, hearty, and pure SoCal perfection.
Tips for Wrapping the Perfect Burrito
Rolling a burrito seems easy until you try to do it with a fully loaded tortilla and everything spills out like a food explosion. So, let’s break down how to wrap your California burrito the right way—clean, tight, and satisfying to bite into.
Use the Right Size Tortilla
Go big or go home. A 12-inch (or larger) tortilla is essential. Anything smaller and you’ll either end up underfilling or making a mess. If you can’t find large tortillas, you can warm two and slightly overlap them before wrapping.
Don’t Overfill
This is the #1 mistake most people make. It’s tempting to load it up with extra fries and guac (because yum), but if you want a burrito that doesn’t explode on first bite, aim for moderation. Think balance, not bulk.
Rolling Technique
Here’s the foolproof method:
- Place the filling slightly off-center toward you, leaving room at the edges.
- Fold in the sides about 1-2 inches.
- Roll the bottom of the tortilla up and over the filling.
- Use your fingers to tuck the filling as you roll.
- Finish the roll and press gently to seal.
Final Toast for the Win
Once wrapped, place the burrito seam-side down on a skillet over medium heat. Toast for 1–2 minutes on each side. This adds a delicious crispy texture and helps the burrito stay closed. Plus, it melts the cheese and melds all the flavors beautifully.
How to Make It Healthier (Optional Adjustments)
We get it. As much as we love indulgent comfort food, sometimes you want to lighten things up without sacrificing taste. Luckily, the California burrito is surprisingly flexible.
Here are a few ways to give it a healthy-ish makeover:
Swap the Fries
- Air-fried or baked fries: Still crispy, less greasy.
- Sweet potato fries: Adds fiber, vitamin A, and a slightly sweet contrast.
- Zucchini fries: For an ultra-light, veggie-packed option.
Use Lean Protein
- Opt for grilled chicken or turkey steak instead of beef.
- Go plant-based with grilled portobello mushrooms or soy chorizo.
Lighter Tortillas
- Choose whole wheat or low-carb tortillas to cut down on refined carbs.
- Try a lettuce wrap version if you want something keto-friendly (though technically no longer a burrito, it’s still tasty).
Reduce High-Calorie Toppings
- Use Greek yogurt instead of sour cream.
- Go easy on the cheese or use a plant-based alternative.
- Skip the extra oil and butter in cooking where possible.
Boost the Veggies
- Add shredded lettuce, diced tomatoes, sautéed onions, or even spinach for volume and nutrients.
- Fresh herbs like cilantro or green onions can elevate flavor with zero calories.
You don’t have to compromise on flavor to make a healthier California burrito—you just have to be a little creative.
Serving Suggestions
Okay, you’ve made this massive, flavor-packed burrito. Now what? Serve it up like a pro with the right sides and drinks to complete the feast.
Side Dishes
- Chips & Guacamole – A classic pairing. Add lime and garlic to your guac for extra zing.
- Mexican Street Corn (Elote) – Grilled corn slathered in crema, cheese, and chili powder.
- Refried Beans or Charro Beans – To add a hearty, traditional element to your meal.
- Side Salad – Something fresh and crunchy to balance the richness.
Dips and Sauces
- Salsa Verde or Rojo
- Chipotle Mayo
- Hot Sauce (Tapatío or Valentina are great choices)
Drinks
- Agua Fresca (like watermelon or hibiscus)
- Mexican soda (Jarritos or Coke in a glass bottle for authenticity)
- Margarita if you’re going full fiesta
Turn it into a burrito night, and your kitchen might become your new favorite taquería.
What to Serve with a California Burrito
Though the burrito is filling on its own, serving it with complementary sides can take the experience up a notch. Here are some ideas:
1. Salsa Sampler Platter
Create a mini bar with:
- Pico de gallo
- Salsa verde
- Chipotle crema
- Mango habanero salsa (for a sweet and spicy kick)
Let guests dip or drizzle as they please.
2. Mini Nacho Skillet
Layer tortilla chips with cheese, beans, jalapeños, and a drizzle of sour cream. Pop under the broiler for 5–7 minutes.
3. Rice Bowls or Mexican Rice
If you’re not stuffing rice inside the burrito, serve it on the side with a bit of lime and cilantro.
4. Corn on the Cob
Roasted and sprinkled with cotija, lime, and chili powder. Simple but killer.
These extras don’t just stretch the meal—they turn it into a full-on fiesta.
Storage and Reheating Tips
Made a few too many burritos? No problem—California burritos actually store and reheat quite well if you do it right. Let’s go over how to save your leftovers without sacrificing flavor or texture.
How to Store Leftover Burritos
- Wrap tightly: Use aluminum foil or parchment paper to keep the burrito intact. This also helps prevent the tortilla from drying out in the fridge.
- Use an airtight container: If you don’t want to use foil, place the burrito in a container with a tight-fitting lid.
- Refrigerate promptly: Store in the fridge within 2 hours of cooking. Burritos will last for about 3–4 days refrigerated.
Freezing Instructions
Want to make a batch ahead of time? Here’s how to freeze them:
- Let the burritos cool completely.
- Wrap each one tightly in foil or plastic wrap.
- Place in a zip-top freezer bag and squeeze out all the air.
- Label and date the bag.
Frozen California burritos will keep for up to 3 months. Pro tip: leave out ingredients like sour cream and guacamole if freezing—they don’t thaw well. You can always add those fresh after reheating.
How to Reheat Without Making It Soggy
The goal? Keep it crispy on the outside and warm on the inside.
From the fridge:
- Oven/toaster oven: Wrap in foil and bake at 375°F (190°C) for 15–20 minutes. For a crispier finish, unwrap during the last 5 minutes.
- Stovetop: Heat on a skillet over medium heat for 5–7 minutes per side, pressing down occasionally.
- Microwave: Wrap in a damp paper towel and heat for 2–3 minutes, flipping halfway through. It’s quick but can make the tortilla a bit soft.
From frozen:
- Thaw overnight in the fridge, then reheat using one of the above methods.
- Or go straight from frozen to oven: 375°F for about 30–35 minutes (still wrapped in foil).
Variations and Add-Ons
One of the best things about the California burrito? It’s totally customizable. You can swap ingredients, add toppings, and make it your own. Let’s explore some popular (and delicious) twists.
Meat Variations
- Grilled Chicken: For a leaner, lighter option.
- Carnitas: Slow-cooked pork adds richness and depth.
- Al Pastor: A sweet and spicy flavor bomb.
- Chorizo: Spicy, smoky, and perfect with eggs if you’re making a breakfast version.
Veggie & Vegan Options
- Grilled Veggies: Bell peppers, onions, zucchini, and mushrooms work great.
- Plant-Based Meat: Beyond or Impossible meat crumbles add protein without animal products.
- Black beans or pinto beans: For a fiber-rich, meat-free filler.
Creative Add-Ons
- Queso blanco or nacho cheese: For an extra creamy element.
- Hot Cheetos: Yup, some people crush them and toss them in. Don’t knock it till you try it.
- Bacon bits: Because why not?
- Sautéed onions & peppers: Adds a fajita-style vibe.
- Scrambled eggs: Turn it into a killer breakfast burrito.
The point is—don’t be afraid to experiment. This burrito is a blank canvas for flavor.
Common Mistakes to Avoid
You’ve come this far—don’t let these simple missteps sabotage your burrito game. Here are the top mistakes people make (and how to avoid them).
1. Skipping the Marinade
The flavor in carne asada comes from the marinade. If you just grill the steak plain, you’re missing out on half the experience. Always marinate for at least 2 hours.
2. Using Soggy Fries
This is a BIG one. Fries that aren’t crispy will turn your burrito into a mushy mess. Make sure they’re golden and crunchy before adding them.
3. Overstuffing the Tortilla
We’ve said it before, but it bears repeating: too much filling = burst burrito. Keep it tight and balanced.
4. Cold Tortilla
If your tortilla is cold, it’ll tear when you try to roll it. Always warm it up first—it makes wrapping way easier.
5. Not Toasting the Burrito
You’re missing out on next-level flavor if you don’t toast your burrito after assembling. It seals everything in, melts the cheese, and gives it a gorgeous golden crust.
Avoid these, and you’re guaranteed burrito greatness every time.
Final Thoughts: Why You’ll Love Making This at Home
Sure, you can find California burritos in taco shops and food trucks all over San Diego—but making it at home is something special.
You control the ingredients, the flavor, the portion size, and the spice level. You get to personalize it to your exact cravings. Plus, there’s something undeniably satisfying about wrapping up a massive, homemade burrito and biting into that crispy-soft, cheesy-fries-and-steak-filled goodness you made with your own hands.
Whether you’re cooking for a hungry family, prepping for burrito night with friends, or just treating yourself to an indulgent weekend meal, this recipe is a crowd-pleaser through and through.
So roll up your sleeves, warm up those tortillas, and get ready to impress everyone—including yourself.
FAQs about California Burrito Recipe
1. Can I make this vegetarian?
Absolutely! Swap the carne asada for black beans, grilled veggies, or a plant-based meat alternative. Add extra guac and cheese for a flavor boost.
2. What’s the best meat for California burritos?
Carne asada (flank or skirt steak) is traditional, but grilled chicken, carnitas, or al pastor all work great depending on your flavor preferences.
3. Can I air fry the fries instead?
Yes! Air frying is a healthier option and still gives you that much-needed crisp. Just don’t overcrowd the basket.
4. How do I avoid a soggy burrito?
Use crispy fries, don’t overload it with wet toppings, and always toast the burrito in a pan after wrapping.
5. Can I freeze California burritos?
You sure can! Wrap them tightly and freeze for up to 3 months. Just leave out sour cream and guac before freezing and add them fresh when reheating.
Conclusion
The California burrito is more than just a meal—it’s a celebration of flavor, culture, and comfort. From juicy carne asada to crispy fries and melty cheese, every bite is a party in your mouth. And now that you know how to make it from scratch, there’s no need to wait in long lines or travel to Southern California to enjoy one.
So go ahead and bookmark this recipe, share it with your foodie friends, and get cooking. Once you taste it, you’ll understand why the California burrito is a cult classic.