Cake in a Mug Recipe: There’s something undeniably magical about whipping up a cake in just minutes, with minimal ingredients, no fancy kitchen gadgets, and almost no mess. That’s exactly what you get with a cake in a mug—an ultra-fast, microwave-baked dessert that’s as easy as it is delicious. Whether you’re a college student in a dorm room, a busy parent looking for a quick treat, or just craving something sweet without all the baking fuss, this guide is for you.
Introduction to Mug Cakes
A mug cake is exactly what it sounds like—a small cake that’s mixed and cooked in a mug, using a microwave. These single-serving cakes are the definition of convenience and have taken the internet by storm for a good reason. They’re incredibly easy to make and require little effort, perfect for those spontaneous sweet cravings.
Unlike traditional cakes that require precise measurements, long baking times, and multiple mixing bowls, a mug cake simplifies the entire process. Everything happens in one cup—from mixing to microwaving. And you can go from craving to devouring in under five minutes.
But don’t let the simplicity fool you—mug cakes can be just as moist, fluffy, and flavorful as any cake from the oven. They’re also endlessly customizable, which means you can adapt them to suit your taste or dietary preferences.
Benefits of Making Mug Cakes
What makes mug cakes so popular? Let’s talk about the irresistible benefits:
1. Quick and Convenient
Time is money—and mug cakes understand that. With just a handful of pantry staples and a microwave, you can create a warm, rich cake in less time than it takes to watch a YouTube video. It’s the ideal solution when you’re in a time crunch but need a dessert fix ASAP.
2. Minimal Cleanup
Nobody likes a pile of dirty dishes after baking. The beauty of a mug cake lies in its simplicity: one mug, one spoon, maybe a measuring spoon or two. That’s it. The cleanup is so easy, you’ll wonder why you ever made full cakes in the first place.
3. Perfect Portion Control
Ever baked a whole cake and then felt obligated to eat the entire thing before it goes stale? Mug cakes solve that problem. They’re single-serving, meaning you enjoy just the right amount without worrying about leftovers or overindulging.
4. Kid-Friendly Fun
Kids love helping in the kitchen, and mug cakes are the perfect safe and fun way to introduce them to baking. No ovens, no knives—just mixing and microwaving. Plus, watching the cake rise in the microwave is a thrill for little ones.
5. Customizable Flavors
Chocolate, vanilla, peanut butter, red velvet, even keto-friendly versions—the options are limitless. You can add chocolate chips, nuts, fruit, spices, or anything else you love. It’s your own personal cake creation station.
Essential Ingredients for a Mug Cake
Most mug cake recipes follow a similar structure, and the ingredients are probably already in your kitchen. Here’s what you typically need:
Core Ingredients
- Flour: All-purpose flour is most common, but you can use almond, coconut, or gluten-free flour if needed.
- Sugar: Granulated white sugar is typical, but brown sugar or alternatives like stevia can be used.
- Baking powder: Helps the cake rise.
- Milk: Dairy or any plant-based milk like almond, soy, or oat.
- Oil or butter: Adds moisture and richness.
- Vanilla extract: Optional, but adds depth of flavor.
- Salt: Just a pinch enhances all the other flavors.
Optional Add-ins for Variety
- Cocoa powder for a chocolate version
- Chocolate chips or chunks
- Peanut butter or Nutella for swirl-ins
- Sprinkles for funfetti cakes
- Fruit pieces, like banana or blueberries
- Cinnamon, nutmeg, or other spices
Mix and match based on what you’re in the mood for—sweet, rich, fruity, or spicy. The combinations are endless, and that’s half the fun!
Tools You’ll Need
Before you dive into your mug cake masterpiece, let’s talk tools. The right mug and tools make all the difference in getting that perfect texture.
Mug Types
- Size matters: Choose a microwave-safe mug that holds at least 12 oz (350 ml) to avoid overflow. A wider mug gives better rise and an even cook.
- Material: Ceramic mugs are best. Avoid plastic or anything with metallic trims.
- Shape: A wider base and straight sides work best for even cooking.
Mixing Tools
- Spoon or fork: For mixing dry and wet ingredients right in the mug.
- Measuring spoons: Precision helps with taste and texture, especially with baking powder or cocoa powder.
- Microwave: A standard 800–1000 watt microwave is ideal.
Using the right tools doesn’t just make the process easier—it ensures your cake comes out fluffy, moist, and oh-so-delicious.
Step-by-Step Guide to the Perfect Mug Cake
Let’s get into the heart of the matter: making your mug cake. Follow these simple steps, and you’ll have a warm, gooey cake ready to enjoy in minutes.
Step 1 – Choose the Right Mug
Choosing the right mug is more important than you might think. Too small, and your cake will overflow and make a mess. Too tall and narrow, and it may cook unevenly. Aim for a ceramic mug that holds at least 12 ounces. The mug should be microwave-safe (check the bottom or packaging for this label). A wide mug with straight sides helps the batter cook more evenly, which means a fluffier and more consistent cake.
Avoid plastic mugs or anything with metal. Metal can’t go in the microwave, and plastic often retains heat poorly, which can affect the cake’s texture. If you’re in doubt, do a quick microwave test by heating a bit of water in the mug to see how it holds up.
Step 2 – Gather Your Ingredients
Preparation is key. Here’s a basic chocolate mug cake ingredient list you can build from:
- 4 tbsp all-purpose flour
- 2 tbsp unsweetened cocoa powder
- 3 tbsp sugar
- 1/8 tsp salt
- 1/4 tsp baking powder
- 3 tbsp milk
- 2 tbsp vegetable oil
- 1/4 tsp vanilla extract
- Optional: 1 tbsp chocolate chips or chopped chocolate
Have everything measured and ready before you start. It makes the process smoother and ensures you don’t forget anything. If you’re feeling fancy, keep extras like whipped cream, caramel drizzle, or crushed nuts nearby for topping later.
Step 3 – Mix the Dry Ingredients
Start by adding all your dry ingredients into the mug. This includes flour, cocoa powder, sugar, baking powder, and salt. Use a spoon or small whisk to mix them together thoroughly. This step is important—if your dry ingredients aren’t well-combined, your cake can turn out lumpy or uneven.
Pro tip: Sift your cocoa powder if it looks clumpy. Cocoa tends to form lumps, which can leave dry pockets in your cake if not mixed well. Make sure to mix until everything is one consistent color and texture.
Step 4 – Add Wet Ingredients
Once your dry mix is ready, it’s time to add the wet ingredients—milk, oil, and vanilla extract. Pour them right into the mug over the dry mixture. If you’re adding something gooey like peanut butter or Nutella, this is the time to swirl it in as well.
Use a spoon to stir everything until you get a smooth, lump-free batter. Scrape the sides and bottom of the mug to make sure nothing’s sticking. You’re aiming for a consistency similar to pancake batter—not too thick, but not watery either.
If you’re adding chocolate chips, fold them in gently after mixing. This helps them stay suspended in the batter instead of sinking to the bottom.
Step 5 – Mix Thoroughly
It can’t be stressed enough: mix thoroughly. One of the most common reasons for a failed mug cake is uneven mixing. Undissolved sugar, flour clumps, or pockets of cocoa can lead to a gritty or uneven texture. Take a full 30 seconds to mix the batter, going around the sides and digging down to the bottom.
Stirring properly also ensures your baking powder is evenly distributed, which is key for a good rise and light, fluffy texture. A poorly mixed cake might end up dense or rubbery—nobody wants that.
Once mixed, give the mug a few gentle taps on the counter to pop any large air bubbles. This small step helps keep the cake from having giant holes inside once cooked.
Step 6 – Microwave the Cake
Now the magic happens. Place your mug in the center of the microwave and cook on high for 60 to 90 seconds. Cooking times can vary based on your microwave’s wattage, so start with 60 seconds and add more in 10-second intervals if needed.
Watch closely as it cooks. The cake should puff up, possibly even rise above the mug rim—don’t panic, it’ll settle back down as it cools. Avoid overcooking; the cake continues to cook for a few seconds after being removed from the microwave.
To check for doneness, lightly press the top of the cake. It should feel springy and not too wet. If it’s still gooey, microwave for a bit longer, but be cautious—30 extra seconds can turn a fluffy cake into a rubbery brick.
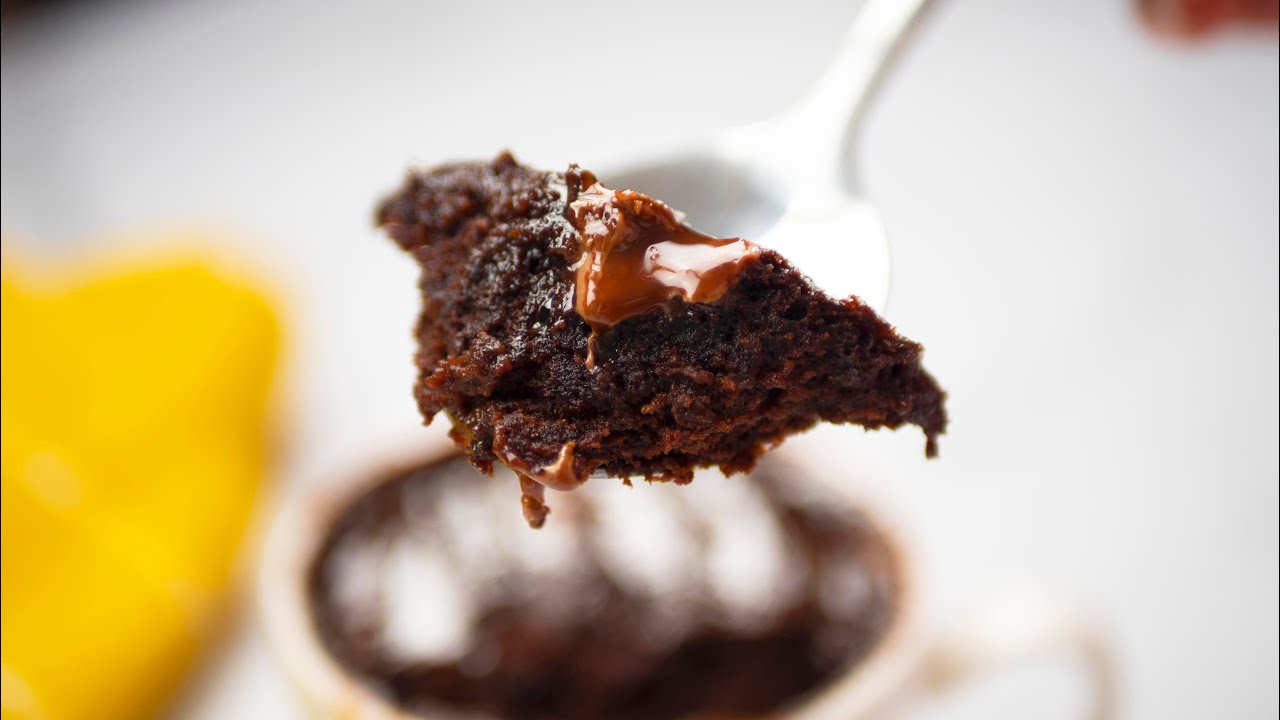
Step 7 – Let It Cool and Serve
As tempting as it is to dig in immediately, give your mug cake 2–3 minutes to cool. The interior can be scorching hot, and letting it rest helps the flavors develop a little more. Plus, toppings stick better to a slightly cooled cake.
Top it with a scoop of ice cream, a drizzle of chocolate syrup, or even a dollop of whipped cream. Sprinkle with chopped nuts, candy bits, or crushed cookies for a fun finish.
You can eat it straight from the mug or carefully run a spoon around the edge and slide it out onto a plate for a more polished presentation.
Common Mistakes to Avoid
Even though mug cakes are incredibly simple to make, a few common mistakes can ruin your dessert. Avoid these pitfalls to ensure your cake comes out perfect every time.
1. Overcooking the Cake
This is the most common issue. It’s easy to think a few extra seconds in the microwave will make your cake fluffier, but the truth is the opposite. Overcooking causes the cake to become dry, tough, and rubbery. Always err on the side of undercooked—you can always zap it for 10 more seconds, but you can’t reverse overcooking.
A good way to test is to gently press the center of the cake. If it feels firm and springs back slightly, it’s ready. If it’s still very wet, add a few more seconds. Remember, mug cakes continue cooking slightly after being removed from the microwave due to residual heat.
2. Using the Wrong Mug Size
Using a mug that’s too small can cause your cake to overflow while it cooks, creating a sticky mess. A mug that’s too large might spread the batter too thin, making it dry out quickly. Always use a mug that’s about 12 ounces or larger, and one that’s microwave-safe.
3. Skipping the Mixing Steps
Don’t rush the mixing process. If you don’t properly combine the ingredients, you might end up with flour pockets, sugar clumps, or uneven baking powder distribution. Stir thoroughly—get to the bottom and around the edges to ensure everything is fully incorporated.
4. Not Measuring Ingredients Properly
Baking is a science, even when it’s done in a mug. Guessing your measurements or eyeballing ingredients can throw off the balance. Use proper measuring spoons for accuracy. A little too much flour can make the cake dense, while too much baking powder can make it taste bitter.
5. Using Cold Ingredients
Using cold milk or butter straight from the fridge can affect how your mug cake rises and cooks. If possible, let your milk come to room temperature, or microwave it for a few seconds before mixing.
Avoiding these simple mistakes can mean the difference between a dry, flat mess and a soft, fluffy, decadent mug cake that feels like a mini celebration.
Flavor Variations and Ideas
The base recipe for a mug cake is super flexible. Once you’ve mastered the basics, it’s time to experiment with flavors and add-ins to suit your taste or cravings. Here are some delicious ideas to try:
1. Chocolate Chip Cookie Mug Cake
- Replace cocoa powder with an extra tablespoon of flour.
- Add a dash of brown sugar and vanilla extract.
- Fold in a tablespoon of chocolate chips.
- Top with a scoop of vanilla ice cream after microwaving.
2. Peanut Butter Mug Cake
- Add 1 tablespoon of peanut butter to the wet ingredients.
- Mix well or swirl it into the top before microwaving.
- Optional: drizzle melted chocolate or extra peanut butter on top.
3. Red Velvet Mug Cake
- Add 1 tsp of red food coloring and 1 tsp of cocoa powder.
- Use buttermilk instead of regular milk for authentic tanginess.
- Top with cream cheese frosting or whipped cream.
4. Lemon Mug Cake
- Replace cocoa powder with an extra tablespoon of flour.
- Add 1 tsp of lemon zest and 1 tbsp of lemon juice.
- Finish with a light lemon glaze after microwaving.
5. Keto Mug Cake
- Use almond flour instead of regular flour.
- Replace sugar with a keto-friendly sweetener like erythritol or stevia.
- Add a tablespoon of unsweetened cocoa powder for a low-carb chocolate version.
Don’t be afraid to get creative. Craving something tropical? Try coconut flakes and pineapple chunks. Want something festive? Toss in some sprinkles and go full funfetti. The possibilities are truly endless.
Decorating Your Mug Cake
Presentation matters—even for a quick mug cake. Here’s how to turn your simple microwave treat into something Instagram-worthy:
1. Toppings and Drizzles
- Whipped cream: Classic and effortless.
- Ice cream: A scoop of vanilla, chocolate, or your favorite flavor melts beautifully into the warm cake.
- Syrups: Drizzle chocolate, caramel, or fruit syrups over the top.
- Fruit: Fresh berries, banana slices, or even a cherry on top.
- Sprinkles: Add a pop of color and fun.
2. Fancy Garnishes
Want to go gourmet? Try grated chocolate, toasted coconut, crushed nuts, or cookie crumbs. Even a light dusting of powdered sugar can elevate the look and taste.
3. Serving Suggestions
While eating straight from the mug is the standard, you can carefully unmold your cake onto a plate and top it like a traditional dessert. Use a knife to gently loosen the sides and turn the mug upside down. Tap gently, and it should slide out easily.
Decorate around the base with fruit, chocolate sauce, or a swirl of cream for an extra-special touch. These small additions can turn your casual snack into a delightful plated dessert.
Nutritional Facts
Wondering what’s in your mug cake? While it’s no kale salad, it can be a fairly moderate indulgence, especially when portion-controlled.
Here’s an approximate nutritional breakdown for a basic chocolate mug cake:
| Nutrient | Amount (Per Serving) |
|---|---|
| Calories | 350–400 kcal |
| Total Fat | 15–20g |
| Carbohydrates | 50–55g |
| Sugars | 25–30g |
| Protein | 4–6g |
| Fiber | 2–3g |
Healthier Substitutes
- Use whole wheat or almond flour to add fiber.
- Swap sugar for stevia or monk fruit sweetener.
- Replace oil with applesauce or mashed banana.
- Try low-fat milk or plant-based alternatives.
By making a few tweaks, you can enjoy this tasty treat while keeping calories in check and even boosting nutrition.
FAQs about Cake in a Mug Recipe
Can I make a cake in a mug without eggs?
Yes! Most mug cake recipes work perfectly without eggs. In fact, omitting the egg helps keep the texture soft and sponge-like, especially in single servings.
What kind of mug should I use?
Use a microwave-safe ceramic mug that holds at least 12 oz. Avoid metal or mugs with metallic paint — we don’t want fireworks in the microwave!
Can I bake a mug cake in the oven instead of the microwave?
Technically, yes — but it’s not ideal. Mug cakes are designed for quick microwave cooking. An oven would dry it out or overcook it unless closely watched.
Why is my mug cake rubbery or dry?
Overcooking is the usual suspect. Try reducing the microwave time by 10–15 seconds. Also, make sure you’re not using too much flour or skipping the oil or butter.
Can I use self-rising flour instead of all-purpose flour?
Absolutely! Just skip the baking powder if you’re using self-rising flour — it already has leavening agents built in.
Can I double the recipe?
Mug cakes are best made one at a time to avoid overflow and uneven cooking. If you need more, make two separate mugs instead of one giant one.
Conclusion
There you have it—the ultimate step-by-step guide to making a delicious, fluffy cake in a mug. Whether you’re a baking pro or someone who’s never turned on an oven in their life, this easy recipe offers a fast, foolproof way to enjoy a sweet treat in just minutes.
Mug cakes are not just about convenience; they’re a celebration of creativity, flavor, and comfort in a cup. They give you the freedom to experiment, satisfy your cravings instantly, and reduce food waste with perfectly portioned servings. Plus, with minimal mess and cleanup, they’re the ideal go-to dessert for late-night snacking, last-minute guests, or a quiet treat for one.
Next time you find yourself staring at your pantry, wondering what to make for dessert—grab a mug, mix up some magic, and treat yourself. With endless flavor options, healthier substitutes, and fun ways to decorate, your microwave might just become your new favorite baking tool.
So go ahead. Get creative. Make it chocolatey, fruity, nutty, or light. Add sprinkles, drizzle caramel, or just keep it classic. Whatever you choose, your perfect mug cake is just a few minutes away.