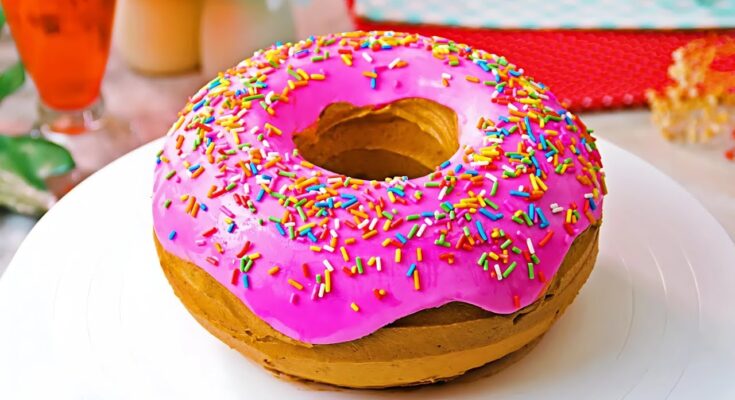
Cake Donut Recipe: There’s something magical about biting into a freshly made cake donut. That slightly crisp outside giving way to a soft, tender crumb inside? Pure bliss. Unlike their yeast-raised cousins, cake donuts are dense, rich, and buttery—perfect for a quick morning treat or a homemade dessert that hits the sweet spot.
So what really sets cake donuts apart? Texture is a big part of it. They rely on baking powder or baking soda for lift, which means they don’t need proofing time like yeast donuts. That makes them faster and easier to whip up, especially for beginner bakers. They’re also incredibly versatile—customize them with your favorite glazes, sugars, or even fillings.
Let’s be honest: store-bought donuts can be a bit hit or miss. But when you make them at home, you control everything—flavor, freshness, and quality. Trust us, after you try this easy step-by-step guide, you’ll never crave a drive-thru donut again.
Essential Ingredients for Cake Donuts
Before diving into the process, let’s get your ingredients sorted. The best part? You probably already have most of these in your pantry.
Basic Pantry Staples:
- All-purpose flour – the foundation of your donut dough.
- Sugar – granulated white sugar for sweetness and texture.
- Baking powder – the leavening agent that gives cake donuts their lift.
- Salt – enhances the overall flavor.
- Eggs – they provide structure and moisture.
- Milk or buttermilk – adds richness and a slight tang.
- Butter – for flavor and that tender crumb.
- Vanilla extract – a must for that classic donut aroma.
Optional Add-ins and Toppings:
- Nutmeg or cinnamon – for a warm, classic flavor.
- Chocolate chips – fold them into the dough for extra decadence.
- Sprinkles or crushed nuts – perfect for topping your glaze.
- Powdered sugar or cinnamon sugar – for dusting or coating.
One thing to keep in mind—quality matters. Use fresh eggs, real butter, and pure vanilla extract. It really does make a difference when your recipe is this simple. You want each ingredient to shine.
Now that your ingredients are lined up, let’s talk gear.
Equipment You’ll Need
Making cake donuts isn’t complicated, but having the right tools makes it smoother and way more enjoyable.
Kitchen Tools to Prepare:
- Mixing bowls – at least two, one for dry and one for wet ingredients.
- Whisk and spatula – for mixing and folding your dough.
- Rolling pin – optional, but helpful for even shaping.
- Donut cutter or round cookie cutter – you’ll need something to form those signature rings.
- Deep fryer or heavy-bottomed pot – for even, safe frying.
- Candy or kitchen thermometer – essential to maintain the right oil temp.
- Cooling rack – to drain excess oil and let those babies cool.
Pro Tips for Better Results:
- Use a thermometer to maintain the oil temperature around 350°F (175°C).
- Avoid overcrowding the pot; fry in small batches.
- Prep all your ingredients before heating the oil—donuts fry quickly!
When everything’s prepped and ready, it’s go time.
Step-by-Step Instructions
Let’s roll up those sleeves and get into the good stuff. Follow these steps, and you’ll have a batch of warm, golden donuts in no time.
Step 1: Prepare the Dough
In a large bowl, whisk together the flour, baking powder, sugar, salt, and any spices (like cinnamon or nutmeg). In another bowl, mix the eggs, milk, melted butter, and vanilla. Slowly combine the wet and dry ingredients. Stir just until the dough comes together—don’t overmix, or you’ll end up with tough donuts.
Once the dough forms, it should be soft but not sticky. If it’s too wet, sprinkle in a little flour. If it’s too dry, add a splash of milk.
Wrap the dough in plastic and chill it for about 30 minutes. This makes it easier to roll and cut.
Step 2: Shaping the Donuts
Lightly flour your work surface and roll the dough to about ½-inch thickness. Use a donut cutter or two different-sized round cutters to shape the donuts. Don’t forget to save those cute little holes—they make perfect bite-sized treats.
Re-roll any scraps once or twice. After that, the dough might get tough.
Once shaped, let the donuts rest for a few minutes while you heat the oil.
Step 3: Frying to Perfection
Here comes the real magic—frying those perfectly shaped donuts to golden, crispy goodness.
Fill a heavy-bottomed pot or deep fryer with oil, preferably a neutral option like canola or vegetable oil. Heat the oil to a steady 350°F (175°C). Use a thermometer—guesswork here can either burn your donuts or leave them soggy and undercooked.
Gently lower the donuts into the hot oil using a slotted spoon or spider strainer. Don’t overcrowd the pot—fry only 2–3 donuts at a time. This helps maintain the oil temperature and ensures even cooking.
Fry each side for about 1–2 minutes, flipping once, until the donuts are golden brown. You’ll notice they puff slightly and develop that signature cake-like exterior. Remove them from the oil and transfer to a wire rack or paper towels to drain the excess oil.
Pro tip: Always test with a donut hole first. If it browns too quickly or not fast enough, adjust your heat before frying the full batch.
Step 4: Cooling and Glazing
Once fried, let the donuts cool for about 10 minutes before glazing. Too hot, and your glaze will melt right off. Too cold, and the glaze won’t adhere as nicely.
Here’s a basic glaze recipe to get you started:
- 1 cup powdered sugar
- 2 tablespoons milk
- ½ teaspoon vanilla extract
Whisk until smooth. Dip the top of each donut into the glaze, let the excess drip off, then place back on the rack to set. Want to get fancy? Add cocoa powder for a chocolate glaze or some lemon zest for a citrus punch.
Or roll your warm donuts in cinnamon sugar for a crunchy, sweet finish.
Glazed or sugared, they’re best enjoyed fresh—but don’t worry, we’ll get into storage next.
Flavor Variations and Customizations
Now that you’ve got the basics down, it’s time to play! Cake donuts are like a blank canvas. You can go traditional or let your creativity run wild.
Classic Cinnamon Sugar
While still warm, toss your donuts in a mixture of cinnamon and granulated sugar. The sugar melts slightly into the surface, giving them that perfect crunch. It’s simple, nostalgic, and always a hit.
Chocolate Glaze
For a rich, chocolaty coating, melt ½ cup of chocolate chips with 2 tablespoons of butter and 1 tablespoon of corn syrup. Dip the donuts and sprinkle with rainbow sprinkles for a fun twist. It’s a kid-friendly favorite and super easy to whip up.
Fruity Options
Want something lighter? Make a strawberry glaze by blending fresh strawberries with powdered sugar and a splash of lemon juice. Or add blueberry puree to your glaze base for a summer-ready option. You can also add fruit zest or juice to the dough for a subtle flavor punch.
Other fun ideas:
- Crushed Oreos or cereal for a crunchy topping
- Maple glaze with bacon bits (for the adventurous)
- Pumpkin spice donuts for fall vibes
The options are endless, and you really can’t go wrong. Mix and match to find your perfect flavor combo.
Storing and Reheating Tips
Homemade donuts are best enjoyed fresh, but if you’ve got leftovers (lucky you!), here’s how to keep them tasting great.
Storing:
- Let them cool completely before storing.
- Place in an airtight container lined with paper towels to absorb any moisture.
- Store at room temperature for up to 2 days or refrigerate for up to 5 days.
Freezing:
- Freeze unglazed donuts in a single layer on a baking sheet.
- Once frozen, transfer to a freezer-safe bag or container.
- Thaw at room temperature and reheat before glazing or serving.
Reheating:
- Microwave for 10–15 seconds to warm them up.
- Or pop them in a 300°F oven for 5–7 minutes to revive that just-fried feel.
Avoid reheating glazed donuts in the microwave—glazes can melt and get messy. A quick oven toast keeps the outside crisp and the inside tender.
Common Mistakes to Avoid
Even simple recipes like cake donuts come with their fair share of potential missteps. If you want bakery-level results, avoid these common donut-making pitfalls.
Overmixing the Dough
One of the biggest mistakes beginners make is overmixing the dough. While you do want everything combined evenly, excessive mixing develops gluten in the flour, making your donuts tough instead of tender. Once the wet and dry ingredients are just incorporated, stop mixing. It’s okay if the dough looks a little rough—it’ll smooth out when you roll it.
Incorrect Oil Temperature
This is a deal-breaker. Too hot, and your donuts will brown too fast on the outside while staying raw inside. Too cool, and they’ll absorb too much oil, ending up greasy and heavy. Use a thermometer to maintain a steady temperature around 350°F (175°C) throughout the frying process. If the oil drops below 325°F, pause frying and let it come back up.
Crowding the Pot
Adding too many donuts at once drastically lowers the oil temperature, which results in uneven cooking. Always fry in small batches and give your donuts enough space to float and cook properly.
Skipping the Cooling Step Before Glazing
Yes, you’re excited. But don’t glaze hot donuts. If they’re too warm, the glaze will slide right off or soak in, leaving a sticky mess. Let them cool on a wire rack for about 10 minutes before dipping or coating.
Avoiding these simple errors will elevate your homemade cake donuts from just okay to absolutely irresistible.
Nutritional Information
While donuts aren’t exactly a health food, it’s always good to know what you’re eating. Here’s a general breakdown for one average-sized cake donut (plain, without glaze):
| Nutrient | Amount (approximate) |
|---|---|
| Calories | 250–300 |
| Fat | 14–18g |
| Saturated Fat | 4–6g |
| Carbohydrates | 30–35g |
| Sugar | 12–18g |
| Protein | 3–5g |
These numbers will vary depending on the ingredients, toppings, and size. Want to lighten things up? Try these tips:
- Bake instead of fry: It cuts down on fat, though you’ll lose some of the crispiness.
- Use Greek yogurt or applesauce in place of some butter or oil.
- Swap in whole wheat flour for added fiber (but use half white, half whole wheat for best texture).
Remember, donuts are a treat—enjoy in moderation or share the love with friends and family.
FAQs About Cake Donut Recipe
What’s the difference between cake donuts and yeast donuts?
Cake donuts use baking powder or baking soda as leavening, making them denser and crumblier. Yeast donuts, on the other hand, are light, airy, and rise with yeast.
Can I bake cake donuts instead of frying them?
Yes! Baked cake donuts are a healthier alternative. Just use a donut pan and bake at 350°F (175°C) for about 12–15 minutes.
Why are my cake donuts dry?
Dry cake donuts usually mean overmixing or overbaking. Mix the batter just until combined and keep an eye on your oven timer.
How do I store leftover cake donuts?
Store them in an airtight container at room temperature for up to 2 days, or refrigerate for up to a week. You can also freeze them for longer shelf life.
Can I add flavors like chocolate or pumpkin?
Absolutely! You can swap out part of the flour for cocoa powder, or mix in canned pumpkin with warming spices like cinnamon and nutmeg for a seasonal twist.
Conclusion
There’s something deeply satisfying about crafting a batch of homemade cake donuts from scratch. It’s a process filled with sensory joy—mixing the dough, the sizzle of hot oil, the sweet aroma of glaze—and the reward is an irresistibly warm, tender treat that’s perfect with a cup of coffee or tea.
Whether you like them plain, coated in cinnamon sugar, or dripping in chocolate glaze, making cake donuts at home is a game-changer. You’re not just following a recipe; you’re creating a moment of indulgence, comfort, and pure homemade magic.
So go ahead, gather your ingredients, warm up your kitchen, and let your inner donut artist shine. Once you’ve nailed this basic recipe, the possibilities are endless. Who knows? You might just become your neighborhood’s favorite donut wizard.


