Butterscotch Pudding Recipe: There’s something undeniably comforting about a creamy bowl of butterscotch pudding. With its rich caramel-like sweetness, smooth texture, and warm golden color, this dessert feels like a hug in a bowl. Unlike store-bought pudding cups that often taste overly sweet or artificial, homemade butterscotch pudding strikes a perfect balance of flavors—sweet, buttery, and slightly salty.
The beauty of butterscotch pudding lies in its simplicity. It’s made with just a handful of pantry staples like butter, brown sugar, milk, and eggs, yet the result is indulgent enough to serve at dinner parties or enjoy as a cozy treat on a rainy afternoon. Plus, it’s versatile—you can enjoy it warm straight from the pan or chilled for a firmer, refreshing dessert.
Butterscotch pudding has stood the test of time because it appeals to both kids and adults. For children, it’s a sweet, creamy treat; for adults, it’s a nostalgic dessert that reminds them of simpler times. If you’ve never made pudding from scratch, this recipe is the perfect place to start. It’s straightforward, foolproof, and deeply satisfying.
By the end of this guide, you’ll know exactly how to whip up your own butterscotch pudding that tastes far better than anything in a box. Let’s start by gathering the ingredients.
Ingredients You’ll Need
The secret to a silky, flavorful pudding is starting with the right ingredients. Butterscotch pudding is simple to make, and chances are, you already have most of the items in your kitchen. Here’s what you’ll need:
Core Ingredients for Butterscotch Pudding
- Unsalted Butter (3 tablespoons) – Provides the base flavor and richness. Butter also helps create that classic butterscotch taste when caramelized with sugar.
- Brown Sugar (1 cup, packed) – The heart of the recipe. Brown sugar gives pudding its deep caramel-like flavor and golden-brown hue. Both light and dark brown sugar work, though dark brown adds more molasses flavor.
- Cornstarch (3 tablespoons) – Acts as the thickener, giving pudding its creamy, smooth consistency without making it heavy.
- Whole Milk (3 cups) – Adds creaminess and body. Whole milk is preferred, but you can use 2% if that’s what you have.
- Heavy Cream (½ cup) – Boosts richness and helps achieve a luscious texture.
- Egg Yolks (2 large) – Contribute to thickness and provide a velvety texture.
- Vanilla Extract (2 teaspoons) – Enhances flavor and balances the sweetness.
- Salt (¼ teaspoon) – A pinch of salt sharpens the butterscotch flavor and prevents the pudding from tasting too sweet.
Optional Ingredients for Extra Flavor
- Whipped Cream – Perfect for topping the pudding before serving.
- Toffee Bits or Caramel Drizzle – For garnish and extra sweetness.
- Sea Salt Flakes – To make salted butterscotch pudding.
- Dark Rum or Bourbon (1 teaspoon) – Adds a grown-up twist to the flavor.
Kitchen Tools Required
- Medium saucepan
- Whisk
- Heatproof mixing bowl
- Measuring cups and spoons
- Strainer (optional, for extra-smooth pudding)
- Serving bowls or ramekins
Having everything ready before you start cooking will make the process seamless and stress-free.
Preparing for the Recipe
Before jumping into the cooking steps, it’s important to prepare properly. Pudding may be a simple dessert, but the details matter.
Tips for Choosing Quality Ingredients
- Butter – Always choose unsalted butter. This way, you can control the salt level. If you only have salted butter, reduce the added salt.
- Brown Sugar – Dark brown sugar creates a deeper flavor, but light brown sugar works fine if you prefer something milder.
- Milk & Cream – The higher the fat content, the creamier your pudding will be. If you want a lighter dessert, swap cream for extra milk.
- Eggs – Use fresh eggs with bright yellow yolks for a richer color and taste.
Measuring Accurately for Best Results
Pudding depends heavily on the right ratios. A little too much cornstarch and you’ll end up with a gelatinous pudding; too little, and it will stay runny. Always measure carefully:
- Pack the brown sugar firmly into the measuring cup.
- Level off cornstarch to avoid adding too much.
- Use liquid measuring cups for milk and cream, not dry cups.
Taking time to prep properly ensures your pudding comes out silky and flavorful, just the way it should.
Step-by-Step Guide to Making Butterscotch Pudding
Now comes the fun part—actually making the pudding. Don’t worry if this is your first time. I’ll walk you through each stage, from melting butter to serving the final dish.
Step 1 – Melting the Butter
Start by placing a medium saucepan over medium heat. Add the unsalted butter and let it melt completely. As it melts, the butter will begin to bubble and foam slightly. Stir gently to keep it from browning too much. The melted butter is the foundation of flavor, so don’t rush this step.
Once the butter is fully melted, you’re ready for the star ingredient: brown sugar.
Step 2 – Adding Brown Sugar and Caramelizing
Once the butter has melted, sprinkle in the packed brown sugar. Stir continuously so that the sugar dissolves into the butter. As the mixture heats, it will begin to bubble and release a deep, rich caramel aroma—that’s when you know the magic is happening.
This process is essentially caramelization, which gives butterscotch its signature flavor. The sugar will transform from grainy to smooth, and the mixture should look glossy and slightly thickened. Be patient here—if you try to rush, you risk burning the sugar.
The trick is to keep the heat at medium. Too high, and the sugar scorches; too low, and it won’t melt properly. Stirring constantly ensures even cooking. After about 3–4 minutes, you should have a fragrant, golden-brown mixture that forms the base of your pudding.
At this stage, you might notice the mixture looks oily—that’s normal. The butter and sugar haven’t fully combined yet. Don’t panic; once you add the liquid in the next step, everything will come together beautifully.
Step 3 – Mixing in Cornstarch and Milk
In a separate bowl, whisk together the cornstarch, egg yolks, and a small splash of milk until smooth. This creates a slurry that prevents lumps when you add it to the hot sugar mixture.
Now, slowly pour the remaining milk and heavy cream into the saucepan with the butter and sugar, whisking constantly. The mixture will bubble vigorously at first, but keep stirring—it will settle. Gradually, pour in the cornstarch-egg slurry, whisking all the while to ensure everything combines smoothly.
At this point, the mixture should look creamy but still thin. Don’t worry; it will thicken as it cooks. The key here is patience and constant whisking to prevent lumps from forming. You want a silky base, not a clumpy one.
Pro tip: If you’re worried about lumps, pour the hot milk mixture into the cornstarch slurry instead of the other way around. This technique, known as tempering, helps regulate the heat and prevents scrambling the egg yolks.
Step 4 – Simmering to the Perfect Thickness
Bring the pudding mixture to a gentle simmer over medium heat, whisking frequently. As it heats, the cornstarch activates, thickening the pudding. You’ll notice the texture shift from thin and runny to thick and glossy. This process usually takes 5–7 minutes.
The pudding is ready when it coats the back of a spoon. To test, dip a spoon into the mixture and run your finger across the back—it should leave a clear line. If it’s still runny, let it simmer a bit longer.
Be careful not to let the pudding boil too hard, as that can cause curdling. A gentle simmer is all you need. The fragrance at this point will be irresistible—a buttery, caramel aroma that fills the kitchen.
If lumps form despite your best efforts, don’t worry. You can strain the pudding through a fine-mesh sieve for a perfectly smooth result.
Step 5 – Adding Vanilla and Salt
Once your pudding has reached the desired thickness, remove the saucepan from the heat. Stir in the vanilla extract and a pinch of salt. This step is where the flavors really come together.
Vanilla adds warmth and rounds out the caramel notes, while salt balances the sweetness and enhances the butterscotch flavor. Without salt, the pudding can taste flat or overly sweet, so don’t skip it—even if it seems like a tiny detail.
At this point, your pudding should be smooth, creamy, and beautifully golden. Give it one final whisk to make sure everything is evenly incorporated.
Step 6 – Cooling and Serving
Now comes the final stage: cooling the pudding. Pour the hot mixture into serving bowls, ramekins, or even a large dish if you prefer to scoop it out later.
To prevent a skin from forming on top, press a piece of plastic wrap directly against the surface of the pudding. If you like the skin, skip this step—it’s a personal preference.
Let the pudding cool at room temperature for about 30 minutes, then transfer it to the refrigerator. Chill for at least 2–3 hours, or until set. The longer it chills, the firmer it becomes.
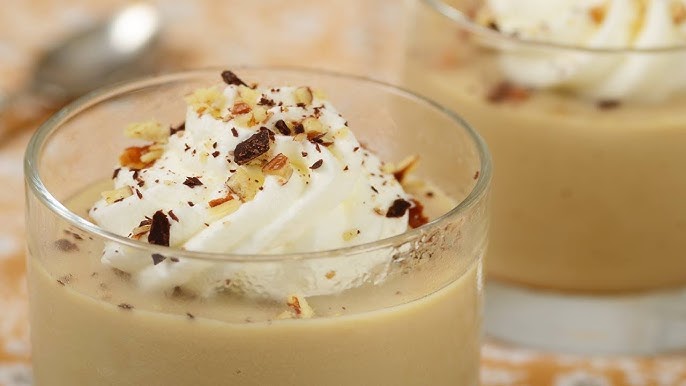
When ready to serve, top with whipped cream, a drizzle of caramel, or a sprinkle of sea salt for a gourmet touch. Some people even like to add crushed cookies or toffee bits for texture.
Serve it chilled for a refreshing dessert or slightly warm for a cozy treat on a cold day. Either way, your homemade butterscotch pudding will be creamy, rich, and absolutely irresistible.
Tips for Perfect Butterscotch Pudding Every Time
Even though butterscotch pudding is a straightforward recipe, a few extra tips can take your dessert from good to spectacular.
Avoiding Lumps in the Mixture
- Always whisk constantly when adding liquids to the hot sugar mixture.
- Make a cornstarch slurry with milk and egg yolks before adding it to the pan.
- If lumps appear, don’t panic—just strain the pudding through a sieve.
Getting the Right Consistency
- Simmer gently; don’t boil aggressively.
- Pudding should be thick enough to coat the back of a spoon.
- Remember, it thickens more as it cools, so don’t overcook.
Storing Leftovers the Right Way
- Store pudding in the refrigerator, covered with plastic wrap pressed against the surface.
- Keeps well for up to 3 days.
- Stir before serving to restore creaminess.
By following these tips, you’ll have restaurant-quality pudding every single time.
More Secrets to Mastering Butterscotch Pudding
How to Elevate the Flavor
If you’ve followed the recipe so far, you already have a silky, delicious pudding. But if you’re someone who loves to experiment, there are several ways to take this humble dessert up a notch.
- Add a Splash of Spirits – A teaspoon of bourbon, dark rum, or even brandy blends beautifully with the caramel notes of butterscotch. It turns your pudding into an elegant adult dessert.
- Infuse with Spices – While simmering the milk, you can add a cinnamon stick, star anise, or even a pinch of nutmeg for a spiced version. Remove the spices before mixing into the pudding.
- Try Browned Butter – Instead of simply melting butter, let it cook until golden and nutty before adding the sugar. This adds a deeper, richer flavor profile.
- Experiment with Toppings – A dollop of lightly sweetened whipped cream is classic, but you can also try crushed ginger cookies, shaved chocolate, or caramel popcorn for a playful twist.
Pudding is like a blank canvas—it welcomes creativity. By tweaking flavors and toppings, you can create a version that feels uniquely yours.
Serving Suggestions
Butterscotch pudding isn’t just for small bowls and spoons. You can get creative with how you serve it, especially if you’re hosting guests or making it for a special occasion.
Classic Serving
Chilled pudding in ramekins topped with whipped cream and a drizzle of caramel sauce is always a winner.
Layered Parfaits
Alternate layers of pudding with crushed cookies, whipped cream, or fruit for a visually appealing dessert. Glass jars or tall glasses work beautifully for this presentation.
Pie Filling
Use butterscotch pudding as a filling for a cookie crust pie. Top with whipped cream and chocolate shavings for a dessert that looks bakery-worthy.
Warm Comfort Food
If you can’t wait for it to chill, serve it slightly warm in mugs with a sprinkle of cinnamon or nutmeg. It feels like a cozy hug on a cold day.
For Kids
Pour pudding into small cups and add colorful sprinkles on top. It’s a simple but fun way to make it kid-friendly.
Nutritional Information (Per Serving, Approx.)
While butterscotch pudding is definitely indulgent, it’s always nice to know what’s in your dessert. Here’s an approximate breakdown per serving (assuming 6 servings):
| Nutrient | Amount |
|---|---|
| Calories | 270–300 |
| Total Fat | 14g |
| Saturated Fat | 8g |
| Cholesterol | 100mg |
| Sodium | 150mg |
| Carbohydrates | 36g |
| Sugars | 28g |
| Protein | 5g |
Note: These values can vary depending on substitutions, such as low-fat milk or alternative toppings.
Common Mistakes and How to Avoid Them
Making pudding might sound simple, but a few missteps can lead to less-than-perfect results. Here are some pitfalls and tips to avoid them:
Mistake 1: Overheating the Sugar
If you crank the heat too high, the brown sugar can burn, giving your pudding a bitter taste. Keep it at medium and stir constantly.
Mistake 2: Scrambling the Eggs
If you add the egg yolks directly into hot liquid without tempering, they’ll scramble. Always whisk them with a bit of milk first and then add slowly to the pan.
Mistake 3: Not Stirring Enough
Pudding thickens quickly, and if left alone, it can form lumps or scorch at the bottom. A steady hand with a whisk keeps it smooth.
Mistake 4: Serving Too Soon
It’s tempting to dig in while it’s still warm, but pudding needs time to set. Chilling allows the flavors to develop fully.
By being mindful of these common mistakes, you’ll consistently achieve silky, flavorful pudding.
Butterscotch Pudding vs. Caramel Pudding
Many people confuse butterscotch with caramel, but they’re not the same. The key difference lies in the sugar used.
- Butterscotch is made with brown sugar, which contains molasses. This gives it a deeper, slightly earthy sweetness.
- Caramel is made with white sugar, which results in a lighter, more straightforward sweet flavor.
Texture-wise, both puddings are creamy, but butterscotch tends to feel richer because of the butter and molasses notes. If you love caramel, chances are you’ll adore butterscotch—it’s like caramel’s bolder, warmer cousin.
Make-Ahead and Storage Tips
One of the best things about butterscotch pudding is that it can be made ahead of time, making it perfect for dinner parties or family gatherings.
- Refrigeration – Store pudding in individual ramekins or one large dish. Cover with plastic wrap pressed against the surface to prevent a skin from forming. It keeps well for up to 3 days.
- Freezing – While freezing isn’t ideal (it can change the texture), you can freeze pudding in airtight containers for up to 1 month. Thaw overnight in the fridge and whisk before serving.
- Meal Prep – Pour pudding into small jars with lids for ready-to-grab desserts or snacks during the week.
FAQs about Butterscotch Pudding Recipe
1. Can I make butterscotch pudding without eggs?
Yes! Simply increase the cornstarch to 4 tablespoons for a fully egg-free version. The texture will be slightly different but still creamy.
2. Can I use plant-based milk?
Absolutely. Almond milk, oat milk, or coconut milk all work, though the flavor will vary slightly. Coconut milk gives a richer, tropical twist.
3. Why did my pudding turn out too runny?
It likely wasn’t cooked long enough. Pudding must simmer until it thickens enough to coat the back of a spoon.
4. Can I use white sugar instead of brown sugar?
Technically yes, but it will turn into caramel pudding rather than butterscotch pudding. For authentic flavor, stick with brown sugar.
5. How long does butterscotch pudding last in the fridge?
Stored properly with plastic wrap pressed against the surface, it lasts up to 3 days.
Conclusion
Butterscotch pudding is proof that simple ingredients can create extraordinary desserts. With its creamy texture, buttery sweetness, and hint of salt, it’s the kind of dessert that makes everyone ask for seconds. Whether you enjoy it warm on a cozy evening or chilled as a refreshing treat, it never disappoints.
The beauty of this pudding lies in its versatility—you can serve it plain, dress it up with toppings, or even use it in other desserts like pies and parfaits. Once you’ve mastered the basic recipe, the possibilities are endless.
So the next time you’re craving something comforting yet indulgent, skip the boxed pudding mix and whip up this homemade butterscotch pudding. Trust me, one spoonful and you’ll wonder why you didn’t make it sooner.


