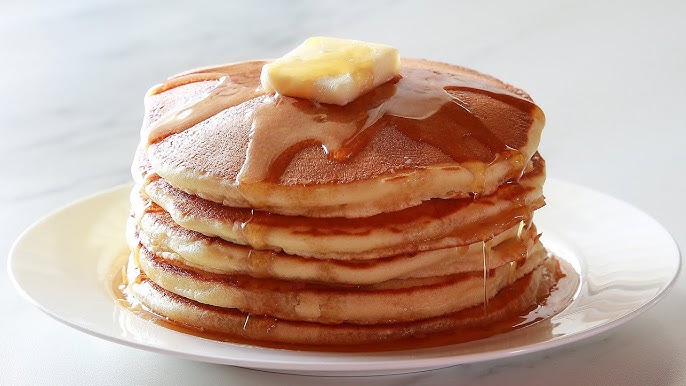
Buttermilk Syrup Recipe: If you’ve never tried buttermilk syrup before, you’re in for a treat. Imagine a velvety, rich sauce with a perfect balance of sweet and tangy flavors that elevates everything it touches—pancakes, waffles, French toast, even ice cream. Unlike store-bought maple-flavored syrups, buttermilk syrup offers a homemade charm that feels warm, comforting, and nostalgic.
What makes it so special?
Buttermilk syrup gets its magic from a combination of sugar, butter, and buttermilk, creating a caramel-like flavor that’s balanced with a subtle tanginess. This unique taste makes it a favorite for breakfast lovers who want something beyond the usual maple syrup.
Many people are surprised to learn that buttermilk syrup is extremely easy to make at home, often requiring ingredients you already have in your kitchen. And here’s the best part—it’s ready in less than 15 minutes from start to finish. You can whip it up on a Sunday morning and instantly make breakfast feel like a luxury.
If you’ve been looking for a signature syrup that sets your brunch apart, this recipe will be your go-to. Not only is it incredibly simple, but it’s also versatile—you can adjust the sweetness, add flavors, or even make it dairy-free. In this guide, we’ll break down every step, share tips for perfect results, and explore creative serving ideas so you can enjoy buttermilk syrup at its best.
The History and Origin of Buttermilk Syrup
While maple syrup has roots in North American history dating back centuries, buttermilk syrup is a more modern invention. It’s believed to have originated in home kitchens in the United States during the mid-to-late 20th century, particularly in the West, where families were experimenting with new breakfast toppings.
The name might suggest an old farmhouse tradition, but buttermilk syrup is actually a creative twist on caramel sauce. By combining the tang of buttermilk with the sweetness of sugar, home cooks discovered a smooth, pourable syrup that paired beautifully with breakfast staples.
Its popularity grew thanks to its appearance in church cookbooks, family recipe collections, and word-of-mouth sharing at brunch gatherings. The internet further boosted its fame—one viral recipe can turn a simple syrup into a nationwide breakfast obsession.
Today, you’ll find buttermilk syrup featured at trendy brunch cafes, on TikTok food videos, and even bottled by artisanal brands. But the charm of making it at home remains unmatched. With minimal ingredients and a quick cooking process, it’s a small effort with big rewards.
Benefits of Making Homemade Buttermilk Syrup
You might be wondering—why bother making your own syrup when you can grab one off the grocery store shelf? Here’s why homemade buttermilk syrup is worth it:
- Freshness and Flavor Control – When you make it yourself, you know exactly what’s going into your syrup. No preservatives, no artificial flavors—just pure, rich goodness. Plus, you can adjust the sweetness and tang to suit your taste.
- Cost-Effective – Store-bought syrups, especially specialty ones, can be pricey. Making buttermilk syrup at home costs a fraction of that, especially if you already have the ingredients in your pantry.
- Customizable – Want a cinnamon-spiced syrup? Or maybe a hint of vanilla bean? Homemade buttermilk syrup can be adapted endlessly. You can even make a dairy-free version by using plant-based butter and vegan buttermilk alternatives.
- Quick and Easy – Some homemade recipes take hours, but buttermilk syrup can be whipped up in about 10–15 minutes. Perfect for last-minute brunch plans.
- Impress Factor – Serving guests homemade buttermilk syrup instantly makes your meal feel more special. It’s one of those “little things” that people remember.
Making buttermilk syrup isn’t just about the syrup itself—it’s about creating a cozy, made-from-scratch experience that elevates the simplest breakfast into something extraordinary.
Ingredients Needed for Buttermilk Syrup
Making buttermilk syrup doesn’t require a long list of fancy ingredients. In fact, you might already have most of them in your kitchen right now. Here’s what you’ll need for the basic recipe:
Primary Ingredients (for about 2 cups of syrup):
- 1 cup granulated sugar
- ½ cup unsalted butter (1 stick)
- ½ cup buttermilk
- 1 teaspoon vanilla extract
- ½ teaspoon baking soda
Ingredient Notes:
- Sugar: White granulated sugar gives the syrup its light golden color. For a deeper caramel flavor, you can substitute part of it with brown sugar.
- Butter: Unsalted butter allows you to control the saltiness, but salted butter can also be used—just skip adding extra salt.
- Buttermilk: The star ingredient. If you don’t have buttermilk, you can make a quick substitute by mixing ½ cup milk with 1½ teaspoons of lemon juice or vinegar. Let it sit for 5–10 minutes before using.
- Baking Soda: This is not optional! It causes the syrup to foam up, creating a light, airy texture.
- Vanilla Extract: Adds warmth and depth to the flavor. You can also experiment with almond or coconut extract for variety.
Optional Add-Ins:
- Pinch of cinnamon or nutmeg for spice
- Maple extract for a maple-buttermilk hybrid
- Zest of orange or lemon for a citrus twist
Having the right ingredients ready before you start cooking will make the process smooth and stress-free.
Essential Tools and Equipment
The beauty of buttermilk syrup is that it doesn’t require special equipment—just a few basic kitchen tools. Here’s what you’ll need:
Must-Have Tools:
- Medium Saucepan – A heavy-bottomed pan distributes heat evenly and prevents scorching. Stainless steel or nonstick works well.
- Wooden Spoon or Silicone Spatula – For stirring the syrup without scratching your cookware.
- Measuring Cups and Spoons – Precision is key to achieving the right balance of sweetness and tang.
- Heat-Resistant Container or Glass Jar – For storing the syrup once it’s cooled.
Helpful Extras:
- Candy Thermometer – Not essential, but helpful if you want to ensure the syrup reaches the ideal temperature (around 230°F / 110°C).
- Small Whisk – Useful for incorporating baking soda evenly into the syrup.
- Pouring Spout Container – Makes serving syrup cleaner and easier.
While you can technically make this syrup with just a pot and a spoon, using the right tools ensures a smoother process and better results.
Step-by-Step Buttermilk Syrup Recipe
If you’ve gathered all your ingredients and tools, you’re ready to dive in. This process is simple, but timing and temperature matter. Follow these steps carefully, and you’ll have a jar of rich, golden syrup ready in minutes.
Step 1 – Preparing Ingredients
Before you turn on the stove, measure everything out and keep it within arm’s reach. Cooking syrup is quick, and you don’t want to scramble for ingredients while sugar is bubbling away.
- Measure 1 cup of sugar, ½ cup of butter, and ½ cup of buttermilk.
- Set aside 1 teaspoon vanilla extract and ½ teaspoon baking soda—these go in last.
- If you’re using any optional spices or extracts, prepare them now.
Tip: Cut the butter into smaller chunks so it melts faster and more evenly.
Step 2 – Cooking the Syrup Base
Place your medium saucepan over medium heat. Add the sugar, butter, and buttermilk all at once.
- Stir gently with a wooden spoon or silicone spatula to combine as the butter melts.
- Once the mixture is smooth, allow it to come to a gentle boil. Keep stirring occasionally to prevent the sugar from sticking to the bottom and burning.
The boiling stage is where the sugar begins to caramelize slightly, giving the syrup its signature flavor. Be patient—rushing this step can lead to uneven texture or burnt sugar.
Step 3 – Adding Buttermilk and Flavor Enhancements
Technically, the buttermilk is already in the base, but this is where the flavors shine. After the syrup has boiled for about 3–4 minutes, reduce the heat slightly and stir in your vanilla extract or any other flavor additions.
- For a spiced syrup, add ¼ teaspoon cinnamon at this stage.
- For citrus notes, stir in a teaspoon of finely grated orange zest.
Adding these while the syrup is still hot helps infuse the flavors without overpowering the natural buttermilk tang.
Step 4 – Final Thickening Process
Now comes the dramatic part—adding the baking soda. Remove the pan from heat and quickly stir in the baking soda. You’ll see the syrup foam up instantly. This reaction is what gives buttermilk syrup its light, fluffy texture.
- Stir until the foam settles slightly but the syrup is still airy.
- Let the syrup rest for a couple of minutes before pouring it into your serving container.
The syrup will thicken a bit as it cools but should remain pourable.
Tips for Perfecting Your Buttermilk Syrup
Even though this recipe is straightforward, small mistakes can change the texture or flavor. Here’s how to ensure perfect results every time:
- Don’t Skip the Baking Soda – It’s essential for the fluffy, foamy consistency.
- Control the Heat – Too high, and your sugar will burn; too low, and it won’t develop the right caramelized flavor.
- Use Fresh Buttermilk – Old or overly sour buttermilk can make the syrup taste unpleasantly sharp.
- Taste Before Serving – If it’s too sweet, add a squeeze of lemon juice; if it’s too tangy, stir in a teaspoon of extra sugar while still warm.
- Avoid Over-Stirring After Foaming – Let the bubbles settle naturally to preserve the light texture.
Flavor Variations and Add-Ons
Once you’ve mastered the classic recipe, you can start experimenting. Buttermilk syrup is like a blank canvas—you can transform it into seasonal or themed versions.
- Maple-Buttermilk Blend – Add 1 tablespoon pure maple syrup for a hybrid flavor.
- Brown Sugar & Cinnamon – Replace half the white sugar with brown sugar and add ½ teaspoon cinnamon for a warm, cozy twist.
- Vanilla Bean Buttermilk Syrup – Scrape seeds from half a vanilla bean and simmer with the syrup base for an elegant touch.
- Coconut Buttermilk Syrup – Use coconut milk instead of buttermilk and stir in shredded coconut at the end.
- Berry-Infused Syrup – Add ½ cup mashed fresh berries in Step 3 for a fruity kick.
These variations make your syrup versatile enough for different occasions, from holiday breakfasts to summer brunches.
Serving Suggestions
Buttermilk syrup isn’t just for pancakes—though it certainly makes them divine. Here are some creative ways to use it:
- Over Waffles & French Toast – The light tang pairs beautifully with buttery waffles or cinnamon-rich French toast.
- On Ice Cream – Drizzle warm syrup over vanilla ice cream for an instant caramel-buttermilk sundae.
- With Fresh Fruit – Pour over sliced bananas, berries, or peaches for a sweet-tart topping.
- In Yogurt Parfaits – Layer with yogurt and granola for a dessert-like breakfast.
- As a Cake Glaze – Brush warm syrup over pound cake or bundt cake for extra moisture and flavor.
A jar of homemade buttermilk syrup in your fridge means you’re always ready to turn an ordinary meal into something memorable.
Storage and Shelf Life
Homemade buttermilk syrup tastes best when fresh, but it stores surprisingly well if handled properly. Here’s how to keep it tasting delicious for days—or even weeks.
Refrigeration:
- Once the syrup has cooled completely, pour it into a clean, airtight glass jar or heat-resistant container.
- Store in the refrigerator for up to 2 weeks.
- The syrup may thicken in the fridge. To use again, gently reheat it in the microwave in 20-second intervals or warm it in a saucepan over low heat.
Freezing:
- Yes, you can freeze buttermilk syrup, though the texture may change slightly upon thawing.
- Store in freezer-safe containers, leaving a bit of headspace to allow for expansion.
- Freeze for up to 3 months. Thaw overnight in the fridge before reheating.
Pro Tip: If you plan to make larger batches, freeze in small portions so you can defrost only what you need—no waste, no repeated thawing and freezing.
Common Mistakes to Avoid
Even the simplest recipes have their pitfalls. Here’s what to watch out for when making buttermilk syrup:
- Burning the Sugar – High heat can turn your syrup bitter in seconds. Always cook on medium and stir regularly.
- Skipping the Baking Soda – This step isn’t just for texture—it also neutralizes some of the acidity in the buttermilk, giving the syrup a balanced flavor.
- Adding Baking Soda Too Early – If you add it before removing from heat, the foam can overflow quickly and make a sticky mess.
- Using Sour or Expired Buttermilk – While buttermilk is tangy, spoiled buttermilk will ruin the taste entirely.
- Over-Stirring After Foaming – Excess stirring breaks down the airy texture, leaving the syrup flat and dense.
Avoid these mistakes, and you’ll enjoy consistently smooth, flavorful syrup every time.
Health Considerations and Nutrition Facts
Buttermilk syrup isn’t exactly diet food—it’s indulgent, rich, and sweet. But if you’re mindful of portions, it can still fit into a balanced lifestyle.
Typical Nutrition (per 2-tablespoon serving):
- Calories: ~110
- Fat: 5g
- Carbohydrates: 16g
- Sugar: 15g
- Protein: <1g
Making a Lighter Version:
- Use reduced-fat buttermilk instead of full-fat.
- Replace part of the sugar with a natural sweetener like stevia or monk fruit.
- Reduce the butter by 1–2 tablespoons—though this will slightly affect the richness.
Good to Know: Buttermilk itself is a source of calcium and contains probiotics, which can aid digestion. While the sugar content is high, enjoying buttermilk syrup occasionally is no different from savoring a slice of cake or a scoop of ice cream—it’s all about moderation.
FAQs about Buttermilk Syrup Recipe
Q1: Can I make buttermilk syrup without baking soda?
Technically yes, but you’ll lose the signature fluffy texture and light mouthfeel. The flavor will be more like traditional caramel sauce.
Q2: My syrup turned grainy. What happened?
Graininess usually means the sugar crystallized—likely from cooking on too high heat or not stirring enough early on.
Q3: Can I make a dairy-free version?
Absolutely! Use plant-based butter and almond or oat milk soured with lemon juice as a buttermilk substitute.
Q4: Is buttermilk syrup the same as caramel sauce?
They’re similar in sweetness but different in flavor. Caramel sauce is richer and buttery, while buttermilk syrup has a tangy balance.
Q5: Can I double the recipe?
Yes, but use a larger pot to prevent overflow during foaming.
Conclusion
Buttermilk syrup is one of those kitchen gems that takes very little effort but delivers a huge payoff. With its sweet-tangy flavor, silky texture, and endless versatility, it can transform everyday breakfasts and desserts into something special. Whether you’re keeping it classic or experimenting with flavors, this syrup is bound to become a regular in your home.
The beauty of making it yourself is that you control everything—from sweetness to consistency to the creative add-ins. Once you’ve tried fresh, homemade buttermilk syrup, it’s hard to go back to store-bought.
So next weekend, grab your saucepan, butter, and buttermilk, and let the magic happen. Your pancakes will thank you.