Buttermilk Cake Recipe: When you hear the words “buttermilk cake,” you can almost smell that rich, buttery aroma drifting from the oven, right? Buttermilk cake is one of those timeless recipes that feels like a warm hug. Whether it’s part of your grandma’s handwritten cookbook or a new recipe you stumbled across online, this cake stands the test of time. It’s soft, fluffy, and oh-so-moist. The secret weapon? Buttermilk, of course. This ingredient adds just the right amount of tanginess and acidity that activates the baking soda and helps the cake rise like a dream.
In this ultimate guide, we’ll break everything down—from the ingredients list to detailed step-by-step instructions so simple even a beginner baker could whip it up without a hitch. So, if you’re ready to impress your tastebuds (and your guests), grab your apron. This buttermilk cake recipe is about to become your new go-to.
Why You’ll Love This Buttermilk Cake
Let’s be honest—there are thousands of cake recipes out there. But why does buttermilk cake deserve a permanent spot in your recipe book? First off, the texture is unbeatable. Thanks to the acidity in the buttermilk, you get a soft, moist crumb that’s neither too dense nor too airy. It’s the Goldilocks of cake textures: just right.
Second, the flavor. Buttermilk adds a subtle tang that balances out the sweetness of the cake perfectly. You know how some cakes are so sugary they almost make your teeth hurt? Not this one. It’s delicately sweet with a hint of creaminess and a buttery finish that leaves you wanting more.
Another reason to love this cake is its adaptability. Want to add fresh blueberries? Go ahead. Thinking about swirling in some lemon zest or topping it with caramel drizzle? Yes, please. It’s a blank canvas for your creativity in the kitchen. Oh, and did we mention it stores well? That means leftovers (if you have any) are just as delicious the next day—maybe even better.
Whether you’re an experienced baker or just learning your way around the kitchen, this buttermilk cake delivers consistent results with minimal fuss. It’s simple enough for a weeknight treat and impressive enough for a special occasion.
Tips for Baking with Buttermilk
What is Buttermilk?
Before diving into baking, it’s good to understand what buttermilk actually is. Traditionally, buttermilk was the liquid left behind after churning butter. Nowadays, it’s a cultured dairy product made by adding lactic acid bacteria to milk. That might sound fancy, but all you really need to know is that it’s slightly tangy, a little thick, and full of baking magic.
The acidity in buttermilk reacts with baking soda or baking powder, creating tiny bubbles that help your cake rise beautifully. This reaction also softens gluten, making the final product more tender and moist. If your cake recipes often turn out dry or dense, using buttermilk could change the game entirely.
Can You Substitute Buttermilk?
What if you don’t have buttermilk on hand? No stress—you can make a quick substitute that gets pretty close. Here are two common methods:
- Vinegar or Lemon Juice + Milk: Add 1 tablespoon of white vinegar or lemon juice to a measuring cup, then fill with milk until you reach 1 cup. Stir and let it sit for 5–10 minutes. Voila!
- Yogurt + Milk: Mix ¾ cup plain yogurt with ¼ cup milk to get a buttermilk-like consistency and acidity.
Keep in mind, homemade versions work in a pinch, but the real thing always gives the best results in terms of flavor and texture.
List of Ingredients You’ll Need
Let’s get into the good stuff—the ingredients. Don’t worry, nothing on this list is exotic or hard to find. In fact, you probably have most of these in your kitchen already. But when it comes to baking, the quality of your ingredients really matters. Fresh butter, room-temperature eggs, and high-quality vanilla extract can make a massive difference in the final taste and texture of your cake.
Dry Ingredients
These form the base structure of the cake. You’ll want to measure carefully—too much flour, and your cake could end up dry.
- 2 ½ cups (310g) all-purpose flour – Sifted for extra lightness.
- 1 ½ teaspoons baking powder – Helps your cake rise.
- ½ teaspoon baking soda – Reacts with the buttermilk to give a fluffy texture.
- ½ teaspoon salt – Enhances flavor and balances sweetness.
Wet Ingredients
These add moisture, fat, and flavor. Bring everything to room temperature before mixing—it helps them blend better and prevents curdling.
- 1 cup (240ml) buttermilk – The star of the show.
- 1 cup (226g) unsalted butter – Softened, not melted.
- 1 ¾ cups (350g) granulated sugar – For that perfect level of sweetness.
- 3 large eggs – Room temperature for best results.
- 2 teaspoons pure vanilla extract – Don’t skimp; it brings warmth and aroma.
Optional Add-ins & Toppings
Want to make it fancy? These extras can elevate your buttermilk cake to gourmet levels:
- Zest of 1 lemon – For a citrus twist.
- 1 cup fresh blueberries or raspberries – Fold in gently.
- ½ cup chopped nuts – Walnuts or pecans add crunch.
- Powdered sugar – A light dusting on top looks elegant.
- Cream cheese frosting or whipped cream – For a richer dessert-style cake.
Once you’ve got your ingredients lined up, you’re halfway there. Let’s move on to the tools and prep!
Tools & Equipment You’ll Need
You don’t need a professional kitchen setup to bake this cake, but having the right tools makes the process easier and ensures better results. Here’s what you’ll want on hand:
- Stand mixer or hand mixer – For creaming the butter and sugar effectively.
- Mixing bowls – At least two: one for dry and one for wet ingredients.
- Measuring cups and spoons – Accurate measurements are key in baking.
- Sifter – Helps aerate the flour and remove lumps.
- Rubber spatula – Perfect for folding ingredients and scraping the bowl.
- 8- or 9-inch round cake pan or a loaf pan – Depending on your preference.
- Parchment paper or non-stick spray – To prevent sticking.
- Cooling rack – Helps your cake cool evenly without getting soggy.
Having these ready before you start means you won’t be scrambling mid-recipe. Think of it like setting up your stage before a big performance—because your cake deserves a spotlight.
Prepping Before You Bake
Before you even turn on the oven, there’s some crucial prep to do. Trust me, this part is the foundation of successful baking. It sets the stage for a smooth process and a perfectly baked cake.
Bring Ingredients to Room Temperature
This one tip can dramatically improve your cake’s texture. Room temperature butter creams better with sugar, and eggs blend more easily, helping to trap air for that fluffy structure. Cold ingredients can lead to curdled batter and uneven baking.
Preheat the Oven
Set your oven to 350°F (175°C) and give it time to fully heat up. A preheated oven ensures even baking right from the start.
Grease and Line the Pan
Even if you’re using a non-stick pan, it’s smart to grease the sides and line the bottom with parchment paper. This guarantees a clean release and prevents heartbreak when trying to remove your beautiful cake.
Sift the Dry Ingredients
It might seem like an extra step, but sifting is essential. It removes clumps, evenly distributes leavening agents, and helps create a lighter batter.
Set Up a Clean Workspace
Baking can get messy fast. Clear your counters, gather your tools, and maybe even set out a kitchen towel for quick cleanups. With everything ready to go, you’ll feel like a baking boss from step one.
Alright, now let’s get into the main event—the actual baking process!
Step-by-Step Buttermilk Cake Recipe
Ready to bake? Follow these step-by-step instructions and you’ll end up with a bakery-quality buttermilk cake that’s soft, flavorful, and impossible to resist.
Step 1: Preheat Your Oven
Begin by preheating your oven to 350°F (175°C). A properly heated oven ensures even baking and the perfect rise. Set your oven rack in the center position to avoid over-browning.
Step 2: Prepare Your Cake Pan
Grease and flour your cake pan (either two 8-inch rounds or one 9×13-inch pan). You can also line the bottom with parchment paper for easy removal.
Step 3: Sift and Mix Dry Ingredients
In a medium bowl, sift together 2½ cups of all-purpose flour, 2½ teaspoons of baking powder, ½ teaspoon of baking soda, and ½ teaspoon of salt. Sifting helps aerate the flour and ensures a light, fluffy texture in your cake.
Step 4: Cream Butter and Sugar
In a large mixing bowl, beat 1 cup of softened unsalted butter with 1¾ cups of granulated sugar until light and creamy—about 3–5 minutes. This step traps air for a tender crumb.
Step 5: Add Eggs One at a Time
Beat in 3 large eggs, one at a time, mixing well after each addition. Scrape down the sides of the bowl to make sure everything is evenly blended.
Step 6: Alternate Adding Buttermilk and Dry Ingredients
Mix 1 cup of buttermilk with 1 teaspoon of vanilla extract. Add the dry ingredients to the butter mixture in three parts, alternating with the buttermilk mixture. Start and end with the dry ingredients, mixing just until combined. Don’t overmix—gentle is the secret to tenderness.
Step 7: Pour Batter into Pan
Pour the smooth batter evenly into your prepared pan and tap it gently to remove air bubbles.
Step 8: Bake Until Golden and Set
Bake for 30–35 minutes, or until a toothpick inserted in the center comes out clean and the top is golden brown.
Step 9: Let It Cool
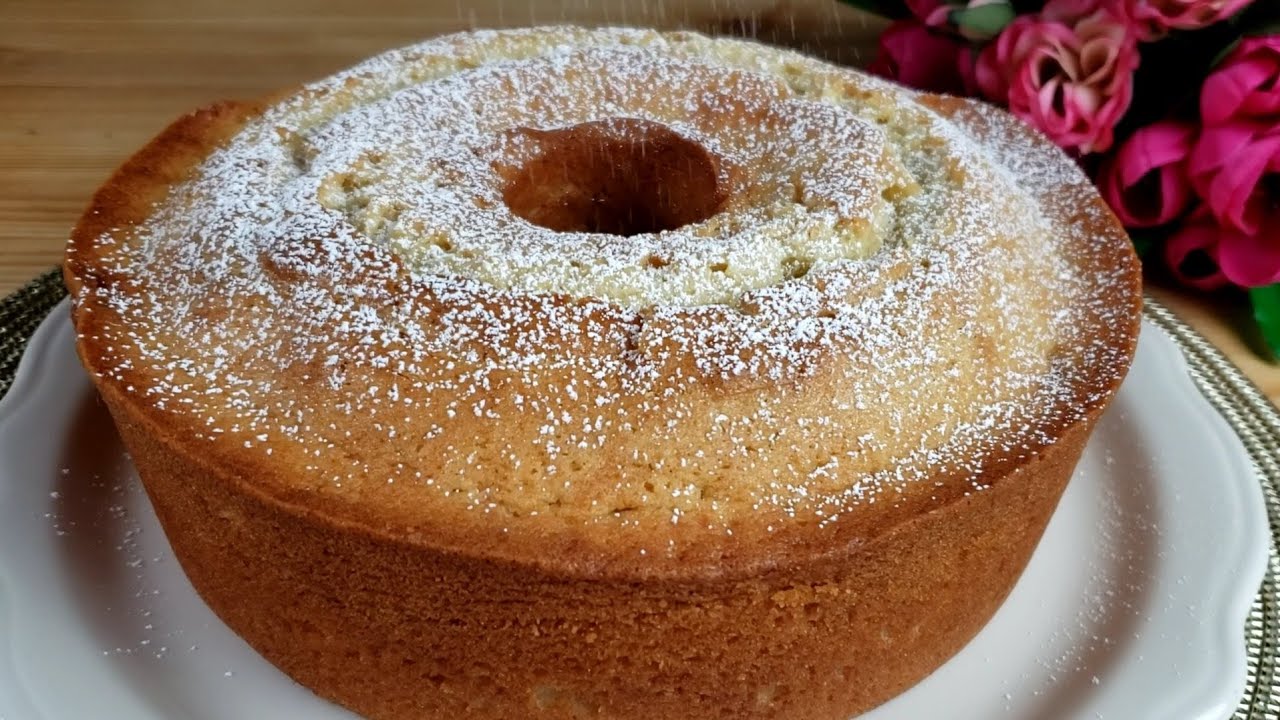
Cool the cake in the pan for 10 minutes before transferring it to a wire rack. Allow it to cool completely before frosting—or enjoy plain with a dusting of powdered sugar for a classic treat.
Frosting and Topping Ideas
This cake is incredible on its own—but let’s be real: frosting takes it to a whole new level. Whether you’re going for indulgent or elegant, here are a few frosting and topping options that pair beautifully with buttermilk cake.
1. Classic Cream Cheese Frosting
The tangy flavor of cream cheese complements the subtle sweetness of the cake. Use it for layer cakes or spread it over the top of a sheet cake.
- 8 oz cream cheese (softened)
- ½ cup butter (softened)
- 2 cups powdered sugar
- 1 tsp vanilla extract
Whip until light and fluffy. Chill slightly before using if it’s too soft.
2. Lemon Glaze
For a light, citrusy finish that pairs well with a lemon-zested version of the cake.
- 1 cup powdered sugar
- 2–3 tbsp fresh lemon juice
Whisk until smooth and pour over the cooled cake.
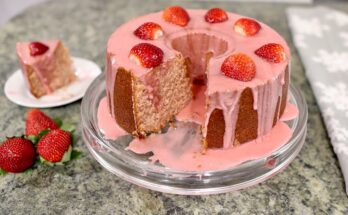
3. Whipped Cream and Berries
If you want something fresh and light, this combo is perfect. Just whip heavy cream with a bit of powdered sugar and vanilla, then top the cake with fresh strawberries, blueberries, or raspberries.
4. Chocolate Ganache
Rich, glossy, and perfect for special occasions. Simply melt equal parts dark chocolate and heavy cream until smooth, let cool slightly, then pour over the cake.
Serving Suggestions
This buttermilk cake is as versatile as it is delicious. Here’s how you can enjoy it:
- With Tea or Coffee: A plain slice dusted with powdered sugar makes the perfect midday snack.
- Layered for Celebrations: Frosted with cream cheese or chocolate frosting, this cake becomes party-worthy.
- Topped with Fruit: Add fresh seasonal berries and a dollop of whipped cream for a light dessert.
- Toasted Leftovers: Slice and toast leftover cake, then add butter or a smear of jam. Yes, it’s as amazing as it sounds.
Whether you’re hosting friends or just treating yourself, this cake adapts to the moment with ease.
How to Store Buttermilk Cake
So you’ve baked the perfect cake—now what? Storage matters if you want that same moist, fluffy texture the next day (or two).
- At Room Temperature: If unfrosted, keep your cake in an airtight container or tightly wrapped in plastic wrap for up to 2–3 days.
- In the Fridge: If frosted (especially with cream cheese), store it in the fridge. Let it come to room temp before serving.
- Avoid Drying Out: Cover all exposed edges with cling film or foil. The key is locking in moisture.
The good news? This cake holds up well, and the flavor often deepens after a day—so don’t worry about leftovers going to waste.
Can You Freeze Buttermilk Cake?
Absolutely! In fact, buttermilk cake freezes like a dream. Here’s how to do it right:
Freezing a Whole Cake (Unfrosted)
- Let the cake cool completely.
- Wrap it tightly in plastic wrap, then again in aluminum foil.
- Place it in a freezer-safe bag or container.
- Freeze for up to 3 months.
Freezing Individual Slices
- Slice the cooled cake.
- Wrap each slice in plastic and place in a ziplock freezer bag.
- This is great for grabbing a single serving whenever that craving hits.
Thawing
Let your cake thaw overnight in the refrigerator or for a few hours at room temperature. Add fresh frosting or toppings once it’s fully thawed, and it’ll taste like you just baked it.
Common Mistakes to Avoid
Even though buttermilk cake is relatively simple to make, there are a few common mistakes that can mess with your final result. Don’t worry—we’ve got you covered with these tips to avoid baking blunders.
1. Skipping the Room Temperature Rule
Cold ingredients don’t mix well. Using cold eggs or butter can lead to a lumpy batter that doesn’t blend evenly. Always let your dairy, eggs, and butter sit out for at least 30–60 minutes before you start baking.
2. Overmixing the Batter
Once you add the dry ingredients, mix just until combined. Overmixing at this stage can over-develop the gluten in the flour, making your cake dense and chewy instead of soft and fluffy.
3. Not Measuring Ingredients Properly
Baking is science, not guesswork. Use a kitchen scale for accuracy whenever possible, especially for flour. Too much flour (often caused by scooping with the measuring cup) can lead to dry, crumbly cake.
4. Using Expired Leavening Agents
Double-check your baking powder and baking soda. If they’re past their prime, your cake won’t rise properly. A simple test: drop a small amount in vinegar or hot water. If it fizzes, it’s still active.
5. Opening the Oven Door Too Soon
We know it’s tempting to peek, but don’t open the oven for at least 25–30 minutes. Letting heat escape too early can make your cake sink in the middle.
6. Not Cooling Properly Before Frosting
Frosting a warm cake will result in a slippery, melty mess. Give your cake at least an hour to cool before adding any toppings or frostings.
Avoid these missteps, and you’ll be on your way to perfect buttermilk cake every time.
Buttermilk Cake Variations
Once you’ve mastered the classic buttermilk cake, the fun really begins. This recipe is incredibly adaptable. Here are a few delicious variations to keep things fresh and exciting.
Lemon Buttermilk Cake
Bright, zesty, and fresh—lemon buttermilk cake is a citrusy spin on the classic. Just add:
- Zest of 2 lemons to the batter
- 2 tablespoons lemon juice
- Top with a lemon glaze made with powdered sugar and juice
This version is perfect for spring gatherings or as a refreshing after-dinner treat.
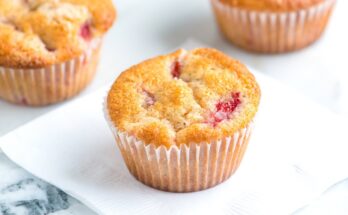
Chocolate Chip Buttermilk Cake
Craving something a little indulgent? Fold 1 cup of mini chocolate chips into the batter before baking. The buttermilk keeps the cake moist, while the chocolate adds bursts of rich sweetness in every bite.
Pro tip: Toss the chips in a bit of flour before adding them to prevent sinking.
Buttermilk Layer Cake
Want to make it celebration-worthy? Double the recipe, bake in two round pans, and stack it up with your favorite frosting. Here are some popular fillings:
- Cream cheese and jam
- Chocolate buttercream
- Fresh whipped cream and strawberries
You can also crumb-coat the outside for a sleek, professional finish. Decorate with sprinkles, nuts, or edible flowers to suit any theme.
FAQs about Buttermilk Cake Recipe
1. Can I use milk instead of buttermilk in this cake?
Not directly, but you can make a substitute. Add 1 tablespoon of lemon juice or vinegar to 1 cup of milk. Let it sit for 5–10 minutes and it’ll mimic the acidity of buttermilk pretty well.
2. How long does buttermilk cake stay fresh?
If stored in an airtight container at room temperature, it lasts 2–3 days. In the fridge, it can last up to 5 days. Just make sure to let it come to room temp before serving.
3. Can I make this cake gluten-free?
Yes! Substitute the all-purpose flour with a 1:1 gluten-free baking flour mix. Make sure your baking powder and baking soda are also certified gluten-free.
4. What’s the best way to freeze buttermilk cake?
Wrap the cooled cake (whole or in slices) tightly in plastic wrap, then foil. Store in a freezer bag for up to 3 months. Thaw in the fridge overnight or at room temp for a few hours.
5. Can I turn this recipe into cupcakes?
Absolutely! This batter makes about 18–20 cupcakes. Fill each liner about ⅔ full and bake at 350°F for 18–22 minutes or until a toothpick comes out clean.
Conclusion
There you have it—a complete, foolproof, step-by-step guide to making the best buttermilk cake you’ve ever had. Whether you’re an experienced baker or just trying your hand at homemade desserts, this recipe delivers moist texture, rich flavor, and versatility that never fails.
From the simple list of pantry staples to the detailed baking process, you now have everything you need to bake like a pro. Want a casual treat? Keep it plain. Hosting a birthday? Frost it up. Freezing leftovers? Easy. Buttermilk cake is the kind of recipe that always has your back—comforting, reliable, and delicious every single time.
So roll up those sleeves, preheat that oven, and treat yourself (and your lucky friends or family) to a slice of buttery, tangy, melt-in-your-mouth cake magic.
Happy baking!