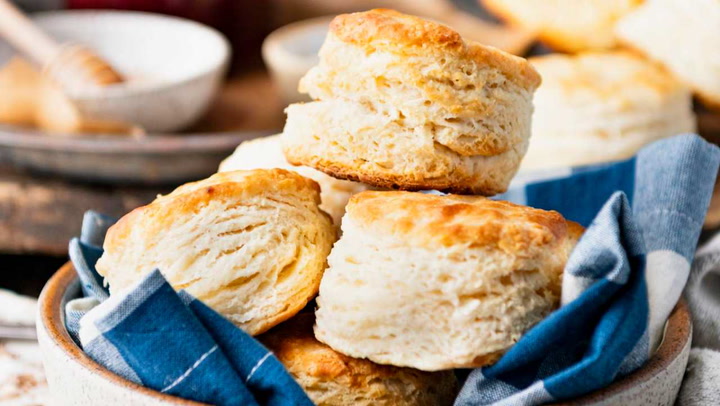
Buttermilk Biscuits Recipe: There’s nothing quite like a warm, flaky buttermilk biscuit fresh out of the oven. Buttermilk biscuits are a staple of Southern comfort food, known for their buttery layers and tender texture. Whether served with gravy, honey, or jam, these biscuits are perfect for breakfast, dinner, or as a snack. But what makes these biscuits stand out? The secret lies in the buttermilk, which gives them their tangy flavor and fluffy rise. If you’ve ever wondered how to make the perfect batch of buttermilk biscuits at home, this step-by-step guide has got you covered!
Ingredients List
Here’s everything you’ll need to get started:
- 2 cups all-purpose flour (plus extra for dusting)
- 1 tablespoon baking powder
- ½ teaspoon baking soda
- ½ teaspoon salt
- 6 tablespoons unsalted butter, chilled and cubed
- ¾ cup buttermilk, chilled
These simple ingredients combine to create magic. Chilled butter and buttermilk are essential for achieving that flaky, tender texture, so be sure to keep them cold until you’re ready to use them.
Tools and Equipment Needed
Before you begin, make sure you have these tools on hand:
- Mixing bowl
- Pastry cutter or fork
- Measuring cups and spoons
- Baking sheet
- Parchment paper
- Rolling pin (optional)
- Biscuit cutter or round glass
Having the right tools ensures that the process runs smoothly. For example, using a pastry cutter helps incorporate butter into the flour evenly, creating those buttery layers we all love.
Preparing Your Ingredients
Preparation is key to baking success. Start by measuring your ingredients accurately. Scoop flour into your measuring cup and level it off with a knife—this prevents overpacking. Cube your butter and keep it in the refrigerator until it’s time to use. Also, pre-measure your buttermilk and store it in the fridge. This way, you can work quickly to keep everything cold.
Making the Dough
Now it’s time to get your hands dirty! Here’s how to mix the dough step by step:
- Mix the dry ingredients: In a large bowl, whisk together the flour, baking powder, baking soda, and salt.
- Add the butter: Use a pastry cutter or fork to cut the cold butter into the flour until the mixture resembles coarse crumbs.
- Pour in the buttermilk: Gradually add the buttermilk, stirring gently with a spoon or your hands. Be careful not to overmix—stop once the dough comes together and is slightly sticky.
The secret to tender biscuits is minimal mixing. Overworking the dough can lead to dense, tough biscuits.
Kneading and Folding the Dough
To create flaky layers, you’ll want to knead and fold the dough strategically:
- Turn the dough out onto a floured surface.
- Gently knead the dough 4-5 times.
- Flatten the dough into a rectangle, then fold it in thirds (like folding a letter). Repeat this process twice more.
This folding technique traps air and creates those signature layers. Remember to work quickly to keep the dough cold.
Cutting the Biscuits
Once your dough is folded and ready, it’s time to cut your biscuits:
- Roll or pat the dough to about ¾-inch thickness.
- Use a round biscuit cutter or glass to cut out biscuits. Press straight down—don’t twist the cutter, as this can seal the edges and prevent rising.
- Gather the scraps, gently press them together, and cut more biscuits.
For the best results, avoid re-rolling the dough too many times, as this can make the biscuits tough.
Chilling the Dough (Optional)
Though optional, chilling the dough before baking can significantly enhance the biscuits’ texture. Here’s why:
- Chilling solidifies the butter, preventing it from melting too quickly in the oven. This helps create steam during baking, resulting in flaky layers.
- Resting the dough also relaxes the gluten, leading to a more tender bite.
If you choose to chill the dough, cover it with plastic wrap and refrigerate it for 20-30 minutes before baking. This extra step can make a noticeable difference, especially if your kitchen is warm.
Preheating the Oven
Preheat your oven to 425°F (220°C). While the oven heats, place your prepared biscuits on a parchment-lined baking sheet.
Here are a few tips to ensure even baking:
- Position the oven rack in the center for consistent heat distribution.
- Avoid opening the oven door frequently, as this can cause temperature fluctuations.
- For extra-crispy tops, you can brush the biscuits with melted butter or buttermilk before baking.
Proper preheating is crucial since high heat is necessary to create the initial lift and rise.
Baking Instructions
With your oven preheated, it’s time to bake your biscuits to golden perfection. Follow these steps:
- Bake for 12-15 minutes: Place the baking sheet in the oven and bake until the biscuits are puffed and golden brown on top.
- Monitor for doneness: The biscuits should have a lightly browned, crisp exterior. You can check by gently lifting one; the bottom should be golden as well.
- Remove from the oven: Once fully baked, transfer the biscuits to a wire rack to cool slightly.
Overbaking can dry out your biscuits, so keep a close eye on them during the last few minutes.
Cooling and Serving Suggestions
Let the biscuits cool for about 5 minutes before serving. This brief resting time allows the layers to set, preventing them from crumbling when you slice or tear them.
Serve your buttermilk biscuits warm with your favorite toppings, such as:
- Butter and honey for a sweet and savory balance.
- Jam or preserves for a fruity touch.
- Gravy (especially sausage gravy) for a hearty breakfast option.
Biscuits are incredibly versatile, so feel free to get creative!
Flavor Variations and Add-ins
Once you’ve mastered the basic recipe, you can experiment with different flavors and textures. Here are some popular variations:
- Cheddar and chive biscuits: Add 1 cup of shredded sharp cheddar cheese and 2 tablespoons of chopped chives to the dry ingredients.
- Garlic herb biscuits: Mix in 1 teaspoon of garlic powder and 1 tablespoon of your favorite dried herbs.
- Sweet biscuits: Add 2 tablespoons of sugar and a sprinkle of cinnamon to the dough for a sweeter option.
These variations can elevate your biscuits for special occasions or themed meals.
Common Mistakes to Avoid
Baking biscuits may seem simple, but a few common mistakes can ruin the outcome. Here’s what to watch out for:
- Overmixing the dough: Overworking activates the gluten, resulting in tough biscuits.
- Skipping the cold butter: If the butter isn’t cold, the biscuits won’t develop flaky layers.
- Twisting the cutter: This seals the edges and prevents the biscuits from rising properly.
- Incorrect oven temperature: A too-low temperature won’t create enough steam for a good rise, leading to dense biscuits.
By avoiding these pitfalls, you’ll consistently achieve bakery-quality results.
Storage and Reheating Tips
If you have leftover biscuits (though that’s rare!), proper storage is key to keeping them fresh. Here’s how:
- Room temperature: Store biscuits in an airtight container for up to 2 days.
- Refrigeration: For longer storage, place them in a sealed bag or container and refrigerate for up to a week.
- Freezing: Wrap each biscuit individually in plastic wrap and store in a freezer-safe bag for up to 3 months.
To reheat, place the biscuits in a 350°F (175°C) oven for 5-10 minutes or microwave them for 20-30 seconds. Reheating in the oven helps maintain their crispy exterior.
FAQs about Buttermilk Biscuits Recipe
1. What makes buttermilk biscuits different from regular biscuits?
Buttermilk biscuits differ from regular biscuits primarily due to the inclusion of buttermilk, which adds a rich, tangy flavor and contributes to a tender texture. The acidity in buttermilk also reacts with the baking soda in the recipe, helping the biscuits rise and become fluffier.
2. Can I substitute regular milk for buttermilk?
Yes, you can substitute regular milk for buttermilk if necessary. To mimic the effects of buttermilk, add 1 tablespoon of vinegar or lemon juice to a cup of milk and let it sit for about 10 minutes before using it in your recipe.
3. Why do my buttermilk biscuits come out flat?
Flat buttermilk biscuits often result from not using enough leavening agents like baking powder or baking soda, overworking the dough, or using old or expired baking agents. Ensure your baking powder and soda are fresh and handle the dough as little as possible.
4. How should I handle the biscuit dough to ensure they are fluffy?
Handle the biscuit dough minimally to keep it tender and fluffy. Overworking the dough develops the gluten, making the biscuits tough. Mix just until the ingredients are combined, then fold the dough over itself a few times before cutting out the biscuits.
5. Can I make buttermilk biscuits ahead of time?
Yes, you can prepare buttermilk biscuits ahead of time. You can either refrigerate the prepared, unbaked biscuits for a few hours before baking or freeze them. To bake from frozen, you might need to add a few extra minutes to the baking time.
6. What is the best way to store leftover buttermilk biscuits?
Store leftover buttermilk biscuits in an airtight container at room temperature for up to 2 days or refrigerate them for up to a week. For longer storage, freeze them in a sealed bag or container for up to 3 months. Reheat in an oven or toaster oven to restore their original texture.
7. Can I add ingredients to my buttermilk biscuits recipe?
Absolutely! You can customize buttermilk biscuits by adding ingredients such as cheese, herbs, bacon bits, or even a sprinkle of sugar for a sweet touch. Just mix these ingredients into the dough before shaping your biscuits.
Conclusion
Making homemade buttermilk biscuits may seem intimidating at first, but with the right technique, anyone can master this classic recipe. From mixing the dough to cutting and baking, every step plays a role in achieving those signature layers and buttery flavor. Now that you have a complete guide, it’s time to roll up your sleeves and give it a try. Trust me—once you’ve had warm, freshly baked buttermilk biscuits, you’ll never want store-bought again!