Buttermilk Biscuit Recipe: There’s something magical about biting into a warm, flaky, homemade buttermilk biscuit. It’s a timeless comfort food, perfect for breakfast, a snack, or even as a side for dinner.
While store-bought biscuits can save time, they lack the flaky, buttery goodness that makes homemade ones irresistible. If you’ve ever wondered how to master the art of buttermilk biscuits, you’re in the right place!
This guide will walk you through a step-by-step process to ensure your biscuits are light, fluffy, and bursting with flavor.
Ingredients and Tools Needed
Before diving into the recipe, gather all the essentials to streamline the process. Here’s what you’ll need:
Ingredients:
- 2 cups of all-purpose flour
- 1 tablespoon of baking powder
- ½ teaspoon of baking soda
- 1 teaspoon of salt
- 6 tablespoons of unsalted butter (cold)
- ¾ cup of cold buttermilk
Tools:
- Mixing bowls (large and small)
- Whisk
- Pastry cutter or fork
- Rolling pin
- Biscuit cutter or round glass
- Baking sheet
- Parchment paper
Having everything ready will make the baking process smooth and enjoyable.
How to Make Buttermilk Biscuits – Step by Step Guide
Step 1: Gather Your Ingredients
Start by measuring out all the ingredients. Accurate measurements are crucial for perfect biscuits. Use a kitchen scale if possible, especially for flour, to avoid dense or dry biscuits.
Step 2: Preheat Your Oven
Set your oven to 425°F (220°C) to preheat. A properly heated oven ensures even baking and beautifully risen biscuits. Place the baking rack in the middle for the best results.
Step 3: Prepare the Dry Ingredients
In a large mixing bowl, whisk together the flour, baking powder, baking soda, and salt. This ensures even distribution of the leavening agents, resulting in evenly risen biscuits.
Step 4: Incorporate the Butter
Cut the cold butter into small cubes and add it to the flour mixture. Use a pastry cutter or your fingers to blend the butter until the mixture resembles coarse crumbs. The cold butter creates pockets of steam as the biscuits bake, leading to that signature flakiness.
Step 5: Add the Buttermilk
Pour the cold buttermilk into the dry mixture. Use a spatula to gently mix until a shaggy dough forms. Avoid overmixing, as it can lead to tough biscuits. If the dough seems too dry, add a tablespoon of buttermilk at a time until it just comes together.
Step 6: Knead the Dough
Lightly flour a clean surface and transfer the dough onto it. Knead the dough gently about 5–7 times. The key here is to handle the dough as little as possible—over-kneading can activate the gluten in the flour, resulting in tough biscuits. You’re aiming for the dough to come together smoothly but still have visible chunks of butter.
Step 7: Roll Out and Cut the Biscuits
Once the dough is ready, use a rolling pin to roll it out to about 1 inch thick. Be careful not to roll it too thin, as thicker dough results in taller, fluffier biscuits. Use a biscuit cutter or the rim of a glass to cut out rounds. Press straight down without twisting the cutter—twisting can seal the edges and prevent proper rising. Gather the scraps, re-roll, and cut additional biscuits until all the dough is used.
Step 8: Arrange on a Baking Sheet
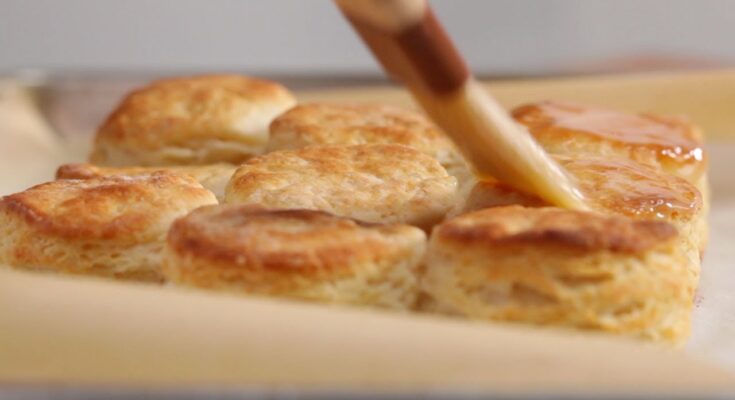
Place the biscuits onto a baking sheet lined with parchment paper. Leave about ½ inch of space between them if you like softer sides or place them farther apart for crispier edges. For an extra golden finish, you can brush the tops with a little melted butter or buttermilk before baking.
Step 9: Bake the Biscuits
Pop the tray into the preheated oven and bake for 12–15 minutes, or until the biscuits are golden brown on top. Keep an eye on them during the last few minutes, as overbaking can dry them out. Once done, remove them from the oven and let them cool slightly on a wire rack.
Step 10: Serve and Enjoy
There’s nothing quite like enjoying freshly baked buttermilk biscuits straight out of the oven. Serve them warm with a pat of butter melting on top, a drizzle of honey, or a dollop of homemade jam. They also pair wonderfully with savory options like gravy, fried chicken, or soup.
Tips and Tricks for Perfect Biscuits
- Keep Everything Cold: Cold butter and buttermilk are crucial for flaky biscuits. You can even chill your mixing bowl and flour beforehand.
- Don’t Overwork the Dough: A light touch prevents tough, dense biscuits.
- Check Your Leavening Agents: Ensure your baking powder and baking soda are fresh for the best rise.
- Use High-Quality Butter: The butter’s flavor shines through, so choose a good-quality brand.
Common Mistakes and How to Avoid Them
- Overkneading the Dough: This leads to dense biscuits. Stop kneading as soon as the dough comes together.
- Using Warm Ingredients: Warm butter won’t create those essential steam pockets.
- Measuring Ingredients Incorrectly: Too much flour or not enough liquid can result in dry, crumbly biscuits.
Healthier Variations of Buttermilk Biscuits
If you’re looking for a healthier twist, try these variations:
- Whole Wheat Biscuits: Swap half of the all-purpose flour for whole wheat flour.
- Dairy-Free Option: Use plant-based butter and almond milk with a splash of vinegar instead of buttermilk.
- Gluten-Free Alternative: Substitute the flour with a gluten-free baking blend.
Serving Suggestions
Buttermilk biscuits are versatile and can be served in various ways:
- Classic Breakfast: Top with scrambled eggs, bacon, and cheese for a hearty morning meal.
- Southern-Style: Serve with sausage gravy for a comforting classic.
- Sweet Treat: Sprinkle with cinnamon sugar or drizzle with chocolate sauce for a dessert twist.
Storing and Reheating Biscuits
Biscuits are best enjoyed fresh, but you can store leftovers too:
- Storing: Place them in an airtight container at room temperature for up to 2 days, or refrigerate for up to a week.
- Freezing: Freeze baked biscuits in a zip-top bag for up to 3 months. Reheat directly from frozen.
- Reheating: Warm biscuits in the oven at 350°F for 5–7 minutes or microwave them for about 20 seconds.
FAQs about Buttermilk Biscuit Recipe
What ingredients do I need for buttermilk biscuits?
For a classic buttermilk biscuit recipe, you’ll need all-purpose flour, baking powder, baking soda, salt, unsalted butter, and buttermilk. Some recipes may also call for a touch of sugar to enhance the flavor.
How do I get my biscuits to be fluffy?
To achieve fluffy buttermilk biscuits, ensure that your butter is cold and cut into small pieces before mixing. This technique helps create steam pockets in the dough as it bakes, leading to a lighter texture. Also, be careful not to overmix the dough; mix just until the ingredients are combined.
Can I make buttermilk biscuits without buttermilk?
Yes, you can substitute buttermilk by mixing milk with a tablespoon of vinegar or lemon juice per cup of milk. Let the mixture sit for about 10 minutes before using it in your recipe.
Why did my buttermilk biscuits turn out hard?
Hard biscuits often result from overworking the dough or using too much flour. Be gentle when mixing and make sure to measure your ingredients accurately. Also, ensure your baking powder is not expired, as it is crucial for the rise.
Can I freeze buttermilk biscuit dough?
Absolutely! Prepare the dough, cut it into biscuit shapes, and then freeze them on a baking sheet. Once solid, transfer the biscuits to a freezer bag and keep them frozen for up to 3 months. Bake them straight from the freezer, adding a few extra minutes to the baking time.
Conclusion
Making buttermilk biscuits from scratch is a rewarding experience. The flaky layers, buttery taste, and melt-in-your-mouth texture are unparalleled. By following this step-by-step guide and incorporating the tips provided, you’ll master the art of biscuit-making in no time. Whether you’re serving them at a family breakfast or a cozy dinner, homemade buttermilk biscuits will undoubtedly steal the show.


