Butterfinger Cake Recipe: If you’re a fan of rich, gooey desserts with that perfect blend of chocolate, peanut butter, and caramel crunch—this Butterfinger Cake is going to blow your mind. This cake has it all: a soft and moist chocolate base, a dreamy caramel and condensed milk filling, a fluffy whipped topping, and, of course, loads of crushed Butterfinger bars for that irresistible crunch. Whether you’re making this for a birthday, a holiday dinner, or just because you had a craving—it’s a guaranteed crowd-pleaser.
So grab your apron and let’s get baking!
Why You’ll Love This Butterfinger Cake
Let’s be real—Butterfinger Cake is not your average dessert. It’s the kind of cake that makes people go back for seconds (and thirds). You get the richness of chocolate, the sweetness of caramel, the creaminess of whipped topping, and that signature Butterfinger crunch all in one bite.
- Easy to make: Uses boxed cake mix, but tastes like it came from a bakery.
- Crowd-pleaser: Perfect for potlucks, birthdays, and holidays.
- Customizable: Add peanut butter, ice cream layers, or different candy bars.
- No fancy skills required: Anyone can nail this with just a few simple steps.
Once you try it, you’ll want to make it over and over again.
What Is Butterfinger Cake?
Butterfinger Cake is a decadent dessert that combines a moist chocolate cake base with sweetened condensed milk, caramel sauce, whipped topping, and crushed Butterfinger candy bars. It’s a type of poke cake, meaning you literally poke holes in the cake after baking and pour sweet liquid (like condensed milk) into the holes, allowing the cake to soak up extra flavor and moisture.
This cake is often served chilled, which makes it especially good during warmer months. But trust me—it’s delicious all year round. The crushed Butterfingers on top add a crunchy, nutty texture that balances the softness of the cake and whipped topping. Think of it as a chocolate-caramel explosion in cake form.
Ingredients You’ll Need
Let’s break it down by parts. You can make this cake with just a few simple ingredients, most of which you might already have in your kitchen.
For the Cake Base
- 1 box of chocolate cake mix (your favorite brand)
- Eggs (as required by cake mix)
- Oil (as required by cake mix)
- Water (as required by cake mix)
For the Filling and Topping
- 1 can (14 oz) sweetened condensed milk
- 1 jar (12 oz) caramel sauce (ice cream topping works)
- 1 tub (8 oz) whipped topping (like Cool Whip), thawed
- 6 full-size Butterfinger bars, crushed
Kitchen Tools You’ll Need
Here’s everything you’ll need to prepare this Butterfinger masterpiece:
- 9×13-inch baking dish
- Mixing bowls
- Electric hand mixer or whisk
- Wooden spoon or skewer (for poking holes)
- Spatula
- Knife (for chopping Butterfingers)
- Plastic bag and rolling pin (for crushing candy)
Tips Before You Start Baking
Before diving in, keep these tips in mind to make your Butterfinger Cake turn out bakery-perfect:
- Don’t overbake your cake – You want it moist enough to absorb the filling.
- Let it cool slightly before poking – If it’s too hot, it may fall apart.
- Use full-fat condensed milk – It’s richer and gives the best flavor.
- Crush Butterfingers last minute – This keeps them crunchy.
- Chill before serving – The flavors meld beautifully when cold.
Step-by-Step Instructions
Step 1: Prepare Your Cake Mix
Start by preheating your oven to the temperature listed on your cake mix box—usually around 350°F (175°C). In a large mixing bowl, prepare the chocolate cake mix according to the package instructions. This typically means combining the dry mix with eggs, oil, and water.
Whisk or beat until smooth and lump-free. Don’t over-mix—just enough to combine everything evenly. Once ready, pour the batter into your greased 9×13 baking dish and smooth the top.
Bake according to the box directions (usually 28–35 minutes), or until a toothpick comes out clean when inserted in the center.
Step 2: Bake the Cake
Slide your dish into the preheated oven and let the magic begin. Keep an eye on it during the last few minutes—ovens vary, and you don’t want a dry cake.
Once the cake is done, remove it from the oven and let it sit for about 10–15 minutes. It should be warm but not hot when you move on to the next step.
Step 3: Poke Holes in the Cake
Take a wooden spoon handle or a skewer and start poking holes across the top of the warm cake. Make the holes about an inch apart. Be generous—you want those gooey fillings to really soak in.
This is what gives the cake its trademark moist, melt-in-your-mouth texture.
Step 4: Pour Over Sweetened Milk and Caramel
Now comes the fun part. While the cake is still warm, pour the sweetened condensed milk slowly over the entire surface. Use a spatula to help it seep into the holes.
Follow up with the caramel sauce. You can warm it slightly in the microwave so it pours more easily. Again, try to get it into those holes—that’s where the magic happens.
Let the cake sit for about 15–20 minutes so all the liquid can soak in.
Step 5: Chill the Cake
Place the cake in the fridge and let it chill for at least an hour. The longer, the better. This helps set the filling and makes it easier to spread the topping in the next step.
If you’re making this ahead for a party, you can even leave it overnight.
Step 6: Prepare the Whipped Topping
Once your cake is nicely chilled, grab your tub of whipped topping. If it’s still a bit frozen, let it thaw on the counter for 15–20 minutes.
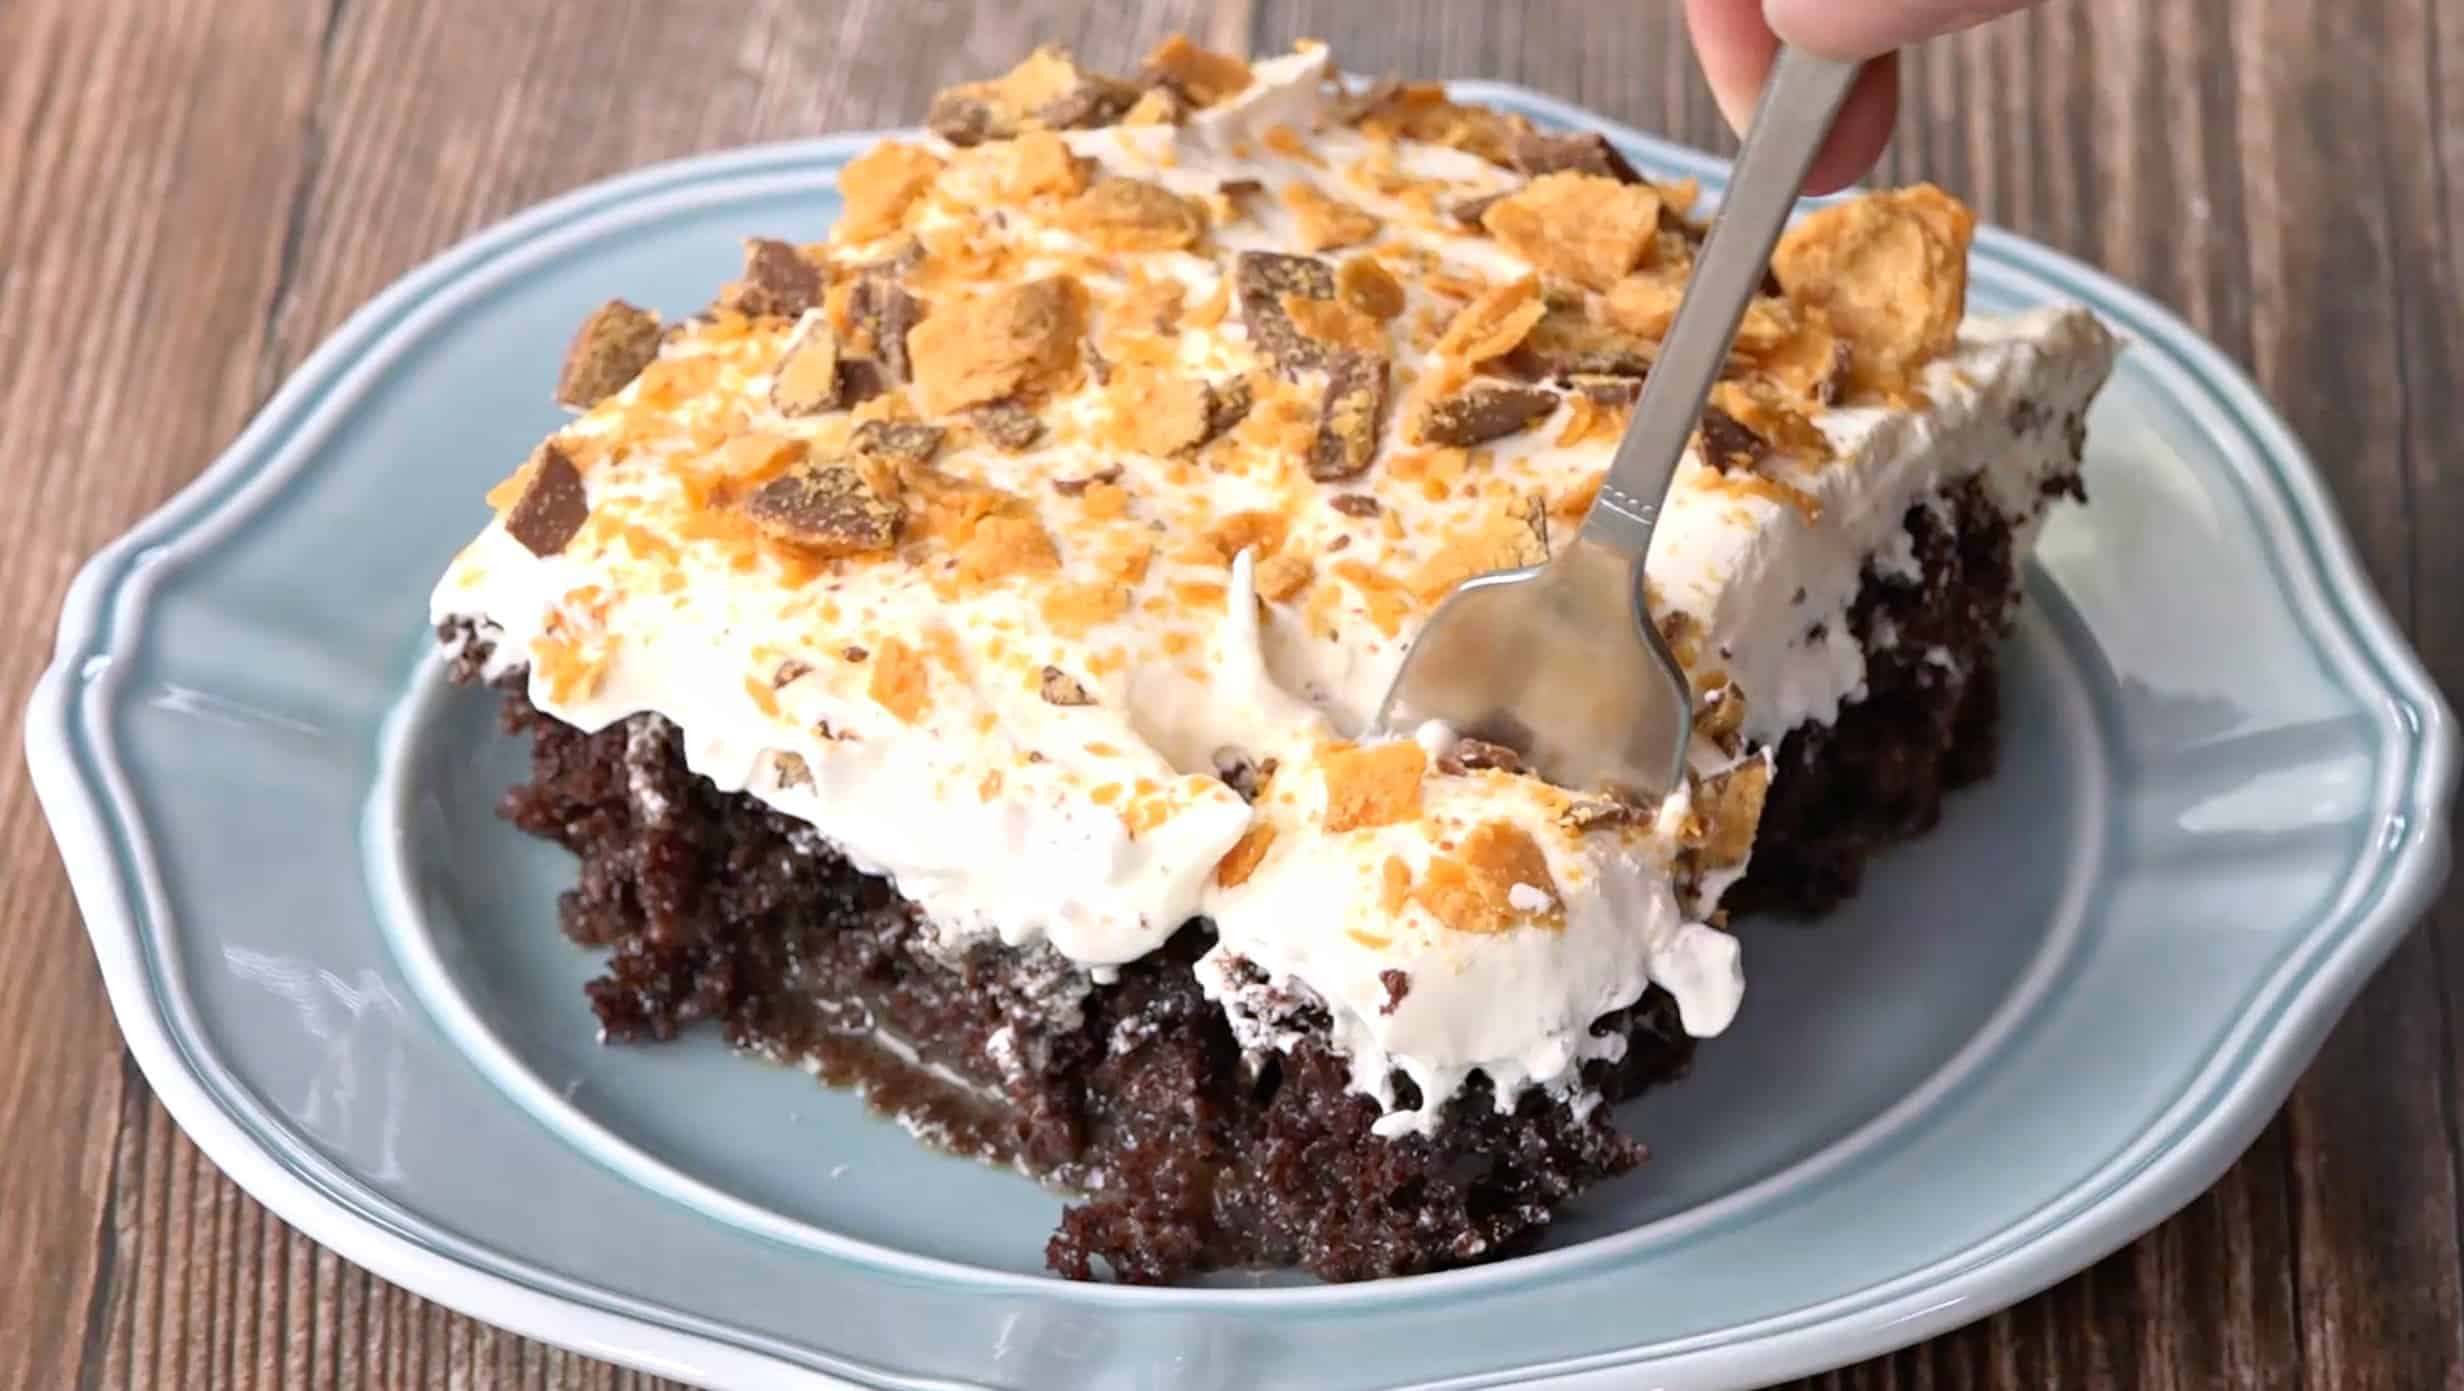
Spread the whipped topping evenly over the entire surface of the cake using a spatula. Try to get it all the way to the edges. Smooth it out to create a nice, clean look.
Step 7: Add Crushed Butterfingers
Here’s where things get seriously delicious. Crush your Butterfinger bars inside a Ziploc bag using a rolling pin or heavy object. Don’t pulverize them into dust—you want a mix of small chunks and fine pieces.
Sprinkle the crushed candy generously over the whipped topping. You can also mix a bit into the whipped topping if you want that candy crunch throughout the top layer.
Step 8: Final Chill Before Serving
Pop the cake back into the fridge for another hour or so before serving. This helps everything set perfectly and allows all the flavors to marry together.
When you’re ready, slice it up and enjoy that rich, crunchy, gooey goodness!
How to Crush Butterfingers Without Making a Mess
Crushing candy bars sounds fun, but if you’ve ever tried doing it without a plan, you know it can get messy fast. Sticky fingers, crumbs everywhere—it’s not ideal. Here’s the easiest (and cleanest) method to crush Butterfingers like a pro:
- Chill the bars first: Place your Butterfinger bars in the freezer for 15–20 minutes. This hardens the chocolate and filling, making them easier to crush without melting.
- Use a plastic freezer bag: Place the frozen bars in a sturdy Ziploc or freezer-safe bag.
- Seal with air pushed out: This prevents the bag from popping open or ripping.
- Use a rolling pin or meat mallet: Gently pound the candy bars until you reach your desired texture. For chunkier bits, use a lighter hand. For finer pieces, roll or pound a bit more.
No mess, no stress, and you get perfectly crushed Butterfingers ready for sprinkling.
Make-Ahead and Storage Tips
Butterfinger Cake is a dream when it comes to prep and storage. You can easily make it a day (or even two) in advance and it just gets better over time. Here’s how to keep it fresh and fabulous:
Make-Ahead Tips:
- Up to 2 days ahead: Assemble the entire cake (except the topping) and refrigerate. Add whipped topping and crushed Butterfingers the day of serving for best texture.
- Freeze individual slices: Wrap each slice tightly in plastic wrap and foil. Freeze for up to 2 months.
Storage Tips:
- Refrigerator: Store leftovers in the fridge, covered with plastic wrap or in an airtight container. It’ll stay fresh for up to 5 days.
- Avoid room temperature: Due to the whipped topping and condensed milk, this cake should always be kept cold.
Pro Tip: If the Butterfinger pieces get soft over time, sprinkle a few fresh crushed bits on top before serving leftovers for added crunch.
How to Make This Recipe from Scratch (No Cake Mix)
Want to level up your Butterfinger Cake by making the base from scratch? Totally doable—and insanely delicious.
Homemade Chocolate Cake Base:
Ingredients:
- 1¾ cups all-purpose flour
- ¾ cup unsweetened cocoa powder
- 2 cups granulated sugar
- 1½ tsp baking powder
- 1½ tsp baking soda
- 1 tsp salt
- 2 large eggs
- 1 cup whole milk
- ½ cup vegetable oil
- 2 tsp vanilla extract
- 1 cup boiling water
Instructions:
- Preheat oven to 350°F (175°C) and grease your 9×13 baking dish.
- Mix dry ingredients (flour, cocoa, sugar, baking powder, baking soda, salt) in a bowl.
- Add eggs, milk, oil, and vanilla. Beat until smooth.
- Stir in boiling water (batter will be thin—don’t worry!).
- Pour into dish and bake for 30–35 minutes.
Then proceed with the same poke-and-fill steps as the original recipe. You’ll end up with a richer, homemade version that tastes like it came straight from a bakery.
Variations to Try
Feeling creative? Here are some delicious spins on the classic Butterfinger Cake:
Butterfinger Ice Cream Cake
- Swap the cake layer for chocolate or peanut butter ice cream.
- Use a graham cracker crust base.
- Layer caramel, whipped topping, and crushed Butterfingers.
- Freeze and slice!
Peanut Butter Butterfinger Cake
- Add a layer of peanut butter between the cake and whipped topping.
- Drizzle melted peanut butter on top before serving.
Gluten-Free Butterfinger Cake
- Use a gluten-free cake mix.
- Double-check that your caramel and candy bars are gluten-free.
- Follow the same process—no need to sacrifice flavor!
There’s really no wrong way to remix this cake. If you love chocolate, peanut butter, and crunch, the sky’s the limit.
Troubleshooting Common Cake Issues
Even easy recipes can go sideways. Here’s how to fix common Butterfinger Cake hiccups:
- Cake is too soggy: You may have used too much condensed milk or not let it chill long enough. Stick to the suggested amounts and give it proper fridge time.
- Cake crumbled when poking: The cake was too hot. Let it cool for 15 minutes before poking.
- Whipped topping melted: Make sure the cake is completely cool before adding topping.
- Candy lost crunch: Butterfingers were added too early or stored in a humid fridge. Always add them last or just before serving.
Don’t panic—almost every mistake can be covered with a little extra whipped topping and crushed candy!
Nutrition Breakdown (Per Slice)
Here’s a rough estimate of the nutritional content per slice (based on 12 servings):
| Nutrient | Amount |
|---|---|
| Calories | ~450 |
| Total Fat | 20–25g |
| Saturated Fat | 10g |
| Carbohydrates | 60g |
| Sugar | 45g |
| Protein | 4g |
| Sodium | 300mg |
Note: These values may vary based on the brand of ingredients used. This cake is meant to be a treat—so enjoy it guilt-free!
Serving Suggestions
Wondering how to serve your Butterfinger Cake for maximum effect? Here are a few ideas:
- Chilled and sliced with a drizzle of extra caramel on the plate.
- Topped with chopped peanuts or chocolate curls for extra texture.
- Served with coffee or a cold glass of milk—it’s rich, so balance is key.
- With ice cream for a full-on dessert experience.
Want to impress at a potluck or family gathering? Serve each slice on a decorative plate with a dusting of crushed Butterfingers and a sprig of mint. It’s the little things.
FAQs about Butterfinger Cake Recipe
Q1: Can I make Butterfinger Cake the night before?
Absolutely! In fact, it’s even better the next day once the flavors have soaked in. Just wait to add the Butterfingers until right before serving to keep them crunchy.
Q2: Can I freeze Butterfinger Cake?
Yes, you can freeze it! Wrap individual slices tightly and freeze for up to 2 months. Thaw overnight in the fridge before serving.
Q3: Can I use homemade whipped cream instead of Cool Whip?
Definitely. Just whip up some heavy cream with a bit of sugar and vanilla. Keep in mind it won’t hold as long as store-bought topping, so serve sooner.
Q4: What other candy bars can I use in this recipe?
Try Snickers, Reese’s, or Heath bars for different flavor combos. Each brings its own unique twist.
Q5: Is there a way to make this cake less sweet?
Yes—use unsweetened whipped cream, reduce the amount of caramel sauce, or opt for a dark chocolate cake base to balance the sweetness.
Final Thoughts
Butterfinger Cake is one of those desserts that feels like it should be complicated—but isn’t. It’s ridiculously easy to make, packed with flavor, and guaranteed to be the star of any dessert table. Whether you’re making it from scratch or using shortcuts, every layer delivers something satisfying—from the moist cake and gooey filling to the light topping and crunchy candy.
So go ahead—grab that box of cake mix, a few Butterfingers, and make magic happen in your kitchen. Just be ready for everyone to ask you for the recipe.


