Burger Sliders Recipe: There’s something irresistibly fun about burger sliders. They’re small, flavorful, and easy to eat—making them perfect for parties, family dinners, or even a quick snack when you don’t want a full-sized burger. Unlike traditional burgers, sliders are typically made using smaller buns and thinner patties, but don’t let their size fool you. These mini burgers pack a punch when it comes to taste.
One of the biggest advantages of sliders is how customizable they are. You can stick to a classic cheeseburger flavor, or get creative with toppings like BBQ sauce, caramelized onions, or spicy jalapeños. They’re also a fantastic option if you’re hosting a crowd because you can make a batch of 12–24 sliders at once, and everyone gets to enjoy a bite-sized treat without feeling overly stuffed.
In this guide, we’ll walk through everything you need to know to make the best burger sliders at home. From the ingredients and tools to a detailed step-by-step process, you’ll have a foolproof recipe that guarantees juicy, flavorful sliders every single time.
Ingredients You’ll Need
Before diving into the cooking steps, let’s gather all the essentials. Having the right ingredients on hand is the key to achieving that perfect balance of flavors and textures in your sliders.
For the Burger Patties
- 1 lb (450g) ground beef (80/20 blend recommended for juiciness)
- 1 teaspoon garlic powder
- 1 teaspoon onion powder
- 1 teaspoon salt
- ½ teaspoon black pepper
- ½ teaspoon smoked paprika (optional for extra flavor)
For the Slider Buns
- 12 small slider buns (Hawaiian rolls are a popular choice)
- 2 tablespoons butter (for toasting)
Toppings and Extras
- 6 slices of cheddar or American cheese (cut in half to fit sliders)
- 1 medium onion (sliced, caramelized, or grilled)
- Lettuce leaves (cut into small pieces)
- Tomato slices (thinly cut to fit sliders)
- Pickles (optional but highly recommended)
Sauces and Condiments
- Ketchup
- Mustard
- Mayonnaise
- Special sauce (a mix of ketchup, mayo, and relish works great)
These ingredients create a base recipe for classic beef sliders. Of course, you can always experiment with toppings or swap beef for chicken, turkey, or even plant-based patties to suit your preference.
Tools and Equipment Required
To make delicious sliders, you don’t need fancy equipment, but having the right tools makes the cooking process smoother.
- Mixing bowl – for preparing the meat mixture
- Baking sheet or tray – if baking patties in the oven
- Cast iron skillet or nonstick pan – for grilling or pan-frying patties
- Spatula – for flipping patties easily
- Sharp knife – for slicing toppings and buns
- Cutting board – to keep prep work organized
- Butter brush – for spreading butter on buns before toasting
Optional but helpful tools:
- Burger press – to shape uniform patties
- Food thermometer – to ensure meat is cooked to safe temperatures
- Griddle – to cook multiple patties at once for large gatherings
With these tools, you’ll be well-prepared to handle each step with ease and precision.
Step-by-Step Guide to Making Burger Sliders
Now comes the fun part—cooking and assembling the sliders. Follow these steps carefully, and you’ll have restaurant-quality sliders made right in your kitchen.
Step 1 – Preparing the Meat Mixture
Start by placing the ground beef into a large mixing bowl. Add garlic powder, onion powder, salt, pepper, and smoked paprika. Mix gently with your hands or a spoon until just combined. Avoid overmixing, as this can make the patties tough.
If you want extra flavor, you can add a tablespoon of Worcestershire sauce or a splash of soy sauce to the mixture. Some people also like mixing in finely chopped onions or grated cheese directly into the meat for a more flavorful patty.
The key here is balance. You want enough seasoning to enhance the natural beef flavor without overpowering it.
Step 2 – Shaping the Patties
Divide the beef mixture into 12 equal portions. Roll each portion into a ball, then flatten it gently into a patty about 2.5 inches wide. Keep in mind that sliders shrink slightly while cooking, so make them a little wider than the buns.
Place the shaped patties on a tray lined with parchment paper. If you’re preparing in advance, you can cover the tray with plastic wrap and refrigerate the patties until you’re ready to cook.
A helpful tip is to press a small dimple in the center of each patty with your thumb. This prevents the patties from puffing up too much during cooking, ensuring they stay flat and fit perfectly on the slider buns.
Step 3 – Cooking the Patties
Cooking is where the magic happens. You can choose between pan-frying, grilling, or baking, depending on what’s most convenient.
- Pan-frying: Heat a cast iron skillet or nonstick pan over medium-high heat. Add a small amount of oil or butter. Place patties in the pan and cook for 2–3 minutes per side until nicely browned. For cheeseburgers, add cheese slices during the last 30 seconds and cover with a lid so it melts perfectly.
- Grilling: Preheat the grill to medium-high. Place patties on the grill and cook for about 2–3 minutes per side. Keep an eye on them since sliders cook quickly.
- Baking: If you’re making a large batch, you can place patties on a baking sheet lined with foil and bake at 375°F (190°C) for 10–12 minutes, flipping halfway.
For food safety, always ensure the internal temperature reaches 160°F (71°C) for ground beef. If you prefer medium doneness, check carefully with a meat thermometer, but avoid undercooking.
The best sliders strike a balance: a juicy, slightly pink center with a beautifully seared crust on the outside.
Step 4 – Toasting the Buns
Never underestimate the importance of perfectly toasted buns. This simple step adds flavor, texture, and prevents sogginess.
- Slice the slider buns in half.
- Spread a thin layer of butter on the cut sides.
- Toast them face down on a skillet, griddle, or oven broiler until golden brown.
The toasting process gives the buns a slight crunch while keeping the inside soft and pillowy. If you’re using Hawaiian rolls, you can toast them as a sheet before cutting, making it easier to assemble multiple sliders at once.
Adding garlic butter or a sprinkle of sesame seeds before toasting can elevate the buns even further.
Step 5 – Assembling the Sliders
This is where everything comes together. Start with the bottom bun, add your cooked patty, place a slice of cheese, and then layer your toppings. Lettuce, tomato, onions, and pickles are classics, but feel free to customize.
Top it off with your favorite condiments—ketchup, mustard, mayo, or even a homemade special sauce. Finally, crown it with the top bun and give it a gentle press to hold everything in place.
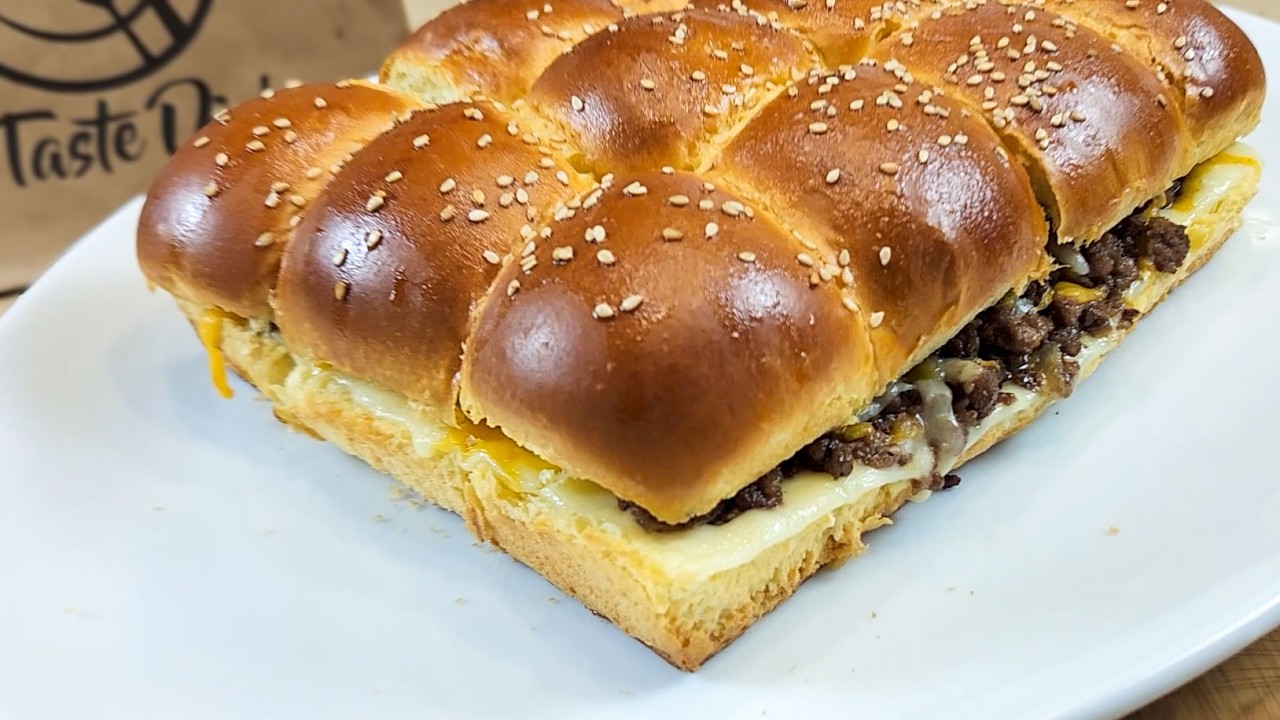
If you’re serving a crowd, you can assemble sliders on a baking tray, brush the tops with melted butter, sprinkle sesame seeds or garlic powder, and bake for a few minutes to melt everything together. This method creates a pull-apart slider experience that’s both fun and delicious.
And there you have it—your sliders are ready to serve!
Pro Tips for the Perfect Burger Sliders
Want to take your sliders from good to unforgettable? Here are some pro tips:
- Use high-quality beef: An 80/20 blend (80% lean, 20% fat) ensures juiciness. Leaner beef tends to dry out.
- Don’t overwork the meat: Handle the mixture gently. Overmixing makes the patties tough.
- Season generously: Sliders are small, so seasoning must be bold enough to stand out.
- Cheese matters: American cheese melts beautifully, but cheddar, Swiss, or pepper jack can add unique flavors.
- Control the toppings: Less is more. Too many toppings can overpower the flavor of the beef or make the slider messy.
- Keep them warm: If cooking in batches, place finished sliders in a warm oven (around 200°F/95°C) to keep them hot until serving.
By following these simple yet effective tips, you’ll ensure your sliders are juicy, flavorful, and a hit at any gathering.
Variations of Burger Sliders
Sliders are incredibly versatile. Once you master the classic version, try experimenting with these popular variations:
Cheeseburger Sliders
The timeless choice—simply add your favorite cheese. American cheese gives that classic melt, while smoked gouda or cheddar provides a gourmet twist.
BBQ Sliders
Mix BBQ sauce into the meat mixture or drizzle it over the patties after cooking. Add caramelized onions and a slice of cheddar for a smoky, sweet flavor.
Chicken Sliders
Use ground chicken or grilled chicken breasts instead of beef. Pair with ranch, buffalo sauce, or honey mustard for a lighter option.
Veggie Sliders
For a vegetarian twist, make patties from black beans, chickpeas, or mushrooms. These sliders are hearty and packed with flavor while being meat-free.
Each variation brings something unique to the table, so you’ll never run out of options when making sliders at home.
Serving Suggestions
Sliders may be the star of the show, but pairing them with the right sides and drinks can turn your meal into a feast. Since sliders are bite-sized, they’re often enjoyed at parties, game nights, and casual dinners where finger foods shine.
Perfect Side Dishes for Sliders:
- French Fries or Sweet Potato Fries: A crispy classic that everyone loves. Sweet potato fries add a slightly healthier twist.
- Onion Rings: Crunchy, golden onion rings complement the savory juiciness of sliders.
- Coleslaw: A tangy, refreshing side that balances the richness of the meat. You can serve it as a side or even pile it directly onto the sliders.
- Potato Salad: Creamy and comforting, this side dish pairs perfectly with mini burgers.
- Pickles or Pickle Chips: Their acidity cuts through the fattiness of the patties and cheese.
- Mozzarella Sticks: A cheesy, indulgent side perfect for game-day gatherings.
Best Drinks to Pair with Sliders:
- Soda and Sparkling Drinks: Cola, lemon-lime soda, or root beer work well for a casual meal.
- Beer: A cold lager or pale ale complements the smoky, savory flavors of sliders.
- Lemonade or Iced Tea: Refreshing and light, balancing the richness of the meal.
- Milkshakes: If you want a diner-style vibe, pair your sliders with a creamy milkshake—vanilla, chocolate, or strawberry.
When serving sliders at parties, consider making a “slider bar” with different toppings and sauces so guests can customize their mini burgers to their liking.
Storing and Reheating Sliders
One of the best things about sliders is that they can be made ahead of time and stored for later. However, to keep them tasting fresh and delicious, you’ll need the right techniques.
How to Store Leftovers:
- Store cooked patties and buns separately to avoid sogginess.
- Place patties in an airtight container and refrigerate for up to 3 days.
- Slider buns can be kept at room temperature in a sealed bag for 2–3 days.
How to Freeze Sliders:
- You can freeze cooked patties by wrapping each one in plastic wrap and placing them in a freezer bag. They’ll last up to 2 months.
- To freeze assembled sliders, wrap them tightly in foil and place them in a freezer-safe bag.
Best Methods for Reheating:
- Oven: Preheat to 350°F (175°C). Wrap sliders in foil and heat for 10–15 minutes until warmed through. This method keeps buns from drying out.
- Microwave: Quick and easy, but may make the buns soggy. Wrap sliders in a damp paper towel and heat in 30-second intervals.
- Stovetop: Reheat patties on a skillet for a few minutes on each side, then reassemble with fresh buns and toppings.
Reheating sliders properly ensures they taste just as good as when they were freshly made.
Common Mistakes to Avoid
Even though sliders are simple to make, a few mistakes can ruin them. Avoid these pitfalls to get perfect sliders every time:
- Overcooking the Patties
Sliders are small, so they cook quickly. Leaving them too long on the heat can dry them out. Always monitor closely and aim for juicy centers. - Using the Wrong Buns
Regular burger buns are too big and overwhelm the sliders. Always use slider buns or Hawaiian rolls for the right ratio of bread to meat. - Overloading with Toppings
It’s tempting to pile on toppings, but too many make sliders messy and difficult to eat. Stick to a few complementary toppings for the best balance. - Skipping Bun Toasting
Untoasted buns absorb juices and sauces, turning soggy fast. A quick toast adds flavor and structure. - Not Letting the Meat Rest
Just like full-sized burgers, sliders benefit from resting for a couple of minutes after cooking. This allows juices to redistribute, keeping the patties moist.
By steering clear of these mistakes, your sliders will stay flavorful, juicy, and Instagram-worthy.
Healthier Alternatives for Sliders
Love sliders but want to cut down on calories? With a few tweaks, you can enjoy these bite-sized burgers without the guilt.
Healthier Meat Options:
- Use ground turkey or chicken instead of beef for leaner patties.
- Try plant-based alternatives like Beyond Meat or black bean patties for a vegetarian version.
Better Buns:
- Swap regular slider buns with whole wheat rolls or lettuce wraps.
- Try cauliflower buns for a low-carb alternative.
Healthier Toppings:
- Replace full-fat cheese with reduced-fat cheese or skip it altogether.
- Add more veggies like spinach, arugula, or grilled peppers.
- Use avocado slices for a creamy yet nutritious topping.
Lighter Sauces:
- Replace mayo with Greek yogurt-based spreads.
- Use mustard or salsa instead of heavy sauces.
By making these small adjustments, you can still enjoy the taste and fun of sliders while keeping them light and wholesome.
FAQs about Burger Sliders Recipe
1. Can I prepare slider patties ahead of time?
Yes! You can shape the patties and store them in the refrigerator for up to 24 hours before cooking. If you want to plan further ahead, freeze them on a tray first, then transfer to a freezer bag. Thaw overnight in the fridge before cooking.
2. How do I keep my sliders from falling apart?
The trick is not to overmix the beef. Gently combine the ingredients and press the patties just enough to hold their shape. You can also chill the patties for 30 minutes before cooking to firm them up.
3. What kind of buns are best for sliders?
Soft buns work best—Hawaiian rolls, potato rolls, or brioche slider buns. They’re slightly sweet, light, and pair beautifully with savory patties. Avoid buns that are too dense or crusty, as they overpower the sliders.
4. Can I bake sliders instead of grilling them?
Absolutely. Baking sliders is an easy way to make a large batch at once. Just line a baking sheet with foil, place the patties on it, and bake at 375°F (190°C) for about 10–12 minutes, flipping halfway.
5. What’s the best way to keep sliders warm for a party?
If you’re serving a crowd, keep the cooked sliders in a warm oven at around 200°F (95°C). Another option is to cover them with foil to retain heat without drying them out.
Conclusion
The step-by-step process is simple: season and shape the patties, cook them to juicy perfection, toast the buns, and then assemble with your favorite toppings. Add some fries or onion rings on the side, and you’ve got yourself a meal that will impress anyone.
Whether you’re making classic cheeseburger sliders, tangy BBQ versions, or even veggie sliders, the possibilities are endless. By following the tips and avoiding common mistakes, you’ll be able to create sliders that are not only delicious but also perfectly balanced in flavor and texture.
So next time you’re hosting or simply craving something indulgent yet manageable, whip up a batch of burger sliders. They’ll be gone in no time—and everyone will be asking for seconds!


