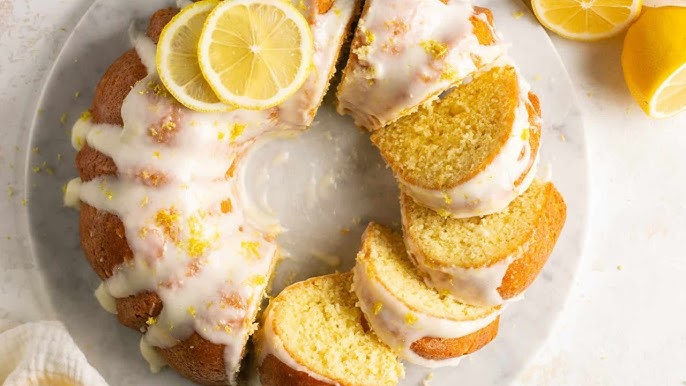
Bundt Cake Recipe: If you’ve ever admired a cake with a beautifully sculpted ring shape and thought, “How do they do that?” — you’ve seen a Bundt cake. Unlike typical round or square cakes, Bundt cakes are baked in a special pan that gives them their iconic dome-like appearance with fluted sides. This isn’t just for looks (though it’s a showstopper!); the pan’s design helps distribute heat evenly, ensuring your cake cooks beautifully all around.
What makes a Bundt cake unique isn’t just the shape—it’s also how it carries flavor and moisture. Because of the shape and structure, these cakes can hold dense batters and rich fillings, making them the perfect option for coffee cakes, pound cakes, or anything with a swirl or glaze. You’ll often find Bundt cakes gracing tables at celebrations, holidays, or even casual family dinners. They’re that versatile.
Why Bundt Cakes Are Special
Bundt cakes have a charm all their own. They can go from casual to classy with just a change in glaze or garnish. Their shape gives a rustic, homemade look, while the defined edges make it easy to slice and serve. Plus, the possibilities are endless — from classic vanilla and lemon to indulgent chocolate fudge or spiced apple, there’s a Bundt cake for every taste.
Also, let’s not forget: they require zero stacking, no elaborate frosting, and are ideal for those who want a visually impressive dessert with minimal fuss. One good pan, a great recipe, and you’re golden.
Essential Ingredients for a Perfect Bundt Cake
Common Ingredients You’ll Need
To get started with a basic but delicious Bundt cake, you’ll need a few pantry staples. Here’s what goes into most classic recipes:
- All-purpose flour – It gives the cake structure.
- Sugar – Adds sweetness and helps with browning.
- Eggs – These bind everything together and add moisture.
- Butter – For richness and flavor.
- Baking powder and/or baking soda – To help the cake rise.
- Salt – Just a pinch enhances the flavors.
- Milk or buttermilk – For a moist crumb.
- Vanilla extract – Adds aroma and taste.
Some recipes may include extras like sour cream, yogurt, or even mayonnaise (yes, it’s a thing!) to up the moisture level. Others will call for cocoa powder, fruit zest, or spices depending on the flavor profile you’re aiming for.
Ingredient Substitutes and Variations
No buttermilk on hand? Mix 1 tablespoon of vinegar or lemon juice with 1 cup of milk and let it sit for 10 minutes. Need a dairy-free version? Almond or oat milk works in most cases. Watching your sugar intake? Use honey, maple syrup, or a sugar substitute like Stevia (though it might slightly change the texture).
Want to mix things up? Here are some ideas:
- Swap half the flour for almond flour for a nutty twist.
- Add a swirl of jam or cream cheese in the center.
- Fold in chocolate chips, nuts, or berries for extra flavor and texture.
Bundt cakes are as flexible as your imagination.
Tools and Equipment You’ll Need
Choosing the Right Bundt Pan
The Bundt pan is the star of the show here. Available in dozens of designs—from simple spirals to elaborate floral shapes—these pans are what give Bundt cakes their dramatic look. But looks aren’t everything. You want a pan made from heavy-duty material (usually cast aluminum) with a non-stick coating. Nordic Ware is the gold standard for many bakers.
Standard pans hold about 10 to 12 cups of batter. If you’re using a smaller or larger pan, make sure to adjust your baking time accordingly.
Pro Tip: Even non-stick pans need greasing. Those intricate ridges are notorious for trapping batter. We’ll get into how to prep the pan like a pro in the next section.
Other Kitchen Essentials
Besides the Bundt pan, you’ll need a few basics:
- Mixing bowls (preferably large ones for easy stirring)
- Hand or stand mixer (optional, but helpful for creaming butter)
- Spatula and wooden spoon
- Measuring cups and spoons
- Cooling rack
- Toothpick or skewer for doneness testing
Having these tools ready makes the baking process smooth and enjoyable, which is what cake-making should always be.
Step-by-Step Bundt Cake Recipe
Step 1: Preparing the Pan
Here’s where many people trip up: prepping the Bundt pan. If you don’t do this correctly, all your baking efforts could end in a stuck mess. Start by using a pastry brush to coat every nook and cranny of the pan with softened butter. You can also use a baking spray that includes flour — it’s specially designed for intricate pans.
Once greased, dust the pan lightly with flour, then tap out the excess. This double layer (fat + flour) helps create a barrier between the cake and the metal. Trust me, this one step can mean the difference between a stunning cake and one that breaks apart.
Step 2: Mixing the Batter
Now comes the fun part — making that luscious batter. Start by creaming together your butter and sugar until it’s light and fluffy. This takes about 3 to 5 minutes using a stand or hand mixer. Don’t rush it; this step traps air in the mixture, which helps your cake rise and gives it that melt-in-your-mouth texture.
Next, add in the eggs one at a time. Make sure each egg is fully incorporated before adding the next. This helps to prevent curdling and creates a smoother batter.
In a separate bowl, whisk together your dry ingredients — usually flour, baking powder, baking soda, and salt. In another, combine your wet ingredients like milk (or buttermilk), vanilla extract, and any other liquid flavorings.
Now, you’ll alternate adding the dry and wet ingredients into the butter mixture. Start and end with the dry. Mix just until combined — don’t overmix or you’ll end up with a dense, chewy cake.
If your recipe calls for extras like chocolate chips, fruit, or nuts, fold them in now using a spatula. This helps distribute them evenly without deflating the batter.
Quick Tip: If you’re adding fresh berries or chocolate chips, coat them lightly in flour before mixing them in. It keeps them from sinking to the bottom of the pan.
Step 3: Baking the Cake
Preheat your oven to 350°F (175°C), or as your specific recipe recommends. Temperature consistency is crucial here, especially with Bundt cakes, which are often denser than standard cakes.
Pour your batter into the prepared Bundt pan. Use a spatula to smooth the top and gently tap the pan on the counter a few times to release any air bubbles trapped inside.
Slide the pan onto the middle rack of the oven. Bake for 45 to 60 minutes, depending on the cake’s density and your oven. Start checking at the 45-minute mark. Insert a skewer or long toothpick into the deepest part of the cake — if it comes out clean or with just a few crumbs, you’re good to go.
Avoid opening the oven door too early, especially within the first 30 minutes. Sudden drops in temperature can make your cake collapse in the center.
Pro Tip: Some bakers rotate the cake halfway through for even baking, but only do this quickly and gently.
Step 4: Cooling and Removing from the Pan
Once your cake is baked to perfection, remove it from the oven and let it rest in the pan for 10 to 15 minutes. This short cooling period helps the cake set and makes it easier to release from the pan without tearing.
Don’t wait too long, though — if the cake cools completely in the pan, it might stick. After 10-15 minutes, place a cooling rack over the top of the pan, then flip everything upside down. If you’ve greased it well, the cake should slide out smoothly.
If it’s being stubborn, gently tap the pan’s sides or use a rubber spatula to loosen the edges. Never use metal utensils, as they can scratch the pan or tear the cake.
Let the cake cool completely on the rack before adding any glaze, icing, or toppings. This prevents everything from melting and sliding off.
Step 5: Adding the Finishing Touches
Your Bundt cake is a blank canvas now — time to dress it up! One of the best things about Bundt cakes is how effortlessly elegant they look, even with minimal decoration.
Here are a few ways to finish your cake:
- Glaze: A simple sugar glaze made with powdered sugar and milk or lemon juice is classic. Drizzle it over the top and let it run down the sides for a gorgeous effect.
- Icing or Frosting: For something richer, whip up a cream cheese frosting or chocolate ganache. Pipe it into the crevices or spread a thin layer all over.
- Dusting: A quick dusting of powdered sugar or cocoa powder adds a touch of class without overwhelming the flavor.
- Fruit and Nuts: Fresh berries, candied citrus slices, or toasted nuts can add both beauty and taste.
Whatever you choose, remember to let the cake cool fully before decorating. A hot cake will melt icing and ruin the look. Once dressed, your Bundt cake is ready to steal the show!
Tips for the Best Bundt Cake Ever
How to Avoid Sticking
If there’s one universal fear every Bundt cake baker has, it’s the cake sticking to the pan. And with good reason — a stuck Bundt can go from wow to whoops in seconds. The key to avoiding this nightmare? Prep, prep, prep.
Even if your Bundt pan says it’s non-stick, you’ll still want to coat it thoroughly. Use softened butter (not melted) and get into every nook and cranny with a pastry brush. Don’t forget the tube in the center! Once it’s buttered, dust it with a light coat of flour, then turn it upside down and tap out the excess.
Alternatively, use a baking spray that includes flour — not just regular cooking spray. Brands like Baker’s Joy are specifically made for this.
Also, let your cake rest in the pan for just the right amount of time after baking — 10 to 15 minutes. This helps it firm up without reattaching itself to the pan.
Finally, run a rubber spatula or soft plastic knife gently around the edges before inverting the pan. These little habits will save your cake — and your sanity.
Getting That Perfect Texture
Nobody wants a dry, crumbly Bundt. Achieving that moist, tender crumb is all about balance — the right ingredients, careful mixing, and proper baking time.
Use ingredients like sour cream, yogurt, or buttermilk to boost moisture. They react with baking soda for a better rise and a soft texture. Also, don’t skimp on fat — butter and oil aren’t just for flavor; they help trap moisture inside the cake.
Be careful with your mixing. Overbeating the batter develops gluten, which can make the cake tough. Mix just until everything is combined — lumps are okay!
Watch the oven. Overbaking is the most common cause of dry cakes. Use a skewer or toothpick to test doneness, and pull the cake out the minute it comes out clean or with moist crumbs.
Cooling the cake on a wire rack also helps. Leave it too long in a hot pan, and steam will escape too quickly, drying out the bottom.
Want extra moistness? Brush the warm cake with a flavored syrup (like lemon or vanilla) before glazing. It soaks in and makes every bite dreamy.
FAQs about Bundt Cake Recipe
Can I make a Bundt cake without a Bundt pan?
Technically, yes — but you won’t get the same look or even baking. A tube pan or angel food cake pan can be a substitute, but watch the baking time and pan volume. The visual flair and heat distribution will be different.
What’s the best way to store a Bundt cake?
Wrap your cooled cake in plastic wrap or store it in an airtight container at room temperature. It stays fresh for 3–4 days. For longer storage, refrigerate it (especially if frosted) or freeze slices individually.
How can I tell if my Bundt cake is fully baked?
Insert a long skewer or toothpick into the thickest part. If it comes out clean or with just a few moist crumbs, it’s done. If there’s wet batter, give it more time — but check every few minutes to avoid overbaking.
Can I freeze a Bundt cake?
Absolutely! Let it cool completely, wrap it tightly in plastic wrap and foil, then freeze for up to 3 months. Thaw at room temperature or in the fridge overnight. Hold off on glazing until you’re ready to serve.
What are the best flavors for Bundt cakes?
Classic vanilla, lemon, and chocolate are always hits, but don’t stop there! Try cinnamon swirl, pumpkin spice, coconut, or marble. Seasonal fruits like apple or berry make great additions too.
Conclusion
Remember, baking is as much about patience as it is about passion. Don’t rush the process. Grease that pan like a pro, mix your batter with love, and let your masterpiece cool before unveiling it. Whether you stick with a classic vanilla glaze or experiment with bold flavors and fillings, the result will always be worth it.
So go ahead — grab that Bundt pan, preheat your oven, and bake up something wonderful. You’ve got this!