Bûche de Noël Recipe: A Bûche de Noël, or Yule Log, is a traditional French Christmas dessert that resembles a wooden log. This festive treat is made from a light sponge cake rolled with a rich filling—typically chocolate or coffee-flavored buttercream—and topped with chocolate ganache to create a bark-like exterior. Think of it as a show-stopping centerpiece that not only looks stunning but tastes absolutely divine. Whether you’re a seasoned baker or trying this for the first time, the magic of crafting your own Bûche de Noël lies in its charm and intricate beauty. Plus, it’s a great conversation starter at any holiday gathering!
It’s more than just cake—it’s an edible piece of art. The texture is soft and spongy on the inside, rich and creamy in the center, and decadently chocolatey on the outside. And the best part? You can get creative with flavors and decorations to truly make it your own. From traditional touches like powdered sugar “snow” and meringue mushrooms to modern flair with gold leaf and sugared cranberries, this dessert offers endless possibilities.
So, if you’re aiming to impress your family and friends this Christmas, there’s no better way than with a homemade Bûche de Noël. And don’t worry—this step-by-step guide will walk you through everything you need to know.
Historical Origins and Significance
The tradition of the Bûche de Noël dates back to pre-medieval times when families would burn a real Yule log in the fireplace to celebrate the winter solstice and bring good luck for the coming year. As homes became more modern and fireplaces less common, this ritual gradually transformed into a symbolic gesture—hence, the creation of the Bûche de Noël cake.
Originating in 19th-century France, this dessert was inspired by the log-burning tradition and quickly gained popularity across Europe. The log shape wasn’t just a clever design—it was a meaningful tribute to heritage, family, and the warmth of home during the cold winter months.
In many households today, the Bûche de Noël remains a cherished holiday staple, passed down through generations. And as baking techniques evolved, so did the variations. From sponge cake bases to flourless versions for gluten-free diets, and fillings ranging from whipped cream to hazelnut praline, there’s a version of this cake for every palate.
Whether you follow the traditional recipe or put a modern twist on it, understanding its history adds a layer of richness to your holiday table. It’s not just a dessert; it’s a story you’re telling through every bite.
Essential Ingredients You’ll Need
For the Sponge Cake
To make the perfect sponge cake base, you’ll need the following ingredients:
- 4 large eggs
- 3/4 cup granulated sugar
- 1/4 cup vegetable oil
- 1 teaspoon vanilla extract
- 1/2 cup all-purpose flour
- 1/4 cup unsweetened cocoa powder
- 1/2 teaspoon baking powder
- 1/4 teaspoon salt
The sponge cake is the heart of your Bûche de Noël. It should be light, airy, and flexible enough to roll without cracking. That’s why it’s important to beat the eggs until they’re fluffy and fold the dry ingredients gently to keep the batter aerated. The cocoa powder not only gives a rich color and flavor but also pays homage to the log’s bark-like appearance.
A good sponge holds its shape and doesn’t fall apart during rolling, so accuracy in measurements and mixing is key. Make sure your eggs are at room temperature, and sift your dry ingredients to prevent lumps.
For the Filling
This creamy center adds flavor and texture contrast to the light sponge. Here’s what you’ll need:
- 1 cup heavy whipping cream
- 1/4 cup powdered sugar
- 1 teaspoon vanilla extract
- Optional: 2 tablespoons cocoa powder (for a chocolate filling)
You can go classic with vanilla whipped cream or infuse it with coffee, peppermint, or even raspberry for a twist. The whipped cream must be firm enough to stay in place when the cake is rolled, so chill your mixing bowl and beaters beforehand for best results.
This filling is what gives the Bûche de Noël its signature melt-in-your-mouth quality. Don’t skimp on it!
For the Chocolate Ganache Frosting
The rich, silky exterior is made with just two ingredients:
- 8 oz semi-sweet chocolate (finely chopped)
- 1 cup heavy cream
Ganache is what turns a simple rolled cake into a festive showpiece. Heat the cream just until it starts to simmer, pour it over the chocolate, and let it sit before stirring. The result is a glossy, spreadable frosting that resembles the bark of a real tree. You can also whip the ganache for a fluffier texture or let it firm up slightly for more defined piping details.
Want a touch of flavor? Add a dash of espresso powder, orange zest, or a splash of brandy to elevate the ganache.
Tools and Equipment Checklist
Kitchen Tools You’ll Need
Before you start baking, gather these tools:
- Electric mixer or stand mixer
- Mixing bowls (various sizes)
- Whisk and spatula
- 10×15-inch jelly roll pan
- Parchment paper
- Sifter or fine mesh sieve
- Offset spatula or butter knife
- Clean kitchen towel (for rolling)
- Cooling rack
- Knife or bench scraper (for creating bark texture)
- Serving platter or cake board
Having the right tools on hand streamlines your process and prevents unnecessary stress. Make sure your jelly roll pan is the correct size—too large, and the cake will be too thin; too small, and it might not cook evenly.
Preparation is half the battle. Set everything out before you start so you can focus on the baking and decorating without interruptions.
Preparation Tips Before You Start
Here’s how to prep like a pro:
- Preheat your oven to 350°F (175°C).
- Line your jelly roll pan with parchment paper, leaving an overhang for easy lifting.
- Lay out a clean kitchen towel and dust it with powdered sugar—this will help prevent sticking when rolling the cake.
- Chill your mixing bowl and beaters if making whipped cream.
Also, make sure all your ingredients are at room temperature unless stated otherwise. This ensures better mixing and consistent texture. Read through the entire recipe first to get a feel for the flow—trust me, it makes a big difference.
Step-by-Step Baking Instructions
Step 1: Preparing the Sponge Cake Batter
This is where the magic begins. A light and airy sponge cake is the foundation of any successful Bûche de Noël, and it all starts with whipping your eggs to the perfect consistency. Begin by cracking the eggs into a large mixing bowl. Add the sugar and beat on high speed using an electric mixer for about 8–10 minutes, or until the mixture triples in volume and becomes pale and fluffy. This is what gives the sponge its lift, so don’t cut corners here!
Once your eggs are whipped, add the oil and vanilla extract, folding gently to retain the air. Sift the flour, cocoa powder, baking powder, and salt together, then add them in small increments. Use a spatula to fold, not stir—overmixing will deflate the batter and result in a dense cake.
When the batter is ready, it should flow like thick ribbon. Pour it evenly into the prepared jelly roll pan and gently spread it out with an offset spatula. Tap the pan lightly on the counter to remove any air bubbles.
Pro tip: if you want an even more chocolaty taste, you can use dark cocoa powder instead of regular. Just make sure it’s unsweetened, or you’ll throw off the sugar balance.
Step 2: Baking the Sponge Cake
With your batter in the pan, slide it into the preheated oven and bake for about 10–12 minutes. You’re looking for a cake that springs back when lightly pressed in the center. Because this is a thin cake, it cooks quickly—keep an eye on it to avoid overbaking, which can make the sponge brittle and prone to cracking.
While the cake bakes, prepare your kitchen towel. Lay it flat on a clean surface and generously dust it with powdered sugar. This will keep the cake from sticking and help create the signature roll shape.
Once baked, immediately loosen the edges with a knife and flip the cake onto the sugared towel. Carefully peel away the parchment paper. Starting from the short side, gently roll the cake (with the towel) into a log shape and let it cool completely. This sets the shape and prevents it from breaking when you add the filling later.
Rolling it while warm may seem scary, but it’s essential for flexibility. Just be gentle and confident—you’ve got this.
Step 3: Making the Filling
While your cake cools, it’s time to whip up that dreamy filling. In a chilled bowl, combine heavy cream, powdered sugar, and vanilla extract. Beat until stiff peaks form—this means the whipped cream holds its shape and doesn’t fall over when you lift the beaters.
For a chocolate twist, add cocoa powder before whipping. Want something more adventurous? Mix in espresso powder, crushed peppermint, or even a touch of hazelnut spread.
Once the cake has cooled completely, unroll it carefully. Spread an even layer of your filling across the entire surface, leaving about a half-inch border around the edges. This prevents overflow when you roll it back up.
Then, roll the cake tightly but gently, peeling it away from the towel as you go. Wrap it in plastic wrap and chill it for at least an hour—this helps it firm up and hold its shape for decorating.
Step 4: Rolling the Cake Without Breaking It
Rolling the sponge cake is arguably the trickiest part of the entire process, but with the right technique, it’s totally doable. The key? Roll it while it’s still warm and pliable. If you wait too long, it’ll stiffen and crack. Use your towel to guide the roll and keep the motion steady and even.
Don’t worry if there are a few minor cracks—once you frost it, they’ll be your little secret. And remember, rustic is beautiful when it comes to Yule logs!
After chilling, unwrap your cake. If you want to make it extra festive, slice off one end at a diagonal and place it on the side to resemble a branch. This gives your log a more authentic woodland look and adds visual interest.
Step 5: Making and Applying the Ganache
Now, for the pièce de résistance: that luscious chocolate ganache. Place your chopped chocolate in a heatproof bowl. Heat the cream in a saucepan just until it starts to simmer, then pour it over the chocolate. Let it sit for a minute, then stir until smooth and glossy.
Let the ganache cool for 10–15 minutes before spreading. It should be thick enough to coat the cake without dripping too much.
Use an offset spatula to frost the cake evenly. To create the bark texture, drag a fork or knife across the surface in long lines. Swirl the ganache around the “branch” to mimic growth rings.
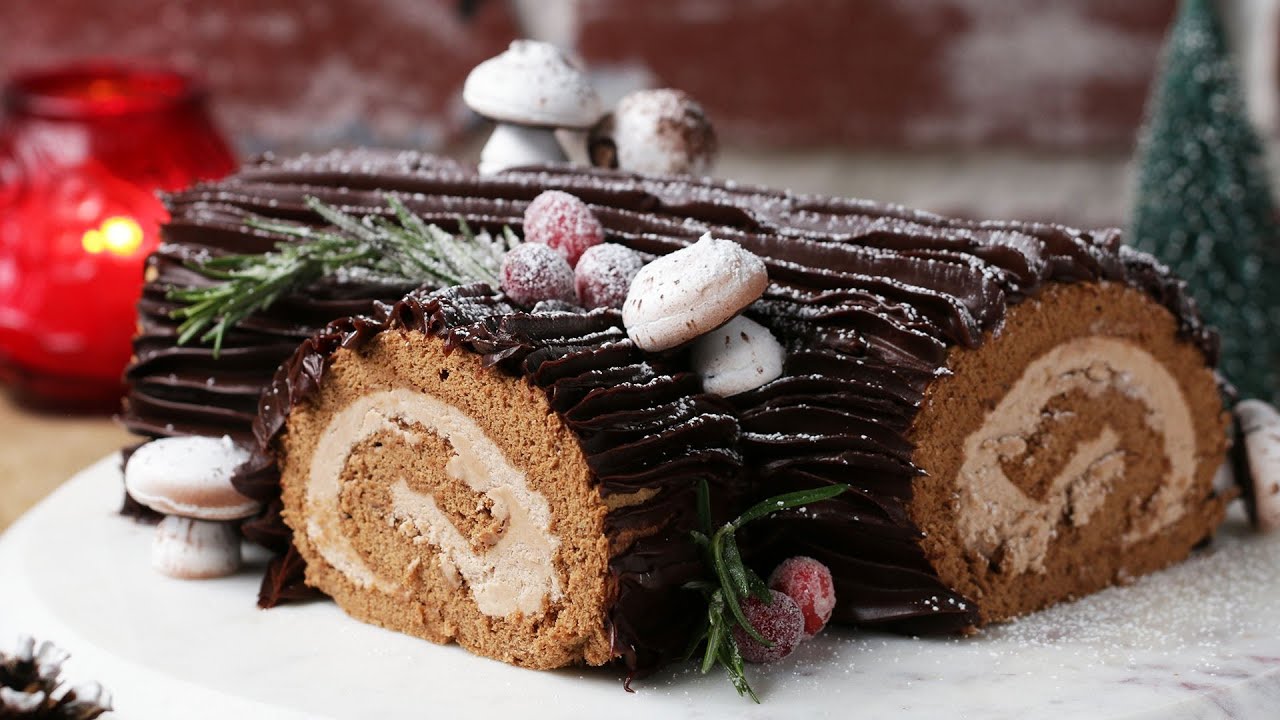
Want to go next level? Dust with powdered sugar for snow, add chocolate shavings, or place a few meringue mushrooms and sugared cranberries for decoration. Your cake will look like it came straight out of a winter forest.
Decoration and Presentation Tips
Creating the Log Texture
Decorating your Bûche de Noël is where you truly bring the woodland fantasy to life. Once the ganache is smoothed over the log, it’s time to create that rustic bark texture. Don’t overthink it—just grab a fork or butter knife and start dragging it gently along the length of the cake. Vary your strokes a bit to make it look natural, like real bark on a tree.
If you’ve added a “branch” section from the trimmed ends, swirl your utensil around the circular part to mimic tree rings. This small touch makes a big impact, making the cake look more realistic and visually appealing.
You can also use a piping bag with a small round or star tip to add decorative swirls, leaves, or vines to enhance the visual appeal. Just keep in mind that less is often more. The log should resemble something earthy and charming, not overly busy.
For a final flourish, dust the top lightly with powdered sugar to mimic freshly fallen snow. It’s an effortless detail that elevates the whole presentation.
Adding Edible Decorations and Flair
Now for the fun part—edible decorations! Classic Bûche de Noël cakes often feature charming little add-ons that make them almost too pretty to eat.
Here are a few ideas to try:
- Meringue Mushrooms: These sweet little creations are a traditional touch. Make them by piping stiff meringue into mushroom shapes, baking until dry, and attaching the tops and stems with melted chocolate.
- Sugared Cranberries: Toss fresh cranberries in simple syrup, roll them in granulated sugar, and let them dry for a glittery, festive pop of color.
- Fresh Herbs: Small sprigs of rosemary or thyme resemble pine branches and add a forest-like element to your cake.
- Chocolate Leaves: Paint melted chocolate onto real, clean, non-toxic leaves. Once hardened, peel off the leaf for a beautiful and edible garnish.
- Edible Gold Dust or Pearls: For an elegant upgrade, lightly brush gold dust over the bark or dot your log with gold pearls for sparkle.
These decorations not only add beauty but bring texture and contrast to the cake. Plus, they make your log look like a dessert from a high-end patisserie.
Serving and Storage Suggestions
Best Ways to Serve Bûche de Noël
Once your Bûche de Noël is decorated to perfection, it’s time to bring it to the table. Let the cake sit at room temperature for about 30 minutes before serving to ensure the ganache softens slightly for easier slicing. Use a serrated knife and a gentle sawing motion to cut clean slices without crushing the sponge.
You can serve it as is, or with a dollop of whipped cream, a drizzle of chocolate sauce, or even a scoop of vanilla ice cream. Add a hot cup of coffee or a festive glass of mulled wine, and you’ve got yourself a decadent dessert experience.
If you’re presenting this at a party or dinner, consider placing it on a wooden board or a rustic cake stand, surrounded by sprigs of pine, cranberries, or mini lights to complete the aesthetic. It’s more than just dessert—it’s a centerpiece!
This dessert is rich, so slice it thinly to get more servings. A standard-sized Bûche can easily serve 8 to 10 people, depending on how generous you are with the portions.
Storing Leftovers
If you’re lucky enough to have leftovers, proper storage is key to keeping your Bûche de Noël delicious. Wrap the cake tightly in plastic wrap or place it in an airtight container. Store it in the refrigerator for up to 4 days.
To maintain its moisture, you might want to cover the ends with extra ganache or cling film before wrapping. This prevents the sponge from drying out.
When you’re ready to enjoy another slice, let it sit out for 15–20 minutes before serving. The flavors are best when not ice cold, and the ganache will soften beautifully.
You can also freeze slices individually by wrapping them in plastic wrap and foil, then placing them in a freezer-safe container. Just thaw in the fridge overnight and enjoy within a month for best results.
FAQs about Bûche de Noël Recipe
1. Can I make a Bûche de Noël in advance?
Yes! You can prepare it a day or two ahead and store it in the fridge. Just be sure to let it come to room temperature before serving for the best flavor and texture.
2. What’s the best filling for a Yule Log cake?
Traditional options include whipped cream or buttercream. Chocolate, coffee, and hazelnut are especially popular. You can also use fruit jams or flavored mascarpone for a twist.
3. My sponge cake cracked while rolling—what do I do?
Don’t worry! Small cracks can be covered up with ganache or decorations. Rolling the cake while it’s still warm and pliable helps prevent cracking.
4. Can I use a boxed cake mix instead?
You can, but a homemade sponge gives better texture and flexibility for rolling. If using a mix, be sure to spread it thin and bake it evenly.
5. How do I make the cake gluten-free?
Substitute the flour with a gluten-free blend that includes xanthan gum or add 1/2 teaspoon of it separately. Also, ensure all other ingredients are gluten-free.
Conclusion
Making a Bûche de Noël from scratch might seem intimidating at first, but it’s actually a rewarding process that blends baking with artistry. From crafting the airy sponge to decorating it like a magical forest log, every step is a celebration of the holiday spirit.
This iconic French dessert is more than just a sweet treat—it’s a tribute to tradition, creativity, and the joy of sharing good food with loved ones. Whether you stick with the classic recipe or put your own spin on the flavors and decorations, the result is always impressive and incredibly tasty.
So roll up your sleeves, gather your ingredients, and give this timeless Christmas cake a go. You’ll be amazed at how much joy it brings to your holiday table—and maybe even start a new family tradition.


