Brown Butter Recipe: Brown butter is like a secret ingredient that can take your cooking and baking to the next level. It might sound fancy, but it’s really just regular butter that’s been gently cooked until it reaches a golden brown color and takes on a rich, nutty aroma. The transformation is surprisingly simple but delivers a deep flavor that adds warmth and complexity to everything from chocolate chip cookies to savory pasta dishes.
Why do people love brown butter so much? Because it delivers a toasted, caramel-like taste that’s almost impossible to achieve with any other ingredient. Whether you’re a baker looking to level up your cookie game or a home cook wanting to add more depth to your sauces or roasted veggies, brown butter can be your go-to flavor booster.
In this guide, you’ll learn how to make brown butter step by step, with detailed tips, visuals to look out for, and pro tricks to ensure it comes out perfect every single time. Let’s dive in!
What Makes Brown Butter Special?
Brown butter—also known as beurre noisette in French—is more than just melted butter. As you cook it, the milk solids in the butter begin to toast and turn brown. That’s where the flavor magic happens.
The process brings out:
- Toasty notes that resemble nuts or caramel
- Aromas that are rich and slightly sweet
- A silky texture that blends smoothly into batters, doughs, or sauces
What sets brown butter apart from regular butter is this transformation. Regular melted butter is fine—it adds fat and flavor—but brown butter? It adds complexity.
Think of it as butter 2.0. It’s more intense, more interesting, and a little bit addictive.
Ingredients You’ll Need
Let’s keep it simple—because that’s the beauty of brown butter. You only need one main ingredient:
Just One Ingredient:
- Butter (preferably unsalted)
That’s it. Just butter. But the type of butter you choose matters. Here’s what to consider:
1. Unsalted vs Salted Butter
- Unsalted butter gives you full control over the flavor, which is especially important in baking.
- Salted butter can work, but the salt can intensify as it browns, making it less predictable.
2. Quality Matters
Choose high-fat European-style butter if you can. Brands like Kerrygold, Plugrá, or Président have a higher butterfat content (82-85%), which results in more flavor and fewer impurities to burn.
3. Quantity
- 1 stick (½ cup or 113g) of butter yields a little less than that in brown butter (around 6-7 tablespoons), because of the water evaporation.
So grab your favorite high-quality butter and let’s get cooking.
Tools You’ll Need
You don’t need fancy gadgets, but the right tools will help make the process smooth and foolproof.
Essential Tools
- Light-colored saucepan or skillet: Helps you see the butter change color more clearly.
- Heat-resistant silicone spatula or wooden spoon: For stirring continuously and scraping the bottom.
- Heatproof bowl: To transfer the brown butter as soon as it’s ready.
- Fine-mesh strainer or cheesecloth (optional): To remove milk solids if you want a clear, smooth butter.
Optional Tools
- Thermometer (for precision): Brown butter is ready at around 250°F (121°C).
- Measuring spoons or cups: For portioning, especially if you’re using the brown butter in baking later.
Make sure your tools are clean and dry. Water and hot fat do not mix well—it can cause splattering.
Before You Start: Important Tips
Before you even turn on the heat, here are some pro tips that’ll help you nail brown butter on the first try:
1. Don’t Rush the Process
Browning butter isn’t something to multitask with. It happens fast, especially at the end, so stay focused.
2. Use Medium Heat
Too high, and the milk solids will burn before they can toast. Start with medium or medium-low heat, and adjust if needed.
3. Stir Frequently
This keeps the milk solids moving and prevents them from sticking and burning at the bottom of the pan.
4. Know What to Look For
You’re watching for a change in color, smell, and sound. The butter will go from yellow to golden to amber—and the aroma? Nutty, warm, and irresistible.
Step-by-Step Guide to Making Brown Butter
Let’s break it down. This is where the magic happens.
Step 1: Cut the Butter Into Pieces
Start with cutting your butter into tablespoon-sized chunks. This helps it melt evenly and brown more consistently. Toss them all into your light-colored pan.
Step 2: Use the Right Pan
A light-bottomed skillet or saucepan is your best friend here. You want to see the color change. Non-stick or cast iron pans can hide what’s happening underneath, which makes it easier to overcook.
Step 3: Melt the Butter Slowly
Place the butter over medium heat and let it melt slowly. Stir occasionally. At this stage, it will foam and bubble as the water in the butter evaporates.
Step 4: Wait and Watch for Browning
As the butter continues to cook, you’ll see golden specks form at the bottom. These are the milk solids toasting.
- The color will shift from yellow → golden → amber.
- Stir frequently and watch closely—it happens quickly!
Step 5: Smell the Aroma
You’ll notice the smell turning nutty, almost like toasted hazelnuts. That’s your cue that brown butter is nearly ready.
Step 6: Remove from Heat at the Right Time
Once the butter reaches a deep golden-brown color and smells nutty, immediately remove it from the heat. The residual heat in the pan will keep it cooking a little longer, so act fast.
Step 7: Strain and Store
If you want a clear brown butter, pour it through a fine-mesh strainer or cheesecloth into a heatproof bowl or jar. Or keep the brown specks—they add flavor and texture.
Let it cool completely before using in baking recipes.
Visual and Sensory Cues
Making brown butter is just as much about paying attention to your eyes, nose, and ears as it is about following steps. This isn’t the kind of recipe where you can set a timer and walk away. The more you understand what to look for and smell, the better your results will be.
Color Change
- At first, your butter will be pale yellow as it melts.
- Then it becomes golden, with white foam bubbling on top.
- Finally, the milk solids begin to turn amber brown, and you’ll see specks at the bottom of the pan.
This is the critical moment! When those brown bits appear and the butter is golden brown (not too dark), you’re ready to pull it off the heat.
Aroma
One of the best parts of making brown butter is the smell. When it’s ready:
- It smells warm and nutty.
- Almost like toasted hazelnuts or caramel.
- If it starts to smell bitter or burnt, it’s gone too far.
Sound
As the water evaporates, you’ll hear a sizzle and pop. This will quiet down toward the end of the browning process. When the popping stops, you’re usually close to done.
Trust your senses. You’ll know when it’s right, especially after you’ve done it once or twice.
Common Mistakes to Avoid
Let’s be real: brown butter is simple, but it’s also easy to mess up if you’re not careful. Here are the most common mistakes people make—and how you can avoid them.
1. Walking Away from the Pan
Brown butter can go from golden and perfect to burnt and bitter in seconds. Stay by the stove and give it your full attention. Multitasking is your enemy here.
2. Using Too High Heat
Cranking up the heat to make it go faster might seem like a shortcut, but it just leads to scorched solids and ruined flavor. Stick with medium or medium-low heat.
3. Not Stirring Enough
You want those milk solids to toast, not burn. Stirring keeps them moving and distributes heat evenly.
4. Using the Wrong Pan
A dark pan hides the color of the butter, making it hard to know when it’s done. Always go with a light-colored or stainless steel pan for best results.
5. Not Removing from Heat in Time
Even after you turn off the heat, the butter keeps cooking. So if you wait too long to move it off the stove or into another container, you might still end up burning it.
How to Store Brown Butter
Once you’ve made a batch of brown butter, you’ll want to keep it fresh and ready for your next culinary adventure.
Short-Term Storage
- In the fridge: Pour it into a glass jar or airtight container and refrigerate. It’ll solidify, just like regular butter.
- It stays good for up to 2 weeks in the fridge.
Room Temperature
- You can leave brown butter out at room temp for 1–2 days in a sealed container, especially if your kitchen is cool.
- However, because it contains milk solids, it’s safer in the fridge.
Freezing Brown Butter
- You can freeze brown butter for up to 3 months.
- Use an ice cube tray to portion it out into tablespoons. Once frozen, store the cubes in a zip-top freezer bag.
Reheating Tips
- If it’s solid, just warm it gently in a saucepan or microwave for a few seconds.
- Stir well before using to reincorporate the brown bits at the bottom.
How Long Does Brown Butter Last?
Brown butter lasts a long time—longer than regular butter, in some cases—because the water content is reduced during cooking. But its shelf life depends on how you store it.
| Storage Method | Shelf Life |
|---|---|
| Room Temperature | 1–2 days |
| Refrigerator | 2–3 weeks |
| Freezer | Up to 3 months |
Signs It’s Gone Bad
- Sour smell
- Mold or discoloration
- Bitter taste
If anything seems off, don’t risk it—make a fresh batch. It only takes 10 minutes!
Creative Ways to Use Brown Butter
So, you’ve made your brown butter. Now what? Here’s where the fun begins. Brown butter adds depth and complexity to both sweet and savory dishes.
Sweet Uses
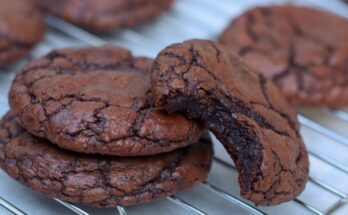
- Cookies: Try it in your favorite chocolate chip cookie recipe for a deep, nutty twist.
- Brownies: Adds richness and a toffee-like taste.
- Cake & Muffins: Substitute regular butter with brown butter for a more complex flavor.
- Frostings & Glazes: Brown butter glaze on cinnamon rolls is next-level.
Savory Uses
- Pasta: Toss with cooked pasta, herbs, and parmesan.
- Roasted Veggies: Drizzle over carrots, Brussels sprouts, or sweet potatoes.
- Fish or Chicken: Spoon over pan-seared fish or grilled chicken.
- Mashed Potatoes: Stir it in for nutty, buttery goodness.
It’s hard to go wrong. Use brown butter anywhere you’d normally use melted butter, and prepare to be impressed.
Brown Butter in Baking Recipes
Brown butter can truly transform baked goods. When you brown butter, you reduce moisture and concentrate flavor, which changes how your baked goods turn out.
Effects in Baking
- Richer flavor: Nutty, caramel-like taste
- Chewier texture: Especially in cookies
- Golden color: Slightly darker bakes
How to Use in Baking
- After browning, cool it completely before using in dough or batter.
- If your recipe calls for creamed butter and sugar, brown butter may not work unless cooled to a solid state.
Recipes That Love Brown Butter
- Chocolate chip cookies
- Banana bread
- Pumpkin muffins
- Pound cake
- Snickerdoodles
- Brown butter frosting
Try it once in your favorite recipe—you’ll never go back to regular butter.
Flavor Variations & Add-ins
Want to level up your brown butter game? Try infusing it with herbs, spices, or even nuts during the browning process.
Savory Variations
- Sage or Rosemary: Add fresh leaves during the last minute of browning. Perfect for pasta or veggies.
- Garlic: Thin slices of garlic infuse the butter with bold flavor.
Sweet Add-ins
- Vanilla Bean: Add seeds or a small splash of vanilla after browning.
- Cinnamon or Nutmeg: Stir in a pinch for a warm, cozy vibe.
Nutty Infusions
- Add chopped nuts like pecans, walnuts, or hazelnuts to toast with the butter.
Just be sure to strain out anything that might burn if you plan to store the butter.
Gluten-Free or Dairy-Free Options
If you’re gluten-free, good news: brown butter is naturally gluten-free. Just make sure your tools and containers are also free from cross-contamination.
Dairy-Free or Vegan Brown Butter?
It’s tricky. Traditional butter contains milk solids, which are essential for browning. Most vegan butters don’t have the same makeup.
That said:
- Some plant-based butters (like Miyoko’s or Earth Balance sticks) can brown slightly, but it’s not quite the same.
- Ghee (clarified butter) is also not the same—it has the solids removed, so it won’t brown.
In short, brown butter is best made with real dairy butter, but you can experiment if you’re dairy-free.
Final Thoughts: Mastering Brown Butter
Brown butter might seem like a small thing, but it packs a huge punch. With just one ingredient and a little time, you can create a flavor booster that transforms basic recipes into gourmet-level dishes.
Remember:
- Use quality butter.
- Watch your heat.
- Stir constantly.
- Trust your senses.
Once you’ve made brown butter once or twice, it becomes second nature. You might even start making a big batch weekly to keep on hand. And trust me—it’ll never go to waste.
FAQs about Brown Butter Recipe
1. Can I use salted butter for brown butter?
Yes, but it’s not ideal. Salted butter can make it harder to control the final flavor, and the salt may intensify as it cooks.
2. Why did my brown butter turn black?
It likely overcooked. Turn off the heat sooner next time—those final seconds matter.
3. Can I store brown butter in the fridge?
Absolutely! It’ll last up to 2–3 weeks in an airtight container. Let it soften at room temp before using.
4. How do I fix burned brown butter?
Unfortunately, you can’t. If it smells bitter or acrid, toss it and start fresh. Always use medium heat and don’t walk away.
5. What are brown butter solids?
Those little brown specks at the bottom of the pan are toasted milk solids. They carry most of the nutty flavor and are completely edible.
Conclusion
Brown butter is pure culinary gold. With nothing more than a stick of butter and some patience, you unlock a world of flavor. It’s the kind of trick that makes you look like a pro in the kitchen—without needing any fancy skills or equipment.
Whether you swirl it into cookie dough, drizzle it over pasta, or sneak it into your favorite cake recipe, brown butter will never disappoint. So go ahead—grab that pan, melt that butter, and discover what you’ve been missing.