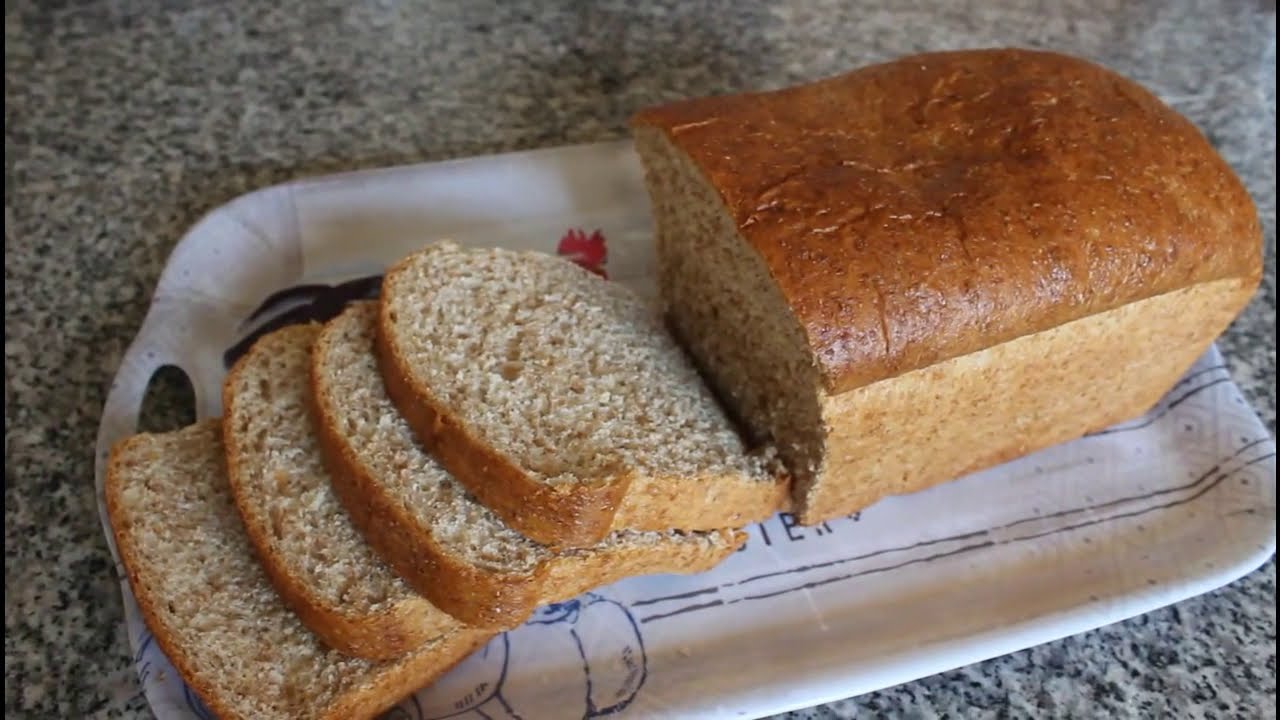
Brown Bread Recipe: Brown bread has been a staple in kitchens across the world for centuries. Unlike white bread, which is made with refined flour, brown bread is crafted with whole wheat flour, giving it a richer texture, deeper flavor, and significantly higher nutritional value. It’s the type of bread that doesn’t just fill your stomach but nourishes your body. The slightly nutty taste, hearty bite, and rustic look make it a perfect choice for both everyday meals and special occasions.
When you bake your own brown bread at home, you not only enjoy fresh, preservative-free bread but also experience the joy of creating something wholesome with your own hands. Store-bought versions often contain added sugars and chemicals to increase shelf life, but homemade brown bread is pure, healthy, and delicious.
What Makes Brown Bread Special
The magic of brown bread lies in its simplicity and nutritional power. It uses whole wheat flour, which retains the bran and germ of the grain—unlike refined flour used in white bread. This makes it richer in fiber, vitamins, and minerals. That’s why brown bread is often recommended for people trying to eat healthier or manage their weight.
Health Benefits of Brown Bread
- Rich in fiber – Aids digestion and keeps you full for longer.
- Packed with nutrients – Contains B vitamins, iron, and magnesium.
- Better for blood sugar control – Whole grains help avoid sudden sugar spikes.
- Weight-friendly – Helps curb cravings due to its high satiety value.
- Supports heart health – Whole grains are linked with a lower risk of heart disease.
By now, you must be tempted to bake your own loaf. Don’t worry—it’s simpler than it looks!
Ingredients You’ll Need
Baking brown bread is all about balance. The ingredients are simple, but each plays a crucial role in giving the bread its structure, flavor, and texture.
Essential Ingredients
- Whole wheat flour (3 cups) – The star of the recipe, packed with fiber.
- Warm water (1 ¼ cups) – Helps activate the yeast and bring the dough together.
- Active dry yeast (2 tsp) – Makes the bread rise and gives it softness.
- Honey or sugar (2 tbsp) – Feeds the yeast and adds a touch of sweetness.
- Salt (1 ½ tsp) – Enhances flavor and balances sweetness.
- Olive oil or butter (2 tbsp) – Adds richness and keeps the bread moist.
Optional Add-ons for Extra Flavor
- Flax seeds, sesame seeds, or sunflower seeds – For crunch and added nutrition.
- Rolled oats – Sprinkled on top for a rustic look.
- Milk instead of water – For a softer crumb and richer taste.
- Molasses – For deeper color and earthy sweetness.
These simple ingredients transform into a golden-brown loaf that smells heavenly and tastes even better.
Kitchen Tools and Equipment
Before jumping into the recipe, let’s make sure you have everything ready in your kitchen.
Basic Tools
- Large mixing bowl
- Wooden spoon or spatula
- Measuring cups and spoons
- Clean kitchen towel or plastic wrap
- Baking tray or loaf pan
- Oven
Optional Tools for Perfection
- Stand mixer with a dough hook – Saves time during kneading.
- Digital kitchen scale – For more accurate measurements.
- Bread knife – For cutting neat slices without squashing the loaf.
- Thermometer – To check if the bread is baked (190°F internal temp is ideal).
With these tools, you’ll make your baking process smoother and more enjoyable.
Step-by-Step Guide to Making Brown Bread
Now comes the fun part—baking your brown bread from scratch! Follow these steps carefully, and you’ll end up with a loaf that’s soft on the inside and beautifully crusty on the outside.
Step 1 – Preparing the Ingredients
Start by gathering all your ingredients and measuring them accurately. Warm water should be lukewarm, not hot, as too much heat can kill the yeast. Place your flour, yeast, salt, and honey (or sugar) within reach so you can mix them easily.
A little tip: sift the flour before using it. This helps in aerating it, making the dough lighter and easier to knead.
Step 2 – Mixing the Dough
Once your ingredients are ready, it’s time to bring them together. In a large mixing bowl, add warm water and yeast. Let it sit for about 5–10 minutes until it becomes frothy. This step is crucial because it shows the yeast is active and ready to work its magic. If your yeast doesn’t bubble, it may be expired or the water was too hot or too cold. Always test this step carefully—it can make or break your bread.
Next, stir in honey or sugar until dissolved, followed by salt and oil. Slowly add the flour, one cup at a time, mixing well after each addition. At first, the dough will be sticky, but don’t worry—that’s completely normal. As you add more flour, the mixture will turn into a rough dough ball that starts to pull away from the sides of the bowl.
If you’re using a stand mixer with a dough hook, let it run on low speed for about 5 minutes until everything combines smoothly. Otherwise, use a sturdy spoon or your hands to bring the dough together. The key here is not to rush—allow the ingredients to blend well, forming the foundation of your bread.
Step 3 – Kneading the Dough
Kneading is where the transformation happens. It’s the step that develops gluten, the protein responsible for giving bread its structure, chewiness, and elasticity. Without proper kneading, your bread will turn out dense instead of soft and fluffy.
Lightly flour your countertop and place the dough on it. Using the heel of your hands, push the dough away, fold it back, then give it a quarter turn. Repeat this rhythmic motion for about 8–10 minutes. You’ll notice the dough becoming smoother, more elastic, and less sticky as you continue.
A good way to check if you’ve kneaded enough is the “windowpane test.” Take a small piece of dough and gently stretch it out. If it forms a thin, translucent sheet without tearing, your dough is ready for the next step. If it breaks easily, knead for another few minutes.
Not only is kneading essential for texture, but it’s also therapeutic. Many bakers find it calming, almost like meditation. By the end of this step, you’ll have dough that feels soft, springy, and full of life—ready to rise into beautiful bread.
Step 4 – First Rise (Proofing the Dough)
Now comes the waiting game, but trust me—it’s worth it. Place your kneaded dough in a lightly greased bowl and cover it with a damp cloth or plastic wrap. Set it aside in a warm, draft-free spot for 1–2 hours, or until it doubles in size.
This process is called proofing. The yeast ferments the sugars in the flour, producing carbon dioxide and alcohol. The gas gets trapped in the gluten structure, causing the dough to expand. That’s why proofing is vital—it gives bread its airy texture and rich flavor.
A pro tip: If your kitchen is cold, preheat your oven for a minute, turn it off, and place the dough inside with the oven light on. The gentle warmth creates the perfect environment for rising.
After the dough has doubled, gently press it with your fingertip. If the indentation remains, your dough is ready for shaping. If it springs back immediately, let it rise for another 20–30 minutes.
Step 5 – Shaping the Dough
Once your dough has risen beautifully, it’s time to shape it into the loaf that will go into the oven. Punch down the dough gently to release excess air, then transfer it to a lightly floured surface.
Flatten it slightly into a rectangle, then roll it tightly from one side to the other, pinching the seam closed. This helps create surface tension, which gives your loaf structure and ensures it rises evenly during baking.
If you’re using a loaf pan, grease it lightly with oil or line it with parchment paper before placing the dough inside. For a rustic, free-form loaf, simply shape it into a round or oval and place it on a baking tray.
Sprinkle some oats or seeds on top if you want extra crunch and a bakery-style finish. Cover the shaped dough loosely with a cloth and let it rest for the second rise. This short resting period helps the dough relax and achieve the final shape before baking.
Step 6 – Second Rise
The second rise, also known as the final proof, is the last chance for your dough to expand before baking. This step is shorter than the first rise but equally important because it determines the final shape and texture of your bread.
Once your dough is shaped and placed in the loaf pan (or on a baking sheet for a rustic loaf), cover it loosely with a kitchen towel. Let it rise for about 30–45 minutes, or until it has puffed up nicely. The dough should rise just above the edges of the pan, giving you that classic domed bread shape.
Here’s a trick to know if your dough is proofed enough: gently poke it with your finger. If the indentation springs back slowly and partially, it’s ready to bake. If it bounces back quickly, it needs a bit more time. But if the indentation doesn’t spring back at all, it may have over-proofed—don’t worry, it will still taste good, but it might not rise as high in the oven.
This stage is like the final stretch before the finish line. The yeast is at its peak activity, and the dough is light, airy, and filled with little gas pockets waiting to expand in the oven.
Step 7 – Baking the Bread
Now comes the most exciting part—baking your brown bread! Preheat your oven to 375°F (190°C) about 15 minutes before the dough finishes rising. A hot oven is crucial for giving your bread that beautiful oven spring—the final burst of rising that happens in the first 10 minutes of baking.
Place your loaf in the center of the oven and bake for 30–35 minutes. The aroma that fills your kitchen during this time is nothing short of heavenly. You’ll know the bread is done when the top is a deep golden-brown and the loaf sounds hollow when tapped on the bottom.
For extra precision, use a kitchen thermometer: the internal temperature should be around 190°F (88°C). This ensures the bread is fully cooked without being dry.
If you want a softer crust, brush the top with melted butter right after baking. For a crunchier crust, leave it as it is and let it cool uncovered.
Watching your bread rise and brown in the oven is pure joy—it’s the moment where all your effort pays off.
Step 8 – Cooling and Serving
It might be tempting to slice into your bread the moment it comes out of the oven, but patience is key here. Freshly baked bread continues to cook internally for a few minutes after it’s removed from the oven. Cutting it too soon will release steam, making the crumb gummy and sticky.
Place the loaf on a wire rack and let it cool for at least 30 minutes before slicing. This helps the bread set properly and makes cutting much easier. Once cooled, use a sharp bread knife to slice even pieces.
Now it’s time to enjoy the fruits of your labor! Brown bread pairs beautifully with butter, jam, peanut butter, or even savory toppings like cheese and avocado. The earthy, nutty flavor of whole wheat flour shines through in every bite, making it perfect for breakfast, sandwiches, or alongside soups and stews.
The satisfaction of tearing into your own homemade bread is unmatched. Not only have you created something wholesome, but you’ve also filled your kitchen with warmth, love, and the irresistible smell of fresh-baked bread.
Tips for Perfect Brown Bread
Even though the recipe is simple, a few tips and tricks can take your brown bread from good to absolutely amazing.
Common Mistakes to Avoid
- Using water that’s too hot – This can kill your yeast, preventing the dough from rising. Always use lukewarm water.
- Not kneading enough – Under-kneaded dough results in dense, heavy bread. Knead until it passes the windowpane test.
- Skipping the second rise – This step is vital for texture and shape. Don’t rush it.
- Cutting too early – Give the bread enough time to cool before slicing.
- Adding too much flour – Sticky dough is normal. Adding excess flour can make bread dry and tough.
How to Make Bread Softer and Fluffier
- Use a bit of milk instead of water for a richer, softer crumb.
- Add a tablespoon of olive oil or butter for extra tenderness.
- Try incorporating a spoonful of yogurt or milk powder to increase softness.
- Don’t over-bake. Keep an eye on your bread in the last few minutes.
By following these simple adjustments, you can make your brown bread bakery-quality every single time.
Variations of Brown Bread
While the classic brown bread recipe is wholesome and delicious, experimenting with flavors and textures can take your homemade bread to the next level. Here are some popular variations you can try.
Honey Brown Bread
Honey brown bread is slightly sweeter and softer than the basic version. Simply replace sugar with honey in your recipe. Honey not only adds a natural sweetness but also helps retain moisture, giving your loaf a tender crumb. This bread is perfect for breakfast toast or to serve with butter and tea.
Seeded Brown Bread
For added crunch and nutrition, mix seeds like flax, sesame, sunflower, or chia into your dough. You can also sprinkle seeds on top before baking for a rustic finish. Seeds enhance the fiber, protein, and healthy fat content of your bread, making it even more nourishing.
Multigrain Brown Bread
Why stop at whole wheat when you can add a mix of grains? Try combining oats, millet, rye, or barley flour with your wheat flour. Multigrain brown bread has a richer texture, nutty flavor, and is packed with nutrients. It’s especially great for sandwiches and hearty meals.
Experimenting with these variations allows you to personalize your bread, making it a unique creation every time you bake.
Nutritional Value of Brown Bread
One of the biggest reasons people choose brown bread over white bread is its superior nutrition profile.
Calories and Macros Breakdown (Per Slice, Approx.)
- Calories: 80–100
- Carbohydrates: 18–20g
- Protein: 3–4g
- Fiber: 2–3g
- Fat: 1–2g
This makes brown bread an excellent choice for those seeking a balanced diet. The higher fiber content helps with digestion and keeps you fuller for longer, making it ideal for weight management.
Why It’s Healthier Than White Bread
Unlike white bread, which is made with refined flour, brown bread retains the bran and germ of the wheat grain. This means it contains more fiber, vitamins (like B-complex), and minerals (like magnesium and iron). Whole grains are also linked to lower risks of heart disease, diabetes, and obesity.
So, when you choose brown bread, you’re not just enjoying better flavor—you’re investing in better health.
Serving Suggestions
Brown bread is incredibly versatile. Here are some delicious ways to enjoy it:
Best Pairings with Brown Bread
- Spread with butter and jam for a classic breakfast.
- Serve with soups and stews for a comforting meal.
- Use it for sandwiches—it pairs well with cheese, veggies, and meats.
- Toast and top with avocado, eggs, or peanut butter for a healthy snack.
Creative Ways to Enjoy It
- French toast: Dip slices in egg and milk mixture, then pan-fry.
- Garlic bread: Brush slices with garlic butter and bake until golden.
- Bread crumbs: Toast and grind leftover slices for homemade bread crumbs.
- Bread pudding: Turn stale bread into a rich, custardy dessert.
Brown bread isn’t just for plain eating—it can transform into exciting dishes with a little creativity.
Storing Brown Bread
Homemade bread doesn’t contain preservatives, so proper storage is important.
Short-Term Storage
- Keep your loaf in an airtight container or bread box at room temperature.
- It will stay fresh for about 2–3 days.
- Avoid refrigerating, as it dries out bread faster.
Long-Term Storage (Freezing Method)
- Slice the bread before freezing for convenience.
- Wrap tightly in plastic wrap, then store in a freezer bag.
- It will stay fresh for up to 3 months.
- To reheat, thaw at room temperature or toast directly from frozen.
By storing properly, you can enjoy your homemade brown bread for days or even weeks without losing flavor or texture.
FAQs about Brown Bread Recipe
1. Can I make brown bread without yeast?
Yes, you can substitute yeast with baking soda and yogurt for a quick bread version. However, it won’t have the same texture as yeast-risen bread.
2. How long does homemade brown bread stay fresh?
At room temperature, it stays fresh for 2–3 days. For longer storage, freeze it for up to 3 months.
3. Can I use gluten-free flour?
Yes, but the texture will be different since gluten gives bread its structure. You may need a gluten-free bread recipe for best results.
4. How do I know when the bread is baked properly?
Tap the bottom of the loaf—it should sound hollow. You can also check with a thermometer; the internal temperature should be around 190°F (88°C).
5. Can I make brown bread in a bread machine?
Absolutely! Just add the ingredients in the order recommended by your machine and select the whole wheat bread setting.
Conclusion
Baking brown bread at home is more than just a recipe—it’s an experience. From kneading the dough to watching it rise in the oven, every step is rewarding. Not only do you get fresh, preservative-free bread, but you also create a healthier option for yourself and your family.
Whether you stick to the classic version or experiment with honey, seeds, or multigrain variations, each loaf tells its own story. And the best part? Every slice is filled with love, care, and nourishment.
So, roll up your sleeves, grab your flour, and start baking—you’ll never look at store-bought bread the same way again.