Brisket Smoker Recipe: There’s something magical about smoked brisket. It’s not just food; it’s a full-on culinary ritual, often starting the night before and ending with a table full of family, friends, and finger-licking satisfaction. Whether you’re new to backyard smoking or a seasoned pitmaster, getting brisket right can feel like chasing barbecue perfection. It’s one of the most rewarding meats to smoke—and one of the most unforgiving if you get it wrong. That’s why this guide isn’t just a recipe. It’s a full breakdown, step-by-step, from selecting your brisket to slicing it like a pro.
Why does brisket hold this iconic status in the world of BBQ? Simple—it’s the flavor, the texture, and the challenge. A smoked brisket is the ultimate test of patience and skill. When cooked low and slow with the right amount of smoke and spice, this tough cut of meat transforms into a juicy, melt-in-your-mouth masterpiece. And with the right guidance? You can pull it off right in your backyard.
What You’ll Need Before You Start
Smoker Type: Which One Should You Use?
Before we even touch the meat, let’s talk gear. Your smoker is your battlefield, and the right one can make or break your brisket. There are four main types of smokers used for brisket:
- Offset Smokers – The go-to for many traditionalists. These require fire management skills and deliver authentic smoky flavor.
- Pellet Smokers – A modern favorite. Easy to use, consistent temps, and wood-pellet flavor.
- Electric Smokers – Super beginner-friendly but offer less bark and smoke ring.
- Kamado Grills (e.g., Big Green Egg) – Excellent heat retention, but you’ll need to learn airflow control.
You can get great results with any of these—just know your smoker’s personality. Some run hot, some cold, some have hot spots. Learn its quirks before your brisket journey begins.
Essential Tools & Accessories
Besides your smoker, gather these tools:
- Meat thermometer (instant-read + probe for internal monitoring)
- Sharp slicing knife
- BBQ gloves (heat-resistant)
- Aluminum foil or butcher paper (for wrapping)
- Spray bottle (filled with water or apple juice)
- Charcoal or pellets
- Wood chunks or chips
- Large cutting board
- Cooler (for resting)
List of Ingredients You’ll Need
Brisket Selection: Flat, Point, or Whole Packer
You can’t smoke a killer brisket without picking the right cut. Here’s what you’re looking for:
- Whole Packer Brisket – Includes both the flat and the point. This is ideal for smoking and gives you more fat to work with.
- Flat Cut – Leaner, more uniform. Easier to slice, but dries out quickly.
- Point Cut – Fattier, more flavor, and perfect for burnt ends.
Choose a brisket that’s flexible when you pick it up. More bend = more marbling = juicier result.
The Rub: Spices That Make the Magic
Keep it simple. Let the beef shine. Classic Texas-style rub:
- Kosher salt
- Coarse black pepper
- Optional: garlic powder, onion powder, paprika, cayenne
Mix your rub in equal parts if using the basics. No sugar in the rub—it can burn during the long cook.
Optional Marinades or Injections
Not necessary, but if you want extra flavor:
- Marinade: Worcestershire sauce, soy sauce, garlic, and beef broth
- Injection: Beef broth, melted butter, garlic powder (injected with a meat syringe)
These help add internal moisture and flavor, especially with leaner briskets.
Wood Types for Smoking: What Works Best?
Hardwoods are key. These give you the best flavor:
- Oak – Balanced and consistent. Great for beginners.
- Hickory – Stronger flavor, popular in the South.
- Mesquite – Bold and smoky. Use sparingly to avoid bitterness.
- Pecan or Applewood – Sweeter and milder. Good for mixing.
Mix woods for a signature flavor. For example: oak + apple = smooth, slightly sweet smoke.
Step-by-Step Guide to Smoking a Brisket
Step 1: Choosing and Trimming the Brisket
Select a whole packer brisket (10–15 lbs) with good marbling. Trim excess fat, leaving about ¼ inch on top for moisture. Remove silver skin and any hard fat that won’t render.
Step 2: Applying the Rub
Coat the brisket evenly with mustard or oil to help the rub stick. Use a mix of salt, coarse pepper, paprika, garlic powder, and brown sugar. Press it in firmly—don’t rub it off.
Step 3: Letting the Brisket Rest Before Smoking
Let it sit at room temperature for 45–60 minutes so the rub adheres and the meat relaxes for even cooking.
Step 4: Prepping the Smoker
Preheat your smoker to 225°F (107°C). Use hardwoods like oak, hickory, or mesquite for authentic flavor. Maintain clean, thin blue smoke—not heavy white clouds.
Step 5: Placing the Brisket on the Smoker
Position the brisket fat-side up so the fat bastes the meat as it cooks. Insert a meat thermometer into the thickest part of the flat.
Step 6: Monitoring Temperature – Internal & Ambient
Keep smoker temperature steady around 225°F. Aim for an internal brisket temperature of 165°F before wrapping.
Step 7: The Stall – What It Is and How to Handle It
At around 150–165°F, the internal temp stalls for hours. Don’t panic—it’s moisture evaporating. Ride it out or wrap the brisket to speed it up.
Step 8: Wrapping the Brisket (Texas Crutch Method)
Wrap the brisket tightly in butcher paper or foil when it hits the stall. This traps steam, pushes past the stall, and keeps it juicy.
Step 9: Finishing the Cook – When Is It Done?
Cook until internal temperature reaches 195–203°F and a probe slides in with no resistance—like butter through warm bread.
Step 10: Resting the Brisket
Let it rest (still wrapped) in a cooler or warm oven for 1–2 hours. This step redistributes juices and deepens tenderness.
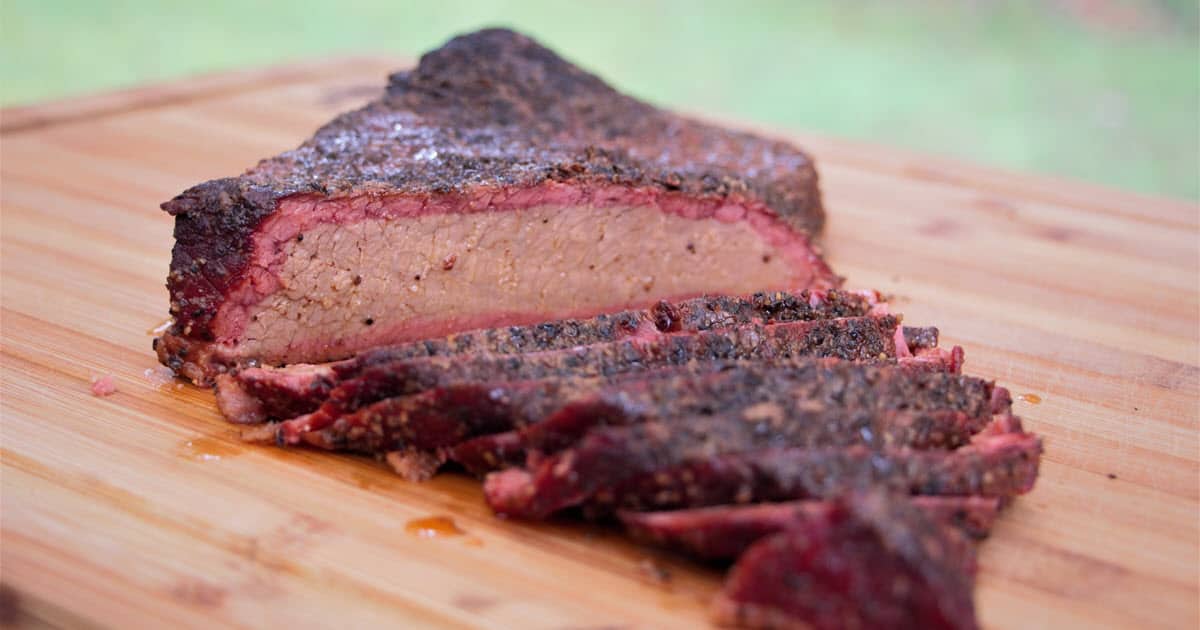
Step 11: Slicing the Brisket – With the Grain or Against?
Always slice against the grain for tenderness. Start from the flat end, cutting ¼-inch slices. When you hit the point (where grain changes direction), rotate and continue. Serve proudly—this is the mark of a true pitmaster.
Serving Suggestions
Brisket is the star, but the supporting cast matters.
Best Sides to Pair with Smoked Brisket
- Smoked mac and cheese
- Coleslaw
- Cornbread
- BBQ baked beans
- Pickles and white bread (Texas-style)
Mix creamy, tangy, and crunchy sides for contrast. You’ve got a fatty, rich main—balance is key.
Sauces: Yay or Nay?
Purists say no. Good brisket stands alone.
But hey—if you love sauce, go for it. Just serve it on the side.
Great options:
- Texas-style thin BBQ sauce (vinegar-based)
- Sweet molasses-style sauce (Kansas City style)
- Spicy mustard BBQ sauce
Make it your own. There are no rules when you’re the pitmaster.
Storing and Reheating Leftover Brisket
Let’s face it—if you smoked a full packer brisket, you’re probably going to have leftovers. But that’s actually a good thing. Reheated brisket can still be absolutely incredible if stored and warmed up the right way.
How to Store Brisket
- Cool it properly – Let the brisket rest after slicing and allow it to cool to room temperature (no more than 2 hours out).
- Use airtight containers – Store slices with a little bit of the juices or drippings to keep them moist.
- Vacuum seal for longer storage – If you’ve got the tools, vacuum sealing works wonders and extends shelf life.
- Freeze in portions – Slice it, separate into meal-size batches, and freeze. It’ll stay good for up to 2–3 months.
How to Reheat Brisket (Without Drying It Out)
This is where most people mess up—microwaving brisket dries it out and ruins the texture.
Instead, try one of these:
- Oven Method: Wrap brisket in foil with some beef broth or leftover juices. Heat at 275°F for 30–45 minutes until warm.
- Sous Vide: Heat sealed brisket in water bath at 165°F for 1–2 hours. Super gentle and retains moisture.
- Skillet Method: Reheat slices in a cast iron pan with a splash of broth and cover with a lid.
Always reheat low and slow. Your brisket deserves better than a nuking.
Common Mistakes to Avoid When Smoking Brisket
Even seasoned pitmasters trip up. Here are the mistakes you don’t want to make.
1. Choosing the Wrong Brisket
Buying a cheap, thin, or ungraded brisket is a recipe for disaster. Look for USDA Prime or Choice-grade brisket with visible marbling.
2. Skipping the Trim
Leaving on too much fat (especially hard fat) can block smoke flavor and cause uneven cooking.
3. Overcomplicating the Rub
Keep it simple. Salt and pepper go a long way. Overpowering rubs mask the flavor of the meat and smoke.
4. Inconsistent Temps
Fluctuating smoker temperatures mess with your cook time and bark. Use digital thermometers and stay on top of fire management.
5. Rushing the Cook
You can’t rush greatness. Smoking brisket takes time—usually 10–15 hours depending on size and temp. Don’t crank the heat to speed it up.
6. Slicing the Wrong Way
Slicing with the grain results in chewy, stringy meat. Always slice against the grain for tender bites.
7. Not Letting It Rest
Resting is key to juicy brisket. Cut too early, and all the juice ends up on your cutting board instead of in your meat.
FAQs about Brisket Smoker Recipe
1. Can I smoke a brisket overnight?
Absolutely. Many pitmasters start their briskets the night before to ensure they’re ready by lunchtime. Just make sure you’re monitoring temps with a digital probe thermometer and have your smoker dialed in for long, consistent heat. Some even use WiFi thermometers to track everything from their bed.
2. How long does it take to smoke a brisket per pound?
A good rule of thumb is 1 to 1.25 hours per pound at 225°F. So, a 12-pound brisket could take 12–15 hours. However, always cook to temperature and tenderness, not just time.
3. What’s the difference between brisket flat and point?
The flat is leaner and more uniform, making it ideal for slicing. The point is fattier, more flavorful, and often used for burnt ends. If you’re feeding a crowd, a whole packer brisket (which includes both) is your best bet.
4. Do I need to flip the brisket while smoking?
Not usually. If your smoker has even heat distribution, there’s no need to flip. In offset smokers with uneven heat, some pitmasters rotate or reposition the brisket halfway through to prevent one side from overcooking.
5. Why didn’t my brisket get a smoke ring?
Smoke rings are caused by a reaction between nitric oxide and the myoglobin in meat. If your brisket didn’t develop one, it could be due to:
- Lack of airflow
- Wood not producing enough nitric oxide
- Too much surface moisture or an overly wet rub
A smoke ring looks cool, but it doesn’t affect flavor. Focus on taste and texture over appearance.
Conclusion
Smoking a brisket is a journey. It’s not just about tossing meat on the smoker and hoping for the best. It’s about preparation, patience, and a little bit of passion. From choosing the right cut to trimming, seasoning, smoking, and slicing—it’s a labor of love that pays off with every bite. Mastering brisket takes time, but once you dial in your process, it becomes an addictive hobby that rewards both your tastebuds and your pride.
Don’t be afraid to experiment. Try different woods, adjust your rub, tweak your cook times. Your perfect brisket might not be someone else’s—but that’s the beauty of barbecue. It’s personal, it’s flavorful, and when done right, it’s unforgettable.
So fire up your smoker, follow the steps, and get ready to make brisket magic. And hey—invite some friends over. Brisket tastes better when it’s shared.