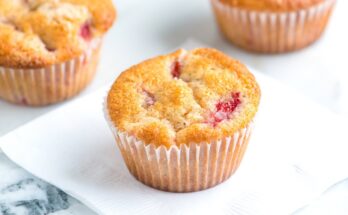
Breakfast Cookies Recipe: Imagine waking up on a busy weekday morning and not having enough time to make a full breakfast. That’s where breakfast cookies come in handy. Unlike regular cookies loaded with sugar, these are wholesome, nutritious, and packed with ingredients that keep you energized throughout the day. They’re a perfect blend of convenience and nutrition—soft, chewy, and customizable with endless add-ins. Think of them as your grab-and-go breakfast option, one that doesn’t compromise on taste or health.
In this guide, we’ll walk you step by step through making the perfect breakfast cookies—from gathering ingredients to baking them golden brown. Plus, we’ll cover storage, variations, and expert tips to make them foolproof every single time.
Benefits of Breakfast Cookies
Breakfast cookies aren’t just delicious—they offer a whole range of benefits that make them worth baking at home.
First, they’re nutrient-dense and filling. With a base of oats, nut butters, seeds, and fruits, these cookies provide complex carbohydrates for energy, healthy fats for satiety, and protein for muscle repair. That means one cookie can fuel you for hours, unlike sugary pastries that leave you hungry soon after.
Second, they’re incredibly convenient. Instead of cooking eggs, toasting bread, or preparing smoothies, you can just grab a cookie and head out the door. For parents, this is a lifesaver—no more struggling to get kids to eat a decent breakfast.
Third, they’re customizable and diet-friendly. If you’re vegan, you can skip the eggs and use flax or chia substitutes. If you’re avoiding gluten, swap oats and flour with gluten-free versions. Want more protein? Add whey, pea protein, or extra nut butter.
Another big benefit is how portable they are. You can pack them for work, school lunches, road trips, or hikes. Plus, they freeze really well, so you can make a big batch and enjoy them for weeks.
Lastly, they’re a fun way to sneak in nutrition. Don’t like eating spinach, zucchini, or chia seeds on their own? Fold them into the cookie dough, and you won’t even notice. Kids especially love them when you add chocolate chips or dried fruits.
In short, breakfast cookies are the perfect mix of health, taste, and convenience, making them a smart addition to your weekly meal prep routine.
Ingredients You’ll Need
The beauty of breakfast cookies lies in their versatility. You don’t need fancy ingredients—just a few basics from your pantry, and you can build on them with healthy add-ins.
Dry Ingredients
- Rolled oats – The heart of any breakfast cookie. They provide fiber and make the cookies chewy.
- Whole wheat flour or oat flour – Helps bind the dough and adds nutrition.
- Baking powder or baking soda – For lightness and rise.
- Brown sugar, coconut sugar, or maple sugar – Natural sweeteners work well, but you can also use honey or agave.
- Spices – Cinnamon, nutmeg, or pumpkin spice for flavor depth.
Wet Ingredients
- Eggs (or flax eggs for vegan) – Provide structure and binding.
- Nut butter (peanut, almond, or cashew) – Adds protein and creaminess.
- Honey, maple syrup, or agave nectar – Natural sweeteners to balance flavors.
- Coconut oil, olive oil, or butter – For richness and texture.
- Vanilla extract – Enhances flavor.
Add-ins and Mix-ins
- Nuts & Seeds – Almonds, walnuts, sunflower seeds, or chia seeds for crunch.
- Dried Fruits – Raisins, cranberries, apricots, or dates for natural sweetness.
- Fresh Fruits – Mashed bananas, grated apples, or shredded zucchini for moisture.
- Chocolate Chips or Cocoa Nibs – For that cookie-like indulgence.
- Protein Powder (optional) – Boosts the protein content for fitness lovers.
You can mix and match these based on taste and dietary preferences. The best part? Every batch can taste different depending on the add-ins you choose.
Equipment You’ll Need
You don’t need a professional bakery setup to make breakfast cookies. A few kitchen essentials will get the job done.
- Mixing Bowls – One for dry ingredients and one for wet ingredients.
- Measuring Cups & Spoons – Accuracy is key for baking.
- Baking Sheet – Line with parchment paper to avoid sticking.
- Mixing Spoon or Spatula – For combining ingredients.
- Hand Mixer (optional) – Speeds up mixing, especially with nut butter.
- Cookie Scoop or Tablespoon – Ensures evenly sized cookies.
- Wire Cooling Rack – Helps cookies cool without becoming soggy.
Optional but helpful gadgets:
- Food Processor – To grind oats into flour or chop nuts finely.
- Silicone Baking Mat – Eco-friendly alternative to parchment paper.
- Airtight Containers – For storing cookies and keeping them fresh.
With just these tools, you can whip up a batch of cookies in under 30 minutes.
Step-by-Step Guide to Making Breakfast Cookies
Now that we’ve covered the ingredients and tools, let’s dive into the step-by-step baking process. The key to perfect breakfast cookies is to balance the wet and dry ingredients so that the dough holds together but doesn’t become too sticky.
Each step matters—from how you mix the dough to how long you bake. Follow along carefully, and you’ll get cookies that are chewy, flavorful, and wholesome.
Step 1: Preheat and Prepare Baking Sheet
The very first step in baking breakfast cookies is preheating your oven. Most recipes work best at 350°F (175°C), which allows the cookies to bake evenly without burning on the outside or staying raw in the center. Preheating ensures that when your cookies go in, they start baking immediately instead of slowly warming up, which can make them dry and flat.
Next, prepare your baking sheet. You can either line it with parchment paper or use a silicone baking mat. Both prevent sticking and help cookies bake more uniformly. If you don’t have either, lightly grease your baking tray with a bit of oil or butter, but keep in mind that parchment paper makes cleanup easier.
This step may seem small, but it’s crucial for cookie texture and appearance. Cookies placed on a cold tray in a cold oven often turn out uneven, so don’t skip this part. While your oven heats up, you can move on to mixing your ingredients—making the process smooth and time-saving.
Step 2: Mix Dry Ingredients
Grab a large bowl and start with the dry ingredients. Add your rolled oats, flour, baking powder (or soda), spices, and sugar. Give them a gentle whisk or stir so that everything is evenly distributed.
Why is this step important? Well, think of it this way: if you add baking soda directly to wet ingredients, it might clump up, leaving some cookies flat and others puffed. Mixing dry ingredients first ensures that the leavening agents and flavors spread evenly throughout the dough.
Here’s a quick tip: if you want your cookies to be extra flavorful, toast your oats in a dry pan for a few minutes before adding them. This adds a nutty aroma and enhances the cookie’s depth of flavor.
At this stage, you can also experiment with spices. Cinnamon and nutmeg are classics, but you could add cardamom for a unique twist or pumpkin spice for a seasonal flair. Once the dry ingredients are ready, set the bowl aside.
Step 3: Mix Wet Ingredients
In a separate bowl, combine the wet ingredients—usually eggs (or flax eggs), nut butter, sweetener (like honey or maple syrup), oil, and vanilla extract. Use a whisk or hand mixer to blend everything until smooth and creamy.
The goal here is to create a rich base that will coat the dry ingredients and bind them together. If your nut butter is too thick, warm it slightly in the microwave so it mixes more easily. Similarly, if you’re using coconut oil, make sure it’s melted but not too hot (otherwise, it could scramble the eggs).
This step is where you build the flavor foundation of your cookies. For example, using almond butter will give a light, nutty taste, while peanut butter makes them richer. Adding mashed bananas or applesauce here can increase natural sweetness and moisture, reducing the need for extra sugar or fat.
Once your wet mixture is smooth, you’re ready to bring the wet and dry worlds together.
Step 4: Combine Wet and Dry Mixtures
Now comes the magic moment—combining everything. Slowly pour the wet mixture into the bowl of dry ingredients. Using a spatula or wooden spoon, fold the two together gently.
The trick is to mix until just combined. Overmixing can make your cookies tough because it activates too much gluten in the flour. You want the dough to be slightly sticky but not runny. If it feels too wet, sprinkle in a little more flour or oats. If it’s too dry, add a splash of milk or a little more mashed banana.
This is also the stage where the cookie dough starts to smell heavenly, with the spices, nut butter, and vanilla blending together. Take a moment to appreciate it—half the fun of baking is enjoying the process, not just the results!
Step 5: Add Mix-ins and Shape Cookies
Here’s where you get creative. Fold in your chosen mix-ins—nuts, seeds, dried fruit, chocolate chips, or even zucchini shreds. The beauty of breakfast cookies is their versatility, so don’t be afraid to mix and match.
For shaping, use a cookie scoop or tablespoon to portion out the dough. Place each mound on the prepared baking sheet, leaving some space between them. Since these cookies don’t spread as much as regular ones, press them down slightly with the back of a spoon or your fingers to flatten them.
If you want a bakery-style finish, sprinkle a few extra chocolate chips or seeds on top before baking. Not only does this make them look more appealing, but it also signals what’s inside—perfect if you’re making different flavors in one batch.
Shaping is more than just aesthetics—it ensures the cookies bake evenly, so each bite is perfectly chewy and delicious.
Step 6: Bake to Perfection
Slide your tray into the preheated oven and bake the cookies for about 12–15 minutes. The exact time depends on your oven and cookie size. Keep a close eye on them after the 12-minute mark.
You’ll know they’re ready when the edges turn golden brown but the centers are still slightly soft. Remember, cookies continue to cook a little as they cool, so don’t overbake them. If you prefer chewier cookies, take them out earlier. For crispier ones, let them bake a minute or two longer.
Here’s a quick pro tip: rotate the baking sheet halfway through for even baking. Many ovens have hot spots, and this small step prevents one side from getting darker than the other.
When done, remove the tray from the oven and let the cookies sit for 5 minutes before transferring them to a wire rack. This resting period helps them firm up without crumbling.
Step 7: Cool and Store Properly
Cooling your cookies is just as important as baking them. If you move them too soon, they’ll break apart. Leave them on the tray for a few minutes, then transfer them to a wire rack to cool completely.
Once cooled, store them in an airtight container at room temperature for up to 4–5 days. If you live in a humid climate, it’s better to refrigerate them to prevent softness. For longer storage, freeze the cookies in a zip-lock bag or airtight box. They can last for up to 2–3 months in the freezer.
When you’re ready to eat, just microwave a frozen cookie for 20–30 seconds or let it thaw at room temperature. They’ll taste just as fresh as the day you baked them.
Proper storage ensures that you always have a healthy grab-and-go snack available, saving you from last-minute unhealthy breakfast choices.
Tips for Perfect Breakfast Cookies
Making breakfast cookies may seem easy, but a few expert tips can take them from good to great:
- Use overripe bananas – They’re sweeter and moister, reducing the need for added sugar.
- Balance moisture – Too much liquid makes cookies gummy; too little makes them crumbly. Adjust oats or flour as needed.
- Don’t skip parchment paper – Prevents sticking and makes cleanup effortless.
- Press the dough slightly – Since breakfast cookies don’t spread much, pressing ensures they bake evenly.
- Add mix-ins last – This prevents overmixing and keeps the add-ins evenly distributed.
- Cool completely before storing – Otherwise, condensation will make them soggy.
With these tricks, you’ll bake consistently delicious cookies every time, no matter which variation you try.
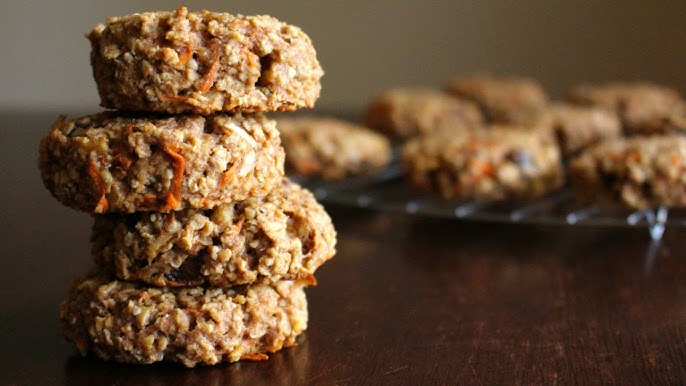
Variations of Breakfast Cookies
One of the best things about breakfast cookies is how adaptable they are. With just a few tweaks, you can create versions that fit different diets, tastes, and occasions. Let’s explore some popular variations you can try at home.
Vegan Breakfast Cookies
Skip the eggs and use flax eggs (1 tablespoon ground flaxseed + 3 tablespoons water = 1 egg). Replace honey with maple syrup or agave nectar, and use coconut oil or nut butter instead of butter. Add dairy-free chocolate chips or dried fruit for sweetness. These cookies are just as chewy and satisfying as traditional ones.
Gluten-Free Breakfast Cookies
Swap out regular oats with certified gluten-free oats and use almond flour, coconut flour, or oat flour instead of wheat flour. This variation keeps the cookies light and chewy while being safe for gluten-sensitive eaters. Just be mindful of coconut flour—it absorbs more liquid, so you may need to add extra wet ingredients.
Protein-Packed Breakfast Cookies
If you’re into fitness or just want a filling snack, add a scoop of protein powder to the dough. Vanilla, chocolate, or unflavored protein works well. You can also throw in extra nut butter, hemp seeds, or Greek yogurt for an added protein boost. These cookies are perfect as a post-workout snack.
Low-Sugar or Diabetic-Friendly Cookies
Reduce added sugars by relying on natural sweetness from mashed bananas, dates, or unsweetened applesauce. You can also use sugar substitutes like stevia, monk fruit, or erythritol. This version still tastes indulgent but is much lighter on the sugar content.
Seasonal Variations
- Fall: Pumpkin puree + pumpkin spice + pecans.
- Winter: Cranberries + white chocolate + orange zest.
- Spring: Carrot shreds + raisins + walnuts (like carrot cake).
- Summer: Blueberries + lemon zest + coconut flakes.
With these variations, you’ll never get bored of breakfast cookies. Each batch can feel like a brand-new recipe!
How to Store and Freeze Breakfast Cookies
Storage is key to keeping your breakfast cookies tasting fresh and delicious. Since they’re made with wholesome ingredients, they don’t have preservatives like store-bought cookies, so proper storage makes all the difference.
Room Temperature Storage
Keep your cookies in an airtight container at room temperature. They’ll stay good for about 4–5 days. Place a piece of parchment paper between layers to prevent them from sticking together.
Refrigeration Tips
If your cookies contain a lot of fresh fruit (like blueberries or grated apples), it’s better to refrigerate them. Store them in a container with a tight lid, and they’ll last up to 7–10 days.
Freezing and Reheating
For long-term storage, freezing is your best option. Place cookies in a single layer on a baking tray, freeze until solid, then transfer them into a zip-lock bag or airtight container. They’ll last for up to 3 months in the freezer.
When you’re ready to eat, simply thaw them at room temperature or pop them into the microwave for 20–30 seconds. This makes them soft, warm, and almost as good as freshly baked.
Batch baking and freezing is perfect for meal prep—you’ll always have a healthy snack ready without needing to bake every week.
Serving Suggestions
Breakfast cookies are versatile and can be enjoyed in many ways. Sure, they’re great on their own, but pairing them with other foods makes them even more satisfying.
- With Morning Drinks: Pair your cookies with a cup of coffee, tea, or warm milk for a comforting breakfast. They also go great with smoothies or protein shakes.
- Yogurt Bowl Topping: Crumble a cookie over Greek yogurt with fresh fruit for a hearty breakfast bowl.
- On-the-Go Snack: Wrap one in parchment paper and toss it in your bag for school, work, or travel.
- Dessert Alternative: Warm up a cookie and serve it with a dollop of nut butter or a scoop of frozen yogurt for a healthier dessert.
- Kid-Friendly Treat: Pack them in lunchboxes as a sweet but healthy option. Kids especially love them with a small side of fruit or a carton of milk.
The beauty of breakfast cookies is that they fit seamlessly into any time of day—breakfast, snack, or dessert.
Nutritional Value of Breakfast Cookies
Breakfast cookies aren’t just tasty—they pack a nutritional punch. Of course, the exact values depend on your chosen ingredients, but here’s a general idea for one medium-sized cookie:
| Nutrient | Approximate Amount | Benefit |
|---|---|---|
| Calories | 180–220 kcal | Energy boost |
| Carbohydrates | 25–30 g | Provides fuel for the day |
| Protein | 5–8 g | Helps with muscle repair and satiety |
| Healthy Fats | 8–10 g | Keeps you full and supports brain health |
| Fiber | 4–6 g | Aids digestion and stabilizes blood sugar |
| Vitamins & Minerals | Varies (iron, potassium, vitamin E, etc.) | Supports overall health |
Unlike processed cookies, breakfast cookies are made with whole ingredients that give lasting energy without the sugar crash. Add-ins like chia seeds, flax seeds, and nuts increase omega-3s and antioxidants, while fruits provide natural sweetness and vitamins.
If you’re mindful of calories or macros, you can easily adjust the recipe—reduce sugar, add more protein powder, or swap oils with applesauce. That’s the beauty of making them at home: you’re in control.
FAQs about Breakfast Cookies Recipe
1. Can I use honey instead of sugar?
Yes! Honey works beautifully as a natural sweetener. Just reduce other liquids slightly since honey adds extra moisture.
2. How long do breakfast cookies stay fresh?
At room temperature, about 4–5 days. Refrigerated, up to 10 days. Frozen, they last 2–3 months.
3. Can I make them without eggs?
Absolutely. Use flax eggs, chia eggs, or applesauce as a binder for a vegan-friendly version.
4. Are breakfast cookies good for weight loss?
They can be! Just watch portion sizes and use healthier add-ins like nuts, seeds, and fruits instead of chocolate or extra sweeteners.
5. What’s the best way to pack them for lunchboxes?
Wrap each cookie in parchment paper or place them in small containers. They stay fresh and mess-free this way.
Conclusion
Breakfast cookies are the ultimate solution for busy mornings—they’re healthy, delicious, portable, and customizable. With simple ingredients and a quick baking process, you can prepare a batch that lasts all week. Whether you want vegan, gluten-free, protein-packed, or seasonal variations, there’s a recipe for everyone.
The best part? You’re in control of the flavors and nutrition. From oats and nut butter to fruits and seeds, every cookie is a wholesome bite of energy. So, next time you’re rushing out the door, skip the sugary pastries and grab a breakfast cookie instead. Your body—and your taste buds—will thank you.