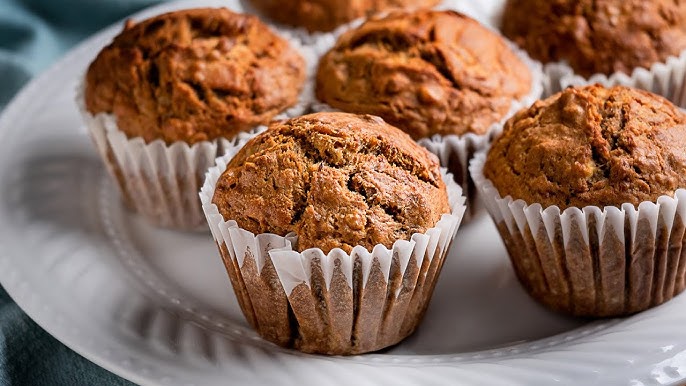
Bran Muffins Recipe: Bran muffins are one of those classic bakery staples that strike the perfect balance between wholesome nutrition and satisfying flavor. They’re hearty, fiber-packed, and incredibly versatile—you can enjoy them for breakfast, as an afternoon snack, or even as a light dessert when paired with a drizzle of honey. While some people associate bran muffins with a “healthy but boring” stereotype, the truth is that with the right recipe, they can be tender, moist, and downright delicious.
What makes bran muffins stand out is their use of wheat bran, the outer layer of the wheat kernel. This ingredient is rich in dietary fiber, vitamins, and minerals, making it a nutritional powerhouse. Unlike typical muffins loaded with refined flour and sugar, bran muffins deliver a slow release of energy, keeping you full and energized for hours.
In this guide, we’ll walk you through everything you need to know about making the perfect bran muffins—from choosing the right ingredients to baking them to golden perfection. Whether you’re a seasoned home baker or a beginner who’s never touched a muffin tin before, this step-by-step recipe will help you master this healthy treat.
Why Bran Muffins are a Healthy Choice
If you’ve ever looked for ways to boost your fiber intake without sacrificing taste, bran muffins are a fantastic option. Wheat bran is high in insoluble fiber, which supports digestion, promotes gut health, and helps maintain regularity. This is why bran muffins are often recommended for people looking to improve their digestive wellness.
Bran muffins also tend to be lower in fat compared to many other muffin recipes, especially when made with healthy oil alternatives or applesauce. They can be adapted to suit a variety of dietary needs—low sugar, gluten-free, vegan, or high-protein—making them a flexible option for nearly any lifestyle.
Nutritionally, they offer a good mix of carbs, protein, and healthy fats, which makes them a great breakfast for sustained energy. And unlike overly sweet pastries, they don’t cause a rapid spike in blood sugar, meaning fewer mid-morning energy crashes.
A Brief History of Bran Muffins
The origin of bran muffins can be traced back to early 20th-century America when nutritionists began promoting fiber-rich diets. Wheat bran, once considered a byproduct of flour milling, started gaining popularity as a health food. By the 1920s, recipes for bran muffins began appearing in cookbooks, often promoted as a wholesome breakfast option for busy families.
Over time, the recipe evolved, with bakers adding molasses, raisins, nuts, and spices to enhance flavor. Today, bran muffins are a staple in bakeries and coffee shops worldwide, appreciated for their combination of health benefits and comforting taste.
Ingredients for the Perfect Bran Muffins
The secret to delicious bran muffins lies in the quality of your ingredients. Using fresh, wholesome components ensures that your muffins will be flavorful, moist, and satisfying.
Main Ingredients and Their Roles
- Wheat Bran – The star ingredient, providing that signature texture and high fiber content.
- Whole Wheat Flour – Adds structure while keeping the muffins hearty and nutritious.
- Brown Sugar or Honey – For sweetness and moisture. Brown sugar adds a caramel-like depth.
- Baking Powder & Baking Soda – These leavening agents help the muffins rise and become fluffy.
- Salt – Enhances flavor and balances sweetness.
- Eggs – Bind ingredients and add richness.
- Milk or Buttermilk – Adds moisture and tenderizes the crumb. Buttermilk also provides a tangy flavor.
- Oil or Melted Butter – Keeps muffins moist. Oils like canola or coconut are great for a healthier twist.
- Vanilla Extract – For aromatic depth.
Substitutions and Dietary Variations
- Gluten-Free: Replace whole wheat flour with a gluten-free blend and ensure your bran is certified gluten-free.
- Vegan: Use flax eggs (1 tbsp flaxseed meal + 3 tbsp water per egg) and plant-based milk.
- Low-Sugar: Swap brown sugar for stevia, monk fruit sweetener, or date paste.
- High-Protein: Add a scoop of vanilla protein powder and slightly reduce flour.
By understanding each ingredient’s role, you can experiment confidently while ensuring your muffins still turn out perfect every time.
Essential Baking Tools
Having the right tools on hand makes the baking process smoother and ensures consistent results.
Must-Have Equipment
- Mixing Bowls – One for dry ingredients and one for wet.
- Measuring Cups and Spoons – Precision is key in baking.
- Whisk and Spatula – For mixing without overworking the batter.
- Muffin Tin – Standard 12-cup muffin tins work perfectly.
- Paper Liners or Cooking Spray – To prevent sticking.
Optional Tools for Better Results
- Cooling Rack – Helps muffins cool evenly without becoming soggy.
- Ice Cream Scoop – For evenly portioning batter.
- Sifter – Ensures dry ingredients are lump-free and aerated.
Having these tools ready before you start baking keeps the process stress-free and efficient.
Preparing for Baking
Preparation is half the battle in baking. Before you start mixing, it’s important to measure, prep, and preheat.
Measuring Ingredients Accurately
Baking is a science—adding too much flour or too little liquid can drastically affect your results. Use the spoon-and-level method for flour (spoon into the cup and level off with a knife) and measure liquids at eye level for accuracy.
Preheating and Pan Preparation
Always preheat your oven—350°F (175°C) is ideal for most bran muffin recipes. Grease your muffin tin or line it with paper cups. Preheating ensures that your muffins start baking immediately, helping them rise properly.
Step-by-Step Bran Muffins Recipe
This is where the magic happens—combining your carefully prepared ingredients to create bakery-worthy muffins.
Mixing Dry Ingredients
In a large bowl, combine wheat bran, whole wheat flour, baking powder, baking soda, salt, and any spices you want to include (like cinnamon or nutmeg). Whisk until evenly blended. This prevents clumps and ensures the leavening agents are distributed throughout.
Mixing Wet Ingredients
In a separate bowl, whisk together the eggs, milk (or buttermilk), oil (or melted butter), and vanilla extract until smooth. If you’re using honey or molasses instead of sugar, mix it with the wet ingredients to ensure even distribution.
One tip for extra moist muffins is to soak the wheat bran in your milk or buttermilk for about 10 minutes before combining it with the rest of the ingredients. This softens the bran, making your muffins tender instead of grainy.
If you want to add mashed bananas, applesauce, or yogurt for extra flavor and moisture, incorporate them into the wet mixture at this stage. These ingredients also act as natural sweeteners, letting you reduce the sugar without compromising taste.
Combining Wet and Dry Mixtures
Once your wet and dry mixtures are ready, create a well in the center of your dry ingredients and pour in the wet mixture. Gently fold the two together with a spatula or wooden spoon until just combined.
The key here is not to overmix—stirring too much develops gluten in the flour, which can lead to dense, tough muffins. A few lumps in the batter are perfectly fine; in fact, they’re a sign that you’ve mixed just enough.
If you’re adding extras like raisins, chopped nuts, or chocolate chips, toss them in a tablespoon of flour first before folding them into the batter. This prevents them from sinking to the bottom during baking.
Baking the Muffins
Preheat your oven to 350°F (175°C) and evenly divide the batter among the muffin cups, filling each about ¾ full. Using an ice cream scoop ensures even portions and consistent baking.
Bake for 18–22 minutes, or until a toothpick inserted in the center comes out clean. The tops should be golden brown, and the muffins should spring back lightly when touched.
Once baked, let them cool in the tin for about 5 minutes before transferring to a wire rack. This helps avoid soggy bottoms and keeps the texture light.
Tips for Perfect Bran Muffins
Perfecting bran muffins comes down to small details that make a big difference.
Avoiding Overmixing
Overmixing is one of the most common muffin mistakes. Stir the batter until the flour is just incorporated. Overworked batter will produce muffins that are rubbery instead of soft and tender.
You can also try the muffin method—mix dry and wet ingredients separately, then combine quickly and gently. This technique minimizes gluten development and ensures a light texture.
Enhancing Flavor and Texture
Bran muffins can be customized in countless ways to boost their flavor. Some tried-and-true tricks include:
- Adding warm spices like cinnamon, nutmeg, or ginger.
- Using molasses for a rich, deep sweetness.
- Mixing in dried fruit like raisins, dates, or cranberries for bursts of natural sweetness.
- Sprinkling oats or seeds on top for crunch and a rustic look.
For extra tenderness, try substituting some of the oil with Greek yogurt or applesauce. Both add moisture without making the muffins greasy.
Common Mistakes to Avoid
Even a simple muffin recipe can go wrong if you’re not careful. Here’s what to watch out for:
Baking Time Errors
Bran muffins can dry out quickly if overbaked. Always check for doneness a couple of minutes before the suggested baking time.
Also, avoid opening the oven door too early. Sudden temperature drops can cause muffins to collapse in the center.
Ingredient Measurement Mistakes
Using too much bran or flour can make muffins heavy and dry, while too much liquid can make them gummy. Always measure ingredients precisely and avoid scooping flour directly from the bag—this packs it down and results in too much flour.
If you’re trying substitutions, remember that they can affect texture and baking time. For example, using honey instead of sugar adds more liquid, so you may need to slightly reduce the milk.
Flavor Variations
One of the best things about bran muffins is how easily they adapt to different flavors.
Adding Fruits and Nuts
Chopped apples, pears, or bananas add natural sweetness and moisture, while nuts like walnuts or pecans add crunch and richness.
Dried fruits—especially raisins, dates, and cranberries—are a classic choice. Soak them in warm water or juice for 10 minutes before adding to keep them soft and plump during baking.
Chocolate and Spice Versions
For a more indulgent twist, fold in dark chocolate chips or chunks. Cocoa powder can also be added for a double-chocolate bran muffin.
Spice lovers can experiment with cardamom, allspice, or pumpkin pie spice for a warm, aromatic muffin perfect for fall mornings.
Serving Suggestions
Bran muffins are versatile enough to enjoy any time of day, but pairing them thoughtfully can elevate the eating experience.
Breakfast and Snack Ideas
- With Fresh Fruit: Pair a warm bran muffin with sliced berries, bananas, or melon for a fiber-rich breakfast.
- Spread with Nut Butter: Almond or peanut butter adds protein and healthy fats, making the meal more filling.
- Topped with Yogurt: A dollop of Greek yogurt and a drizzle of honey turns your muffin into a mini parfait.
- On-the-Go Snack: Wrap muffins individually and keep them in your bag for a healthy snack at work or school.
Pairing with Beverages
A hot beverage pairs perfectly with the hearty texture of bran muffins:
- Coffee: The robust flavor of coffee balances the natural sweetness of the muffin.
- Tea: Herbal or spiced teas like chai complement warm spices in the muffins.
- Milk: A cold glass of milk (dairy or plant-based) keeps the pairing simple and satisfying.
Storing and Freezing Bran Muffins
One of the great things about bran muffins is that they store and freeze beautifully, making them ideal for meal prep.
Short-Term Storage
Keep muffins in an airtight container at room temperature for up to 3 days. To keep them moist, place a sheet of paper towel under and over the muffins inside the container—it absorbs excess moisture and prevents sogginess.
Freezing for Long-Term Use
For longer storage, wrap muffins individually in plastic wrap or foil, then place them in a freezer-safe bag. They’ll last up to 3 months in the freezer.
To reheat, microwave for 20–30 seconds or place in a 300°F (150°C) oven for 10 minutes. This will revive their soft texture and fresh-baked aroma.
Nutritional Benefits of Bran Muffins
Beyond their taste, bran muffins pack an impressive nutritional punch.
Fiber Content and Digestive Health
Wheat bran is loaded with insoluble fiber, which adds bulk to stool, promotes regularity, and supports gut health. Eating fiber-rich foods like bran muffins can also help with weight management, as they keep you feeling full longer.
Low-Sugar and Heart-Healthy Variations
Reducing sugar and using healthy fats like olive or coconut oil makes bran muffins a heart-friendly option. Adding flaxseeds or chia seeds boosts omega-3 content, which supports cardiovascular health.
Gluten-Free and Vegan Bran Muffin Options
Not everyone can eat traditional wheat bran muffins, but with a few tweaks, you can make them inclusive for most diets.
Gluten-Free Adjustments
Use certified gluten-free oat bran or rice bran instead of wheat bran. Swap whole wheat flour for a gluten-free baking blend containing xanthan gum for proper texture.
Vegan Baking Tips
Replace eggs with flax eggs or chia eggs, and use plant-based milk like almond or soy. Coconut oil or vegan margarine works well in place of butter. Vegan bran muffins can be just as moist and flavorful as traditional ones with the right substitutions.
FAQs about Bran Muffins
1. How long do bran muffins stay fresh?
When stored in an airtight container at room temperature, bran muffins remain fresh for about 3 days. If refrigerated, they can last up to a week, though refrigeration can slightly dry them out. Freezing is the best option for long-term storage.
2. Can I make bran muffins without sugar?
Yes! You can replace sugar with natural sweeteners like mashed bananas, applesauce, or dates. Alternatively, low-calorie sweeteners such as stevia or monk fruit work well. Just note that texture and sweetness may vary depending on the substitute.
3. Are bran muffins kid-friendly?
Absolutely. You can make them more appealing to kids by adding mini chocolate chips, cinnamon, or a touch of maple syrup. Using smaller muffin tins can also create bite-sized treats that are easier for children to enjoy.
4. What’s the best type of bran to use?
Wheat bran is the most common and provides a slightly nutty flavor. Oat bran is another great option, offering a milder taste and a softer texture. Always choose fresh, high-quality bran for the best results.
5. Can I make the batter ahead of time?
It’s best to bake bran muffins immediately after mixing to ensure proper rising. However, you can prepare the dry ingredients ahead of time and store them in an airtight jar. When ready to bake, simply mix with the wet ingredients.
Conclusion
Bran muffins are a wonderful combination of health and comfort—nutrient-rich, fiber-packed, and endlessly customizable. Whether you stick to the classic recipe or experiment with fruits, nuts, and spices, they’re an easy way to enjoy a wholesome treat any time of day.
By following the step-by-step guide above, you’ll be able to bake muffins that are tender, flavorful, and just the right amount of sweet. They store well, freeze beautifully, and adapt to various dietary needs, making them a versatile addition to your baking repertoire.
So the next time you’re looking for a nourishing breakfast or a quick snack, skip the store-bought options and whip up a batch of homemade bran muffins—you’ll never look back.