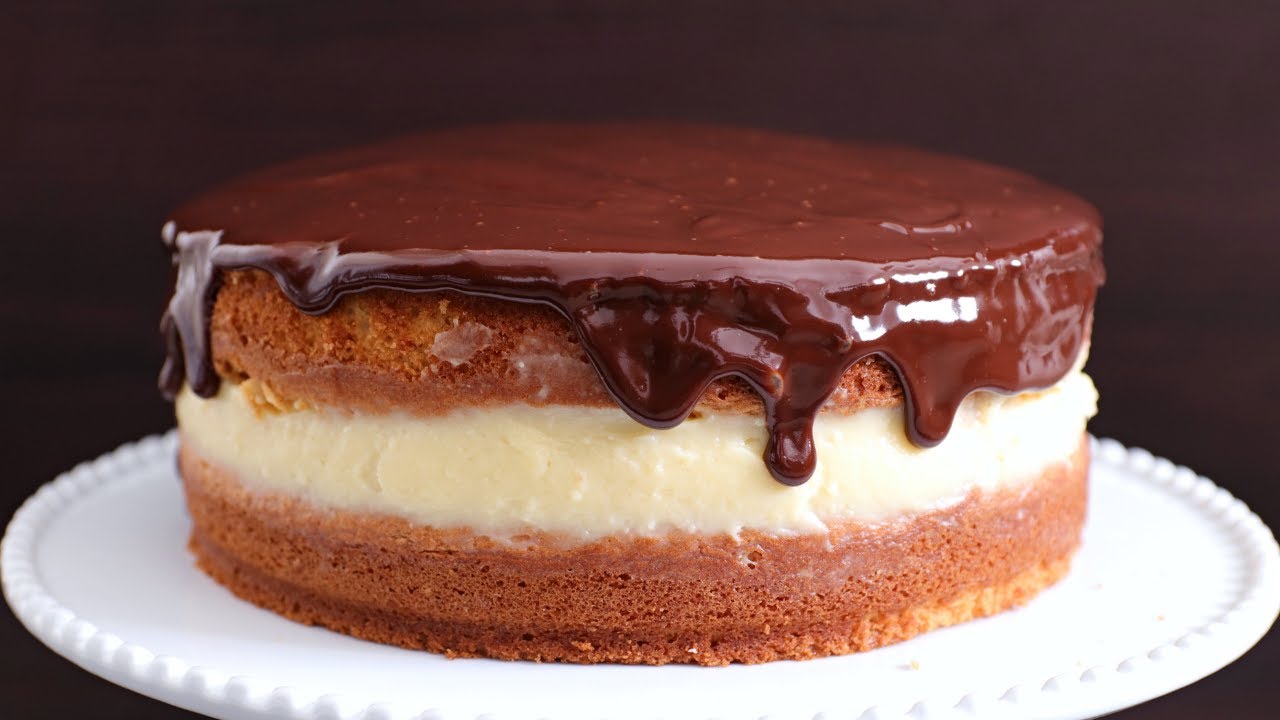
Boston Cream Cake Recipe: Boston Cream Cake is that one dessert that feels like a warm hug wrapped in chocolate and vanilla delight. It’s the ultimate indulgence with layers of moist yellow sponge cake, a luscious vanilla pastry cream filling, and a glossy, rich chocolate ganache poured over the top. It’s not just a cake; it’s a triple-threat dessert experience that hits all the right notes—soft, creamy, and chocolatey. Imagine a giant Boston Cream Donut—but elevated and turned into a full-on showstopper of a cake.
This cake is incredibly popular at celebrations because it’s not overly sweet yet indulgent enough to impress. The contrast between the fluffy cake and the silky custard is just perfection, and the ganache topping? That’s the literal cherry on top—smooth, shiny, and decadently rich. If you’re looking to make a dessert that earns applause at the dinner table or family gathering, Boston Cream Cake is your go-to.
A Brief History of the Dessert
Believe it or not, Boston Cream Cake isn’t just a mouthwatering dessert; it’s a slice of American history. This dessert actually evolved from the beloved Boston Cream Pie, which was created in the mid-19th century at the Parker House Hotel in Boston. Funny enough, it was called a “pie” because, at the time, cakes and pies were often baked in the same kind of tin.
Boston Cream Pie was named the official dessert of Massachusetts in 1996, but the cake version has since become a modern twist that’s easier to cut, stack, and serve. The basic structure remains the same: sponge cake, pastry cream, and ganache—but layering it like a traditional cake gives it a visual upgrade and makes it easier to serve to a crowd.
So whether you’re baking it to relive history or simply to satisfy a sweet tooth, Boston Cream Cake brings old-school charm with a modern twist.
Ingredients Needed
Creating the perfect Boston Cream Cake starts with gathering all the right ingredients. Don’t worry—nothing too fancy here, just some pantry staples and a few fridge regulars.
For the Sponge Cake
- 1 cup all-purpose flour
- 1 tsp baking powder
- 1/4 tsp salt
- 4 large eggs (room temperature)
- 1 cup granulated sugar
- 1/2 cup whole milk
- 1/4 cup unsalted butter
- 1 tsp vanilla extract
This sponge cake is light but structured enough to hold the pastry cream without becoming soggy. The milk and butter mixture helps keep it moist while giving it a nice rich flavor.
For the Pastry Cream Filling
- 2 cups whole milk
- 1/2 cup granulated sugar
- 4 large egg yolks
- 1/4 cup cornstarch
- 1/4 tsp salt
- 2 tbsp unsalted butter
- 1 tsp vanilla extract
Pastry cream is essentially a thickened custard. It adds that velvety center that defines Boston Cream Cake. Cornstarch helps thicken it without making it taste eggy, while butter and vanilla add depth.
For the Chocolate Ganache Topping
- 1 cup heavy cream
- 8 oz semi-sweet chocolate (chopped or chips)
- 1 tbsp unsalted butter (optional for shine)
The ganache is simple yet elegant. The cream-to-chocolate ratio gives you a pourable, glossy finish that firms up just enough for that picture-perfect slice.
Step-by-Step Instructions
Step 1: Preparing the Sponge Cake
Preheat your oven to 350°F (175°C). Grease and line two 9-inch round cake pans with parchment paper.
In a medium bowl, whisk together the flour, baking powder, and salt. In a large mixing bowl, beat the eggs using a hand mixer or stand mixer on high speed until thick and pale (about 5 minutes). Gradually add the sugar while continuing to beat.
In a small saucepan, heat the milk and butter until the butter is melted and the mixture is hot but not boiling. Slowly pour the hot milk mixture into the egg mixture while mixing on low speed. Stir in the vanilla extract.
Gently fold the dry ingredients into the wet mixture, taking care not to deflate the batter. Pour evenly into the prepared pans.
Bake for 20–25 minutes, or until a toothpick inserted into the center comes out clean. Let the cakes cool in the pans for 10 minutes before transferring to a wire rack to cool completely.
Moist, tender, and golden—this sponge cake sets the perfect foundation.
Step 2: Making the Pastry Cream Filling
In a medium saucepan, heat the milk over medium heat until it’s just about to boil.
In a separate bowl, whisk together egg yolks, sugar, cornstarch, and salt until smooth and pale. Slowly pour the hot milk into the egg mixture while whisking constantly (this prevents scrambling). Return the mixture to the saucepan and cook over medium heat, whisking constantly, until thickened (about 5 minutes).
Remove from heat and stir in the butter and vanilla extract. Pour the pastry cream into a bowl and press plastic wrap directly onto the surface to prevent a skin from forming. Chill for at least 2 hours before using.
Silky, rich, and packed with vanilla flavor—this pastry cream is the heart of your Boston Cream Cake.
Step 3: Assembling the Cake
Once your sponge cakes are completely cooled and the pastry cream has set nicely in the fridge, it’s time for the magic to happen—layering!
Place one cake layer on your serving plate or cake stand. If the top is domed, feel free to level it with a serrated knife for even stacking. Then, using a spatula or piping bag, spread the chilled pastry cream evenly across the top of the first cake layer. Be generous but careful not to go too close to the edges—it will spread slightly when you add the second layer.
Gently place the second cake layer on top. Press down slightly to secure it, but don’t squish the filling too much. It should sit firm and not ooze out the sides. Once stacked, refrigerate the layered cake for about 30 minutes before adding the ganache. This helps the layers firm up and prevents the ganache from sliding off.
Assembling isn’t just stacking—it’s creating an experience. A smooth, creamy center sandwiched between soft, golden layers is what makes this cake so irresistible.
Step 4: Preparing the Chocolate Ganache
While your cake is chilling, it’s time to prepare that glossy chocolate crown.
In a saucepan, heat the heavy cream over medium heat until it begins to simmer—do not boil. Remove from heat and pour the hot cream over the chopped chocolate in a heatproof bowl. Let it sit for a minute or two to melt the chocolate.
Stir gently until smooth, shiny, and fully combined. Add the butter for extra shine and richness, then let the ganache cool slightly—just enough so it thickens but is still pourable.
Now comes the fun part—pouring the ganache. Take your chilled cake out of the fridge and pour the ganache over the top, allowing it to naturally spread toward the edges. You can use a spatula to encourage some gentle drips down the sides, but the key here is elegance, not mess.
Let the ganache set at room temperature or place the cake in the fridge for about 30 minutes to firm up that glossy topping.
Step 5: Final Assembly and Chilling
With your cake fully assembled and beautifully topped with ganache, it’s tempting to dig in—but hold tight. Chilling the finished cake for another hour allows all the layers to set and the flavors to meld together.
This final chill ensures a cleaner slice and enhances the overall texture. When you cut into it, you’ll get those perfect layers: soft sponge, silky cream, and that rich ganache glistening on top.
Serving this beauty is a treat in itself. Slice carefully with a sharp, hot knife (run it under warm water and dry it before each cut). Each slice should hold its shape and show off those decadent layers with pride.
Tips and Tricks for the Perfect Boston Cream Cake
How to Avoid Common Mistakes
Even the most seasoned bakers can face hiccups when making a Boston Cream Cake, but knowing what to look out for can save the day.
First off, don’t rush the cooling process. Whether it’s the sponge cake, pastry cream, or ganache, each component needs to cool properly to prevent a gooey mess. Trying to assemble a warm cake with warm filling? That’s a recipe for disaster. Patience really pays off here.
Another common mistake is undercooking the pastry cream. If it’s too runny, it won’t hold between layers, and your cake will start to slide. Make sure to cook it until it thickens like pudding and passes the “coat-the-back-of-a-spoon” test. Also, remember to press plastic wrap directly on the surface when chilling to prevent skin formation.
As for the sponge, don’t overmix the batter. You want it light and airy—not dense. Use a folding motion when combining wet and dry ingredients to keep that fluffiness intact.
And finally, don’t pour hot ganache directly onto a cold cake unless you want a melted mess. Let it cool just enough to thicken slightly but stay spreadable. Pour from the center and gently guide it to the edges for that perfect waterfall effect.
Avoiding these pitfalls makes the difference between a cake that’s just “okay” and one that steals the spotlight.
Substitutions and Variations
Want to get a little creative? Boston Cream Cake is surprisingly flexible when it comes to substitutions and variations.
Don’t have time to make the sponge cake from scratch? A quality yellow boxed cake mix can be a solid backup. Just make sure it’s light and moist—avoid anything too dense.
For the pastry cream, you can substitute cornstarch with flour in equal amounts, though the texture will be slightly different—more custard-like. You can even infuse the milk with flavorings like coffee, orange zest, or almond extract for a twist.
If you’re going dairy-free, swap out the milk and cream with coconut milk or almond milk, and use dairy-free butter and chocolate. The taste will be different but still rich and enjoyable.
For an extra touch of flair, some bakers add a splash of rum or coffee liqueur to the ganache or brush the sponge layers with a syrup made from vanilla and sugar to keep things ultra moist.
Mini versions (think cupcakes) also work brilliantly if you’re serving a crowd or want individual portions. Just hollow out the center of each cupcake, pipe in the pastry cream, and top with ganache. Fancy and fun!
Serving and Storage Suggestions
Best Way to Serve Boston Cream Cake
Serving this cake is where all your effort pays off. Bring it to room temperature for about 15–20 minutes before serving. This lets the ganache soften slightly, making slicing easier and the flavor more pronounced.
Cut with a hot, dry knife for clean slices. If you want it to look extra professional, wipe the knife between each slice. Serve it with a dollop of whipped cream or a fresh berry or two if you’re feeling fancy, but honestly—it’s so rich it doesn’t need much.
It’s perfect for birthdays, family dinners, or even casual Sunday desserts. And if you’re entertaining, you can prep it the day before, freeing up time on the big day.
How to Store and Freeze
Boston Cream Cake needs to be refrigerated because of the pastry cream. Store any leftovers in an airtight container or covered with plastic wrap. It will stay fresh in the fridge for up to 4 days.
Freezing? Yes, you can—just be strategic. It’s best to freeze the sponge cake layers and pastry cream separately if you’re planning ahead. Wrap them tightly in plastic wrap and then foil, and store in the freezer for up to 2 months.
If you want to freeze the assembled cake, slice it into portions, wrap each piece tightly, and freeze. Thaw overnight in the fridge and enjoy it almost as good as fresh.
Keep in mind, ganache can develop a dull surface after freezing, so if presentation is key, fresh is best. But for those midnight cravings or last-minute guests, freezer-friendly slices are a lifesaver.
FAQs about Boston Cream Cake Recipe
Can I make Boston Cream Cake in advance?
Yes, and it actually tastes better after chilling! Make it a day ahead and store it in the fridge. Just let it sit at room temperature for 15–20 minutes before serving.
What if my pastry cream is too runny?
It likely wasn’t cooked long enough. You can try returning it to the heat and cooking until it thickens. Add a slurry of 1 tsp cornstarch and 1 tbsp milk if needed.
Can I use boxed cake mix?
Absolutely. Choose a high-quality yellow or vanilla cake mix. It’s a great time-saver and still tastes amazing.
Is there a dairy-free version?
Yes, swap out the milk, cream, butter, and chocolate with plant-based alternatives. Coconut milk and dairy-free chocolate work well.
How long does Boston Cream Cake last?
Stored in the fridge, it’s best eaten within 3–4 days. For longer storage, freeze individual slices and thaw as needed.
Conclusion
Boston Cream Cake is not just a dessert—it’s a showstopper, a mood lifter, and a nostalgic bite of American culinary tradition. Whether you’re baking it for a special occasion or just because your sweet tooth called, this cake delivers every single time. With its soft, airy sponge, creamy custard center, and that irresistible ganache topping, it’s hard to stop at just one slice.
What makes it even better is how forgiving and versatile it is. With a few tricks and a bit of patience, anyone can master this classic. So grab your whisk, preheat that oven, and get ready to wow yourself—and everyone around you—with this homemade masterpiece.