Body Butter Recipe: Making your own body butter at home is more than just a fun DIY project—it’s a skincare game-changer. Store-bought creams often come loaded with preservatives, artificial fragrances, and chemicals that might feel good initially but can strip your skin over time. Homemade body butter, on the other hand, is crafted with natural ingredients that your skin actually recognizes and loves. It’s rich, deeply moisturizing, and fully customizable depending on your skin’s needs.
Imagine dipping your fingers into a creamy, whipped butter that melts instantly into your skin, leaving it soft, hydrated, and glowing. That’s the magic of homemade body butter. Plus, you have total control over what goes into it. Want a calming lavender scent before bedtime? Add lavender essential oil. Need something extra hydrating for dry winter skin? Mix in a heavier butter like shea or cocoa.
Not only does DIY body butter nourish your skin, but it’s also a way of practicing self-care. The act of melting, blending, and whipping ingredients feels almost therapeutic—like cooking, but for your skin. And the best part? It’s cost-effective. With just a handful of natural ingredients, you can create a luxurious skincare product that rivals high-end brands.
Why Choose Homemade Body Butter Over Store-Bought?
Let’s be real—most store-bought lotions and creams come with a list of ingredients so long it feels like reading a chemistry textbook. Many of these ingredients are there simply to extend shelf life, create texture, or make the product smell appealing. But do they actually benefit your skin? Not always.
Homemade body butter, in contrast, skips the unnecessary fillers. You’re working with raw butters, nourishing oils, and pure essential oils. Each ingredient serves a purpose. Shea butter soothes dryness, coconut oil locks in moisture, cocoa butter adds a rich protective layer, and essential oils bring therapeutic properties. You know exactly what’s touching your skin, and that peace of mind is priceless.
Another advantage is customization. Everyone’s skin is different—some need lightweight hydration, while others crave deep nourishment. When you make body butter at home, you can tweak the recipe based on your skin’s needs. Want something non-greasy for summer? Use lighter oils like jojoba or almond oil. Need a winter rescue? Add more cocoa butter for a thicker consistency.
And let’s not forget about sustainability. By making your own skincare, you cut down on plastic packaging and reduce your environmental footprint. Plus, it’s fun and creative—you get to play alchemist in your kitchen.
Benefits of Using Body Butter for Skin
Body butter is like food for your skin—it nourishes, repairs, and protects. Here are some of the amazing benefits you’ll enjoy when you start using it regularly:
- Deep Hydration: Unlike lotions that are water-based and evaporate quickly, body butter is oil-based, which means it penetrates deeper into the skin and keeps it moisturized for longer.
- Skin Barrier Protection: The rich oils and butters form a protective layer on the skin’s surface, shielding it from harsh weather, pollution, and dehydration.
- Healing Properties: Many natural butters, like shea and cocoa, contain vitamins A, E, and fatty acids that promote healing of cracked, irritated, or inflamed skin.
- Anti-Aging Benefits: Regular use of body butter improves skin elasticity, reduces the appearance of fine lines, and keeps skin looking youthful and radiant.
- Soothing Dry and Sensitive Skin: If you suffer from eczema, psoriasis, or seasonal dryness, body butter can bring relief by calming irritation and locking in moisture.
- Natural Glow: With consistent use, your skin develops a healthy glow thanks to the nourishing oils and antioxidants.
Now that you’re excited about making your own, let’s dive into the ingredients you’ll need.
Ingredients You’ll Need for Body Butter
The beauty of body butter lies in its simplicity. You don’t need a long list of complicated items—just a few natural ingredients will do the trick. Let’s break them down:
Essential Oils for Fragrance and Skin Benefits
Essential oils don’t just make your body butter smell divine; they also bring skin-loving benefits. For example:
- Lavender oil: Calms the skin and promotes relaxation.
- Tea tree oil: Great for acne-prone skin due to its antibacterial properties.
- Peppermint oil: Refreshing and cooling, ideal for summer blends.
- Orange or lemon oil: Adds a zesty freshness while brightening the skin.
You can mix and match essential oils based on your mood and skincare goals.
Carrier Oils for Moisturization
Carrier oils dilute essential oils and provide the base of hydration. They also decide how light or heavy your body butter feels.
- Coconut oil: Deeply moisturizing and solid at room temperature, adding structure to your butter.
- Jojoba oil: Lightweight and mimics the skin’s natural sebum.
- Sweet almond oil: Gentle and great for sensitive skin.
- Olive oil: Rich and healing, perfect for dry patches.
Butters as the Base Ingredient
This is where the magic happens. Butters give your recipe the luxurious, creamy consistency we all love.
- Shea butter: Moisturizing, soothing, and packed with vitamins A and E.
- Cocoa butter: Rich, protective, and perfect for very dry skin.
- Mango butter: Lightweight yet nourishing, ideal for those who dislike greasy textures.
Optional Additives for Extra Nourishment
You can level up your body butter with a few optional ingredients:
- Vitamin E oil: A natural preservative that also nourishes the skin.
- Arrowroot powder or cornstarch: Helps reduce greasiness and gives a smoother finish.
- Aloe vera gel (oil-soluble): Adds soothing properties.
Now that we’ve got our ingredients ready, let’s move on to the fun part—making your body butter!
Step-by-Step Guide to Making Body Butter
Step 1 – Gather and Measure Your Ingredients
Preparation is everything. Start by deciding how much body butter you want to make. A standard batch is around one cup, which is usually enough to fill a small jar. Here’s a basic recipe to start with:
- ½ cup shea butter
- ¼ cup coconut oil
- ¼ cup carrier oil of choice (like jojoba or almond)
- 10–15 drops essential oil
- 1 teaspoon vitamin E oil (optional)
- 1 tablespoon arrowroot powder (optional, for less greasiness)
Make sure you measure accurately. Too much butter and your mix could turn out too hard; too much oil and it might be overly greasy. Use a kitchen scale for best results.
Once your ingredients are measured, set them aside and prepare a clean glass or stainless-steel bowl, a whisk or hand mixer, and jars for storage.
Step 2 – Melting the Butters and Oils
This is where your kitchen starts smelling amazing. Combine your shea butter, cocoa butter (if using), and coconut oil in a heat-safe bowl. Place the bowl over a pot of simmering water (a double boiler method). Gently stir as the ingredients melt into a smooth liquid.
Avoid microwaving, as it can overheat oils and strip away nutrients. Low and slow is the key here. Once melted, add in your carrier oil and stir well.
At this stage, your mixture will look like golden liquid. Don’t worry—it will soon transform into the fluffy body butter you’ve been dreaming about.
Step 3 – Cooling and Whipping Process
Once your oils and butters are fully melted and combined, remove the bowl from the heat and let it cool slightly. You don’t want to add essential oils yet because the heat can reduce their potency. At this point, place the bowl in the refrigerator for about 30–45 minutes, or until the mixture begins to solidify around the edges but still has a soft center.
This semi-solid stage is perfect for whipping. Using a hand mixer or stand mixer, begin whipping the mixture on medium speed. You’ll notice it starting to look creamy, almost like whipped cream. The more air you whip into it, the lighter and fluffier your body butter will become.
If the mixture is too hard, let it sit at room temperature for a few minutes before whipping. If it’s too runny, return it to the fridge until it firms up a little more. The key is patience—you’re essentially creating a skincare mousse, and it’s worth the effort.
Pro tip: Whip in intervals. Mix for a few minutes, then let it rest in the fridge for another 5–10 minutes, and whip again. Repeating this process two to three times gives your body butter that luxurious, cloud-like texture you see in professional products.
By the end of this step, you should have a smooth, fluffy mixture that looks good enough to eat (but don’t—it’s strictly for your skin!).
Step 4 – Adding Essential Oils and Final Touches
Now that your base is whipped to perfection, it’s time to customize it. Add 10–15 drops of your chosen essential oils and mix them in gently with a spatula or on low speed with your mixer. Remember, essential oils are powerful—less is more. You can always add a drop or two later if you want a stronger scent.
This is also the stage to add any extras like vitamin E oil or arrowroot powder. Vitamin E not only nourishes your skin but also extends the shelf life of your body butter by slowing down the oxidation of oils. Arrowroot powder, on the other hand, absorbs excess greasiness, leaving a silky finish that’s perfect for daily wear.
Mix everything thoroughly, making sure no clumps remain. Scrape down the sides of the bowl so all ingredients are evenly distributed. Once blended, your body butter is officially ready to use!
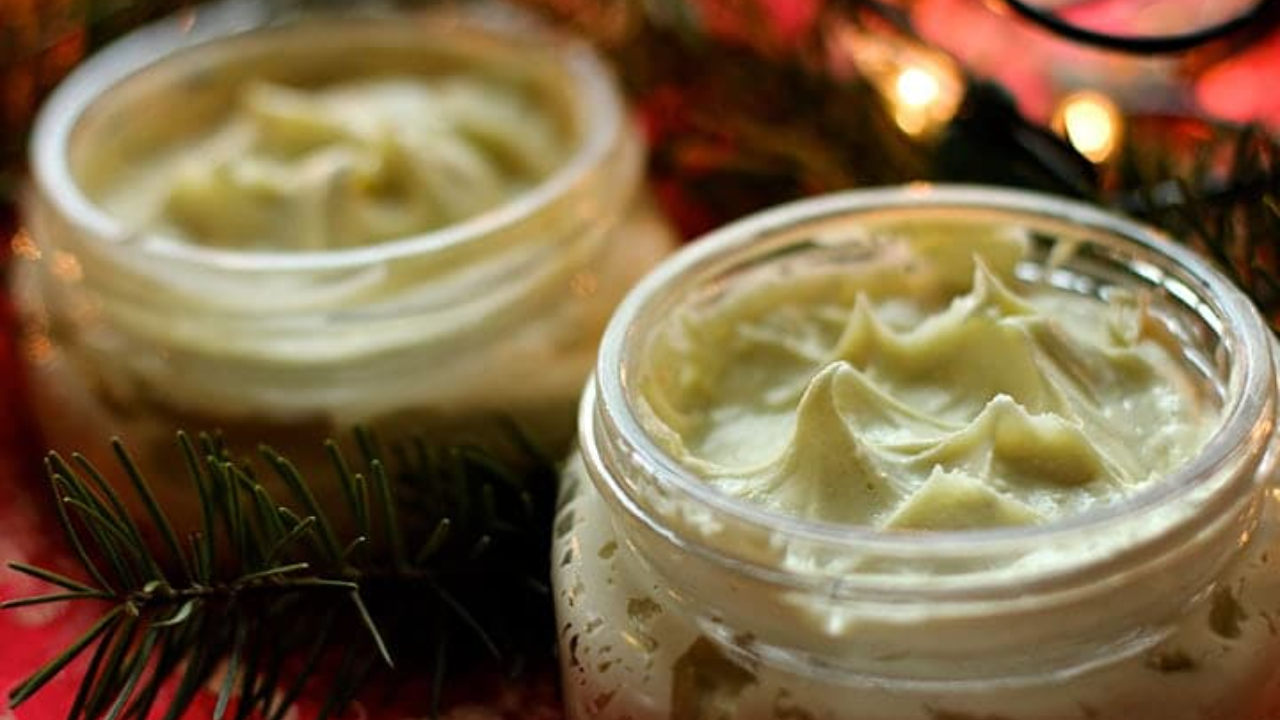
Step 5 – Storing Your Homemade Body Butter
Proper storage is essential to keep your body butter fresh and effective. Transfer the whipped mixture into clean, airtight glass jars or tins. Mason jars, cosmetic containers, or recycled skincare jars work perfectly.
Store your jars in a cool, dry place away from direct sunlight. Heat can cause the butter to melt, while sunlight may degrade the oils and essential oils. If you live in a hot climate, keeping it in the refrigerator during summer is a smart move.
Homemade body butter generally lasts 6–12 months, depending on the oils used and whether you added natural preservatives like vitamin E. Always use clean, dry hands or a spoon when scooping out the butter to prevent contamination.
And there you have it—your homemade body butter, ready to pamper your skin!
Tips and Tricks for Perfect Body Butter
Making body butter is simple, but a few small tweaks can take your recipe from good to incredible. Here’s how to perfect your blend:
How to Get a Fluffy and Whipped Texture
The secret to that dreamy whipped consistency lies in the cooling and whipping stages. Don’t rush. Alternate between chilling and whipping until your butter is fluffy and light. Using a stand mixer with a whisk attachment will make your life much easier, but a hand mixer works just fine too.
If your body butter ends up too firm, whip in a bit more liquid oil. If it’s too soft, chill it again and whip once more. Remember, this is all about experimenting until you find the texture you love.
Adjusting Recipes for Different Skin Types
Not all skin is the same, and that’s the beauty of DIY—you get to tailor it to your needs:
- For dry skin: Add more cocoa butter or shea butter for an ultra-rich cream.
- For oily or acne-prone skin: Use lightweight oils like jojoba or grapeseed and less butter.
- For sensitive skin: Stick with gentle ingredients like mango butter and avoid strong essential oils.
Common Mistakes to Avoid
- Overheating oils: This reduces their natural benefits. Always melt on low heat.
- Skipping the cooling stage: If you try to whip too early, you won’t get the fluffy consistency.
- Adding too much essential oil: It can irritate the skin. Stick to safe dilution ratios (about 1–2% of your total recipe).
- Not labeling jars: If you make multiple scents, it’s easy to confuse them later.
With these tips, your homemade body butter will rival anything you’d buy in a store.
Variations of Body Butter Recipes
One of the most exciting parts of making homemade body butter is experimenting with different variations. With just a few tweaks in ingredients and essential oils, you can create a butter that matches your mood, skin type, or even the season. Here are some tried-and-true recipes you’ll love:
Calming Lavender Body Butter
Lavender is well-known for its relaxing aroma and skin-soothing properties. This variation is perfect for use before bedtime or whenever you want to unwind.
Ingredients:
- ½ cup shea butter
- ¼ cup coconut oil
- ¼ cup sweet almond oil
- 15 drops lavender essential oil
- 1 teaspoon vitamin E oil
Benefits: Lavender essential oil helps reduce stress, calm irritation, and promote restful sleep. Combined with shea and almond oil, this butter provides deep hydration while gently soothing the skin.
Use it after a warm bath to lock in moisture and prepare your body for a restful night’s sleep.
Refreshing Citrus Body Butter
If you love an energizing scent that perks up your senses, citrus body butter is the way to go. This blend feels like sunshine in a jar!
Ingredients:
- ½ cup mango butter
- ¼ cup coconut oil
- ¼ cup jojoba oil
- 8 drops orange essential oil
- 7 drops lemon essential oil
- 5 drops grapefruit essential oil
Benefits: Citrus oils brighten the skin, uplift your mood, and add a refreshing aroma. Mango butter is lightweight, making this recipe less greasy—perfect for daytime use.
Apply this in the morning for a burst of energy and glowing skin that lasts throughout the day.
Deep Moisture Cocoa Body Butter
This recipe is designed for those with extra dry skin, especially in the colder months. Cocoa butter is the star here, known for its rich, protective qualities.
Ingredients:
- ½ cup cocoa butter
- ¼ cup shea butter
- ¼ cup olive oil
- 10 drops vanilla essential oil (optional for a chocolate-vanilla scent)
- 1 teaspoon vitamin E oil
Benefits: Cocoa butter forms a protective barrier that locks in moisture, while olive oil deeply nourishes and softens rough patches. Add vanilla essential oil for a warm, comforting fragrance that smells almost edible.
This butter is perfect for elbows, knees, heels, or any areas prone to dryness.
Storage and Shelf Life of Body Butter
You’ve put time and effort into making your homemade body butter, so storing it properly is key to preserving its texture, fragrance, and effectiveness.
How Long Does Homemade Body Butter Last?
Most body butters last anywhere from 6 to 12 months. The exact shelf life depends on the oils used and whether you added natural preservatives like vitamin E oil. Butters and oils are fats, and like all fats, they can eventually go rancid. You’ll know it’s time to toss it if it develops an off smell, changes color, or feels different on your skin.
To extend shelf life, always:
- Store in airtight containers.
- Keep away from heat and direct sunlight.
- Use clean, dry hands or a spoon to scoop.
Best Containers for Storage
Glass jars are the gold standard—they’re eco-friendly, reusable, and don’t react with essential oils. Dark-colored glass (like amber or cobalt) is even better because it protects your body butter from light.
If you prefer portability, small metal tins are great for travel or gifting. Plastic containers can work in a pinch, but they may absorb oils and odors over time.
Benefits of Using Natural Ingredients
One of the biggest reasons people switch to DIY skincare is the purity of natural ingredients. When you craft your own body butter, you’re skipping fillers, parabens, and synthetic fragrances that often irritate skin.
Skin Healing Properties
Natural butters and oils are loaded with vitamins, fatty acids, and antioxidants that heal and rejuvenate the skin. For example, shea butter contains cinnamic acid, which helps reduce inflammation, while coconut oil has antibacterial properties that support skin health.
Environmental and Cost Benefits
Beyond skin health, making your own products is kinder to the environment. By reusing jars and sourcing organic ingredients, you reduce packaging waste and avoid contributing to the harmful effects of chemical manufacturing.
And let’s talk savings—high-end body butters can cost $30 or more for a small jar. With DIY, you can whip up a batch for a fraction of the cost, often less than $10, depending on the ingredients you choose.
In short, using natural ingredients isn’t just a win for your skin; it’s a win for your wallet and the planet too.
Safety and Allergy Considerations
While natural ingredients are generally safe, it’s still important to be cautious. Everyone’s skin reacts differently, and what works for one person may not work for another.
Patch Testing Before Use
Before slathering your new body butter all over, do a simple patch test. Apply a small amount on your inner forearm and wait 24 hours. If there’s no redness, itching, or irritation, you’re good to go.
Avoiding Harmful Additives
Stick with high-quality, unrefined butters and oils whenever possible. Avoid synthetic fragrances or colorants unless you’re using skin-safe, natural options. Essential oils should always be used sparingly and diluted properly.
If you have specific allergies (like to nuts), be mindful of carrier oils like almond oil and substitute with alternatives such as grapeseed or sunflower oil.
By following these precautions, you can enjoy the benefits of body butter without unwanted side effects.
FAQs about Body Butter Recipe
1. Can I make body butter without essential oils?
Yes! Essential oils are optional. If you prefer unscented body butter or have sensitive skin, simply skip them.
2. How can I make body butter less greasy?
Add a tablespoon of arrowroot powder or cornstarch during the final whipping stage to cut down on greasiness.
3. What’s the best butter for very dry skin?
Cocoa butter is the richest and most protective, making it ideal for extremely dry or cracked skin.
4. Can I add color to homemade body butter?
Yes, but use natural colorants like mica powder or beetroot powder. Avoid synthetic dyes that may irritate skin.
5. How often should I apply body butter?
You can use it daily, ideally after a shower or bath when your skin is still slightly damp for better absorption.
Conclusion
Making body butter at home is an empowering way to take control of your skincare routine. With just a few natural ingredients, you can create a luxurious product tailored to your skin’s unique needs. Whether you prefer the calming scent of lavender, the energizing freshness of citrus, or the deep nourishment of cocoa butter, there’s a recipe for everyone.
Not only will your skin thank you for the hydration and care, but you’ll also feel the satisfaction of crafting something with your own hands. Plus, it’s eco-friendly, cost-effective, and endlessly customizable. So why settle for store-bought when you can whip up your own skin-loving goodness right at home?


