Blueberry Biscuit Recipe: Who doesn’t love the combo of warm, fluffy biscuits and juicy blueberries bursting in every bite? This blueberry biscuit recipe is the perfect way to bring a little sweetness to your morning routine or afternoon snack. These aren’t your average biscuits—no, they’re soft, flaky, slightly sweet, and loaded with fresh blueberry flavor. Whether you’re making them for brunch, dessert, or just because, this recipe delivers every time.
The best part? You don’t have to be a professional baker to pull it off. With simple ingredients and our step-by-step guide, you’ll whip up a batch of bakery-quality blueberry biscuits right in your own kitchen. Get ready for golden brown tops, buttery layers, and fruity goodness in every bite.
So, grab your apron and let’s get into it. These blueberry biscuits are about to become your new go-to!
List of Ingredients You’ll Need
Before diving into the step-by-step instructions, make sure you’ve got everything you need on hand. Here’s your complete ingredient checklist to make sure you’re fully stocked.
Dry Ingredients
- 2 cups all-purpose flour – the base of your biscuit dough.
- 1 tablespoon baking powder – gives the biscuits their lift.
- ½ teaspoon baking soda – adds lightness and helps balance the acidity.
- ½ teaspoon salt – enhances the overall flavor.
- 3 tablespoons granulated sugar – for a touch of sweetness.
Wet Ingredients
- ½ cup unsalted butter (cold and cubed) – this creates those tender, flaky layers.
- ¾ cup buttermilk (cold) – adds richness and reacts with the leaveners for rise.
- 1 teaspoon vanilla extract – for added depth and warmth.
Fruit
- 1 cup fresh blueberries – the star of the show! You can also use frozen, just don’t thaw them first.
Optional Toppings
- 1 tablespoon heavy cream or melted butter – to brush on top before baking.
- Coarse sugar – for a crunchy, sweet finish.
- Simple vanilla glaze – to drizzle over warm biscuits for extra sweetness (recipe below).
💡 Pro tip: Keep all your cold ingredients in the fridge until the moment you need them. Cold butter = flakier biscuits!
Essential Tools and Equipment
You don’t need fancy equipment to make these biscuits, but having the right tools will make the process smoother and more enjoyable. Here’s what we recommend:
- Mixing bowls – one large for dry ingredients, one small for wet.
- Pastry cutter or two forks – for cutting butter into the flour.
- Measuring cups and spoons – accuracy matters in baking!
- Baking sheet – lined with parchment paper for easy cleanup.
- Rolling pin (optional) – or just pat the dough by hand.
- Biscuit cutter or drinking glass – to cut out those perfect rounds.
- Pastry brush – for brushing cream or butter on top.
If you’re missing a tool, don’t worry—you can usually find a creative workaround. The key is to not let anything stop you from baking!
How to Choose the Best Blueberries
Your biscuits are only as good as the berries you put in them. Here’s how to pick the best ones:
- Fresh blueberries: Look for plump, deep blue berries with a silvery sheen. Avoid any that look shriveled or mushy.
- Frozen blueberries: Totally fine! Use them straight from the freezer—no need to thaw. Just toss them in a tablespoon of flour before mixing to prevent color bleeding.
- Wild blueberries: These are smaller and pack a tangier punch. They work great too!
💡 Tip: If your berries are very tart, you can sprinkle a little sugar over them before adding to the dough for balance.
Preparing Your Ingredients
Before you start mixing, take a few minutes to prep everything properly:
- Measure accurately: Spoon flour into your measuring cup and level it off with a knife—don’t scoop straight from the bag!
- Chill your butter: Cube it and pop it back in the fridge while you prep everything else. The colder, the better.
- Rinse and dry berries: If using fresh blueberries, rinse gently and pat them completely dry.
This step might feel small, but it really sets you up for baking success. Prepping well = smooth sailing during the baking process.
Step-by-Step Guide to Making Blueberry Biscuits
Now that you’ve gathered your ingredients and tools, it’s time to get baking! Follow this step-by-step guide closely, and you’ll have a batch of delicious, golden blueberry biscuits ready in no time.
Step 1: Preheat the Oven
Start by preheating your oven to 425°F (220°C). You want it nice and hot, so the biscuits rise fast and form those beautiful flaky layers. While the oven heats, line a baking sheet with parchment paper or a silicone baking mat.
Step 2: Mix the Dry Ingredients
In a large mixing bowl, whisk together:
- 2 cups all-purpose flour
- 1 tablespoon baking powder
- ½ teaspoon baking soda
- ½ teaspoon salt
- 3 tablespoons sugar
This dry blend sets the stage for the perfect biscuit dough. Make sure all ingredients are evenly mixed, so you don’t end up with clumps of baking soda or salt.
Step 3: Cut in the Butter
Next, grab your cold, cubed butter from the fridge. Using a pastry cutter or two forks, cut the butter into the flour mixture until it looks like coarse crumbs. You should still see pea-sized bits of butter scattered throughout.
Why is this step important? Because those butter bits will melt during baking, creating steam pockets that lead to flaky, tender biscuits.
💡 Pro Tip: You can also freeze your butter and grate it using a box grater for even distribution and easier cutting.
Step 4: Add Blueberries and Wet Ingredients
Gently fold in your blueberries. Be careful not to crush them!
In a separate bowl, whisk together:
- ¾ cup cold buttermilk
- 1 teaspoon vanilla extract
Pour the buttermilk mixture into your flour-butter-blueberry combo and stir gently just until the dough starts to come together. Don’t overmix — the dough should be shaggy and slightly sticky.
Step 5: Form the Dough
Turn the dough out onto a lightly floured surface. With floured hands, gently pat it into a rectangle about 1-inch thick. If the dough feels too sticky, sprinkle a little more flour, but don’t overdo it — too much flour will make your biscuits dry.
Now here’s the key to flaky biscuits: fold the dough like a letter. Fold it into thirds, turn it 90 degrees, pat it down again, and repeat the folding process 2–3 times. This creates visible layers.
Step 6: Cut the Biscuits
Once you’ve folded the dough, gently pat it into a final 1-inch-thick rectangle. Use a round biscuit cutter (or a floured glass) to cut out your biscuits. Press straight down—don’t twist—so the biscuits can rise evenly.
Gather the scraps, gently re-pat them, and cut out more biscuits until all the dough is used.
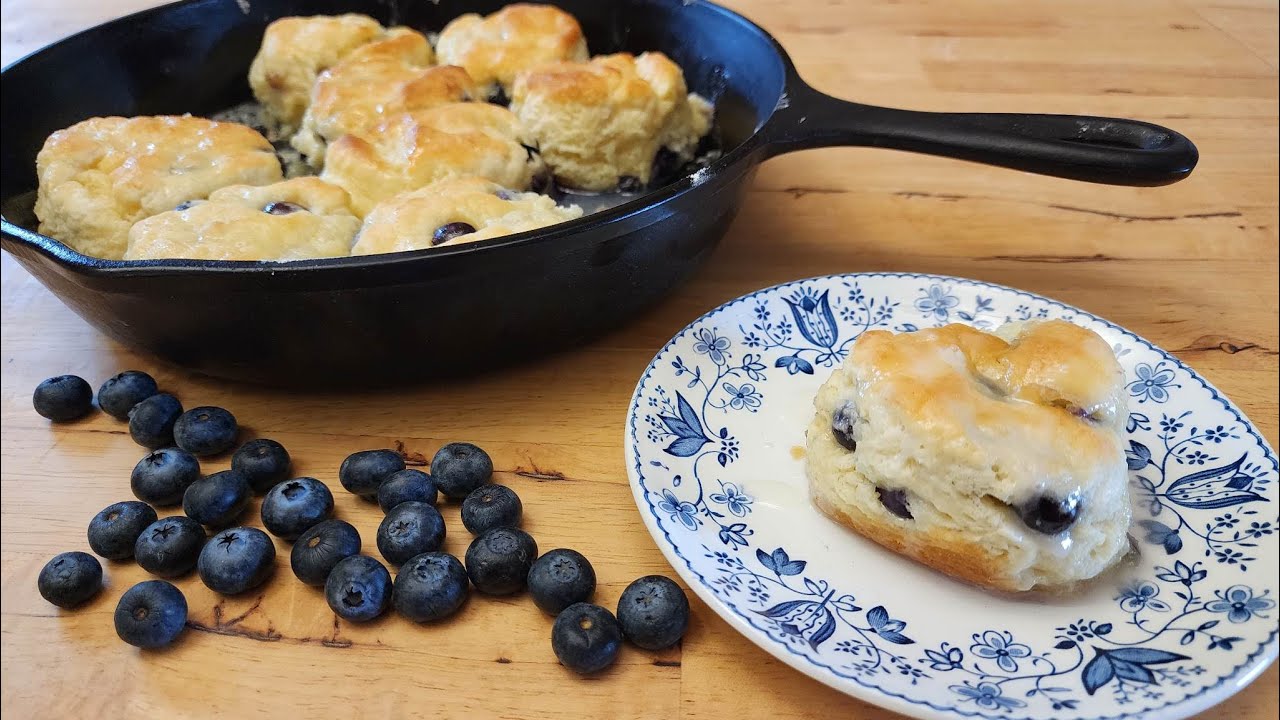
Step 7: Bake to Golden Perfection
Place the biscuits onto your prepared baking sheet. For softer sides, place them close together. For crispier edges, space them out.
Brush the tops with heavy cream or melted butter for that beautiful golden finish, and sprinkle with a little coarse sugar if you want a sweet crunch.
Bake at 425°F (220°C) for 15–18 minutes, or until the tops are golden brown and a toothpick inserted comes out clean.
Step 8: Cooling and Serving
Let the biscuits cool on the pan for 5 minutes, then transfer them to a wire rack. Serve them warm — either plain, buttered, or with a sweet glaze on top.
Trust me, these are going to disappear fast.
Common Mistakes to Avoid
Even a simple recipe like this has a few pitfalls. Here are the most common mistakes and how to avoid them:
- Overmixing the dough: This can make your biscuits tough and dense. Mix just until combined.
- Using warm butter: Warm butter won’t create the layers you want. Keep it cold!
- Twisting the biscuit cutter: This seals the edges and stops the biscuit from rising fully.
- Crowding the pan: If you want crispy edges, give each biscuit room to expand.
- Overbaking: They should be golden on top and just cooked through. Watch the last few minutes closely.
Learning from these tips will set you up for biscuit success every single time.
Tips to Make Your Blueberry Biscuits Extra Flaky
Let’s talk about flakiness—because that’s what sets a good biscuit apart from a great one. You know that satisfying pull-apart texture that makes every bite a buttery dream? Yep, that’s what we’re after. Follow these tips to nail it every single time:
1. Keep Everything Cold
This can’t be stressed enough. Cold ingredients are the key to flaky layers.
- Cold butter: When it melts in the oven, it releases steam that creates air pockets (aka flakiness).
- Cold buttermilk: Helps keep the dough chilled and prevents butter from melting early.
- Cold mixing bowl: Bonus tip—chilling your bowl can help if your kitchen is warm.
💡 If the dough starts to feel too warm, just pop it in the fridge for 10 minutes before rolling it out.
2. Don’t Overwork the Dough
You’re not kneading bread here. Overworking the dough develops gluten, which leads to chewy, tough biscuits. You want to mix until the dough just comes together. A few dry spots? Totally okay.
3. Use the Folding Method
Folding the dough like a letter and patting it down several times helps build layers, just like in croissant or puff pastry dough. This simple trick boosts flakiness without adding complexity.
4. Pat, Don’t Roll
Instead of rolling out the dough aggressively, pat it gently with your hands. This helps preserve the structure and avoids pressing out all the little butter chunks you worked so hard to keep cold.
5. Bake at High Heat
Baking your biscuits at 425°F (220°C) gives them a strong, quick rise. Low-and-slow baking won’t create the same lift or golden tops.
These aren’t just little extras—they make the difference between a decent biscuit and a bakery-worthy masterpiece.
How to Store and Reheat Blueberry Biscuits
Baked a big batch and wondering how to keep them fresh? Don’t worry, your biscuits will stay delicious for days—if they even last that long.
Storing Your Biscuits
- Room Temperature: Store in an airtight container for up to 2 days. Keep them wrapped in a clean kitchen towel or parchment to avoid sogginess.
- Refrigerator: If you plan to keep them longer, place biscuits in a sealed container and refrigerate for up to 5 days.
💡 Add a paper towel inside the container to absorb excess moisture and keep the texture just right.
How to Reheat Without Drying Them Out
To bring your biscuits back to life:
- Oven: Preheat to 350°F (175°C), wrap the biscuits in foil, and warm for 8–10 minutes.
- Microwave: Wrap in a damp paper towel and heat for 15–20 seconds. It works in a pinch, but the oven is better for texture.
A quick brush of melted butter after reheating also helps them taste freshly baked!
Can You Freeze Blueberry Biscuits?
Absolutely, and it’s one of the best ways to always have fresh biscuits ready when you want them. You can freeze both unbaked and baked blueberry biscuits—each method has its pros.
Freezing Unbaked Biscuits
- Place the cut biscuit dough on a parchment-lined tray.
- Freeze until solid (about 1 hour).
- Transfer to a freezer-safe bag or container and label.
✅ Bake straight from frozen at 425°F. Just add a couple of extra minutes to the baking time.
Freezing Baked Biscuits
Let the baked biscuits cool completely, then:
- Wrap individually in plastic wrap or foil.
- Place in a freezer bag and squeeze out excess air.
✅ To reheat, bake at 350°F wrapped in foil for 10–12 minutes.
Both methods work great, so use whatever fits your schedule!
Serving Suggestions
Wondering what to serve with your warm, buttery blueberry biscuits? There are so many ways to enjoy them!
Sweet Serving Ideas
- Drizzle with glaze (see next section)
- Spread with honey butter or fruit jam
- Top with whipped cream and more berries for a shortcake-style dessert
Savory Combos That Work Surprisingly Well
- Serve alongside fried chicken or savory brunch dishes for a sweet-savory contrast
- Add a bit of cheese to the dough for a tangy twist (cheddar + blueberry = delicious!)
- Sandwich them with bacon and eggs for an epic breakfast sandwich
However you serve them, these biscuits are sure to steal the show.
How to Make a Simple Glaze (Optional)
Want to make your biscuits even more irresistible? Drizzle on a quick vanilla glaze. It’s simple and elevates the entire batch.
Simple Glaze Recipe
- ½ cup powdered sugar
- 1 tablespoon milk or cream
- ¼ teaspoon vanilla extract
Mix everything in a small bowl until smooth. If it’s too thick, add more milk one teaspoon at a time. Drizzle over warm biscuits using a spoon or fork.
Want a citrus twist? Add a bit of lemon or orange zest. It’ll complement the blueberries beautifully.
Gluten-Free and Vegan Alternatives
Craving blueberry biscuits but have dietary restrictions? No worries—we’ve got you covered. With a few smart swaps, you can enjoy these tasty treats whether you’re gluten-free, vegan, or both!
Gluten-Free Version
To make gluten-free blueberry biscuits, replace the all-purpose flour with a 1:1 gluten-free baking flour blend. Look for one that includes xanthan gum, which helps mimic the elasticity of gluten.
Additional tips:
- Don’t overmix: Gluten-free dough can become gummy if overworked.
- Chill the dough: This helps firm up the texture before cutting and baking.
- Bake slightly longer: You might need to add 2–3 extra minutes for them to cook through.
Some popular gluten-free flour brands include Bob’s Red Mill and King Arthur Baking’s GF blend.
Vegan Version
For a vegan-friendly twist, here’s how to adjust the ingredients:
- Butter → Use vegan butter or solid coconut oil (unsweetened and unflavored)
- Buttermilk → Make your own vegan version: Mix ¾ cup almond or oat milk with 1 tablespoon apple cider vinegar and let it sit for 5 minutes.
- Optional glaze → Use plant-based milk in the glaze recipe.
Make sure any sugar you use is certified vegan, as some sugars are processed with animal byproducts.
✅ These swaps still result in fluffy, flavorful biscuits that no one will guess are vegan or gluten-free!
FAQs about Blueberry Biscuit Recipe
1. Can I use frozen blueberries for biscuits?
Absolutely! Frozen blueberries work great—just use them straight from the freezer and toss them in a little flour before mixing to prevent color bleeding.
2. Why didn’t my biscuits rise?
This could be due to old baking powder, overworked dough, or twisting the cutter while shaping. Always use fresh leavening agents and press your cutter straight down without twisting.
3. What’s the best flour to use for blueberry biscuits?
All-purpose flour works perfectly. If you want extra tender biscuits, you can try a mix of all-purpose and cake flour.
4. Can I make the dough ahead of time?
Yes! You can prepare the dough, shape the biscuits, and freeze them unbaked. When ready to bake, just pop them straight into the oven—no thawing needed.
5. How do I keep biscuits from getting soggy?
Cool them completely before storing and keep them in a paper towel-lined container to absorb excess moisture. Reheat in the oven to restore crispness.
Conclusion
And there you have it—a complete, foolproof guide to making homemade blueberry biscuits that are flaky, buttery, and bursting with berry flavor. Whether you’re enjoying them warm from the oven, drizzled with glaze, or paired with your favorite brunch dish, these biscuits are guaranteed to impress.
The beauty of this recipe is in its simplicity. With just a handful of pantry staples and some juicy blueberries, you can create something that looks and tastes like it came straight from a bakery. Whether you’re a beginner baker or a seasoned pro, this step-by-step guide ensures success every time.
So what are you waiting for? Preheat that oven, grab your blueberries, and treat yourself (and your family) to something special. Once you make these once, they’re going to be on repeat—trust me.