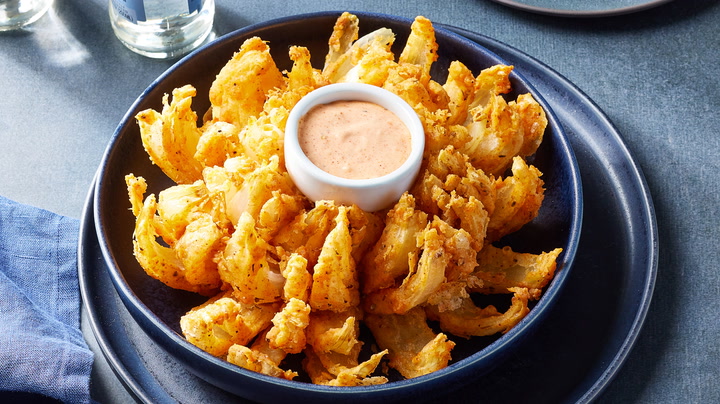
Blooming Onion Sauce Recipe: You’ve probably sat down at a restaurant like Outback Steakhouse and marveled at the crispy, golden-brown blooming onion before diving right into that addictive dipping sauce. That tangy, creamy, spicy sauce is the real hero behind the appetizer. But guess what? You don’t need to dine out every time you crave it—you can recreate it right at home.
Making your own Blooming Onion Sauce isn’t just easy—it’s fun and way more rewarding. You control the ingredients, dial the spice up or down, and skip the preservatives. This step-by-step guide will walk you through the exact process to make the perfect sauce from scratch. Whether you’re making it for a blooming onion, fries, burgers, or even as a spread for sandwiches, this sauce is going to become your new obsession.
Ready to sauce things up in your kitchen? Let’s go!
List of Ingredients You’ll Need
Making Blooming Onion Sauce doesn’t require anything fancy. In fact, you likely have most of these ingredients in your pantry or fridge already.
Primary Ingredients:
Here’s everything you’ll need for the classic flavor:
- Mayonnaise (½ cup): The creamy base of the sauce. Go for full-fat for richness.
- Ketchup (2 tablespoons): Adds a tangy sweetness.
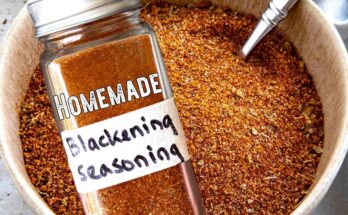
- Prepared Horseradish (2 teaspoons): Brings the heat and zip that gives the sauce its kick.
- Paprika (1 teaspoon): Gives that smoky depth.
- Garlic Powder (½ teaspoon): For bold aroma and flavor.
- Onion Powder (¼ teaspoon): Enhances the savoriness.
- Salt & Black Pepper (to taste): For balance and seasoning.
Optional Add-Ins for Extra Flavor:
- Hot Sauce (a few dashes): For spice lovers.
- Worcestershire Sauce (½ teaspoon): For added umami.
- Smoked Paprika or Cayenne Pepper (a pinch): For a deeper, smokier heat.
Ingredient Tips:
- Use freshly opened mayo and ketchup for the best taste.
- Always taste your horseradish before adding—it varies in strength by brand.
Step-by-Step Guide to Making Blooming Onion Sauce
Let’s break it down one step at a time. Don’t worry—it’s foolproof.
Step 1: Gather All Your Ingredients
Before you even pick up a spoon, make sure you’ve got everything laid out. This practice, known as “mise en place,” makes cooking smoother and faster. Double-check your spices, measure out your mayo and ketchup, and make sure your horseradish isn’t expired (trust us, that stuff can go funky fast).
A good setup means you won’t be scrambling mid-recipe, and your sauce will come together like a pro made it.
Step 2: Mix the Base (Mayo & Ketchup)
Start by combining the mayonnaise and ketchup in a medium-sized mixing bowl. This is your creamy, sweet foundation. The mayo adds richness, while the ketchup brings in that zingy, slightly sweet undertone.
Ratio Tip: The standard 2:1 ratio of mayo to ketchup is ideal for balancing flavor and consistency. You can always tweak it later, but this is a solid start.
Use a whisk or spoon to blend them well. You want a smooth, even mix without any visible streaks of either ingredient.
Step 3: Add Horseradish and Spices
Next up: flavor bombs.
Add your prepared horseradish to the bowl. This is where the sauce gets that signature kick—it’s bold, sharp, and a little fiery. Start with 2 teaspoons and increase if you want more heat.
Then, sprinkle in your spices:
- Paprika
- Garlic powder
- Onion powder
- Salt & pepper
Pro Tip: If you’re feeling adventurous, a dash of cayenne or a few drops of hot sauce can really bring it to life.
Gently fold the spices in until everything’s fully incorporated. The color should shift to a light orange-pink hue.
Step 4: Blend Until Smooth
This step may seem minor, but consistency matters. You can use a whisk, fork, or even a small food processor. The goal is a silky, lump-free sauce.
If you see clumps or gritty bits, keep stirring. A well-blended sauce is not only prettier but coats food more evenly—and tastes better.
Step 5: Taste and Adjust
Now for the fun part—taste-testing!
Use a spoon (or better yet, a fry) to check the flavor. Does it need more tang? Add a touch more ketchup. Too bland? Sprinkle in more garlic or salt. Too spicy? Stir in extra mayo to cool it down.
This step is all about customizing the sauce to your taste. No two batches ever need to be the same!
Step 6: Let It Rest (Chill Time)
Here’s a secret: the sauce gets WAY better after it chills. Pop it into a sealed container and refrigerate it for at least 30 minutes, preferably an hour or more.
During this time, the flavors blend and mellow out. The heat from the horseradish softens, and the garlic and paprika infuse into the creamy base.
Trust the process. It’s worth the wait.
Step 7: Serve and Enjoy!
Your Blooming Onion Sauce is ready to steal the show. Pair it with:
- A freshly made blooming onion
- Onion rings
- French fries
- Chicken tenders
- Burgers or sliders
- Veggie sticks
It’s creamy, spicy, savory, and totally addictive. Watch it disappear in minutes.
Pro Tips for the Perfect Blooming Onion Sauce
Want to take your sauce from good to unforgettable? These pro tips can make all the difference.
1. Use High-Quality Mayo
Not all mayonnaise is created equal. A rich, creamy mayo like Duke’s or Hellmann’s gives the best texture and depth of flavor. Avoid low-fat or light versions—they tend to water down the sauce and dull the flavor.
2. Don’t Skip the Horseradish
Horseradish is the signature ingredient that gives Blooming Onion Sauce its trademark “zing.” Use the prepared horseradish found in the refrigerated section, not horseradish sauce (which is diluted with other ingredients). Start small and build your way up based on your spice tolerance.
3. Spice It Right
Smoked paprika adds a delicious depth of flavor that regular paprika lacks. Want more heat? Cayenne or hot sauce is your best friend. Want more tang? A splash of lemon juice or vinegar can brighten things up.
4. Let It Chill – Seriously
Letting the sauce rest in the fridge for at least 30 minutes is non-negotiable. It helps the flavors meld together, making the taste more cohesive and balanced.
5. Stir Before Serving
Sometimes, the sauce may separate slightly if it sits for a while in the fridge. Just give it a good stir before serving to restore its creamy consistency.
These little tweaks can turn a simple dip into a star of the meal.
Common Mistakes to Avoid
Even with simple recipes, things can go sideways. Watch out for these common slip-ups:
1. Using Horseradish Sauce Instead of Prepared Horseradish
Horseradish sauce is much milder and already mixed with mayo or cream, which will water down your Blooming Onion Sauce. Stick with prepared horseradish to keep that sharp kick.
2. Adding Too Much Paprika
Paprika is great for color and a smoky edge, but too much can overpower the rest of the flavors and make the sauce taste dry or powdery.
3. Skipping the Chill Time
In a rush? It’s tempting to serve the sauce right away—but don’t. Skipping the resting period leads to a sauce that tastes disjointed and flat.
4. Overmixing with a Food Processor
Yes, a food processor can save time, but don’t overdo it. Overmixing can break down the mayo and turn your sauce runny.
5. Using Expired or Low-Quality Spices
Old spices lose their punch. Make sure your garlic powder, onion powder, and paprika are fresh for the best flavor.
Avoid these mistakes and your sauce will taste just like (or even better than) the restaurant version.
How to Store and Reuse the Sauce
Once you’ve whipped up this flavor-packed sauce, the next question is: how do you store it?
Refrigeration
Store the sauce in an airtight container—glass jars with tight-fitting lids work best. Keep it in the fridge, and it’ll stay fresh for up to 7 days.
Can You Freeze It?
Technically, yes—but it’s not ideal. Mayo-based sauces tend to separate and get a weird texture when thawed. Stick to refrigerating for the best results.
Reusing Tips
This sauce is a leftover hero. You can use it the next day as:
- A sandwich spread
- A dip for chicken nuggets or fish sticks
- A burger topping
- A dressing base (thin it with a little milk or lemon juice)
Just give it a stir before each use, and it’s good to go!
Serving Ideas Beyond Blooming Onions
This sauce isn’t just for blooming onions—its flavor is versatile enough to pair with tons of other dishes.
1. French Fries
Move over, ketchup. This sauce is rich, spicy, and the perfect dip for crispy fries.
2. Onion Rings
Double the onion fun! Dipping onion rings into Blooming Onion Sauce is a match made in heaven.
3. Chicken Tenders or Nuggets
Crispy chicken + this sauce = next-level snack. Great for game days or lunchboxes.
4. Burger or Sandwich Spread
Swap out plain mayo for this sauce on your next burger. It brings a punch of flavor that makes every bite better.
5. Veggie Dip
Looking for a way to make raw veggies exciting? This sauce does the trick—especially with carrots, celery, and bell peppers.
6. Seafood Dip
Try it with fried shrimp, fish sticks, or even crab cakes. The creamy texture and zesty flavor complement seafood perfectly.
This sauce is your all-in-one flavor booster. Once you make it, you’ll find yourself reaching for it again and again.
Nutritional Information (Approximate)
Curious about what’s in each bite? Here’s a general breakdown of Blooming Onion Sauce per tablespoon (approximate values):
| Nutrient | Amount |
|---|---|
| Calories | 90–100 kcal |
| Fat | 10g |
| Carbohydrates | 1–2g |
| Protein | <1g |
| Sugar | 1g |
| Sodium | 150–200mg |
Healthier Substitutes:
- Use Greek yogurt instead of mayo for a protein-packed, lighter version.
- Try vegan mayo to make it plant-based.
- Reduce the ketchup and add tomato paste + vinegar to lower sugar.
This sauce isn’t exactly low-calorie, but it’s all about balance—and flavor!
Why Make It at Home?
Still wondering if it’s worth making your own sauce? Let’s break it down.
1. You Control the Flavor
Want it spicier? Creamier? Less salty? When you make it yourself, you’re the boss.
2. No Preservatives or Fillers
Store-bought sauces often contain ingredients you can’t pronounce. Homemade means fresh and clean.
3. Saves Money
Instead of paying restaurant prices, you can make a whole batch for the cost of a couple condiment packets.
4. It’s Fun!
There’s something super satisfying about making your own dipping sauce. It’s a small win in the kitchen—and one your taste buds will thank you for.
FAQs about Blooming Onion Sauce Recipe
1. Can I make Blooming Onion Sauce without horseradish?
Yes, but you’ll miss that signature kick. Try substituting with a bit of Dijon mustard or wasabi for a similar effect.
2. How long does homemade Blooming Onion Sauce last?
It lasts about 5–7 days in the fridge when stored in an airtight container.
3. What does Blooming Onion Sauce taste like?
It’s creamy, tangy, slightly spicy, and full of savory flavor with a hint of sweetness.
4. Is this sauce spicy?
It has a mild kick from horseradish and optional hot sauce, but it’s not overly spicy. You can adjust the heat to your liking.
5. Can I make a vegan version of this sauce?
Absolutely! Use vegan mayo and make sure your other ingredients are plant-based. The flavor will still be delicious.
Conclusion
The next time you crave that zesty, creamy, slightly spicy dip that makes Blooming Onions shine, skip the restaurant and head to your kitchen. This homemade Blooming Onion Sauce recipe is incredibly simple, customizable, and straight-up addictive.
With just a few pantry ingredients and a little chill time, you’ll have a sauce that’s not only great with blooming onions but also fries, burgers, chicken, and more. The best part? You made it from scratch—and it tastes even better than what you’d get out.
So, grab your mixing bowl and whip up a batch. Once you try it, you’ll never want to dip into anything else again.