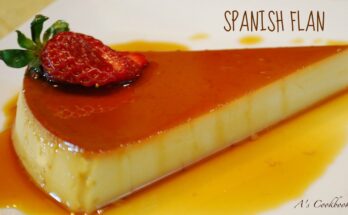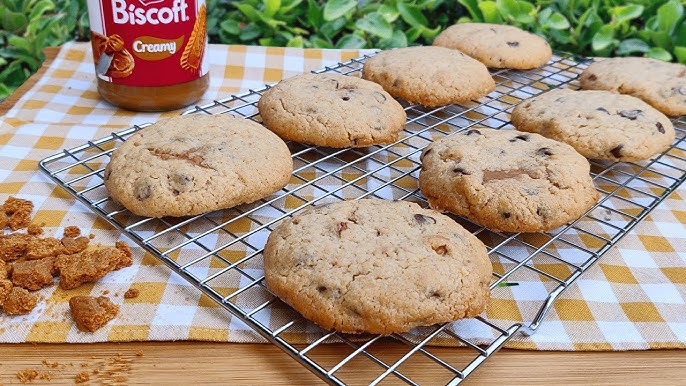
Biscoff Cookies Recipe: There’s something magical about biting into a cookie that’s crispy on the edges, slightly chewy in the middle, and bursting with warm, spiced flavors. That’s exactly what Biscoff cookies bring to the table. Known for their deep caramelized taste and subtle notes of cinnamon, nutmeg, and brown sugar, these cookies are more than just a sweet treat—they’re an experience. They pair beautifully with coffee, tea, or even a cold glass of milk, making them a go-to indulgence for any time of the day.
What Makes Biscoff Cookies Special?
Unlike traditional cookies, Biscoff cookies are made with a perfect balance of spices and caramelized sugar. Their flavor is rich yet comforting, with hints of cinnamon and a slightly earthy depth that keeps you reaching for another bite. They’re lighter than gingerbread, less sweet than sugar cookies, and more complex than your everyday biscuit. What really sets them apart is their texture—thin, crispy, and delicate, yet sturdy enough to dunk into a hot drink without falling apart.
Think of them as the ultimate coffee companion: a treat that doesn’t overpower your beverage but enhances it with every bite. Whether you bake them at home or grab a pack from the store, Biscoff cookies have earned their cult-favorite status for a reason.
A Brief History of Biscoff Cookies
Biscoff cookies, also known as “speculoos,” originated in Belgium. Traditionally, they were baked during the holiday season, particularly around St. Nicholas Day, using wooden molds to create intricate patterns. Over time, the cookies gained popularity worldwide, especially after Lotus Bakeries began mass-producing them. Today, they’re a beloved snack served on airplanes, coffee shops, and home kitchens alike.
The word “Biscoff” itself is a combination of “biscuit” and “coffee,” which perfectly sums up the cookie’s purpose. What started as a festive European treat is now a global delight, and the good news is—you don’t have to travel abroad to enjoy them. With the right recipe, you can make these golden-brown cookies right in your kitchen.
Ingredients You’ll Need
Before we jump into baking, let’s gather everything you’ll need. The beauty of this recipe is that it uses common pantry staples, plus a few spices that give it that signature flavor.
Dry Ingredients
- 2 cups all-purpose flour
- 1 teaspoon baking soda
- ½ teaspoon baking powder
- ½ teaspoon salt
- 1 teaspoon ground cinnamon
- ½ teaspoon ground nutmeg
- ¼ teaspoon ground ginger
- ¼ teaspoon ground cloves
- ½ cup brown sugar (packed)
- ½ cup granulated sugar
These dry ingredients create the foundation of the cookie. The flour holds everything together, while the spices deliver that iconic warm, cozy taste. Brown sugar adds depth with its molasses content, while granulated sugar ensures the cookies stay crispy.
Wet Ingredients
- ¾ cup unsalted butter (softened to room temperature)
- 1 large egg
- 1 teaspoon vanilla extract
- 2 tablespoons milk
Butter is the star of most cookies, and here it brings richness and a melt-in-your-mouth texture. The egg binds everything, while vanilla adds a sweet aroma that complements the spices beautifully. Milk helps loosen the dough just enough for easy shaping.
Optional Add-ins for Flavor Enhancement
- ¼ cup Biscoff spread (for extra flavor)
- ½ cup mini chocolate chips (for a twist)
- Crushed Biscoff cookies (to fold into the dough for crunch)
These are not mandatory, but if you’re feeling adventurous, they’ll elevate your cookies to the next level. Adding a spoonful of Biscoff spread to the dough creates a more intense caramelized flavor, while chocolate chips add sweetness. Crushed cookies inside cookies? That’s just cookie heaven.
Essential Tools for Baking
You don’t need fancy gadgets to make Biscoff cookies, but having the right tools ensures smooth baking and consistent results.
Baking Equipment Checklist
- Mixing bowls (one large, one medium, one small)
- Measuring cups and spoons
- Electric mixer or stand mixer (optional, but helpful)
- Rubber spatula
- Whisk
- Rolling pin
- Cookie cutters or a sharp knife
- Baking sheet
- Parchment paper or silicone baking mat
- Cooling rack
This equipment makes the process easier. If you don’t have a stand mixer, a hand mixer works just fine. And if you don’t own cookie cutters, don’t worry—a simple knife can cut neat squares or rectangles.
Tips for Accurate Measurements
When baking, accuracy matters. Here are a few quick tips:
- Spoon flour into your measuring cup and level it off with a knife (never scoop directly from the bag, or you’ll pack in too much).
- Use liquid measuring cups for milk and vanilla, not dry ones.
- Pack brown sugar firmly into the cup so it holds its shape when turned out.
- Always double-check your spices—they make or break this recipe.
Getting the measurements right ensures your cookies come out with the perfect texture and flavor balance every single time.
Step-by-Step Guide to Making Biscoff Cookies
Now that we’ve got the ingredients and tools ready, let’s get into the fun part: baking. Follow these steps carefully, and you’ll have a batch of golden, crisp, and delicious Biscoff cookies that taste like they came straight from Belgium.
Step 1 – Preparing the Dough
The first step in making Biscoff cookies is creating a well-balanced dough. Start by creaming together the butter, brown sugar, and granulated sugar in a large mixing bowl until it becomes light and fluffy. This step is crucial because it incorporates air into the mixture, giving your cookies a lighter texture.
Next, add the egg and vanilla extract, mixing until fully combined. In a separate bowl, whisk together all the dry ingredients—flour, baking soda, baking powder, salt, and spices. Slowly add the dry mixture to the wet ingredients, stirring until just combined. Be careful not to overmix; you want the dough to hold together but not become tough.
If you’re adding Biscoff spread or other mix-ins, fold them in gently at this stage. The dough should feel soft but not sticky. If it’s too sticky, pop it in the fridge for 10–15 minutes before moving to the next step.
Step 2 – Chilling the Dough
Chilling the dough is one of the most important steps in making Biscoff cookies, and it’s often the difference between cookies that spread too much and cookies that hold their perfect shape. After mixing your dough, transfer it to a lightly floured surface and shape it into a disk. Wrap it tightly in plastic wrap and refrigerate for at least 1 to 2 hours. If you’re planning ahead, you can even let it rest overnight.
Why is this step so crucial? When dough chills, the butter firms up, which prevents the cookies from spreading too thin during baking. It also gives the spices time to meld into the flour, resulting in a richer, more aromatic flavor. Think of it as letting all the ingredients “get to know each other” before they hit the oven.
Here’s a helpful tip: if you’re in a hurry, you can pop the dough in the freezer for 30 minutes instead of refrigerating for 2 hours. Just don’t skip chilling altogether—it’s what ensures that signature crispness. Once your dough is chilled, it should be firm enough to roll out without sticking to your rolling pin. If it’s too stiff straight from the fridge, leave it on the counter for 5 minutes before working with it.
At this point, your kitchen will already smell like warm spices, and you’ll know you’re just steps away from a batch of heavenly Biscoff cookies.
Step 3 – Shaping the Cookies
Now comes the fun and creative part—shaping your cookies! Lightly flour your surface and rolling pin, then roll out the chilled dough to about ¼-inch thickness. The thickness matters: too thin and the cookies will burn quickly, too thick and they’ll lose that classic crisp texture.
Traditionally, Biscoff cookies are rectangular with slightly rounded edges, but don’t feel limited to that. You can use cookie cutters to create festive shapes for the holidays or keep it simple with circles. If you want a rustic look, you can even cut the dough into neat squares with a sharp knife.
As you cut your cookies, place them on a baking sheet lined with parchment paper or a silicone mat, leaving about an inch of space between each one. This allows for even baking and proper airflow. If the dough gets too soft while cutting, don’t panic—just slide it back into the fridge for 10 minutes to firm up again.
Pro tip: For those picture-perfect edges, dip your cookie cutter in flour before each cut. This keeps the dough from sticking and ensures clean lines. Once shaped, your cookies are ready for the oven—but remember, the next step is just as important.
Step 4 – Baking the Cookies
Preheat your oven to 350°F (175°C). Make sure it’s fully heated before you put your cookies in, as consistent temperature is key to achieving that golden-brown perfection.
Place your baking sheet in the middle rack of the oven and bake the cookies for about 10–12 minutes. The edges should look slightly darker than the centers, but don’t wait until the whole cookie is brown—that usually means they’re overbaked. Remember, cookies continue to firm up as they cool, so pulling them out when they’re just set in the middle ensures the perfect crispness.
If you’re baking multiple trays, rotate them halfway through the baking time to avoid uneven browning. Every oven is different, so keep an eye on your first batch to find your sweet spot. For slightly softer cookies, bake closer to 9 minutes. For extra crispy cookies, let them go up to 13 minutes.
When you pull them out, the aroma of caramelized sugar and cinnamon will fill your kitchen—this is the moment that makes all the effort worth it.
Step 5 – Cooling and Storing
Once your cookies are out of the oven, resist the temptation to move them immediately. They’re very delicate while hot, and trying to pick them up can cause breakage. Let them sit on the baking sheet for about 5 minutes to firm up before transferring them to a wire cooling rack. Cooling on a rack allows air to circulate around the cookies, preventing sogginess.
Once cooled completely, your Biscoff cookies should be crisp on the outside and full of flavor. At this stage, you can enjoy them right away (because let’s be honest, who can wait?), or you can store them for later.
To store, place them in an airtight container at room temperature. They’ll stay fresh and crisp for up to 7 days. If you want to keep them longer, freeze them in a sealed bag or container for up to 2 months. Just thaw them at room temperature when you’re ready to enjoy.
A neat trick to maintain crispness is to add a small piece of bread or a sugar cube inside the container. The cookies will absorb less moisture, staying fresh longer. Now, every time you open that container, you’ll get a whiff of pure spiced bliss.
Tips for Perfect Biscoff Cookies
Even the best bakers make mistakes, but with these handy tips, you’ll be turning out bakery-quality Biscoff cookies every time.
Common Mistakes to Avoid
- Skipping the chill time – Without chilling, your cookies will spread too much.
- Overmixing the dough – Tough cookies happen when you beat the flour too long.
- Baking too long – Overbaked cookies lose their delicate balance of crisp and flavor.
- Wrong spice measurements – A little too much clove or nutmeg can overpower everything.
Baking Hacks for Best Results
- Always use parchment paper—it helps prevent sticking and promotes even browning.
- Roll the dough evenly for consistent baking. Uneven thickness means uneven cookies.
- For an extra touch, sprinkle a tiny bit of cinnamon sugar on top before baking.
- Bake a small test cookie first. If it spreads too much, chill the dough longer.
These tips might sound simple, but they make a huge difference in creating cookies that not only taste amazing but also look impressive.
Variations of Biscoff Cookies
Biscoff cookies are amazing on their own, but why stop there? With a little creativity, you can transform the classic recipe into unique variations that suit any occasion. Whether you’re a chocolate lover, a sandwich cookie fan, or someone with dietary preferences, there’s a version for you.
Biscoff Chocolate Chip Cookies
If you’re the kind of person who thinks every cookie tastes better with chocolate, this variation will be your new favorite. Simply fold in ½ cup of mini chocolate chips into the dough before chilling. The bitterness of dark chocolate pairs beautifully with the spiced caramel notes of Biscoff, while milk chocolate adds a creamy sweetness that balances the spice. You can even drizzle melted chocolate on top once the cookies cool for a more decadent treat.
Biscoff Sandwich Cookies
Turn your cookies into indulgent little sandwiches by spreading Biscoff cookie butter or vanilla buttercream between two baked cookies. The creamy filling adds a soft texture that contrasts the crisp cookies perfectly. For an extra flair, roll the edges in crushed Biscoff crumbs or mini chocolate chips. These are perfect for parties or as a gift in a decorative tin.
Vegan and Gluten-Free Alternatives
Good news—Biscoff cookies can be made vegan and gluten-free without losing their signature flavor. To make them vegan, swap the butter for vegan margarine or coconut oil, and replace the egg with a flaxseed egg (1 tablespoon ground flaxseed + 3 tablespoons water). For a gluten-free version, use a high-quality gluten-free flour blend and ensure your baking powder is gluten-free. The result? Still crispy, still spiced, and just as satisfying.
Serving Suggestions
Biscoff cookies are versatile, and how you serve them can elevate the experience even more.
Pairing Biscoff Cookies with Beverages
- Coffee: Their caramelized flavor makes them the ultimate coffee companion. Dip them in a latte or cappuccino for that melt-in-your-mouth magic.
- Tea: Pair with black tea for a bold flavor contrast or chai tea for a spice-on-spice pairing.
- Milk: A classic option that balances the spice with creamy freshness.
- Hot chocolate: If you’re in the mood for indulgence, dunking a Biscoff cookie into hot chocolate is pure bliss.
Using Biscoff Cookies in Desserts
Don’t stop at eating them plain—Biscoff cookies can also be used as ingredients in other desserts:
- Cheesecake crust: Crush cookies and mix with melted butter for a spiced cheesecake base.
- Ice cream topping: Crumble cookies over vanilla or caramel ice cream.
- Tiramisu twist: Replace ladyfingers with Biscoff cookies for a unique flavor.
- Parfaits: Layer cookies with whipped cream and fruit for an easy dessert in a glass.
With a little imagination, Biscoff cookies become more than a snack—they become part of unforgettable desserts.
Storing and Preserving Freshness
The beauty of Biscoff cookies is that they can be made ahead of time and stored without losing their delightful crisp texture.
Short-Term Storage
Keep your cookies in an airtight container at room temperature. They’ll stay crisp and fresh for up to 7 days. For best results, line the container with parchment paper and stack the cookies carefully to avoid breakage. If your kitchen is humid, toss in a food-safe silica packet or even a small piece of bread—it absorbs moisture and keeps the cookies crunchy.
Freezing Biscoff Cookies
For long-term storage, freezing is the way to go. Place the cooled cookies in a freezer-safe bag or container with parchment paper between layers to prevent sticking. They’ll last up to 2 months in the freezer. To thaw, simply let them sit at room temperature for 15–20 minutes. Bonus tip: you can also freeze unbaked dough. Roll it into a log, wrap it tightly, and freeze. When the craving strikes, slice off a few pieces, bake, and enjoy freshly baked cookies anytime.
Nutritional Information
Biscoff cookies aren’t exactly diet food, but hey—treats are meant to be enjoyed! Here’s a rough nutritional breakdown per cookie (based on a standard 2-inch cookie):
| Nutrient | Amount (Approx.) |
|---|---|
| Calories | 90–100 kcal |
| Carbohydrates | 12g |
| Fat | 4g |
| Protein | 1g |
| Sugar | 6g |
Healthier Alternatives
If you want to lighten things up without losing flavor, here are a few swaps:
- Replace half the butter with unsweetened applesauce for lower fat.
- Use whole wheat flour or oat flour for added fiber.
- Reduce the sugar slightly and add a touch of honey or maple syrup.
- Opt for dark chocolate chips if you’re adding chocolate—they bring antioxidants to the mix.
These tweaks won’t make your cookies health food, but they’ll let you enjoy them a little more often without the guilt.
FAQs about Biscoff Cookies Recipe
1. Can I make them ahead of time?
Yes! The dough can be made up to 2 days in advance and kept in the fridge. You can also freeze the dough and bake later for ultimate convenience.
2. How do I keep them crispy?
Always cool them completely before storing, and keep them in an airtight container. Avoid leaving them uncovered on the counter—moisture is the enemy of crisp cookies.
3. Can I double the recipe?
Absolutely. This recipe doubles (or even triples) very well. Just make sure your mixing bowl is big enough and chill the dough in smaller portions for easier handling.
4. What makes them different from gingerbread cookies?
While both are spiced cookies, gingerbread has a stronger ginger flavor and a softer, chewier texture. Biscoff cookies are thinner, crispier, and have a more caramelized, cinnamon-forward taste.
5. Can I use store-bought Biscoff spread in the dough?
Yes! Adding 2–3 tablespoons of Biscoff spread enhances the caramel-spice flavor and gives the cookies a richer taste. Just fold it into the dough with the wet ingredients.
Conclusion
Biscoff cookies are more than just a treat—they’re a tradition, a comfort, and a flavor-packed delight that never fails to impress. From their spiced aroma to their caramelized crunch, they’re the perfect companion to your favorite hot drink or dessert recipe. With the step-by-step guide above, you now have everything you need to bake them at home and even experiment with fun variations.
So, the next time you crave something sweet, skip the store-bought pack and whip up a fresh batch yourself. Trust me—your kitchen will smell heavenly, and your taste buds will thank you.