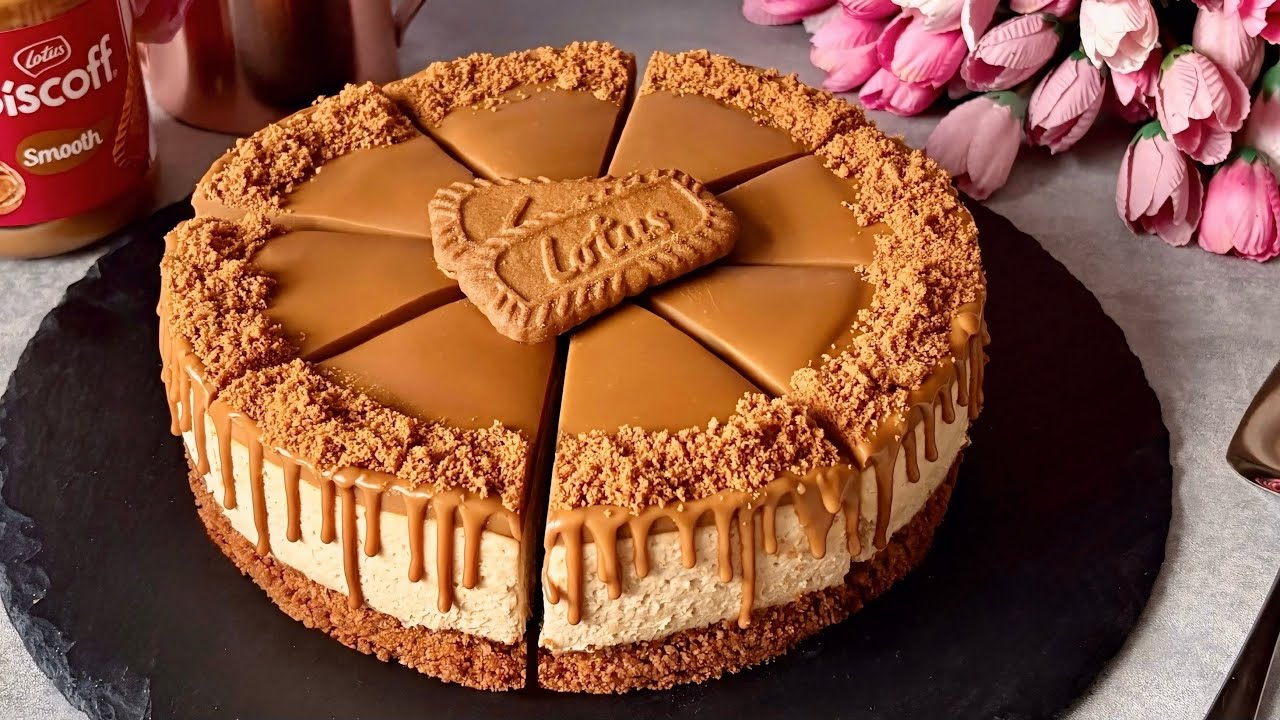
Biscoff Cheesecake Recipe: Craving something sweet, creamy, and undeniably delicious? Look no further. This Biscoff Cheesecake recipe blends the creamy richness of cheesecake with the irresistible caramelized flavor of Lotus Biscoff. Whether you’re making it for a party or a late-night treat, this dessert will steal the show.
Why Biscoff is the Perfect Flavor for Cheesecake
There’s something magical about Biscoff. Those crunchy little cookies pack a warm, spiced caramel flavor that screams comfort. Now, imagine blending that into a creamy, dreamy cheesecake. Biscoff pairs perfectly with the tangy richness of cream cheese. The sweet, slightly spiced profile adds depth and elevates the entire dessert into something out of this world.
What Makes This Cheesecake Unique?
Unlike classic cheesecakes that rely on graham cracker crusts and vanilla bases, this Biscoff version uses crushed Lotus Biscoff cookies for the crust and the filling. You’ll even melt down Biscoff spread for an indulgent topping that seals the deal. It’s rich, flavorful, and incredibly easy to make – no fancy ingredients or techniques needed. Plus, it looks stunning with minimal effort.
Ingredients You’ll Need
Biscoff Biscuit Crust Ingredients
- 2 cups (about 180g) crushed Lotus Biscoff cookies
- ½ cup (115g) unsalted butter, melted
This forms the buttery, flavorful base of your cheesecake. Biscoff cookies are rich and sweet, so no need to add extra sugar to the crust.
Creamy Cheesecake Filling Ingredients
- 3 packages (8 oz each) cream cheese, softened
- 1 cup (200g) granulated sugar
- ¾ cup (180g) Biscoff spread
- 1 tsp vanilla extract
- 3 large eggs
- ½ cup (120g) sour cream
The filling is where the magic happens. The Biscoff spread adds flavor, while the sour cream gives it that perfect, smooth texture.
Toppings and Extras
- ½ cup (120g) Biscoff spread (for topping)
- Extra Biscoff cookies (for garnish)
- Whipped cream (optional)
Melted Biscoff spread on top gives a glossy, indulgent finish. Crumbled cookies add crunch, and whipped cream makes it a show-stopper.
Kitchen Tools Required
Essential Baking Tools
- 9-inch springform pan
- Mixing bowls
- Hand mixer or stand mixer
- Measuring cups and spoons
- Rubber spatula
These basics are all you need to pull off a cheesecake like a pro.
Optional Tools for a Pro Finish
- Offset spatula (for smooth toppings)
- Piping bag (for whipped cream)
- Cake turntable (if you’re feeling fancy)
Step-by-Step Instructions
Step 1: Making the Biscoff Crust
Start by crushing your Biscoff cookies into fine crumbs using a food processor. No processor? No problem. Just pop the cookies into a ziplock bag and crush them with a rolling pin. Once they’re finely ground, mix with melted butter until evenly coated.
Press this mixture into the bottom of a springform pan. Use the back of a spoon or a flat-bottomed glass to press it firmly. Chill the crust in the fridge while you prepare the filling – about 15–20 minutes is perfect.
Step 2: Preparing the Cheesecake Filling
In a large bowl, beat the softened cream cheese until smooth and fluffy. Gradually add in sugar and mix until fully incorporated. Now comes the best part – add the Biscoff spread and vanilla extract. Beat until creamy.
Add the eggs one at a time, mixing on low speed. Be careful not to overmix here – too much air can cause cracks. Lastly, fold in the sour cream until just combined.
Step 3: Baking the Cheesecake to Perfection
Pour the filling into your chilled crust and smooth the top. Place the pan on a baking sheet and bake at 325°F (160°C) for 50–60 minutes. The edges should be set but the center should still jiggle slightly.
To avoid cracking, turn off the oven, crack the door slightly, and let the cheesecake cool inside for 1 hour.
Step 4: Cooling and Setting the Cheesecake
Once out of the oven, let it cool to room temperature, then refrigerate for at least 4 hours—overnight is even better. This chilling time helps the cheesecake firm up and makes slicing cleaner and easier.
Step 5: Decorating and Serving
Melt your extra Biscoff spread in the microwave for about 20–30 seconds and pour over the top of your chilled cheesecake. Use a spatula to spread it evenly. Garnish with crushed or whole Biscoff cookies, and if you like, pipe on some whipped cream for extra flair.
Slice, serve, and get ready for compliments.
Pro Tips for the Perfect Biscoff Cheesecake
Want to take your Biscoff cheesecake from good to unforgettable? Here are some game-changing tips to help you nail it every single time:
- Use room temperature ingredients – This is non-negotiable. Cold cream cheese won’t blend smoothly and can result in a lumpy batter. Let your cream cheese, eggs, and sour cream sit out for about 30–60 minutes before starting.
- Don’t overmix the batter – Beating too long introduces air into the batter, which can cause your cheesecake to puff up while baking and crack as it cools. Mix just until everything is combined.
- Bake in a water bath (optional) – This trick creates a moist environment and ensures even baking. Wrap your springform pan in foil, place it in a larger roasting pan, and fill it with hot water halfway up the sides. Your cheesecake will bake gently and avoid cracks.
- Cool gradually – Sudden temperature changes can shock the cheesecake and cause it to sink or crack. Letting it cool in the oven with the door slightly open is a tried-and-true method.
- Chill overnight – As tempting as it is to dive right in, letting your cheesecake sit in the fridge overnight improves the flavor and texture dramatically. Patience pays off here.
Common Mistakes to Avoid
Even a simple recipe like this can go sideways if you’re not careful. Here are the most common mistakes people make when baking a Biscoff cheesecake—and how to avoid them:
- Using low-fat cream cheese – Don’t do it. You need full-fat cream cheese to get that creamy, indulgent texture. Lower-fat versions can result in a watery filling that doesn’t hold its shape.
- Skipping the chill time – Cheesecake needs time to set. Cutting into it too soon can leave you with a gooey mess. Always chill for a minimum of 4 hours, preferably overnight.
- Cracking crust – If your crust crumbles when cutting, it may have been too dry. Make sure your cookie crumbs are well-coated in butter and pressed down firmly.
- Overbaking – If your cheesecake looks completely firm in the oven, it’s likely overbaked. Look for a slight jiggle in the center—it’ll firm up as it cools.
- Using the wrong pan – Springform pans are a must. They make releasing the cheesecake clean and easy, and help avoid a crumbled dessert disaster.
How to Store and Freeze Biscoff Cheesecake
One of the best parts of cheesecake? It stores beautifully.
Storing:
- Refrigerator: Wrap the cheesecake tightly with plastic wrap or place in an airtight container. It will stay fresh in the fridge for up to 5 days.
- Don’t garnish until serving – To keep it looking fresh, wait to add whipped cream or crumbled cookies until just before serving.
Freezing:
- Let your cheesecake chill and set completely.
- Wrap it in plastic wrap, then foil.
- Freeze for up to 2 months.
- When ready to eat, thaw in the fridge overnight.
You can even freeze individual slices! Just wrap each one tightly, place in a freezer-safe bag, and grab one anytime the craving hits.
Variations and Add-Ons
Want to put your own twist on this cheesecake? There’s plenty of room to get creative:
- Chocolate Swirl Biscoff Cheesecake – Add melted dark chocolate into half of your filling and swirl before baking.
- Mini Biscoff Cheesecakes – Use a muffin tin to make bite-sized versions – perfect for parties!
- Salted Caramel Topping – Drizzle caramel sauce on top for extra indulgence.
- Biscoff Cheesecake Bars – Bake in a square pan and slice into bars for a handheld treat.
- No-Bake Biscoff Cheesecake – Skip the oven! Use whipped cream and gelatin instead of eggs and baking. A faster, summer-friendly option.
Whatever version you go for, the base flavor of Biscoff never fails.
FAQs about Biscoff Cheesecake Recipe
1. Can I make this Biscoff cheesecake ahead of time?
Absolutely! In fact, it’s even better the next day. Make it up to two days ahead, chill, and garnish before serving.
2. What can I use instead of Biscoff cookies?
Graham crackers or digestive biscuits work, but you’ll lose that iconic caramelized flavor. Stick with Biscoff if possible for best results.
3. Can I use a no-bake method for this cheesecake?
Yes! Swap the eggs for whipped cream and gelatin. No-bake Biscoff cheesecake is perfect for summer or when you’re short on time.
4. How do I prevent my cheesecake from cracking?
Use room temp ingredients, don’t overmix, bake in a water bath, and cool gradually. These small steps go a long way!
5. Can I make this recipe gluten-free?
Yes, just use gluten-free speculoos-style cookies or gluten-free graham crackers for the crust.
Conclusion
This Biscoff Cheesecake recipe isn’t just another dessert—it’s a show-stopping, crowd-pleasing, melt-in-your-mouth masterpiece that’s surprisingly easy to make. From the buttery cookie crust to the velvety filling and glossy topping, every bite is pure bliss. Whether you’re serving it at a special occasion or sneaking a slice at midnight, one thing’s for sure: this cheesecake will have everyone asking for seconds.
So grab those Biscoff cookies, preheat the oven, and prepare to wow yourself and your guests. You’re not just baking—you’re creating a dessert that feels like a warm hug in every bite.