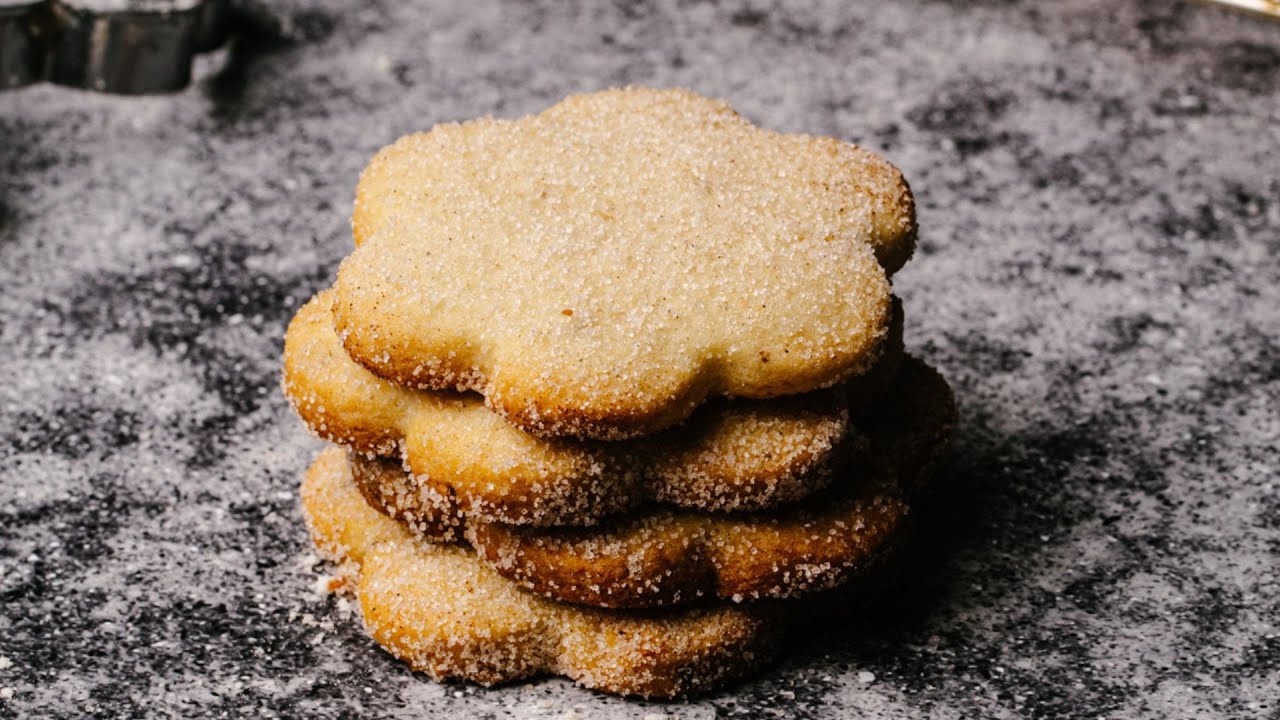
Biscochitos Recipe: Biscochitos aren’t just cookies; they’re a taste of tradition. Crispy on the outside, tender on the inside, and coated in a sweet cinnamon-sugar layer, these cookies are deeply tied to New Mexico’s culture. If you’ve ever wanted to recreate the state cookie of New Mexico in your own kitchen, this detailed step-by-step guide will walk you through everything—from choosing the right ingredients to baking the perfect golden batch.
Whether you’re making them for Christmas, a family celebration, or just to enjoy with your morning coffee, this recipe will help you bring the authentic flavors of biscochitos right into your home.
What Are Biscochitos?
Biscochitos (sometimes spelled bizcochitos) are traditional shortbread-style cookies flavored with anise, cinnamon, and often made with lard. Unlike regular sugar cookies, biscochitos have a crumbly yet melt-in-your-mouth texture that makes them instantly addictive. The balance of sweet sugar and the unique, slightly licorice-like flavor of anise sets them apart from other cookies.
These cookies are typically cut into festive shapes using cookie cutters, with stars and flowers being the most common. What makes them special is not only the flavor but also the way they represent a piece of cultural heritage passed down through generations.
A Brief History of Biscochitos
Biscochitos originated in Spain and were brought to the Southwest by Spanish colonists. Over time, the recipe was adapted using local ingredients and traditions, becoming a staple in New Mexican households. In 1989, biscochitos were declared the official state cookie of New Mexico, a unique honor that highlights just how important they are to the region’s culture.
Traditionally, they were made using lard, which gives the cookies their signature flaky texture. While some modern recipes substitute butter, many New Mexicans still swear by the authentic lard-based version for that true-to-tradition flavor.
Why Biscochitos Are Special in New Mexico
For New Mexicans, biscochitos are more than cookies—they symbolize family, celebrations, and heritage. These cookies are often made during Christmas, weddings, quinceañeras, baptisms, and other festive gatherings. Families gather in kitchens to roll out dough, cut shapes, and share stories while baking together.
They are usually served with coffee, hot chocolate, or even a glass of wine, making them versatile for different occasions. Their cultural significance and delicious flavor are why biscochitos have stood the test of time and remain beloved in New Mexico and beyond.
Ingredients You’ll Need
The Essential Ingredients
To make authentic biscochitos, you’ll need the following ingredients:
- 4 cups all-purpose flour – the base of the cookies
- 2 teaspoons baking powder – helps give a slight lift
- ½ teaspoon salt – balances flavors
- 1½ cups lard – creates a flaky texture (butter can be substituted)
- 1 cup granulated sugar – for sweetness
- 2 teaspoons anise seeds – provides that unique licorice-like flavor
- 2 large eggs – adds structure and richness
- 2 tablespoons brandy (or orange juice) – enhances flavor
- Cinnamon-sugar mixture (½ cup sugar + 1 teaspoon cinnamon) – for coating
These ingredients combine to create a cookie that’s rich, flavorful, and impossible to resist.
Substitutions and Variations
- Lard vs. Butter: Traditionalists prefer lard, but if you don’t have it, unsalted butter works well. Just keep in mind the texture will be slightly different.
- Brandy Alternatives: If you don’t use alcohol, orange juice or milk can be substituted.
- Flavor Variations: Some bakers like to add a touch of vanilla or lemon zest for extra aroma.
- Sugar Swap: For a slightly healthier version, coconut sugar or light brown sugar can be used, though it changes the flavor slightly.
Tools and Equipment for Baking
To make the process easier, gather the following tools:
- Large mixing bowls
- Electric mixer or hand whisk
- Measuring cups and spoons
- Rolling pin
- Cookie cutters (stars, circles, flowers, or your favorite shapes)
- Baking sheets
- Parchment paper
- Cooling rack
Having everything ready before you start baking ensures the process goes smoothly without any last-minute kitchen runs.
Step-by-Step Guide to Making Biscochitos
Step 1 – Preparing Your Workspace
Before you dive into mixing ingredients, take a moment to prepare your workspace. Clear off your counter, preheat your oven to 350°F (175°C), and line your baking sheets with parchment paper. This not only prevents sticking but also makes cleanup much easier.
Measure out all your ingredients ahead of time (a technique called mise en place). This small step saves time and prevents mistakes, especially when working with dough that can dry out quickly if left sitting.
It’s also a good idea to set aside your rolling pin, cookie cutters, and a small bowl of cinnamon sugar so everything is within easy reach once the cookies are ready to bake.
Step 2 – Mixing the Dough
In a large bowl, whisk together the flour, baking powder, and salt. Set it aside.
In another large mixing bowl, beat the lard (or butter) and sugar until light and fluffy. This step is important because it incorporates air into the mixture, which helps give the cookies their delicate texture. Add in the eggs, one at a time, and beat until smooth. Stir in the anise seeds and brandy.
Gradually add the dry mixture into the wet mixture, stirring until a soft dough forms. The dough should be pliable but not sticky. If it feels too dry, add a teaspoon of brandy or orange juice. If it’s too wet, sprinkle in a little more flour.
Once combined, lightly knead the dough for about a minute, just enough to bring it together. Overworking the dough can make the cookies tough instead of tender.
Step 3 – Chilling the Dough for Best Results
Once your dough is mixed, it’s time to chill it. Wrap the dough in plastic wrap or place it in an airtight container, then refrigerate for at least 30 minutes to 1 hour. Chilling is essential because it firms up the fat (lard or butter) and makes the dough much easier to roll out without sticking.
Skipping this step might save time, but you’ll end up with cookies that spread too much in the oven and lose their shape. Plus, chilling allows the flavors of the anise and brandy to meld into the dough, enhancing the overall taste.
If you’re preparing for a big event, you can even make the dough a day in advance and refrigerate overnight. This not only saves you time but also intensifies the flavor profile of your biscochitos.
When ready to roll, lightly flour your work surface and rolling pin to prevent sticking. Divide the dough into smaller portions to make it easier to handle, keeping the rest chilled until you’re ready to use it.
Step 4 – Rolling and Cutting the Cookies
Now comes the fun part—rolling and shaping your cookies!
Take a portion of the chilled dough and roll it out on a lightly floured surface to about ¼-inch thickness. The thickness matters: too thin, and your cookies will be too crisp; too thick, and they’ll lose that delicate crunch biscochitos are known for.
Next, grab your favorite cookie cutters. Traditionally, biscochitos are cut into stars, flowers, or simple round shapes, but you can get creative with hearts, bells, or holiday-themed cutters.
As you cut the dough, place each cookie on your prepared baking sheet, leaving about an inch of space between them. Don’t worry—they won’t spread too much, but giving them room ensures even baking.
After cutting, gather the scraps, reroll them, and cut more cookies until all the dough is used. Be careful not to over-handle the dough, though, as too much rolling can make the cookies tougher.
Step 5 – Baking to Golden Perfection
Preheat your oven to 350°F (175°C) if you haven’t already. Place your trays of cookies into the oven and bake for 10–12 minutes. Keep an eye on them—the edges should be lightly golden, not brown.
Every oven is different, so it’s a good idea to rotate your pans halfway through baking to ensure even cooking. If you’re baking multiple trays, you might also want to switch racks to prevent uneven browning.
The cookies should feel set when touched but still soft in the center. Remember, they’ll continue to firm up as they cool. Once baked, remove the trays from the oven and let the cookies rest for a couple of minutes before transferring them to a cooling rack.
That short cooling time is crucial because biscochitos are delicate right out of the oven and can easily break if handled too soon.
Step 6 – Dusting with Cinnamon Sugar
The final touch—and arguably the most satisfying step—is coating your cookies in cinnamon sugar. While the cookies are still slightly warm (not hot, but not fully cooled either), gently roll or sprinkle them with the cinnamon-sugar mixture.
This coating not only gives biscochitos their signature sparkle but also adds an extra layer of sweetness and warmth that pairs beautifully with the anise flavor.
If you want a stronger cinnamon kick, you can press the cookies lightly into the sugar mixture so it sticks more firmly. For a subtler finish, just sprinkle a light dusting over the tops.
Once coated, let the cookies cool completely on a wire rack. At this point, your kitchen will smell heavenly, and resisting a taste test will be almost impossible. Go ahead—treat yourself to one (or two)!
Tips for Perfect Biscochitos Every Time
Common Mistakes to Avoid
Like any traditional recipe, biscochitos require a little patience and attention. Here are the most common pitfalls to watch out for:
- Skipping the chill time – This often leads to flat, spread-out cookies.
- Overmixing the dough – Too much handling makes the cookies tough instead of crumbly.
- Baking too long – They should be just golden at the edges, not browned.
- Adding too much flour – This can make the dough dry and difficult to roll.
How to Keep Biscochitos Crispy Yet Tender
The perfect biscochito is both crispy and tender, almost melting in your mouth. To achieve this balance:
- Always use fresh lard or butter—stale fat can ruin the flavor.
- Roll the dough evenly so all cookies bake at the same rate.
- Store them correctly (we’ll cover this in the next section).
- Don’t overcrowd the baking sheets; airflow ensures even crisping.
Little tweaks make a big difference, and once you’ve mastered the technique, every batch will turn out beautifully.
Serving and Storing Biscochitos
Best Ways to Serve Biscochitos
Biscochitos are versatile, and their subtle sweetness makes them perfect for almost any occasion. The most traditional way to enjoy them is with a cup of coffee or hot chocolate—the warmth of the drink balances the crisp, cinnamon-coated cookie perfectly. Some people even like dipping their biscochitos, letting the drink soften the cookie slightly for a melt-in-your-mouth experience.
During holidays, they’re often served on large platters alongside other festive desserts like empanaditas (mini turnovers) and pan dulce. Their light texture makes them a perfect companion to heavier desserts, offering a balance of flavors and richness.
For more formal occasions, like weddings or quinceañeras, biscochitos are often arranged beautifully in decorative tins or trays, sometimes wrapped individually for guests to take home. Whether it’s a casual snack with family or part of an elaborate celebration, biscochitos always bring people together.
Storage Tips for Longer Freshness
One of the best things about biscochitos is that they keep well if stored properly. After the cookies have cooled completely, place them in an airtight container at room temperature. They’ll stay fresh for up to 2 weeks without losing their flavor or texture.
If you live in a humid climate, you might want to add a sheet of parchment paper between layers of cookies to prevent sticking. For even better results, store them in a tin lined with wax paper—just like grandmothers used to do. This not only preserves freshness but also maintains their crispness.
If you’re planning to serve them at an event, you can bake them a few days in advance without worrying about them going stale. In fact, many people say biscochitos taste even better the next day, once the flavors have had time to deepen.
Can You Freeze Biscochitos?
Yes! Biscochitos freeze beautifully, which makes them perfect for preparing ahead of time. To freeze, arrange the cooled cookies in a single layer inside a freezer-safe container or zip-top bag. If you need to stack them, place parchment paper between the layers to prevent sticking.
When stored in the freezer, biscochitos can last up to 3 months. To enjoy, simply let them thaw at room temperature. They’ll taste just as fresh and delicious as the day you baked them.
If you prefer, you can also freeze the cookie dough instead of the baked cookies. Just wrap it tightly in plastic wrap, then place it in a freezer bag. When you’re ready to bake, thaw the dough in the refrigerator overnight, roll, cut, and bake as usual.
Biscochitos for Special Occasions
Christmas Traditions
Biscochitos are synonymous with Christmas in New Mexico. No holiday season is complete without the smell of cinnamon and anise wafting through kitchens. Families often bake dozens—sometimes hundreds—of these cookies to share with neighbors, friends, and loved ones.
They’re usually served at Christmas Eve gatherings, alongside tamales, posole, and hot chocolate. For many, making biscochitos is a cherished tradition, with recipes passed down for generations. Children learn the art of rolling and cutting the dough while grandparents share stories of past holidays.
The star-shaped cutters are especially popular during Christmas, symbolizing the festive spirit. Eating a biscochito at Christmastime isn’t just about the cookie—it’s about the memory and tradition that come with it.
Weddings and Family Gatherings
Beyond the holidays, biscochitos also play a special role in weddings and family celebrations. In New Mexico, it’s common for families to bake massive batches weeks before a wedding, ensuring there’s enough to serve guests and pack into decorative boxes as take-home favors.
At these gatherings, biscochitos symbolize love, togetherness, and cultural pride. The cookies are often presented on beautifully decorated platters, surrounded by other traditional sweets. Their light, crumbly texture pairs wonderfully with coffee, tea, or even champagne at wedding receptions.
For birthdays, baptisms, or quinceañeras, biscochitos are a must-have. They carry a sense of heritage and celebration, reminding everyone present of the traditions that bind families together.
FAQs about Biscochitos Recipe
1. Can I make biscochitos without lard?
Yes, you can substitute lard with unsalted butter. However, keep in mind that lard gives biscochitos their signature flaky texture. With butter, the cookies will still be delicious but slightly less traditional.
2. How long do biscochitos last?
Stored in an airtight container at room temperature, biscochitos last up to 2 weeks. If frozen, they can keep for 3 months without losing their flavor.
3. Can I make biscochitos gluten-free?
Absolutely! You can use a 1:1 gluten-free flour blend instead of all-purpose flour. The texture may differ slightly, but the flavor will remain delightful.
4. Do biscochitos taste better fresh or the next day?
Many people believe biscochitos taste even better the next day. The flavors of the anise, cinnamon, and brandy deepen over time, creating a more balanced and aromatic cookie.
5. What can I serve with biscochitos?
Biscochitos pair wonderfully with coffee, tea, hot chocolate, or even a glass of wine. They’re also great alongside other desserts at holiday gatherings or as part of a festive cookie platter.
Conclusion
By following this step-by-step guide, you can recreate the authentic flavors right in your own kitchen. Whether you’re baking them for Christmas, a wedding, or simply to enjoy with coffee on a quiet afternoon, biscochitos are sure to bring joy to everyone who tastes them.
So, gather your ingredients, dust off your rolling pin, and start baking. Each bite will connect you to a tradition that has been cherished for centuries.