Bingsu Recipe: Bingsu is one of the most popular desserts in Korea, loved for its soft snow-like ice, creamy milk flavor, and colorful toppings. Traditionally enjoyed during warm weather, Bingsu combines finely shaved ice with sweet toppings such as red beans, condensed milk, fruit, mochi, ice cream, or syrups. Unlike regular crushed ice desserts, authentic Korean Bingsu uses milk-based ice that creates a fluffy, melt-in-your-mouth texture.
In this complete guide, you will learn everything about Bingsu — from its origins to ingredients, preparation techniques, topping ideas, and expert tips to make it perfect every time.
What is Bingsu?
Bingsu is a Korean shaved ice dessert known for its delicate texture and rich toppings. The word “Bing” means ice and “Su” means water. Traditionally, the dessert consists of shaved ice topped with sweetened red beans (patbingsu), condensed milk, rice cakes, fruit, syrups, and sometimes ice cream.
Unlike Western shaved ice desserts, Bingsu uses milk-frozen ice blocks, giving it a creamy texture rather than a crunchy one.
Modern Bingsu variations include:
- Mango Bingsu
- Oreo Bingsu
- Matcha Bingsu
- Strawberry Cheesecake Bingsu
- Chocolate Brownie Bingsu
Because of its versatility and beautiful presentation, Bingsu has become popular worldwide.
History of Bingsu
Bingsu dates back to the Joseon Dynasty in Korea (1392–1897). Historical records show that royal ice houses stored ice during winter so it could be used during summer.
At that time, shaved ice was served with red bean paste, rice cakes, and fruit. Over time, the dessert evolved and became more elaborate with the introduction of milk, syrups, ice cream, and modern toppings.
Today, Bingsu is a staple dessert in Korean cafés and dessert shops.
Why Bingsu is Different from Regular Shaved Ice
Many people think Bingsu is just crushed ice with toppings, but the difference lies in the texture and preparation.
Key differences include:
Milk-Based Ice
Instead of water ice, Bingsu is often made using frozen milk.
Ultra-Fine Ice Flakes
The ice is shaved extremely thin, producing a fluffy snow-like texture.
Layered Toppings
Ingredients are layered inside and on top for flavor in every bite.
Balanced Sweetness
Condensed milk and toppings create a balanced dessert that is not overly sugary.
Ingredients You’ll Need
Below are the core ingredients used in a classic Bingsu recipe. The toppings can vary depending on your preference.
For the Shaved Ice Base
- 2 cups whole milk (or milk alternative like almond milk)
- 2 tablespoons condensed milk (optional for sweetness)
Classic Bingsu Toppings
- ½ cup sweetened red bean paste (Pat)
- ½ cup diced fresh fruit (strawberries, mango, or kiwi)
- ¼ cup condensed milk
- 2 tablespoons mochi or rice cake pieces
- 1 scoop vanilla ice cream (optional)
- 2 tablespoons roasted soybean powder (Injeolmi powder)
Optional Modern Toppings
- Chocolate syrup
- Oreo crumbs
- Mango cubes
- Matcha powder
- Cheesecake bites
- Brownie chunks
- Coconut flakes
- Granola
Equipment Needed
To make authentic Bingsu at home, the following tools are helpful:
- Blender or shaved ice machine
- Freezer-safe container
- Sharp knife or ice shaver
- Mixing bowl
- Serving bowl (deep bowl works best)
A Bingsu ice shaver machine produces the best fluffy texture, but you can still make it using a blender.
Preparing the Milk Ice Base
The key to perfect Bingsu is preparing the ice base correctly.
Step 1: Mix the Milk Base
In a bowl, combine:
- 2 cups milk
- 2 tablespoons condensed milk
Stir well until fully combined.
Step 2: Freeze the Mixture
Pour the mixture into a shallow container and freeze for 6–8 hours or overnight.
Freezing in a shallow container helps the ice shave more easily.
Step 3: Break the Ice
Once frozen solid, remove the block and cut it into smaller chunks.
These chunks will be shaved or blended to create the snow texture.
Step-by-Step Guide to Making Bingsu
Follow these steps to make authentic Korean Bingsu at home.
Step 1 – Prepare the Ice Base
Freeze milk or water in ice cube trays until solid. Traditional bingsu uses milk ice for a creamier and richer texture.
Step 2 – Shave the Ice
Use a shaved ice machine or a blender to crush the frozen cubes into very fine, fluffy ice. The texture should be soft and snow-like rather than chunky.
Step 3 – Prepare the Toppings
Slice fresh fruits such as strawberries, mangoes, or bananas. You can also prepare sweet red beans, mochi pieces, condensed milk, or ice cream depending on the flavor you want.
Step 4 – Fill the Bowl
Place the shaved ice into a large bowl and gently shape it into a small mound. This forms the base of the dessert.
Step 5 – Add Sweetener
Drizzle condensed milk or a sweet syrup over the shaved ice. This adds creaminess and sweetness to the dessert.
Step 6 – Add the Toppings
Arrange your toppings on top of the ice. Popular choices include fresh fruit, sweet red beans (pat), mochi, cereal flakes, or chocolate syrup.
Step 7 – Optional Ice Cream
For extra indulgence, place a scoop of vanilla or fruit-flavored ice cream on top of the shaved ice.
Step 8 – Serve Immediately
Serve bingsu right away while the ice is light and fluffy. Mix slightly before eating to combine the toppings and flavors.
Popular Types of Bingsu
Modern Bingsu has evolved into many delicious variations.
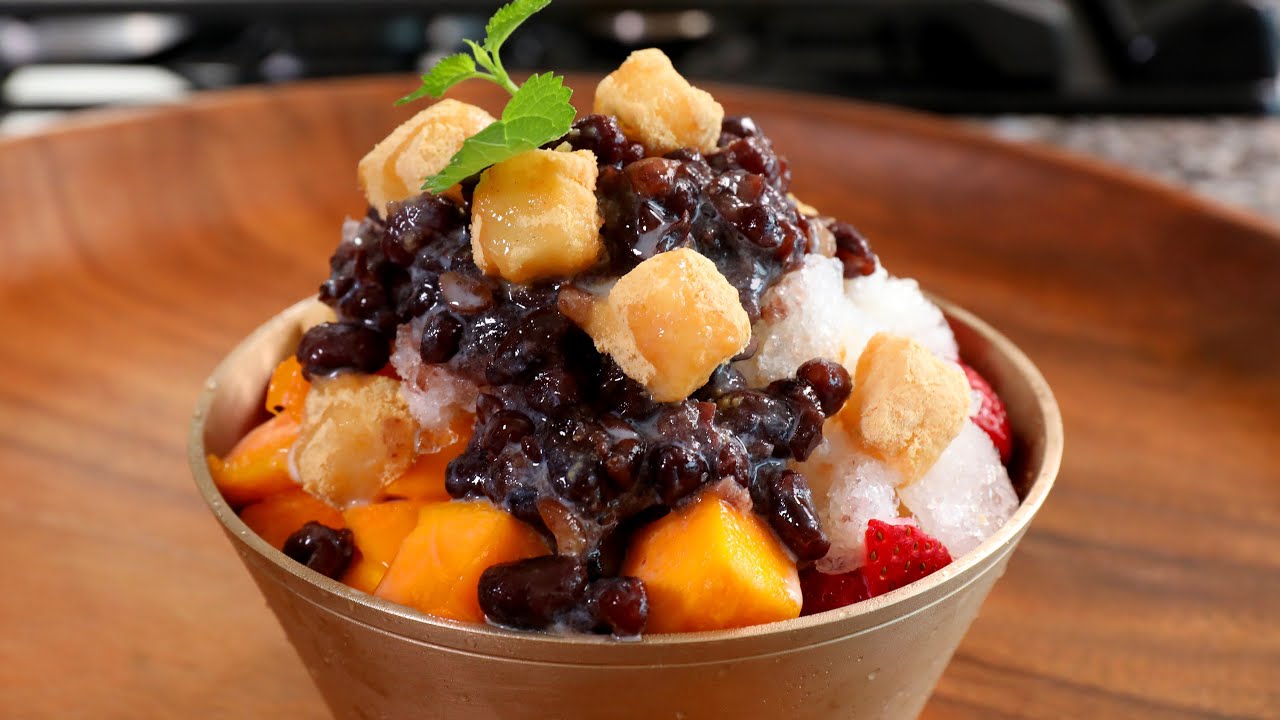
Patbingsu (Traditional Red Bean Bingsu)
This is the classic version.
Ingredients include:
- Shaved milk ice
- Sweet red bean paste
- Mochi
- Condensed milk
- Soybean powder
It offers a sweet, nutty, and creamy flavor.
Mango Bingsu
One of the most popular café versions.
Ingredients:
- Fresh mango cubes
- Mango syrup
- Vanilla ice cream
- Condensed milk
The tropical sweetness pairs perfectly with the icy base.
Oreo Chocolate Bingsu
Perfect for chocolate lovers.
Toppings include:
- Oreo cookie crumbs
- Chocolate syrup
- Brownie pieces
- Chocolate ice cream
Strawberry Cheesecake Bingsu
A rich and fruity dessert.
Toppings:
- Fresh strawberries
- Cheesecake cubes
- Strawberry syrup
- Whipped cream
Matcha Bingsu
A Japanese-inspired version.
Toppings:
- Matcha powder
- Red beans
- Mochi
- Matcha ice cream
Tips for Making Perfect Bingsu
Use Milk Instead of Water
Milk produces softer ice and richer flavor.
Freeze in Thin Layers
Thin ice blocks shave more easily.
Avoid Over-Blending
Over-blending turns the ice into slush.
Serve Immediately
Bingsu melts quickly, so serve it right after preparing.
Balance the Toppings
Avoid adding too many heavy toppings that compress the ice.
Healthy Bingsu Alternatives
If you want a healthier version, try these swaps:
- Use almond milk or oat milk instead of dairy
- Replace condensed milk with honey or maple syrup
- Use fresh fruit instead of sugary syrups
- Add granola or nuts for crunch
This makes the dessert lighter but still delicious.
Common Mistakes to Avoid
Using Regular Ice Cubes
They produce coarse ice instead of fluffy snow.
Too Many Syrups
Excess syrup makes the dessert overly sweet.
Packing the Ice Too Tightly
Compressed ice loses its airy texture.
Adding Warm Toppings
Warm toppings melt the ice too quickly.
Best Fruits for Bingsu
Fresh fruits add flavor and color.
Popular options include:
- Mango
- Strawberry
- Blueberry
- Kiwi
- Banana
- Pineapple
- Peach
These fruits pair perfectly with the creamy ice.
How Cafés Make Ultra-Fluffy Bingsu
Professional Korean dessert cafés use special Bingsu machines that shave frozen milk blocks into extremely thin flakes.
These machines create the signature “snow flower ice” texture known as Snowflake Bingsu.
While home methods work well, café machines produce the fluffiest result.
How to Store Bingsu Ingredients
Although Bingsu itself should be eaten immediately, you can store components.
Milk ice base:
Freeze up to 1 week.
Red bean paste:
Store in refrigerator for 5 days.
Fresh fruit:
Cut just before serving.
Serving Ideas
Bingsu works well for many occasions:
- Summer dessert parties
- Family gatherings
- Café-style desserts at home
- Korean-themed dinners
- Refreshing after-meal treat
Serve it in wide bowls so toppings are easy to reach.
FAQs about Bingsu Recipe
1. What is Bingsu?
Bingsu is a popular Korean shaved ice dessert made with finely shaved ice, sweet toppings, and condensed milk. It is refreshing, creamy, and commonly enjoyed during warm weather.
2. What type of ice is used for Bingsu?
Traditional bingsu uses milk-based ice, which creates a softer and creamier texture than regular water ice. However, water ice can also be used if milk ice is not available.
3. Do I need a shaved ice machine?
A shaved ice machine gives the best fluffy texture, but you can also use a strong blender or food processor to crush ice finely.
4. What toppings are commonly used?
Popular toppings include sweet red beans, fresh fruits like strawberries or mango, mochi pieces, condensed milk, cereal flakes, chocolate syrup, and sometimes ice cream.
5. Can I make Bingsu healthier?
Yes. Use fresh fruits, reduce condensed milk, and avoid heavy syrups. Yogurt or honey can also be used as lighter alternatives.
6. Can Bingsu be made in advance?
It’s best prepared right before serving. Shaved ice melts quickly, which can change the texture of the dessert.
7. What is Patbingsu?
Patbingsu is the most traditional version of bingsu. It includes sweet red beans, rice cakes (tteok), condensed milk, and shaved ice.
Final Thoughts
Bingsu is more than just a dessert — it is an experience. With its fluffy milk ice, colorful toppings, and refreshing taste, it has become one of the most beloved Korean sweets around the world.
The beauty of Bingsu lies in its creativity. Whether you prefer the traditional red bean version or modern flavors like mango, chocolate, or matcha, this dessert allows endless customization.
Once you master the milk ice base and layering technique, you can create café-style Bingsu right in your kitchen.
Try it once, and it may become your new favorite summer dessert.