Best White Chicken Chili Recipe: If you’re tired of the same old red chili and looking for something that hits the spot with a creamy, savory twist, white chicken chili is your new best friend. Unlike the traditional tomato-based chili, this version swaps red meat for tender shredded chicken and packs in white beans, green chiles, and spices that sing with Southwestern flair. It’s hearty without being heavy, spicy yet balanced, and creamy enough to feel indulgent while still being healthy. Whether you’re cooking for a family dinner or meal-prepping for the week, this chili fits the bill.
Now, what makes this recipe stand out? It’s all about layering flavor, taking simple ingredients, and transforming them into a bowl of comfort that tastes like it’s been simmering for hours—even if it only takes 30 minutes. Ready to get cooking?
Ingredients You’ll Need
Before diving into the steps, let’s get your pantry and fridge ready. Here’s what you’ll need for this flavor-packed recipe.
Main Ingredients:
- 2 tablespoons olive oil
- 1 medium onion, chopped
- 3 cloves garlic, minced
- 1 can (4 oz) diced green chiles
- 1 teaspoon ground cumin
- 1 teaspoon oregano
- 1/2 teaspoon chili powder
- Salt and black pepper to taste
- 2 cans (15 oz each) cannellini or great northern beans, drained and rinsed
- 3 cups cooked shredded chicken (rotisserie works great)
- 3 cups low-sodium chicken broth
- 1/2 cup sour cream or Greek yogurt
- 1 cup shredded Monterey Jack cheese
Optional Add-ins:
- Corn (fresh or frozen)
- Lime juice (for brightness)
- Fresh cilantro (for garnish)
- Jalapeño slices (for heat)
- Avocado chunks (for creaminess)
Each ingredient is chosen not only for its flavor but for how it complements the rest of the chili. From the creaminess of the beans to the tang of lime and the mellow heat of green chiles, it all works together seamlessly.
Kitchen Tools Required
Cooking great chili doesn’t require fancy gadgets, but having the right tools on hand makes the process smoother.
Essential Equipment:
- Large pot or Dutch oven
- Sharp chef’s knife
- Cutting board
- Can opener
- Wooden spoon or silicone spatula
- Immersion blender or standard blender (optional but recommended)
Pro Tip: Use a Dutch oven if possible—it retains heat better and creates a more even simmer, which is key for deep flavor.
Step-by-Step Cooking Instructions
Let’s dive into the actual cooking process. Don’t worry—this recipe is simple enough for beginners, but flavorful enough to impress any foodie.
Step 1: Prep Your Ingredients
Before the heat goes on, make sure everything is chopped, measured, and ready. Dice your onion, mince the garlic, and shred your chicken if it’s not already pre-cooked. Drain and rinse the beans, open your can of green chiles, and have your spices nearby. This step saves a ton of time and stress once you’re at the stove.
Step 2: Sauté and Build the Base
Heat olive oil in your pot over medium heat. Add the chopped onion and sauté until it turns translucent—about 5 minutes. Then toss in the minced garlic and diced green chiles. Stir it all around and let it cook for another minute until fragrant. Add your spices—cumin, oregano, chili powder—and let them toast in the oil for a minute. This is where the base of your chili starts to bloom with bold flavor.
Step 3: Simmer to Perfection
Now add the beans, chicken broth, and bring the mixture to a gentle boil. Once boiling, reduce the heat to a simmer and let it cook uncovered for about 15–20 minutes. This allows the flavors to meld and deepen, while softening the beans even further. If you’re using corn, add it in during this step. Stir occasionally to prevent sticking.
Step 4: Blend and Thicken
Now here’s the secret to that creamy, luscious texture without adding heavy cream—blend a portion of the chili. Use an immersion blender right in the pot and give it a few quick pulses. You don’t want to puree the entire thing, just enough to break down some of the beans and thicken the broth naturally.
No immersion blender? No problem. Simply scoop out 1 to 1½ cups of the chili (make sure it includes beans and broth), blend it in a regular blender until smooth, and then stir it back into the pot. This simple step transforms the consistency from soupy to velvety and satisfying. Trust me, it’s worth it.
Step 5: Add Chicken and Final Touches
Once your chili has a creamy texture, stir in the shredded chicken and let it warm through for another 5 to 7 minutes. Then, reduce the heat to low and add the sour cream or Greek yogurt, followed by the shredded cheese. Stir everything gently until melted and combined. Taste and adjust seasoning with salt and pepper if needed.
If you love a zesty kick, squeeze in some fresh lime juice and stir in chopped cilantro right before serving. These finishing touches brighten the whole dish and balance the richness beautifully.
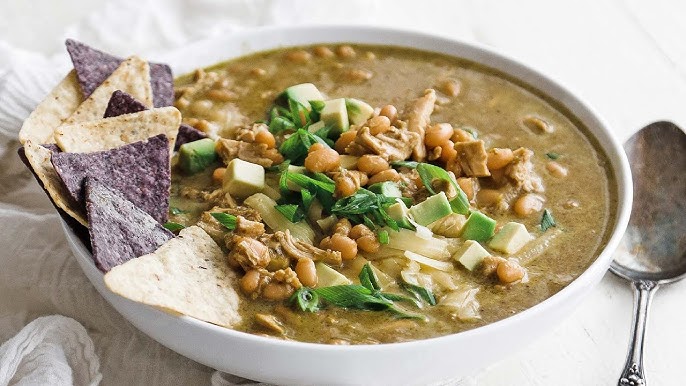
Serving Suggestions and Toppings
White chicken chili is delicious on its own, but it becomes downright addictive when paired with the right toppings and sides. Here are some ideas to take your bowl from good to unforgettable:
Topping Ideas:
- Crushed tortilla chips or strips for crunch
- Diced avocado for creaminess
- Shredded cheese (Monterey Jack or pepper jack for spice)
- Fresh cilantro for a burst of color and flavor
- Jalapeño slices if you want more heat
- A dollop of sour cream or Greek yogurt
Best Sides:
- Warm cornbread or tortilla chips
- A crisp green salad with lime vinaigrette
- Rice or quinoa if you want to stretch it further
Make it your own. This chili is like a canvas—you can customize it every time you make it based on what you’ve got in the fridge.
Storage and Reheating Tips
This chili isn’t just great fresh—it’s even better the next day. The flavors deepen overnight, making leftovers a total win.
Refrigerator Storage:
- Store in an airtight container for up to 4 days.
- Let it cool to room temperature before refrigerating to avoid condensation and sogginess.
Freezer Storage:
- Portion into freezer-safe containers or bags.
- Freeze for up to 3 months.
- Label with the date and portion size to make meal planning easier.
Reheating Tips:
- On the stove: Heat over medium-low, stirring frequently to avoid scorching. Add a splash of broth if it’s too thick.
- In the microwave: Reheat in 1-minute intervals, stirring in between, until hot.
Whether you’re meal-prepping for the week or stocking your freezer, this recipe keeps beautifully.
Nutritional Breakdown
Want to know what’s in every hearty bite? Here’s a rough estimate per serving (assuming six servings):
| Nutrient | Amount (Per Serving) |
|---|---|
| Calories | 350–400 |
| Protein | 30–35g |
| Carbohydrates | 20–25g |
| Fat | 12–15g |
| Fiber | 5–7g |
| Sugar | 2–4g |
Healthy Swaps:
- Swap sour cream with Greek yogurt for more protein and less fat.
- Use low-sodium broth to control salt.
- Add extra veggies like spinach or kale for more fiber and nutrients.
This dish is a powerhouse of lean protein, fiber, and flavor—all while feeling like comfort food. That’s what we call a win-win.
FAQs about White Chicken Chili Recipe
1. Can I Make It in a Crockpot?
Absolutely. Just sauté your onions and garlic first, then add all ingredients (except dairy and cheese) to the slow cooker. Cook on low for 6–8 hours. Stir in sour cream and cheese at the end.
2. What Can I Use Instead of Chicken?
Turkey, pork, or even tofu work well. For a vegetarian option, add extra beans and corn.
3. Is This Recipe Spicy?
It’s mildly spicy. You can kick up the heat with jalapeños or extra chili powder—or tone it down by using only mild green chiles.
4. How Long Can I Store It?
In the fridge, up to 4 days. In the freezer, 3 months. Just make sure it’s in an airtight container.
5. Can I Freeze White Chicken Chili?
Yes, and it freezes beautifully. Just cool it completely, store in a freezer-safe container, and reheat gently on the stove with a splash of broth or water.
Conclusion
There you have it—a bowl of white chicken chili that’s creamy, comforting, and packed with bold Southwestern flavor. It’s one of those recipes that once you make it, it becomes a regular in your rotation. Whether you’re serving it for a family dinner, a game-day party, or prepping lunches for the week, this chili delivers every time.
And the best part? It’s easy to tweak based on your mood or pantry. Want it spicier? Add more green chiles or jalapeños. Need it dairy-free? Use coconut milk instead of sour cream. The possibilities are endless.
So grab your biggest pot, gather your ingredients, and start cooking. Your taste buds will thank you.