Best Turkey Brine Recipe: There’s nothing worse than slicing into your Thanksgiving turkey only to discover it’s as dry as the Sahara. We’ve all been there, right? The key to preventing that tragic holiday fail is simpler than you might think: brining. Whether you’re a first-time Thanksgiving host or a seasoned kitchen pro, a good turkey brine can transform your bird into a show-stopping centerpiece. Trust me, once you brine, you’ll never go back.
What Is a Turkey Brine?
At its core, a turkey brine is just a salty, flavorful solution that the turkey soaks in for several hours (or even a whole day) before cooking. But what’s actually happening during that soak?
When you place a turkey in brine, osmosis kicks in. The salt in the brine breaks down the proteins in the turkey meat, which allows it to retain more moisture. Even better, the flavors from the herbs, spices, and other ingredients in the brine seep into the meat, infusing it from the inside out.
That’s why a brined turkey ends up juicier, more tender, and tastier than its unbrined cousin. It’s not just about adding salt—it’s about locking in flavor and moisture where it counts.
Benefits of Brining a Turkey
If you’re still on the fence, let’s talk benefits—because there are a lot.
- Juiciness: The number one benefit. Your turkey won’t dry out, even if you slightly overcook it.
- Flavor Infusion: Herbs, garlic, peppercorns, citrus… the options are endless and go straight into the meat.
- Texture: Brining breaks down some muscle proteins, which helps make the meat extra tender.
- Even Cooking: Brining helps equalize the moisture levels throughout the bird, making for more consistent results.
Brining is basically a foolproof insurance policy for your Thanksgiving centerpiece. And who doesn’t want that?
Types of Brines: Wet vs. Dry
Before you start, it’s important to know that not all brines are created equal. There are two main types: wet and dry.
Wet Brine
A wet brine is the most traditional and popular method. It’s a salty solution made from water, salt, sugar, and flavor enhancers like herbs and spices. The turkey is fully submerged in this liquid mixture for up to 24 hours.
Pros:
- Great for adding moisture
- Can layer in complex flavors
- Classic method
Cons:
- Needs a large container
- Can be messy
Dry Brine
A dry brine skips the liquid and instead involves rubbing the turkey with a mix of salt and seasonings. The salt draws out moisture, which then gets reabsorbed into the meat, along with all the flavor.
Pros:
- Easier cleanup
- No container needed
- Crispier skin when roasting
Cons:
- Doesn’t add moisture like a wet brine
So which should you choose? If it’s your first time brining or you’re going for maximum juiciness, go with a wet brine. If you’re tight on fridge space or want ultra-crispy skin, try dry brining.
Essential Ingredients for the Best Turkey Brine
Making a killer brine isn’t complicated, but there are some key players you shouldn’t skip. Here’s what you’ll need for the perfect wet brine:
1. Water
The base of the brine. You’ll need enough to fully submerge your turkey—usually about 1 gallon per 5 pounds of bird.
2. Salt
This is the real MVP. Kosher salt works best because it dissolves well and doesn’t have any additives. Aim for about 1 cup of kosher salt per gallon of water.
3. Sugar
Brown sugar adds a slight sweetness that balances the salt and enhances browning. White sugar, maple syrup, or even honey also work.
4. Aromatics
This is where you can get creative:
- Garlic cloves
- Onion slices
- Bay leaves
- Fresh rosemary, thyme, sage
- Black peppercorns
- Orange or lemon slices
5. Optional Add-ins
Want to level up? Try adding:
- Apple cider or juice
- Ginger slices
- Star anise or cinnamon sticks for warmth
- Crushed juniper berries for a woodsy note
Once you’ve got these ingredients ready, you’re just steps away from turkey perfection.
Step-by-Step: How to Make a Wet Turkey Brine
Ready to roll up your sleeves? Here’s a foolproof, step-by-step guide to making and using the best turkey brine ever. Whether it’s your first time or your tenth, this method will give you amazing results every time.
Step 1: Choose the Right Container
You’ll need a large stockpot, brining bag, or even a cooler. The goal is to fully submerge your turkey in the brine. If fridge space is tight, a cooler with ice packs works just fine. Just make sure the temperature stays below 40°F (4°C).
Step 2: Make the Brine
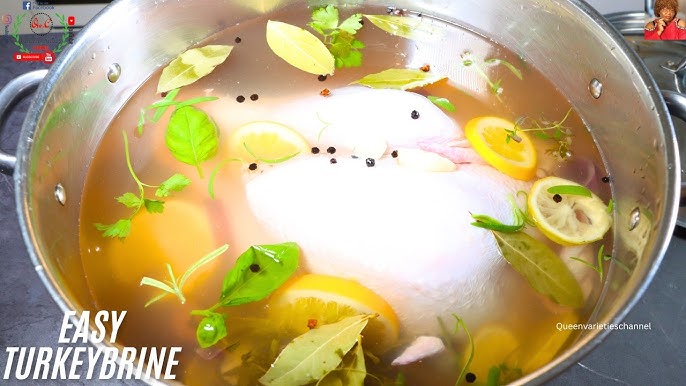
Start by heating a portion of your water—say 1/3 of the total amount—on the stove in a large pot. Add your kosher salt and sugar, and stir until they fully dissolve. Then toss in your aromatics: sliced garlic, herbs, citrus, spices—whatever you’re using.
Let it simmer for 5–10 minutes to extract those rich, aromatic flavors. Once done, remove it from the heat and let it cool. Add the remaining cold water or even ice to speed up the cooling process. Never add your turkey to warm brine!
Step 3: Prep the Turkey
Remove the giblets and any plastic inserts from the turkey cavity. Rinse the bird under cold water and pat it dry with paper towels.
Step 4: Brine the Bird
Place your turkey in the brining container breast side down. Pour the cooled brine over it. If necessary, weigh the turkey down with a plate or bowl to ensure it stays submerged.
Cover the container and refrigerate for 12 to 24 hours. For smaller turkeys (under 12 lbs), 12 hours is usually enough. Larger birds benefit from a full 24-hour soak.
Step 5: Remove and Rinse
Once your turkey is done brining, remove it from the liquid and rinse it thoroughly under cold water. You want to wash off any excess salt so your bird isn’t overly salty.
Step 6: Dry the Turkey
Pat the turkey dry with paper towels and place it on a rack over a baking sheet in the fridge for at least 8 hours or overnight. This step is optional but helps dry the skin for better crisping when roasting.
Boom—you just prepped a perfectly brined turkey.
Best Herbs and Spices for Turkey Brine
Now let’s talk flavor. You can really have fun with your herb and spice choices in your turkey brine. Here are some winning combinations to inspire your next bird.
Classic Herb Brine
- Fresh rosemary
- Thyme
- Sage
- Bay leaves
- Black peppercorns
This combo delivers a clean, savory, and traditional flavor profile perfect for Thanksgiving.
Citrus-Herb Brine
- Orange and lemon slices
- Crushed garlic
- Fresh parsley
- Thyme
- Coriander seeds
Bright and aromatic, this is ideal for a lighter, fresher take on turkey.
Apple Cider Brine
- Apple cider (replaces some water)
- Cinnamon sticks
- Cloves
- Allspice
- Star anise
Great for a fall-themed feast. It adds a touch of sweetness and deep spice that really complements the turkey.
Spicy Southwest Brine
- Chili flakes
- Cumin
- Coriander
- Smoked paprika
- Jalapeño slices
Want something with a kick? This bold mix is for adventurous eaters.
Feel free to mix and match based on what you like. You really can’t go wrong as long as you include salt and keep the ratios balanced.
How Long Should You Brine a Turkey?
Timing is everything when it comes to brining. Go too short, and you won’t get that deep flavor and moisture. Go too long, and your turkey might turn mushy or too salty. So, what’s the sweet spot?
Here’s a simple guide:
| Turkey Weight | Wet Brine Time |
|---|---|
| Up to 12 lbs | 8–12 hours |
| 12–16 lbs | 12–18 hours |
| 16–20 lbs | 18–24 hours |
| 20+ lbs | Up to 30 hours |
If you’re short on time, even 6 hours can make a noticeable difference, especially for smaller birds. Just remember: when in doubt, lean toward the shorter end. You can always add seasoning after, but you can’t fix an over-brined bird.
How to Brine a Turkey Safely
Food safety might not be the most exciting topic, but when you’re working with poultry and salt water for hours (or days), it’s crucial. Done wrong, it can make people sick. Done right, it’s smooth sailing.
Keep It Cold
Turkey must be kept at or below 40°F (4°C) while it brines. That means:
- In the fridge: Best option if your container fits.
- In a cooler: Add ice packs or bags of ice and check the temp often.
- Outside (if cold enough): If it’s consistently below 40°F outside and secure from animals, it can work.
Never brine a turkey at room temperature. Bacteria love warm, moist environments.
Use Clean Equipment
Sanitize everything: the brining container, your hands, countertops, cutting boards—everything that touches raw turkey or brine.
Discard the Brine
Never reuse brine. Once the turkey comes out, pour it down the drain. The brine is now full of raw meat bacteria and isn’t safe for other uses.
Use Fresh Ingredients
Don’t brine a previously frozen turkey that was injected with a salt solution—it can become too salty. Look for “natural” or “no added salt” labels.
How to Rinse and Dry the Turkey After Brining
This step is just as important as the brine itself—don’t skip it! Here’s how to get your turkey brine-free and oven-ready.
Step 1: Rinse Thoroughly
After brining, take the turkey out of the brine and place it in your sink. Rinse it well, inside and out, with cold water. This removes any excess salt and brine from the surface, which helps prevent the bird from being too salty or soggy.
Step 2: Dry Completely
Use paper towels to pat the bird as dry as possible. You want that skin to get nice and crispy when roasting, and moisture is the enemy of crispiness.
Step 3: Air Dry in Fridge (Optional but Recommended)
For the ultimate crispy skin, place the turkey uncovered on a wire rack over a baking sheet in the fridge for 8–24 hours. This step helps dry out the skin further, creating a beautiful golden-brown crust when it hits the oven.
How to Roast a Brined Turkey
Now that you’ve done the prep work, it’s showtime. Roasting a brined turkey is slightly different from a regular one, mainly because it’s already well-seasoned and juicy. Here’s how to roast it to perfection.
Preheat and Prep
- Preheat your oven to 325°F (163°C).
- Remove the turkey from the fridge and let it sit at room temp for about 1 hour.
- Season lightly (if at all) since the brine already infused a lot of flavor. A simple butter rub or herb mix will do.
Trussing and Stuffing
- Don’t overstuff the cavity—it slows cooking and increases the risk of uneven doneness.
- You can add aromatics like onions, apples, and herbs inside for extra flavor.
Roasting Time
Here’s a quick chart for unstuffed turkeys:
| Weight | Roasting Time (Unstuffed) |
|---|---|
| 12–14 lbs | 3 to 3.75 hours |
| 14–18 lbs | 3.75 to 4.25 hours |
| 18–20 lbs | 4.25 to 4.5 hours |
| 20–24 lbs | 4.5 to 5 hours |
Use a meat thermometer to check:
- 165°F (74°C) in the thickest part of the thigh
- 160°F (71°C) in the breast
- Let it rest for 20–30 minutes before carving to let juices redistribute.
Pro Tip: Don’t baste too often—opening the oven drops the temp. Instead, rub the bird with butter before roasting for that golden, crispy finish.
Flavor Variations: Citrus, Apple, and Spicy Brines
Want to change it up and impress your guests with something unique? These brine variations are just what you need to give your turkey a new twist.
Citrus Brine
Perfect for a bright, zesty flavor.
Ingredients:
- Orange and lemon slices
- Fresh rosemary and thyme
- Garlic cloves
- Peppercorns
Pairs beautifully with herb butters and white wine gravies.
Apple Brine
Slightly sweet and autumnal.
Ingredients:
- Apple cider or apple juice
- Brown sugar
- Cinnamon sticks
- Allspice
- Bay leaves
Ideal for pairing with sage stuffing and cranberry sauces.
Spicy Cajun Brine
For heat lovers!
Ingredients:
- Crushed red pepper
- Garlic
- Paprika
- Cayenne pepper
- Thyme
Serve with spicy gravy or cornbread stuffing for a Southern-style feast.
Feel free to invent your own combo too! Think of the brine like a marinade—it’s your chance to layer in whatever flavors you love most.
Mistakes to Avoid When Brining Turkey
Even with the best brine recipe, simple mistakes can ruin your efforts. Let’s talk about some common pitfalls and how to dodge them like a kitchen ninja.
1. Using Too Much Salt
Salt is essential, yes—but overdoing it leads to a turkey that tastes like a salt lick. Always stick to the recommended ratio: about 1 cup of kosher salt per gallon of water. And remember, not all salts are created equal—kosher salt has larger grains than table salt, so don’t substitute one-for-one.
2. Brining Too Long
More isn’t always better. Leaving your turkey in the brine too long can lead to mushy texture and overwhelming saltiness. Stick to the time chart mentioned earlier—usually 12 to 24 hours is the sweet spot.
3. Not Cooling the Brine Before Use
Hot or even warm brine = food safety nightmare. You must let the brine cool completely before adding your turkey. If you’re in a rush, toss in ice to chill it down quickly.
4. Forgetting to Rinse the Turkey
Skipping the rinse step after brining is a fast track to salty turkey. Rinse it well under cold water to wash off excess salt and seasonings.
5. Roasting Straight from the Fridge
Your turkey needs to come to room temp for about an hour before roasting. This ensures even cooking throughout. A cold bird can end up raw inside and dry outside.
Avoid these rookie mistakes, and you’re well on your way to turkey glory.
Turkey Brine Recipe Card (Quick View)
Here’s a simple, go-to recipe you can print or screenshot for your next turkey day.
Classic Wet Brine Recipe for a 12–16 lb Turkey
Ingredients:
- 1 gallon water (plus extra if needed to fully submerge)
- 1 cup kosher salt
- 1/2 cup brown sugar
- 4 cloves garlic, smashed
- 1 onion, sliced
- 2 bay leaves
- 1 tbsp whole black peppercorns
- 1 tbsp dried rosemary or 3 sprigs fresh
- 1 tbsp dried thyme or 3 sprigs fresh
- 1 orange, sliced
- Optional: 2 cups apple cider or juice
Instructions:
- Heat 1/3 of the water with salt and sugar in a large pot. Stir until dissolved.
- Add all aromatics and simmer for 5–10 minutes.
- Remove from heat and add remaining water and/or ice to cool.
- Place turkey in brining container and pour brine over top. Ensure turkey is fully submerged.
- Refrigerate or chill in a cooler for 12–24 hours.
- Rinse turkey thoroughly, pat dry, and air-dry in fridge if desired.
- Roast as usual.
FAQs about Best Turkey Brine Recipe
Q1: What is the purpose of brining a turkey?
Brining helps the turkey stay juicy and flavorful by allowing it to absorb moisture and seasoning. It’s the secret to avoiding dry, bland meat—especially during holiday feasts.
Q2: How long should I brine my turkey?
For best results, brine your turkey for 12 to 24 hours in the refrigerator. Avoid going beyond 24 hours to prevent an overly salty or mushy texture.
Q3: Can I use a frozen turkey for brining?
Yes, but make sure it’s completely thawed before brining. Brining a frozen bird won’t allow the flavors to properly penetrate the meat.
Q4: Do I need to rinse the turkey after brining?
Yes. Give it a quick rinse under cold water to remove excess salt and brine residue, then pat it dry with paper towels before roasting.
Q5: What are the basic ingredients for a turkey brine?
The essentials include water, salt, sugar, and optional add-ins like herbs, garlic, citrus, and spices for extra flavor.
Q6: Can I dry brine instead of using a liquid brine?
Absolutely. Dry brining uses salt rubbed directly on the bird, which also enhances flavor and moisture without the need for a liquid soak.
Q7: Should I brine a pre-seasoned or self-basting turkey?
Nope. These turkeys are already injected with salty solutions, so brining them again can lead to overly salty results.
Q8: What container should I use to brine a turkey?
Use a large food-safe container, stockpot, or even a cooler. Just make sure it’s non-reactive (no aluminum!) and the turkey is fully submerged.
Q9: Is it safe to brine at room temperature?
Big no-no. Always refrigerate your brining turkey or keep it chilled with ice to avoid bacterial growth.
Q10: Can I reuse the brine?
Never. Once used, the brine contains raw poultry bacteria—discard it immediately after use.
Final Tips for the Best Thanksgiving Turkey
To wrap this up with a bow, here are a few last-minute tips to ensure your turkey is the highlight of your holiday spread:
- Invest in a meat thermometer. It’s the only way to guarantee the perfect doneness without guesswork.
- Let it rest. Rest your turkey for at least 20–30 minutes before carving. It locks in juices and makes slicing easier.
- Don’t overthink it. Brining does most of the heavy lifting—just roast it simply and let the flavor shine.
- Use the drippings. The juices from a brined turkey make insanely flavorful gravy. Just adjust for salt content before adding more seasoning.
- Plan ahead. Brining takes time. Set yourself a reminder two days before Thanksgiving to start.
Brining may seem like an extra step, but trust me—once you taste the difference, it’ll become your go-to method forever. Moist, tender, and flavorful turkey? That’s what we call a holiday win.