Best Peach Cobbler Recipe: There’s just something magical about a warm, gooey, golden-brown peach cobbler straight out of the oven. The sweet aroma fills your kitchen, and the crispy crust combined with juicy peaches makes it impossible not to sneak a bite before it cools. Whether you’re enjoying it in the heat of summer or craving a cozy dessert in winter, peach cobbler always hits the spot. This guide walks you through the best peach cobbler recipe step by step, even if you’ve never baked a day in your life.
But what makes a cobbler truly stand out? It’s that perfect harmony between the soft, syrupy fruit layer and a biscuit-like or cake-style topping that’s slightly crisp on the outside but pillowy inside. This guide will teach you exactly how to achieve that balance. You don’t need to be a pro baker—just bring a love for dessert and a few simple ingredients. Let’s turn your kitchen into a sweet haven!
Ingredients You’ll Need
Before we even preheat the oven, you’ll need to gather your ingredients. One of the beauties of peach cobbler is how simple and affordable it is. You probably already have most of the ingredients sitting in your pantry right now.
Fresh vs. Canned Peaches
Let’s talk peaches. If it’s peach season and you’ve got a basket of juicy fresh ones, absolutely go for it. Fresh peaches give you control over texture and sweetness. You’ll want them peeled, pitted, and sliced. About 6 to 8 medium peaches should do the trick, roughly 4 cups.
Out of season? No problem! Canned peaches in syrup or juice work wonderfully. Just drain them first—too much liquid will make your cobbler soggy. You can also use frozen peaches; just thaw and drain them before using.
Pantry Staples
Here’s your core ingredient list:
- Peaches (fresh, canned, or frozen) – 4 cups
- Granulated sugar – 1 cup (divided for fruit and batter)
- Brown sugar – 1/4 cup (for richer flavor)
- All-purpose flour – 1 cup
- Baking powder – 2 teaspoons
- Salt – 1/2 teaspoon
- Milk – 3/4 cup (whole or 2% preferred)
- Unsalted butter – 1/2 cup (melted)
- Ground cinnamon – 1 teaspoon
- Vanilla extract – 1 teaspoon
- Lemon juice – 1 tablespoon (enhances the peach flavor)
Optional Add-ins for Extra Flavor
Want to add your own twist? Try tossing in:
- A pinch of nutmeg for a warmer, spicier profile.
- A tablespoon of bourbon or rum for depth.
- Chopped pecans or walnuts for crunch.
- A handful of raspberries or blueberries for a fruit fusion.
These extras can elevate your cobbler from classic comfort food to a signature dessert.
Kitchen Tools Required
You don’t need fancy equipment to whip up this cobbler, but having the right tools makes the process smoother and more enjoyable.
Must-Have Equipment
Here’s what you’ll definitely need:
- 9×13 inch baking dish – The ideal size for even baking and that golden crust.
- Mixing bowls – One for the batter, one for the peach mixture.
- Whisk and spatula – For stirring and folding ingredients with ease.
- Measuring cups and spoons – Accuracy is key in baking.
Helpful Tools for Easy Preparation
These aren’t essential, but they’ll make your life easier:
- Peeler – If you’re using fresh peaches, this speeds up the process.
- Sifter – Helps aerate your flour and avoid clumps.
- Microplane grater – Great if you’re adding lemon zest or nutmeg.
- Ice cream scoop – For perfect serving size when dishing it out later.
With your tools and ingredients ready, it’s time to bring the magic to life.
Preparing the Peaches
Let’s get hands-on. Your peach layer is the heart of the cobbler—it needs to be flavorful, juicy, and tender without turning mushy.
How to Peel and Slice Fresh Peaches
Fresh peaches have a silky texture and natural sweetness that makes your cobbler next-level good. To peel them easily, here’s a trick:
- Boil water in a pot and gently lower in the peaches for 30–45 seconds.
- Transfer to ice water to stop the cooking.
- Peel the skins right off – they should slip off like magic.
Next, slice them evenly. Aim for medium-thin slices—too thick, and they won’t cook through; too thin, and they’ll disintegrate into mush.
In a large bowl, mix the peach slices with 1/2 cup of sugar, 1 tablespoon of lemon juice, a pinch of cinnamon, and 1/4 cup of brown sugar. Let this sit for at least 15–20 minutes so the fruit macerates and creates that sweet, syrupy base.
Using Canned or Frozen Peaches
Short on time or fresh fruit? Use canned or frozen peaches, no shame in it. Just make sure to:
- Drain them well if using canned (you don’t want excess syrup).
- Thaw and pat dry frozen peaches to avoid a watery mess.
You’ll still toss them in the same sugar-lemon-cinnamon combo. This flavor prep is non-negotiable—it gives your cobbler its depth and sweetness.
Making the Cobbler Batter
Now, let’s talk about the crowning glory: the batter. It’s the golden, slightly crisp top that contrasts perfectly with the soft peaches beneath.
Mixing the Batter to the Right Consistency
In a medium bowl, whisk together:
- 1 cup of flour
- 1/2 cup of granulated sugar
- 2 teaspoons of baking powder
- 1/2 teaspoon of salt
Next, add:
- 3/4 cup milk
- 1 teaspoon vanilla extract
- 1/2 cup melted butter (unsalted)
Stir just until combined—don’t overmix. Your batter should be smooth and pourable, kind of like pancake batter.
Tips for a Fluffy, Golden Crust
Want that perfect crust every time? Follow these pro tips:
- Melt the butter in your baking dish while the oven preheats. Pour the batter over the butter—don’t stir! This creates those beautiful, buttery edges.
- Add the peaches on top of the batter. Again, don’t mix them in. They’ll sink slightly as they bake, while the batter puffs up around them for that layered cobbler effect.
- Sprinkle a cinnamon-sugar mix on top before baking for a caramelized finish.
Then pop it in the oven and let the magic happen.
Baking the Cobbler to Perfection
Baking is where all the flavors fuse together and the real transformation happens. You’ve prepped your fruit, mixed your batter, and now it’s time to let the oven do the heavy lifting. But don’t just toss it in and hope for the best—perfect peach cobbler requires the right time, temperature, and a little bit of patience.
Ideal Oven Settings
Preheat your oven to 375°F (190°C). This is the sweet spot for getting a nicely browned crust while allowing the peaches to bubble and soften beneath. Place the baking dish in the center rack to ensure even heat distribution. If you’re using a glass or ceramic dish, this temperature works beautifully; for metal pans, check a few minutes early since they tend to cook faster.
Bake for 40 to 45 minutes, or until:
- The crust is golden brown and firm to the touch.
- The peach filling is bubbling around the edges.
- A toothpick inserted into the crust comes out clean.
If your crust starts to brown too quickly but the inside isn’t fully cooked, loosely tent the cobbler with foil for the last 10 minutes. That’ll prevent overbrowning without sacrificing texture.
Signs It’s Done Right
You’ll know it’s perfect when you see the batter has puffed up and absorbed some of the fruit juices while still holding its own form. The top should be crisp but tender underneath, like a soft cookie crust. Resist the urge to cut into it immediately. Let it cool for at least 10 to 15 minutes so the juices can thicken slightly. Trust me, the wait is worth it.
Serving Suggestions
A peach cobbler is pure comfort food, and while it’s amazing on its own, the right pairing can make it unforgettable. Here’s how to serve it like a pro.
Classic Pairings
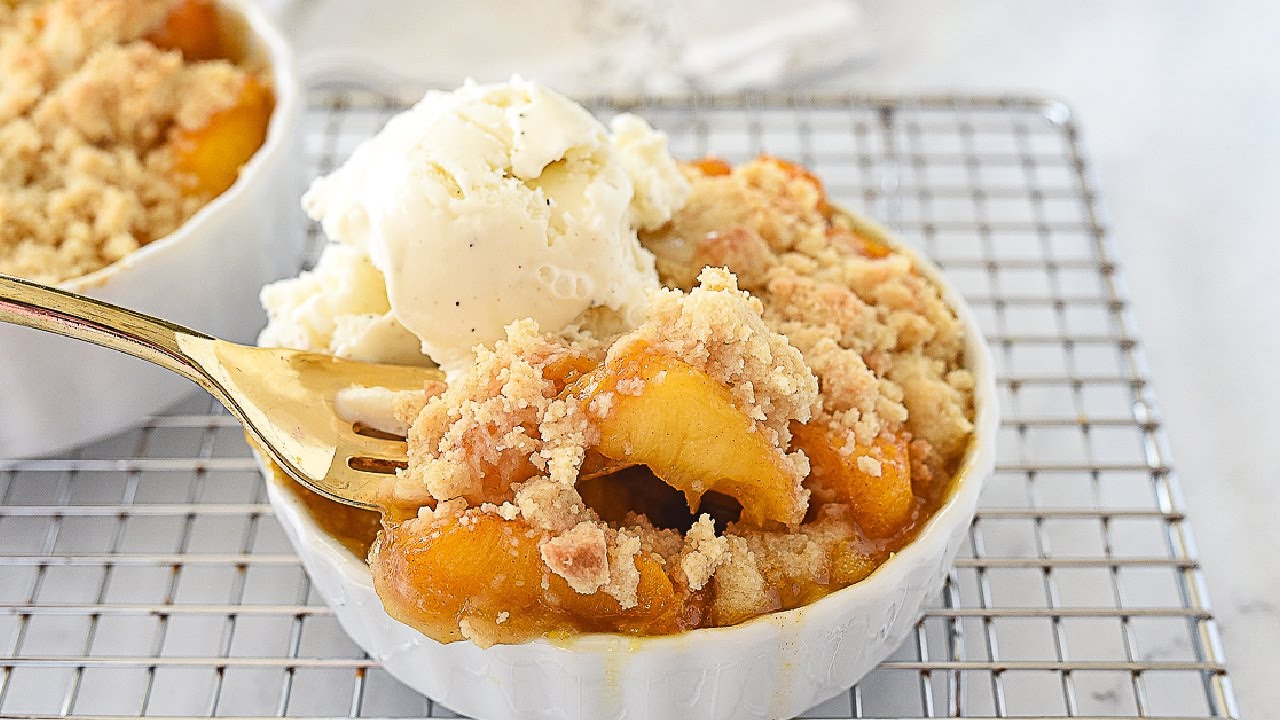
- Vanilla ice cream – The go-to. The warm cobbler melts the ice cream just enough to create a creamy sauce over the top.
- Whipped cream – Light, fluffy, and a great dairy-free option if you use coconut cream.
- Caramel drizzle – Adds a deep, rich sweetness that plays beautifully with the peaches.
- A dash of cinnamon or nutmeg – For extra spice and visual appeal.
Serving Tips
- Serve warm, not piping hot. Letting it cool a little makes slicing and scooping easier.
- Use a wide, flat spoon or spatula to get a clean serving with both crust and peach filling.
- Dust the top with powdered sugar if you’re feeling fancy—or if you want that Instagram-worthy photo.
This dessert also tastes fantastic chilled or at room temperature. In fact, many people say it’s even better the next day once all the flavors have fully married.
How to Store and Reheat Peach Cobbler
Made a big batch? No worries. Peach cobbler stores well and reheats like a dream. Here’s how to keep that fresh-baked taste even days later.
Storing Leftovers
- Room temperature – If you plan to eat it within 24 hours, you can loosely cover it with foil and leave it on the counter.
- Refrigerator – For longer storage, transfer leftovers to an airtight container or wrap the baking dish with plastic wrap. It’ll keep for 3–4 days.
- Freezer – Want to save it for later? Peach cobbler freezes surprisingly well. Store it in freezer-safe containers and label it with the date. Use within 2 months for best quality.
Reheating Tips
- Microwave – Quick and easy. Place a portion on a microwave-safe dish, cover with a damp paper towel, and heat in 30-second bursts.
- Oven – To retain crispness, reheat in the oven at 350°F (175°C) for about 15–20 minutes.
- Air fryer – A modern favorite. It crisps up the top beautifully while warming the inside evenly.
Always reheat only the portion you’ll eat, as repeated heating can make the crust soggy.
Peach Cobbler Variations
Once you’ve mastered the classic version, it’s time to play! Peach cobbler is one of those desserts that loves creativity. Whether you’re accommodating dietary needs or just want to try something new, here are a few twists to keep things interesting.
Fruit Swaps and Additions
- Mixed Berry Cobbler – Add blueberries, blackberries, or raspberries.
- Apple-Peach Cobbler – Great for fall; adds texture and sweetness.
- Tropical Twist – Pineapple and mango mixed with peaches create a bright, exotic flavor.
Crust Variations
- Bisquick or drop-biscuit topping – For a fluffier, cakier texture.
- Oat crumble – Mix oats, butter, and brown sugar for a crispier, rustic top.
- Cornmeal crust – Adds a Southern flair and slightly grainy texture that complements the sweetness.
Dietary Options
- Gluten-free – Use a 1:1 gluten-free flour blend and double-check your baking powder.
- Vegan – Swap in plant-based milk and butter alternatives. Use maple syrup or agave instead of sugar if desired.
- Sugar-free – Try using monk fruit sweetener or stevia-based blends.
Get experimental—it’s hard to go wrong with a base as forgiving and flavorful as this.
Tips and Tricks for Peach Cobbler Success
Here are some final nuggets of wisdom to ensure every batch of peach cobbler is your best yet.
Common Mistakes to Avoid
- Overmixing the batter – Leads to tough crusts. Mix until just combined.
- Adding too much liquid – Especially with canned or frozen peaches. Drain well!
- Baking at the wrong temperature – Can cause uneven cooking. Stick with 375°F.
Expert Secrets
- Rest your batter – Letting it sit for 10 minutes before pouring helps it rise better.
- Butter first, batter second, peaches last – This order gives you those gorgeous golden edges and rich flavor.
- Use cast iron for extra crisp – A well-seasoned cast iron skillet gives unbeatable texture.
Making Mini Peach Cobblers for Parties
Want to impress your guests with individual servings that are cute, practical, and just as delicious? Mini peach cobblers are your go-to dessert for potlucks, picnics, and dinner parties. They’re super simple to assemble and look fantastic on a dessert table.
Why Go Mini?
- Perfect Portions – No slicing or scooping needed. Everyone gets their own!
- Faster Baking – Smaller portions cook faster, usually within 25-30 minutes.
- Portable – Great for outdoor events or packed lunches.
- Customizable – Add nuts, berries, or spices to individual servings to cater to different tastes.
How to Make Mini Cobblers
You can use ramekins, muffin tins, or small mason jars. Here’s a quick rundown of how to do it:
- Prepare your peach filling as usual.
- Spoon it into the bottom of each greased ramekin or tin.
- Pour the cobbler batter evenly over the top.
- Sprinkle cinnamon-sugar for added texture.
- Bake at 375°F (190°C) for 25–30 minutes, until golden and bubbly.
Top each one with a small scoop of ice cream or a dollop of whipped cream right before serving. These are always a hit and disappear fast!
History of Peach Cobbler
Understanding where peach cobbler came from only deepens your appreciation for this timeless treat. It’s more than just a delicious dessert—it’s a dish with roots in American culinary history.
Origins of Cobbler
Cobbler is believed to have originated in the early American colonies. Settlers often didn’t have the proper ingredients or equipment for making traditional British puddings, so they improvised. Instead of layered pastries, they used biscuit dough dropped on top of stewed fruit—hence the name “cobbler,” as it looked like a cobbled street.
The Peach Connection
Peaches became a Southern staple in the U.S. by the 19th century, thanks to the region’s ideal growing conditions. It wasn’t long before cooks started pairing juicy, ripe peaches with cobbler-style crusts, especially during the summer harvest months.
Peach cobbler grew into a cultural icon, especially in Southern cuisine. It’s now a fixture at picnics, cookouts, and family gatherings across the country.
Why This Recipe Works Every Time
There are hundreds of peach cobbler recipes out there—some too soggy, others too dry. So why does this one always deliver? It’s all about balance, timing, and the right ingredients.
Balanced Flavor and Texture
This recipe nails the sweet-to-tart ratio. The lemon juice highlights the natural tang in the peaches, while the brown sugar adds depth. And the crust? Buttery and crisp on the outside, soft and spongy inside.
Easy to Customize
Whether you’re using fresh, frozen, or canned peaches, this recipe adapts beautifully. It also welcomes extra fruit, spices, and even boozy add-ins without throwing off the core structure.
No-Fail Steps
- Melted butter base ensures a rich, even bake.
- Batter-poured-over-butter technique guarantees a fluffy crust that rises through the fruit.
- Don’t stir once assembled — this helps create layers.
No tricks. Just solid technique and reliable results every time you bake.
FAQs about Best Peach Cobbler Recipe
1. Can I use canned or frozen peaches instead of fresh?
Absolutely! While fresh peaches bring out the best flavor, canned (drained) or frozen (thawed and drained) peaches are great time-saving options—especially when peaches are out of season.
2. Do I need to peel the peaches?
Peeling is optional. If you prefer a smoother texture, peel them. But if you like a little rustic charm and added fiber, keep the skin on—it softens during baking.
3. What kind of sugar works best for peach cobbler?
Granulated sugar is classic, but brown sugar adds a caramel depth. Some recipes use a mix of both for that rich, golden flavor.
4. Can I make peach cobbler ahead of time?
Yes, you can! Bake it, let it cool, and store in the fridge for up to 3 days. Reheat in the oven to revive that golden crust.
5. Should peach cobbler be served hot or cold?
Warm is the sweet spot—especially with a scoop of vanilla ice cream on top. But hey, leftovers cold from the fridge? Still delicious.
6. How do I get the topping to stay crisp?
Serve it fresh from the oven for peak crispiness. If you’re reheating, pop it in the oven instead of the microwave to keep that golden top from going soggy.
7. Can I make it gluten-free?
Totally. Just substitute the all-purpose flour with a gluten-free baking mix—make sure it includes xanthan gum for structure.
8. What spices pair well with peach cobbler?
Cinnamon is a must, but don’t sleep on nutmeg or even a pinch of ginger for a subtle kick.
9. Can I freeze peach cobbler?
Yes, freeze it fully baked. Wrap it tightly and store for up to 2 months. Reheat in the oven until warmed through.
10. How do I prevent a soggy cobbler?
Drain excess juice from the peaches and don’t overdo the filling. A thicker batter and preheating your baking dish can also help.
Conclusion
Peach cobbler is one of those classic desserts that never goes out of style. Whether you’re feeding a crowd, treating your family, or just craving something sweet and cozy, this step-by-step recipe makes it foolproof. From its juicy peach base to its golden, buttery topping, it hits every comforting note a dessert should.
What makes it truly special? Its simplicity. You don’t need any advanced baking skills or expensive ingredients. Just a few pantry staples, a handful of fresh or canned peaches, and the willingness to dig in and bake with love.
So, next time you’ve got peaches in your kitchen and a craving for something sweet—this recipe has your back. Trust the process, enjoy the journey, and get ready for compliments all around.