Best Focaccia Recipe: Focaccia is Italy’s beloved flatbread—soft, chewy, and infused with olive oil. It’s not just bread; it’s a canvas of flavor. Imagine biting into a slice that’s crispy on the outside, pillowy on the inside, and dripping with the scent of rosemary and garlic. That’s focaccia. It’s a versatile bread that stands proudly on its own or plays sidekick to soups, salads, and antipasto platters.
Focaccia belongs to the same family as pizza dough but is much more forgiving. It doesn’t demand perfect shaping or fancy toppings. What it asks for is patience and high-quality olive oil. Whether you’re new to baking or a seasoned kitchen pro, this bread is your gateway to homemade artisan baking.
Brief History and Popularity
Originating from ancient Rome, focaccia was traditionally baked on the hearth or on heated stones. The name comes from the Latin word focus, meaning “hearth” or “fireplace.” Over centuries, this rustic flatbread evolved into regional variants like Ligurian focaccia with herbs, or the sweet version found in Venice.
Today, focaccia’s popularity spans the globe. You’ll find it in Italian delis, artisan bakeries, and even grocery stores. But nothing beats the homemade version—fresh, aromatic, and tailored to your taste.
Ingredients You’ll Need
Basic Ingredients Breakdown
To make the best focaccia, simplicity is key. You don’t need a pantry full of ingredients—just a handful of high-quality staples. Here’s what you need:
- Flour – All-purpose flour works great, but bread flour gives a slightly chewier texture.
- Yeast – Active dry yeast or instant yeast will do the trick.
- Water – Lukewarm, not hot. This activates the yeast without killing it.
- Salt – Sea salt or kosher salt for both the dough and topping.
- Sugar or Honey – Just a pinch to feed the yeast and add a slight sweetness.
- Olive Oil – Go for extra virgin olive oil. It’s the hero ingredient.
That’s it for the base. These ingredients come together to form a dough that’s soft, airy, and bursting with flavor once baked.
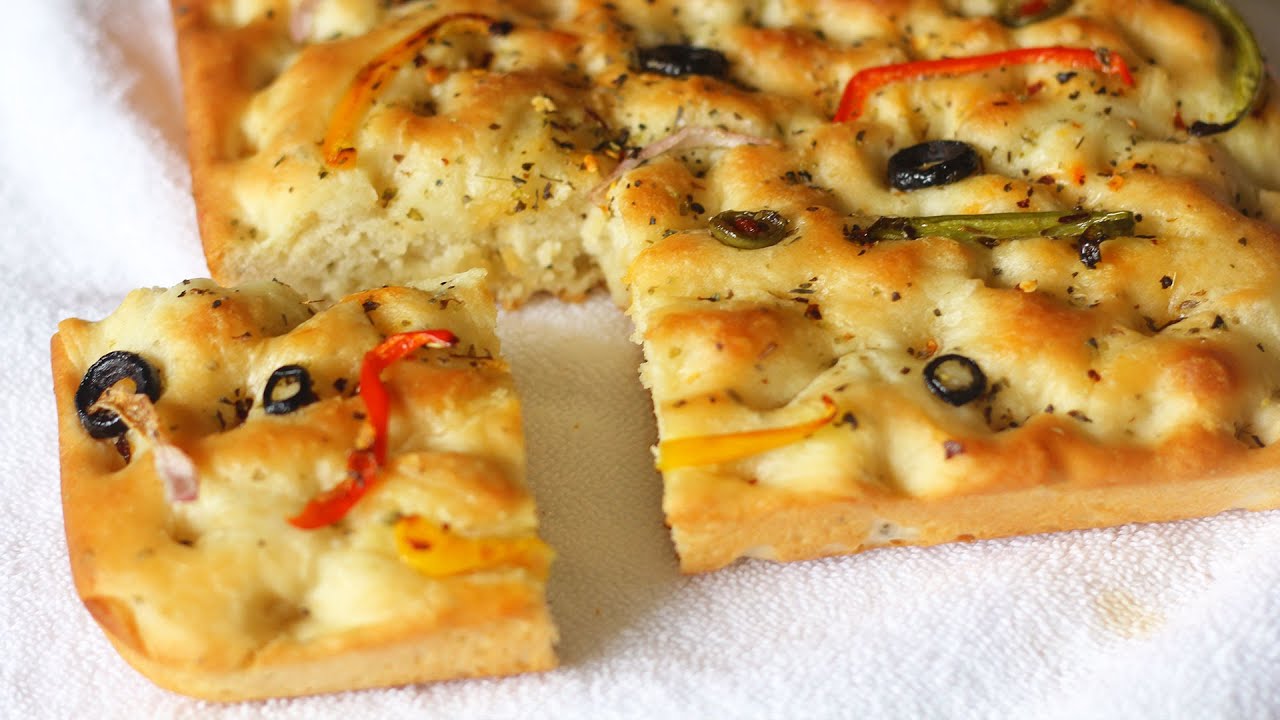
Optional Add-ons for Flavor Boost
Want to go beyond the classic? Here are some favorite focaccia toppings:
- Fresh Herbs – Rosemary, thyme, oregano
- Garlic – Minced or roasted
- Cherry Tomatoes – Pressed into the dough
- Caramelized Onions – Sweet and savory
- Cheese – Parmesan or mozzarella sprinkled on top
- Olives – Green or black, pitted and sliced
You can mix and match to create your own signature focaccia. There’s no wrong combo—as long as it’s something you love.
Tools and Equipment Required
Kitchen Essentials for Perfect Focaccia
Making focaccia at home doesn’t require a fancy setup. You just need a few basic tools:
- Mixing Bowl – A large one to mix and let the dough rise.
- Measuring Cups & Spoons – Precision matters in baking.
- Wooden Spoon or Dough Scraper – For mixing and handling the sticky dough.
- Baking Pan – A 9×13-inch metal or glass pan works best.
- Plastic Wrap or Damp Towel – To cover the dough while it proofs.
- Pastry Brush – For spreading olive oil generously.
- Oven – Preheated to ensure even baking.
Optional, but helpful:
- Stand Mixer with Dough Hook – Saves time on kneading.
- Digital Kitchen Scale – For precise measurements.
These tools ensure your focaccia bakes evenly and turns out just like it does in your favorite Italian bakery.
Step-by-Step Focaccia Recipe
Step 1: Mixing the Dough
Let’s get started with the dough. In a large bowl, combine:
- 4 cups of all-purpose flour
- 2¼ tsp (1 packet) of active dry yeast
- 2 tsp salt
- 1½ cups warm water (110°F/45°C)
- 2 tbsp olive oil
- 1 tsp sugar
Stir everything together until a shaggy dough forms. Don’t worry if it’s sticky—that’s exactly what you want. Sticky dough means more hydration, which leads to that airy, open crumb in your final bread.
Cover the bowl with plastic wrap or a damp cloth and let it rest for 10 minutes. This step helps the flour absorb the water and makes the dough easier to handle.
Step 2: First Proofing
After your dough has rested, it’s time for the first proofing, also known as the bulk fermentation. This is where the yeast works its magic, creating air bubbles that will give your focaccia that signature light and airy texture.
Generously coat another large bowl with olive oil—don’t skimp. Transfer the dough to this bowl and turn it to coat all sides with oil. This prevents sticking and helps create that irresistible crust later on.
Cover the bowl tightly with plastic wrap or a damp towel and let it sit at room temperature for 1 to 2 hours. The dough should double in size and look soft and bubbly. If your kitchen is chilly, place the bowl in a warm spot, like inside a turned-off oven with the light on.
A good rule of thumb? If you gently poke the dough and the indentation stays, it’s ready for the next step. The more you let it rise (within reason), the more flavor and air pockets you’ll get.
Step 3: Shaping and Dimpling the Dough
Once the dough has doubled in size, it’s time to shape it. Generously oil a 9×13-inch baking pan. Again, don’t be shy with the olive oil—you want that golden crust.
Gently turn the dough into the pan. Be careful not to deflate it too much. Using your fingertips, press and stretch the dough to fill the entire pan. If it resists stretching, let it rest for 5-10 minutes, then try again.
Now for the fun part: dimpling. Dip your fingers in olive oil and press deep dimples all over the surface of the dough. You’re not just making it pretty—these dimples trap pockets of oil and flavor.
After dimpling, drizzle more olive oil over the top and sprinkle with flaky sea salt. This is also the time to add any toppings: rosemary sprigs, sliced olives, or halved cherry tomatoes pressed gently into the dough.
Step 4: Second Proofing
This second rise is shorter but just as important. Let the shaped dough rest uncovered for 30 to 45 minutes. It will puff up slightly, and the surface will begin to look a little glossy.
This step allows the dough to relax and ensures a tender, airy crumb. If you skip or rush it, you might end up with dense bread. So give it a little time—it’s worth it.
During this stage, preheat your oven to 425°F (220°C). Make sure it’s fully preheated before you bake. A hot oven is crucial to getting that signature crust and soft interior.
Step 5: Baking to Golden Perfection
Slide your pan into the center rack of the preheated oven and bake for 20 to 25 minutes. Keep an eye on it during the last 5 minutes. You’re looking for a deeply golden top and edges that are crisp but not burned.
Once baked, remove from the oven and let it cool in the pan for 10 minutes. Then transfer to a wire rack (if you can resist digging in right away).
Brush the top with a little more olive oil for that classic glossy look. The aroma will fill your kitchen and make it nearly impossible to wait—but letting it cool slightly will make slicing easier and preserve the structure of the crumb.
Tips and Tricks for the Best Focaccia
Achieving the Right Texture
- Hydration is key: The dough should be sticky and moist. More water means more steam during baking, which creates an open crumb.
- Use bread flour if you want more chew: All-purpose works well, but bread flour has more protein, which strengthens the dough.
- Cold fermentation: For even more flavor, let the dough rise overnight in the fridge. Just bring it to room temp before shaping.
Common Mistakes to Avoid
- Under-proofing: If the dough doesn’t double during the first rise, give it more time.
- Over-proofing: If the dough starts to collapse, it may be over-proofed.
- Not enough oil: Focaccia loves olive oil. It keeps the dough moist and gives it that irresistible flavor and texture.
- Using the wrong pan: Metal pans yield a crispier crust than glass or ceramic.
Serving and Storing Focaccia
Best Ways to Serve
Focaccia is incredibly versatile. Here are a few ideas:
- Serve warm with a dipping sauce of olive oil and balsamic vinegar.
- Use it as the base for gourmet sandwiches.
- Pair with soups or salads for a hearty meal.
- Cut into sticks for a party appetizer.
You can even top leftovers with cheese and reheat it for a quick snack.
How to Store Leftovers
If you have leftovers (which is rare!), wrap focaccia in aluminum foil or plastic wrap and store it at room temperature for up to 2 days. To keep it longer, refrigerate it, but expect it to lose some of its softness.
To reheat, place it in a preheated oven at 350°F (175°C) for 5-10 minutes. You can also toast slices in a skillet with a bit of olive oil for extra crispiness.
FAQs about Easy Focaccia Recipe
1. What is focaccia bread?
Focaccia is a classic Italian flatbread that’s soft, airy, and rich in olive oil flavor. It’s often topped with herbs, garlic, or vegetables and can be enjoyed on its own or as a sandwich base.
2. Do I need special flour for focaccia?
No, all-purpose flour works great for homemade focaccia. However, using bread flour can give it a slightly chewier texture.
3. How long does focaccia dough need to rise?
Typically, focaccia dough needs at least 1 to 2 hours to rise. For a deeper flavor, you can refrigerate it overnight for a slow fermentation.
4. Can I freeze focaccia bread?
Yes! After baking, let it cool completely, wrap tightly in plastic wrap and foil, then freeze. It stays fresh for up to 3 months. Reheat in the oven for the best texture.
5. How do I get that crispy crust?
The secret is olive oil! Generously coat the baking pan and drizzle some on top before baking. A hot oven also helps crisp up the edges beautifully.
6. What toppings can I use on focaccia?
Popular options include rosemary, sea salt, cherry tomatoes, garlic, olives, and caramelized onions. Feel free to get creative!
7. Can I make focaccia without yeast?
Traditional focaccia requires yeast for its signature rise and airy texture. But you can try baking powder-based versions for a quicker alternative, though the texture will differ.
8. Is focaccia gluten-free?
Standard focaccia is not gluten-free. However, you can use gluten-free flour blends designed for yeast breads to create a similar version.
9. Why is my focaccia dense and not fluffy?
This could be due to under-proofing or overmixing the dough. Ensure the dough rises fully and handle it gently after the first rise.
10. How should I store leftover focaccia?
Wrap it in foil or place in an airtight container at room temperature for up to 2 days. For longer storage, refrigerate or freeze it. Reheat before serving for best results.
Conclusion
Making focaccia at home is more than just baking—it’s an experience. From mixing the dough to creating those signature dimples and savoring that first warm bite, it’s the kind of recipe that turns your kitchen into a cozy Italian bakery. With just a handful of ingredients and a little patience, you can enjoy artisan bread that rivals anything from a professional oven. Try it once, and you’ll be hooked for life.