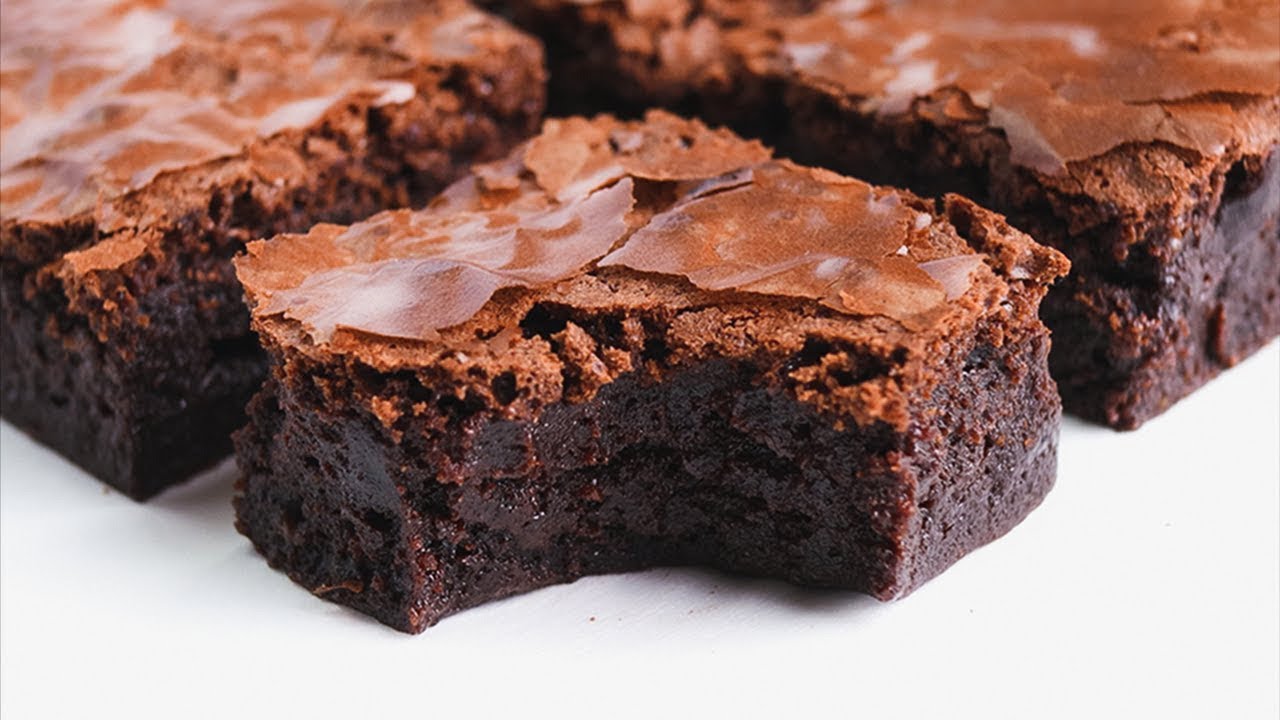
Best Chocolate Brownie Recipe: There’s something magical about biting into a warm, gooey, rich chocolate brownie. But what separates a decent brownie from an unforgettable one? It all boils down to the texture, flavor balance, and ingredients. A perfect brownie should strike a delicate harmony between fudgy and cakey—chewy edges with a moist, dense center that practically melts in your mouth. It should have that deep chocolate flavor, a glossy top, and a slightly crisp crust that cracks just enough when you bite into it.
Consistency is key. Some people prefer their brownies extra fudgy, others want a little more cake-like texture—but in general, the best brownie is one that gives you a rich chocolate hit with every bite. Achieving that takes the right ratio of fat, sugar, and flour, along with careful mixing and proper baking times. With a few pro tips and a step-by-step guide, you’ll never have to settle for store-bought again.
Why Homemade is Better Than Store-Bought
There’s no comparison between homemade and store-bought brownies. Not only do homemade brownies taste infinitely better, but you also have complete control over the quality of ingredients. Want organic butter? Dark chocolate? Less sugar? Gluten-free? You name it—you can tailor your batch to your liking.
Store-bought mixes often rely on preservatives and artificial flavors to extend shelf life. Plus, they’re usually loaded with processed sugars and oils. With homemade brownies, you get fresh ingredients and that unbeatable aroma wafting through your kitchen. Baking them yourself also adds that extra pinch of love and warmth—something a box mix can never replicate. Whether you’re baking for a celebration or just because, homemade brownies always hit differently.
Ingredients You’ll Need
Basic Pantry Staples
Before diving into baking, let’s round up the core ingredients that form the foundation of every great brownie:
- Unsalted Butter (1 cup / 226g): Gives the brownie richness and moistness.
- Granulated Sugar (1¼ cups / 250g): Sweetens and helps form the shiny crust.
- Brown Sugar (½ cup / 100g): Adds depth and a slight caramel note.
- Eggs (3 large): Bind everything together and contribute to structure.
- All-purpose Flour (¾ cup / 95g): Just enough to hold the batter—too much makes them cakey.
- Unsweetened Cocoa Powder (½ cup / 45g): Intensifies the chocolate flavor.
- Salt (½ tsp): Balances the sweetness and enhances flavor.
- Vanilla Extract (1 tsp): Adds aromatic sweetness.
- Semi-sweet Chocolate (1 cup / 170g): Melted for that gooey base.
These are your essentials. With just these items, you’re well on your way to brownie heaven.
Optional Add-ins for Extra Flavor
If you’re feeling adventurous, consider throwing in a few of these extras:
- Chocolate chips or chunks: For a double-chocolate experience.
- Nuts (walnuts, pecans): Adds crunch and earthy flavor.
- Espresso powder (1 tsp): Enhances the chocolate depth.
- Sea salt flakes (sprinkled on top): For a sweet-salty contrast.
- Peanut butter or Nutella swirls: For a rich twist.
- Marshmallows or caramel drizzle: For indulgent variation.
Customizing your brownies with mix-ins can take them from delicious to unforgettable. Just be sure not to overload—too many extras can affect texture and baking time.
Tools and Equipment Required
Must-Have Baking Tools
You don’t need a fancy kitchen setup to bake amazing brownies. Here’s the bare minimum you’ll need:
- Mixing bowls (1 large, 1 medium): For wet and dry ingredients.
- Whisk or hand mixer: To blend your batter thoroughly.
- Rubber spatula: For folding and scraping the bowl clean.
- 8×8 or 9×9-inch baking pan: The ideal size for thick, chewy brownies.
- Parchment paper: Makes removal easy and prevents sticking.
- Measuring cups and spoons: Accuracy is key when baking.
Nice-to-Have Extras
If you want to level up your brownie game, these tools can help:
- Digital kitchen scale: For precise measurements, especially for flour and cocoa.
- Offset spatula: For evenly spreading batter into the pan.
- Cooling rack: Helps brownies cool faster and evenly.
- Oven thermometer: Ensures your oven is the right temp—many home ovens run hot or cold.
Having the right tools makes baking more enjoyable and increases your chances of success. Once you get the hang of it, you’ll find yourself whipping up brownies on a whim.
Step-by-Step Brownie Baking Instructions
Step 1: Prepping Your Oven and Pan
Preheat your oven to 350°F (175°C). While it’s heating, grab your baking pan and line it with parchment paper, leaving some overhang on the sides. This makes it easier to lift the brownies out after baking. You can also lightly grease the pan with butter if you don’t have parchment paper.
Proper prep is important—don’t skip this step! It prevents sticking and ensures even baking. A well-lined pan equals hassle-free brownies that slide right out, no mess, no broken corners.
Step 2: Melting Chocolate and Butter
In a heatproof bowl, combine 1 cup of unsalted butter and 1 cup of semi-sweet chocolate (chopped or chips). Place the bowl over a pot of simmering water (double boiler method) or microwave in 30-second intervals, stirring between each, until fully melted and smooth.
The key here is low and slow. High heat can scorch the chocolate, making it grainy and bitter. Stir gently until you have a silky, glossy mixture. Once melted, remove from heat and let it cool slightly for about 5 minutes. You don’t want to scramble your eggs when you mix them in!
This step sets the foundation for your brownies. The melted butter and chocolate combo is what gives them their rich, decadent base. Think of it like the heart of your brownie—it needs to be just right.
Step 3: Mixing the Batter
Pour your slightly cooled chocolate mixture into a large mixing bowl. Add in the 1¼ cups of granulated sugar and ½ cup of brown sugar, and whisk until well combined. Then, add the 3 eggs, one at a time, whisking vigorously after each addition. Add 1 tsp vanilla extract and stir until smooth and glossy.
At this point, your batter should be thick and shiny—like molten chocolate lava. In a separate bowl, whisk together your ¾ cup of flour, ½ cup cocoa powder, and ½ tsp salt. Gradually sift the dry ingredients into the wet mixture, folding gently with a rubber spatula.
Here’s the golden rule: do not overmix! Overmixing can make your brownies tough and cakey. Fold just until the flour disappears. If you’re adding any extras like nuts or chocolate chips, this is the time to stir them in gently.
Step 4: Pouring and Spreading
Pour the brownie batter into your prepared pan, using a spatula to scrape every last bit of goodness from the bowl. Spread it evenly into all corners, smoothing the top as best you can.
Here’s where you can get creative—swirl in a bit of peanut butter, Nutella, or sprinkle some sea salt or extra chocolate chips on top. These finishing touches make your brownies stand out and add layers of flavor and texture.
Make sure the batter is evenly spread. Uneven thickness can lead to underbaked or overbaked spots. Tap the pan lightly on the counter to eliminate any air bubbles.
Step 5: Baking to Perfection
Slide your pan into the preheated oven and bake at 350°F (175°C) for about 25–30 minutes. But here’s the thing—don’t rely solely on time. Every oven is different.
Start checking at the 25-minute mark. Insert a toothpick into the center—if it comes out with a few moist crumbs (not raw batter), they’re done. If it comes out completely clean, they might be overbaked.
For fudgier brownies, pull them out when the edges are set but the center still has a little jiggle. They’ll continue to cook as they cool, setting up into that dreamy texture we all love.
Tips and Tricks for the Best Results
Don’t Overmix!
This might be the most repeated tip in baking, but it’s especially important for brownies. Overmixing the batter after adding flour activates the gluten, which makes your brownies more like bread—dense and chewy in the wrong way.
Mix just until your flour disappears into the batter. Fold gently with a spatula instead of aggressively whisking. This simple technique ensures your brownies stay soft and gooey.
Also, don’t skip the cooling time before cutting. Brownies need at least 30 minutes to 1 hour to cool properly. Cutting them too early will make them fall apart—and you’ll lose that beautiful shape.
How to Tell When Brownies are Done
Timing is everything when baking brownies. Here are a few ways to know when they’re just right:
- Edges should look set and slightly pulled away from the pan.
- Center should be soft but not jiggly like jelly.
- Toothpick should come out with moist crumbs, not wet batter.
- Top should look shiny and cracked—that’s the signature brownie crust.
If you like ultra-gooey brownies, pull them a minute or two earlier. Prefer them a bit firmer? Leave them in a few minutes longer, but be careful not to dry them out.
Serving Suggestions
Classic Toppings and Pairings
Now that you’ve baked the perfect brownies, let’s talk about how to enjoy them! These little squares of joy are delicious on their own, but the right toppings can elevate them even further:
- Vanilla ice cream: The ultimate pairing—hot brownie, cold creamy scoop.
- Whipped cream: Light, fluffy contrast to dense chocolate.
- Berries: Strawberries, raspberries, or blueberries for a fruity kick.
- Chocolate sauce or caramel drizzle: Because why not go all out?
- Crushed nuts or cookie crumbs: Adds crunch and flavor.
Presentation matters too. Dust with powdered sugar, stack them high, or cut them into hearts or shapes for a themed treat. You eat with your eyes first, right?
Creative Ways to Serve Brownies
Looking to get fancy or surprise your guests? Here are a few creative ideas:
- Brownie sundaes: Layer brownie chunks with ice cream and toppings in a glass.
- Brownie trifle: Alternate layers of brownie, whipped cream, and fruit.
- Brownie sandwiches: Spread frosting or Nutella between two brownie slices.
- Brownie skewers: Stack cubes of brownie with fruit on a skewer.
Brownies are incredibly versatile. You can serve them at casual movie nights, elegant dinner parties, bake sales, or birthday celebrations. No matter how you plate them, they’ll always steal the show.
Storing and Freezing Brownies
Keeping Them Fresh for Days
So, you’ve made a perfect batch of brownies—but what if you don’t eat them all in one sitting? (Hard to imagine, we know.) Storing them the right way keeps them soft, fudgy, and delicious for several days.
At room temperature, brownies stay fresh for up to 4-5 days when stored in an airtight container. You can layer them with parchment paper to prevent sticking. Keep them in a cool, dry place away from direct sunlight or heat.
If you prefer slightly warm brownies, just pop them in the microwave for 10–15 seconds before serving. It brings back that gooey texture without affecting the flavor.
You can also store brownies with a slice of bread in the container—it helps keep them moist. The brownies absorb moisture from the bread, keeping them soft for longer.
Freezer-Friendly Tips
Brownies freeze like a dream! If you’ve baked a large batch, freezing is a great way to make them last for weeks.
- Wrap individual slices tightly in plastic wrap or foil.
- Place them in a freezer-safe bag or container.
- Label them with the date—they’ll stay good for up to 3 months.
To thaw, leave them at room temperature for 30–60 minutes. For that freshly-baked taste, warm them in the microwave for about 20 seconds. You can also freeze the entire tray before cutting—just wrap it well in foil and plastic.
Freezing doesn’t alter the taste or texture if done right. It’s a brownie lover’s best trick for always having a sweet treat on hand.
Common Mistakes to Avoid
Overbaking or Underbaking
This is the most common mistake with brownies. A few extra minutes can turn your gooey treat into a dry brick. Remember, brownies continue to cook as they cool, so it’s okay to pull them out when they’re slightly underdone in the center.
Use a toothpick to check doneness—but don’t wait for it to come out completely clean. Moist crumbs are your green light. If it’s wet with batter, give it a few more minutes.
Underbaking, on the other hand, can leave the center raw and runny. The edges should be set, and the center should not jiggle when you shake the pan.
Using the Wrong Type of Chocolate
Quality matters. Low-grade or overly sweet chocolate chips can make your brownies taste artificial or overly sugary. For rich, deep chocolate flavor, always opt for semi-sweet or dark baking chocolate.
Avoid using only cocoa powder—it lacks the fat needed for fudgy brownies. If using cocoa, pair it with melted butter and chocolate for balance.
Also, be cautious with salted butter. It can throw off your flavor if your recipe already includes salt. Always use unsalted butter and add salt separately for full control.
Making Variations of the Classic Brownie
Fudgy vs. Cakey Brownies
Let’s settle the great brownie debate—fudgy or cakey? It all comes down to ingredients and ratios:
- Fudgy brownies use more butter and chocolate, less flour, and sometimes an extra egg yolk. The result? Dense, moist, and intensely rich.
- Cakey brownies use more flour and sometimes a touch of baking powder for lift. They’re lighter, with a texture closer to cake but still chocolatey.
Adjust your recipe based on your preference. Want that middle-ground “chewy” style? Aim for balance—equal parts butter and flour, no leavening agents, and beat the eggs well for structure.
Adding Nuts, Caramel, or Peanut Butter
Once you’ve mastered the classic, it’s time to have some fun. Here are a few tasty add-in ideas:
- Chopped walnuts or pecans: Adds crunch and nutty richness.
- Peanut butter swirls: Just drop spoonfuls into the batter and swirl with a knife.
- Salted caramel drizzle: Add a ribbon of caramel for sweet and salty contrast.
- White chocolate chips: For color and creamy pockets of sweetness.
- Crushed cookies or candy pieces: Think Oreos, M&Ms, or toffee bits.
The best part about brownies? They’re super forgiving. Don’t be afraid to experiment and make them your own.
Gluten-Free and Vegan Alternatives
Swaps for Flour, Eggs, and Dairy
Got dietary needs? You can still enjoy amazing brownies with just a few swaps.
For gluten-free brownies:
- Use a 1:1 gluten-free flour blend. Look for ones that contain xanthan gum.
- Almond flour also works but creates a denser texture.
For vegan brownies:
- Replace eggs with flax eggs (1 tbsp ground flax + 2.5 tbsp water = 1 egg).
- Use coconut oil or vegan butter instead of dairy butter.
- Opt for plant-based milk (like almond or oat) if needed.
Dairy-free chocolate is widely available, and you can still achieve a rich, fudgy consistency with the right fat and sugar balance.
Tips for Getting the Texture Right
Baking gluten-free or vegan can be tricky. Here are a few tricks to help:
- Let your batter rest for 10–15 minutes before baking—it helps absorb moisture.
- Don’t overbake. Alternative flours can dry out more quickly.
- Use coffee or espresso powder to enhance the chocolate flavor—especially useful in vegan versions where flavor can be muted.
These alternatives can taste just as indulgent when made with care. In fact, many people can’t even tell the difference!
Fun Facts About Brownies
History of the Brownie
Did you know brownies were a happy accident? Legend has it that a baker forgot to add baking powder to a chocolate cake and ended up with a dense, fudgy creation—the first brownie!
They originated in the United States in the late 19th century, first appearing in a cookbook in 1896. Since then, brownies have evolved from a kitchen mistake to one of the most beloved desserts worldwide.
Popular Brownie Records and Trivia
- The largest brownie ever made weighed over 3,000 pounds!
- There’s a National Brownie Day celebrated on December 8th.
- The “corner piece vs. center piece” debate is very real. Some people even buy special pans with only edge sections!
Brownies aren’t just a dessert—they’re a cultural phenomenon. Whether you’re baking for comfort, fun, or celebration, brownies always hit the spot.
FAQs about Chocolate Brownie Recipe
1. Can I use cocoa powder instead of chocolate?
Yes, but it changes the texture. Cocoa powder lacks fat, so you’ll need to increase butter or oil to compensate. The flavor also won’t be as deep unless you add espresso powder or extra vanilla.
2. How do I make my brownies fudgy instead of cakey?
Use more butter and chocolate, less flour, and skip any baking powder. Also, avoid overbaking—fudgy brownies are done when the center is just barely set.
3. Can I double this recipe?
Absolutely! Just use a 9×13-inch pan and increase the baking time by about 10 minutes. Keep an eye on doneness with a toothpick.
4. What’s the best way to cut brownies cleanly?
Let them cool completely first. Then use a sharp knife dipped in hot water and wiped clean between each cut.
5. How long do homemade brownies last?
Stored in an airtight container, they’ll last 4–5 days at room temperature. You can also freeze them for up to 3 months.
Conclusion
And there you have it—the ultimate, step-by-step guide to baking the best chocolate brownies from scratch. Whether you love them gooey and rich or cakey and light, this guide gives you everything you need to bake your perfect batch. With simple ingredients, the right tools, and a few pro tips, you can create a homemade treat that’s far superior to anything from a box.
From mixing to storing and even serving, you’re now fully equipped to bake brownies like a true dessert pro. Don’t be afraid to experiment with flavors and textures—make each batch your own.
So fire up your oven, melt that chocolate, and enjoy the rich, comforting magic of homemade brownies. Happy baking!