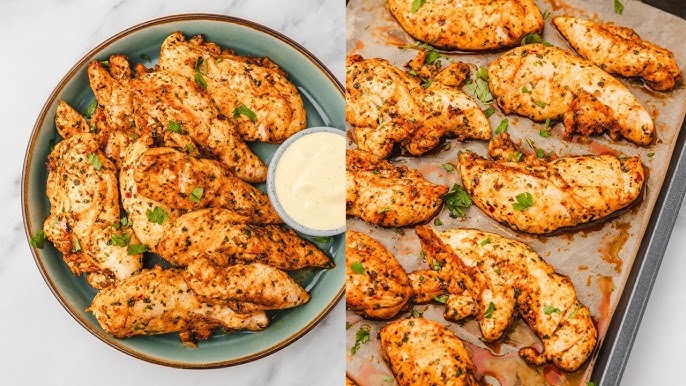
Best Chicken Tenders Recipe: Chicken tenders are the golden treasures of comfort food—tender, juicy strips of chicken coated in a crispy, flavorful crust. They’re a staple at restaurants, family dinners, and game nights, loved by both kids and adults. But here’s the secret: making them at home is way easier than you think, and they taste even better than what you’d get at a fast-food joint.
Why settle for frozen, overly processed options when you can whip up a batch of crispy chicken tenders from scratch in your own kitchen? When done right, they’re juicy on the inside, crunchy on the outside, and seasoned to perfection. And the best part? You control everything—from the oil used to the level of spice and crunch.
In this step-by-step guide, I’ll walk you through the best chicken tenders recipe with easy instructions that will leave your kitchen smelling amazing and your family begging for more.
Ingredients You’ll Need
Before we dive into the method, let’s talk about the stars of the show—your ingredients. Having the right components makes a world of difference in taste, texture, and crispiness.
Main Ingredients:
- Chicken tenders or chicken breasts (cut into strips): 1.5 to 2 lbs
- Buttermilk: 1 cup (for tenderizing and flavor)
- All-purpose flour: 1.5 cups
- Eggs: 2 (beaten)
- Bread crumbs or panko: 1.5 cups (for extra crunch)
- Salt and pepper: to taste
- Garlic powder: 1 tsp
- Paprika: 1 tsp
- Onion powder: 1 tsp
Optional Ingredients (for extra flavor or variations):
- Hot sauce: Add to the marinade for a spicy kick
- Parmesan cheese: Mix with breadcrumbs for extra savory flavor
- Cornstarch: For extra crunch when mixed with flour
- Italian seasoning or cayenne pepper: To spice up the crust
Using buttermilk is a total game-changer. It not only tenderizes the chicken but also infuses it with rich flavor that makes each bite unforgettable. If you don’t have buttermilk on hand, you can make your own by adding 1 tablespoon of lemon juice or vinegar to a cup of milk and letting it sit for 5–10 minutes.
Step-by-Step Preparation Guide
Let’s break this down into simple, foolproof steps that will turn your kitchen into the ultimate fried chicken hotspot.
Step 1: Prepping the Chicken
Start by rinsing your chicken tenders or breast strips and patting them dry with paper towels. This is crucial—wet chicken won’t absorb the marinade properly and will make your coating soggy later.
If you’re using whole chicken breasts, slice them into even strips about 1-inch wide to ensure even cooking. Thinner strips will cook faster and crisp up better without drying out.
Step 2: Creating the Perfect Marinade
In a large bowl, combine the buttermilk with salt, pepper, and a dash of hot sauce (optional). Submerge the chicken strips into the marinade and cover the bowl with plastic wrap. Let it marinate in the refrigerator for at least 30 minutes, but for best results, go for 2–4 hours. If you have the time, overnight is even better—the chicken will be incredibly tender and flavorful.
This marinade not only tenderizes the meat but also infuses it with rich, tangy flavor that enhances the taste of the crust.
Step 3: Coating for Crunch
Now comes the fun part—coating!
Set up a breading station with three bowls:
- Flour + spices: Combine all-purpose flour, garlic powder, paprika, onion powder, salt, and pepper.
- Egg wash: Beat two eggs with a splash of water.
- Breadcrumbs or panko: For extra crunch.
Remove each piece of chicken from the marinade and dredge it first in the seasoned flour, then in the egg wash, and finally coat it generously with breadcrumbs or panko. Press the breadcrumbs firmly into the chicken to ensure a nice, thick crust.
Tip: Double-dip for extra crunch. After the first coating, repeat the flour and breadcrumb steps for a thicker, crunchier crust.
Step 4: Frying or Baking – Your Choice
Now that your chicken is beautifully breaded, it’s time to cook it to golden perfection. You’ve got a couple of options here—frying for maximum crunch or baking/air-frying for a healthier twist.
Frying Method (Classic and Crispy)
- Heat the oil: Use a deep skillet or heavy-bottomed pot and pour in about 2 inches of vegetable oil. Heat to 350°F (175°C). Use a thermometer to keep it accurate—too hot, and your coating will burn; too cold, and your tenders will absorb oil and turn greasy.
- Fry in batches: Don’t overcrowd the pan. Fry 3–4 tenders at a time for 3–4 minutes on each side, until golden brown and cooked through. Internal temperature should reach 165°F (74°C).
- Drain and cool: Place the cooked tenders on a wire rack or paper towel-lined plate to drain excess oil.
The result? Crispy, golden, restaurant-quality chicken tenders that are juicy on the inside and packed with flavor.
Baking Method (Lighter Alternative)
- Preheat your oven: Set it to 425°F (220°C).
- Place tenders on a baking sheet: Use a wire rack on top of the sheet so air can circulate, which helps with crispiness.
- Spray with oil: Lightly spray the tenders with cooking oil for that golden crust.
- Bake for 20–25 minutes: Flip halfway through. You’ll still get a satisfying crunch with much less oil.
Air Fryer Method (Quick and Healthy)
- Preheat air fryer: Set to 400°F (200°C).
- Arrange tenders in a single layer: Don’t stack them—air needs to circulate.
- Cook for 10–12 minutes: Flip halfway through for even cooking and color.
The air fryer version is shockingly crispy and ideal if you’re short on time or watching your calories.
Step 5: Serving Suggestions
Your chicken tenders are done—now comes the best part: eating them! Serve them hot and crispy with your favorite dipping sauces and sides.
Best Dipping Sauces:
- Honey mustard
- Ranch dressing
- Barbecue sauce
- Buffalo or sriracha mayo
- Garlic aioli
Perfect Pairings:
- French fries or sweet potato fries
- Mac and cheese
- Coleslaw
- Corn on the cob
- A simple green salad
Want to go a little fancy? Slice the tenders and toss them on top of a salad, or stuff them into wraps or sandwiches with lettuce, tomato, and your favorite sauce.
Tips for Extra Crispy Tenders
If your goal is ultra-crunchy, golden brown tenders that rival any restaurant, these tips are non-negotiable.
Use Panko Breadcrumbs
Regular breadcrumbs are fine, but panko takes it to the next level. It creates that light, airy crunch you want in every bite.
Chill After Breading
Let your breaded chicken rest in the fridge for 15–20 minutes before frying. This helps the coating adhere better and reduces the chance of it falling off during cooking.
Add Cornstarch to the Flour
Mixing 1–2 tablespoons of cornstarch into your flour boosts crispiness without adding heaviness.
Don’t Overcrowd the Pan
Too many tenders in the pan drops the oil temperature fast, making them greasy instead of crispy. Fry in small batches and give them space.
Use a Wire Rack for Cooling
This is key! Cooling your tenders on a rack (not paper towels) prevents steam from building up underneath, which would make them soggy.
Storing and Reheating Chicken Tenders
Made a big batch? No worries—chicken tenders store and reheat like a dream if you do it right.
How to Store:
- Let the tenders cool completely before storing.
- Use an airtight container and refrigerate for up to 3 days.
How to Reheat Without Losing Crunch:
- Oven: Preheat to 375°F (190°C), place tenders on a wire rack or baking sheet, and bake for 10–12 minutes.
- Air fryer: Reheat at 350°F (175°C) for 4–5 minutes.
- Avoid microwaving—your glorious crust will turn to mush.
Pro tip: Reheat leftovers uncovered to allow moisture to escape and keep that crispy texture.
FAQs about Chicken Tenders Recipe
Can I use chicken breast instead of tenders?
Absolutely. Just slice them into 1-inch strips. They’ll cook just as well and taste just as good.
How do I make gluten-free chicken tenders?
Use gluten-free flour and breadcrumbs or crushed rice crackers. Everything else stays the same.
What’s the best oil for frying?
Use oils with high smoke points like canola, vegetable, or peanut oil for best results.
Can I air fry chicken tenders?
Yes! Air frying is a great, healthier alternative. You’ll still get a satisfying crunch with less oil.
How long can I marinate the chicken?
Minimum of 30 minutes, but 2–4 hours is ideal. Overnight marination gives the best flavor and texture.
Conclusion
There you have it—the ultimate step-by-step guide to making the best chicken tenders right in your kitchen. Whether you fry, bake, or air fry, these golden bites of goodness are guaranteed to be a hit. Once you try this homemade version, you’ll never want to go back to frozen tenders or takeout again.
Crispy, juicy, and loaded with flavor—what more could you want? So roll up your sleeves, grab those ingredients, and treat yourself to the chicken tenders of your dreams.