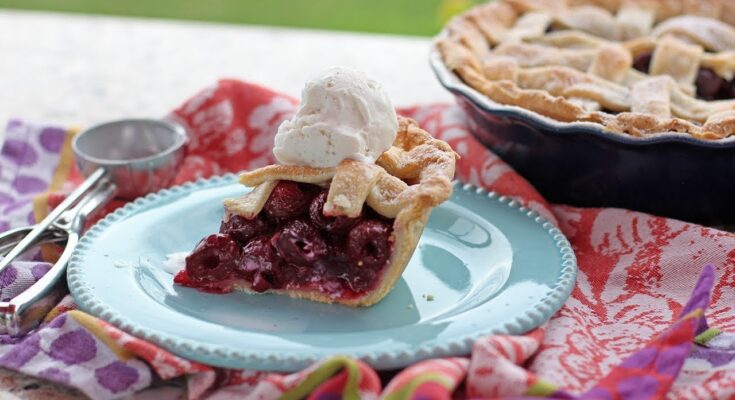
Best Cherry Pie Recipe: There’s nothing quite like the taste of a fresh, homemade cherry pie. It’s sweet, tangy, buttery, and bursting with flavor in every bite. Whether you’re making it for a summer picnic, a festive holiday dessert, or just to satisfy a craving, cherry pie never fails to impress. This isn’t just any cherry pie recipe—it’s a foolproof, step-by-step guide that will walk you through each stage, ensuring your pie turns out picture-perfect every time.
What makes this cherry pie stand out? It’s the balance of tart cherries with just the right amount of sugar, a flaky homemade crust, and a golden, glossy top that crackles when you cut into it. You’ll learn how to create that from scratch with this easy-to-follow recipe that’s been tested to perfection.
Ingredients You’ll Need
Before diving into baking, let’s go over everything you’ll need. Gather your ingredients so the process flows smoothly.
For the Cherry Filling
- 5 cups pitted tart cherries (fresh or frozen)
- 1 cup granulated sugar (adjust to taste)
- ¼ cup cornstarch (or 1/3 cup flour as thickener)
- 1 tbsp lemon juice (freshly squeezed)
- 1 tsp vanilla extract
- Pinch of salt
- Optional: ½ tsp almond extract for extra depth
Using tart cherries like Montmorency gives your pie a more complex flavor. If you use sweet cherries, reduce the sugar slightly. Cornstarch is the preferred thickener because it doesn’t cloud the filling and holds up well when baked.
For the Homemade Pie Crust
- 2 ½ cups all-purpose flour
- 1 tsp salt
- 1 tbsp sugar
- 1 cup unsalted butter (cold, cut into cubes)
- 6–8 tbsp ice water (as needed)
Making your crust from scratch might sound intimidating, but it’s easier than you think—and so worth it. Cold butter and minimal handling are key to achieving that perfect flake.
Preparing the Pie Dough
The crust is the foundation of any good pie. If it’s not right, the whole pie suffers. Let’s get this crust buttery, flaky, and delicious.
Step-by-Step Dough Instructions
- Mix dry ingredients: In a large bowl, whisk together flour, salt, and sugar.
- Cut in butter: Add cubed butter to the flour mixture. Use a pastry cutter or your fingers to break the butter into pea-sized pieces.
- Add ice water: Slowly drizzle in cold water, mixing just until the dough holds together when pressed.
- Form into discs: Divide dough into two equal parts. Flatten into discs, wrap in plastic wrap, and chill for at least 1 hour.
This process chills the fat and relaxes the gluten, making the dough easier to roll and ensuring it doesn’t shrink while baking.
Tips for a Flaky Crust
- Use cold ingredients: Butter, water, and even the bowl should be cold.
- Don’t overwork the dough: The less you handle it, the flakier it’ll be.
- Chill between steps: Chilling gives the dough time to hydrate and firm up.
Mastering pie dough is all about precision and patience. You’ll be surprised how quickly it becomes second nature with a bit of practice.
Making the Cherry Pie Filling
Now, let’s move on to the heart of the pie: the filling. It needs to be thick, sweet, and slightly tart—the kind that doesn’t ooze out when you slice into it.
Fresh vs. Frozen Cherries
Fresh cherries are always best when they’re in season. But frozen cherries work just fine, especially if you can’t find fresh ones. Just be sure to:
- Thaw and drain them before using.
- Adjust the sugar slightly based on the sweetness.
- Add a bit more thickener to account for excess moisture.
How to Thicken the Filling Properly
The worst thing is a runny pie. To avoid that:
- Simmer the cherries: Combine cherries, sugar, lemon juice, and cornstarch in a saucepan.
- Cook until thickened: Stir over medium heat until the mixture thickens and bubbles.
- Cool before using: Let it come to room temperature before adding to your crust.
This process helps control the moisture and gives your filling that jammy, luscious consistency.
Assembling the Pie
Now that you’ve got a chilled, flaky crust and a luscious cherry filling, it’s time to bring everything together. This is where the magic really happens—transforming individual components into a mouthwatering cherry pie.
Rolling Out the Dough
- Flour your surface: Lightly flour a clean countertop or pastry board to prevent sticking.
- Roll from the center out: Start rolling your chilled dough disc into a 12-inch circle. Use even pressure and rotate the dough as you go to maintain a circular shape.
- Transfer to pie pan: Gently lift the dough using your rolling pin and place it into a 9-inch pie dish. Press it down softly to fit the pan.
Here’s a little trick—don’t stretch the dough to fit. Stretching causes shrinkage while baking. Instead, let it naturally fall into place and trim any excess hanging over the edges.
Filling and Covering the Pie
- Add the cooled cherry filling: Spoon the filling evenly into the bottom crust. Spread it out with the back of your spoon.
- Top crust options: You can cover the pie with a full crust or get creative with a lattice top.
- Seal the edges: Press the top and bottom crusts together with your fingers or a fork to seal. Trim the excess and crimp the edges for that classic pie look.
- Egg wash magic: Beat one egg with a tablespoon of milk or water and brush it over the top crust. This gives the pie a beautiful golden shine.
- Cut slits: If using a full top crust, make a few slits for steam to escape while baking.
Whether you go for a traditional look or a decorative lattice, this step is where your pie starts to look like something from a magazine.
Baking the Pie to Perfection
Here’s where all your prep pays off. Bake the pie to get that deep golden-brown crust and a bubbling, thick filling.
Temperature and Timing
- Preheat your oven: Set it to 400°F (200°C) before the pie goes in.
- Start hot, then reduce: Bake for 20 minutes at 400°F, then reduce to 350°F (175°C) and continue baking for another 35–40 minutes.
- Shield the crust: Use a pie shield or foil to cover the edges if they start browning too fast.
This method ensures your crust is crisp while the filling cooks through and bubbles up beautifully.
How to Know When It’s Done
Look for these signs:
- The crust is a deep golden brown.
- The filling is bubbling thickly through the slits or lattice.
- The bottom crust feels firm and baked through (use a clear pie plate if possible).
Don’t rush the bake time—undercooking leads to a soggy bottom and runny filling. You want the pie to have structure, even after it cools.
Cooling and Serving the Pie
Resist the temptation to dig in right away—cooling the pie is just as crucial as baking it.
How Long to Let It Rest
Let the pie cool at room temperature for at least 3–4 hours. This gives the filling time to set. If you slice into it too early, you risk a runny mess.
If you’re short on time, cool it for 1 hour at room temperature, then pop it in the fridge for another 2. But ideally, overnight chilling gives the best texture.
Serving Suggestions
- Classic vanilla ice cream: The cold creaminess pairs perfectly with warm cherry.
- Whipped cream: A light, fluffy topping that doesn’t overpower.
- Drizzle with chocolate or caramel: Add a gourmet touch.
Serve it warm, room temperature, or chilled—this pie is delicious every way you slice it.
Storing Leftovers
If you’ve got leftovers (lucky you!), storing cherry pie properly ensures it stays fresh and delicious for days.
- At room temperature: Cherry pie can be kept covered on the counter for up to 2 days. Use foil or plastic wrap to keep it from drying out.
- In the refrigerator: For longer freshness, refrigerate your pie. It can last 4–5 days in the fridge. Just cover it loosely with foil or plastic wrap.
- Freezing the pie: Yes, you can freeze cherry pie! Wrap individual slices or the whole pie in plastic wrap and then foil. It’ll stay good for up to 3 months. Thaw overnight in the fridge before reheating.
To reheat, warm slices in the oven at 350°F (175°C) for about 10–15 minutes. This helps maintain the crispness of the crust better than the microwave.
Common Mistakes to Avoid
Even seasoned bakers can slip up. Here are a few common pitfalls and how to dodge them:
- Runny filling: Usually caused by not cooking the filling long enough or skipping the cooling step. Always thicken and cool your filling first.
- Soggy bottom crust: Avoid this by pre-baking the bottom crust slightly or using a metal pie dish that conducts heat well.
- Shrunken crust: Happens when the dough hasn’t chilled enough. Chill before rolling, and again after lining the pie pan.
- Overbaking or underbaking: Use visual cues—golden crust and bubbling filling. Don’t just rely on the timer.
- Too sweet or too tart: Taste your cherries before baking and adjust sugar levels accordingly. Every cherry variety is different.
Being mindful of these issues will save your pie from the dreaded baking blues and make sure each slice is spot-on.
Tips for the Perfect Cherry Pie Every Time
Success lies in the details. These tried-and-true tips can elevate your cherry pie from good to truly exceptional:
- Use high-quality cherries: Whether fresh or frozen, quality makes a big difference in flavor.
- Almond extract is a game changer: Just a hint brings out the best in cherries.
- Chill your crust ingredients: Butter and water should be ice cold to create flakiness.
- Ventilation is key: Don’t forget slits or a lattice top to allow steam to escape.
- Don’t skip the egg wash: It adds that bakery-style golden finish.
- Bake on a lower oven rack: Helps the bottom crust cook fully and prevents sogginess.
Once you bake this pie a few times and implement these tips, you’ll have your process down like a pro.
Nutritional Information
Here’s a rough breakdown of a slice (1/8 of a 9-inch pie):
| Nutrient | Approximate Amount |
|---|---|
| Calories | 380–420 kcal |
| Carbohydrates | 55g |
| Sugars | 25g |
| Fat | 18g |
| Saturated Fat | 10g |
| Protein | 3–4g |
| Fiber | 2g |
| Sodium | 170mg |
Please note: These values can vary depending on the type of cherries, sugar, and crust used.
Gluten-Free and Vegan Variations
Dietary restrictions? No problem. This cherry pie can be easily adapted.
For Gluten-Free:
- Use a gluten-free flour blend (with xanthan gum) for the crust.
- Ensure your thickener (cornstarch or flour) is certified gluten-free.
For Vegan:
- Replace butter with vegan butter or solid coconut oil.
- Use a flax egg (1 tbsp ground flax + 3 tbsp water) if needed in the crust.
- Skip the egg wash—use plant-based milk and maple syrup for a golden finish.
These tweaks won’t compromise taste or texture. Everyone deserves a slice of this pie, after all!
FAQs about Cherry Pie Recipe
1. Can I use canned cherry pie filling instead of fresh cherries?
Yes, but it won’t have the same vibrant flavor. If using canned filling, choose a high-quality brand and reduce sugar in the crust.
2. Why is my cherry pie too runny after baking?
It could be from using too little thickener or not letting it cool long enough. Always allow the pie to set before slicing.
3. What type of cherries is best for cherry pie?
Tart cherries (like Montmorency) are best. They balance well with sugar and give that classic cherry pie taste.
4. Can I make the pie crust ahead of time?
Absolutely. You can refrigerate it for up to 3 days or freeze it for up to 2 months.
5. What’s the best way to reheat cherry pie?
Use the oven at 350°F (175°C) for 10–15 minutes to revive the crust and warm the filling without making it soggy.
Conclusion
There you have it—your complete, step-by-step guide to making the best cherry pie ever. From crafting the perfect crust to mastering the ideal filling consistency, this recipe covers it all. Whether you’re baking it for a family gathering, a holiday celebration, or just because you love pie (who doesn’t?), this cherry pie will steal the show.
It’s rustic, it’s homemade, and it’s bursting with flavor. And the best part? You made it all from scratch. Once you bake this once, it’ll become a regular request from friends and family, guaranteed.


