Best Buttercream Frosting Recipe: There’s nothing quite like the creamy, rich, and perfectly sweet taste of a good buttercream frosting. Whether you’re icing cupcakes for a birthday, layering a special cake, or just licking the spoon (we don’t judge), a silky-smooth buttercream can make all the difference.
In this detailed, step-by-step guide, we’re going to walk through the ultimate buttercream frosting recipe that’s easy, customizable, and better than any store-bought version.
What is Buttercream?
Buttercream frosting is a classic, all-purpose icing made from butter and sugar. Its light, fluffy texture and sweet, buttery flavor make it a go-to choice for cakes, cupcakes, cookies, and more. The base recipe usually includes just butter, powdered sugar, and a bit of milk or cream—but it’s endlessly customizable with extracts, colorings, and mix-ins.
There are several types of buttercream, including American, Swiss, Italian, and French. However, the simplest and most popular version, especially in home kitchens, is American buttercream. It’s fast, easy, and doesn’t require cooking—perfect for beginners and pros alike.
Why Buttercream is a Classic Choice
Buttercream has stood the test of time for a reason. It’s not just delicious; it’s also incredibly versatile. Here are a few reasons it remains a staple in baking:
- Easy to make: Requires no special cooking skills or techniques.
- Quick to prepare: Takes less than 15 minutes from start to finish.
- Flexible: You can adjust sweetness, flavor, and texture with a few tweaks.
- Sturdy: Holds up well on cakes and cupcakes—even in warmer weather.
Plus, buttercream is a blank canvas. Whether you want chocolate, coffee, strawberry, or lemon flavor, the base recipe accommodates it all. You can color it with food gel, pipe it into beautiful designs, or keep it rustic with a smooth, creamy spread.
Key Ingredients for Buttercream Frosting
Butter – The Star of the Show
Butter is the heart and soul of buttercream. It’s where most of the flavor and all the richness comes from. The quality of your butter will absolutely impact your end result. Here’s what to keep in mind:
- Use unsalted butter: This gives you full control over the saltiness of the frosting.
- Room temperature is key: Softened butter creams better and blends more smoothly with the sugar.
- Go for quality: Higher fat content (like European-style butter) results in a richer, smoother buttercream.
If your butter is too cold, it won’t mix well. If it’s melted or too soft, your frosting will be greasy. The ideal is butter that yields gently when you press it but still holds its shape.
Sugar – Choosing the Right Sweetness
Powdered sugar (also called icing sugar or confectioners’ sugar) is what gives buttercream its sweetness and structure. Here’s how to use it like a pro:
- Sift it first: Powdered sugar tends to clump, and sifting helps create a smooth, lump-free texture.
- Add gradually: Dumping it all in at once can create a cloud of sugar dust—and an overly sweet mess.
- Balance to taste: The typical ratio is about 2 cups of sugar per 1 cup of butter, but you can adjust to your sweetness preference.
Avoid using granulated sugar. It won’t dissolve properly and will leave your frosting gritty, no matter how much you mix it.
Vanilla Extract – For That Perfect Flavor
Even if you’re going for a flavored buttercream (like strawberry or mocha), a splash of vanilla brings depth and balance. For the best results:
- Use pure vanilla extract: It’s a bit pricier than imitation, but the flavor payoff is worth it.
- Start with 1–2 teaspoons: Add more if you like a stronger vanilla presence.
You can even experiment with vanilla bean paste for a gourmet twist or try almond, lemon, or maple extract to switch things up.
Optional Ingredients – Customizing Your Frosting
The basic butter-sugar-vanilla combo is delicious on its own, but sometimes you want to take it up a notch. Consider adding:
- Milk or cream: For thinning and softening the texture. Start with 1–2 tablespoons.
- Salt: A pinch can help cut the sweetness and enhance the flavor.
- Food coloring: Gel food color works best—more vibrant and doesn’t alter consistency.
- Flavor powders or purees: Cocoa powder, freeze-dried fruit, espresso powder, or citrus zest all work beautifully.
Play around with combinations to match your baked goods and your tastebuds!
Tools You’ll Need
Mixer – Hand or Stand?
Technically, you can make buttercream by hand, but unless you’re training for an arm-wrestling competition, an electric mixer is your best friend here. You have two good options:
- Hand mixer: More affordable, compact, and easy to clean. Perfect for small batches.
- Stand mixer: More powerful, consistent, and hands-free. Great for big batches or heavy-duty piping work.
No matter which you choose, use the paddle attachment (if using a stand mixer). It blends better without incorporating too much air, which can make the frosting too fluffy and unstable.
Bowls, Spatulas, and Sifters
Here’s what else you’ll want on hand:
- Large mixing bowl: Make sure it’s big enough to contain the sugar without puffing up everywhere.
- Rubber spatula: Essential for scraping the sides of your bowl and getting every last bit of frosting out.
- Sifter or fine mesh strainer: Helps you avoid lumps in your powdered sugar.
If you’re planning to pipe your frosting, grab some piping bags and tips too. You can go simple or get fancy with star tips, round tips, and petal tips for gorgeous cake decorating.
Step-by-Step Buttercream Frosting Recipe
Step 1 – Soften the Butter
Before you start anything, bring your butter to room temperature. This usually takes about 30–60 minutes sitting on the counter, depending on the weather.
You’re looking for that perfect “soft but not melty” consistency. To speed things up, cut the butter into cubes or microwave it for a few seconds—but be careful not to overdo it. Melted butter won’t work.
Step 2 – Cream the Butter to Perfection
Now that your butter is perfectly softened, it’s time to whip it. This step is essential for achieving that smooth, fluffy texture buttercream is known for. Place the butter in your large mixing bowl and use your mixer on medium speed to beat it.
Let it cream for a solid 4 to 5 minutes. Yes, it might seem long, but trust me—it makes a difference. You’ll notice the butter changing from a pale yellow to a lighter, almost white color. That’s exactly what you want. Creaming incorporates air into the butter, giving the frosting its lightness.
Pro Tip: Scrape down the sides of the bowl frequently. You want every bit of butter to get whipped properly, so don’t let any cling to the bowl’s edge.
Once your butter is light and fluffy, you’re ready for the next big step.
Step 3 – Gradually Add Sugar
This is where the magic starts. You’ll be adding your sifted powdered sugar a little at a time—no rushing! Start with ½ cup increments, mixing on low speed to avoid a sugar storm. Once it’s somewhat incorporated, increase the speed to medium-high and beat for another 30 seconds or so.
Repeat this process until all the sugar is in. Depending on your taste, you’ll likely use 3 to 4 cups of powdered sugar for every 1 cup of butter. This gives a good balance of sweetness and structure.
Tips to Keep It Smooth:
- Always sift your sugar beforehand.
- Taste as you go! Don’t be afraid to stop and adjust.
- If it’s getting too thick, don’t panic—milk or cream will come to the rescue in the next step.
Once all the sugar is incorporated, your frosting will start to take shape. It’ll be thick, sweet, and stiff—but not yet perfect.
Step 4 – Add Vanilla and Beat Until Fluffy
With the butter and sugar fully combined, it’s time to bring in the flavor. Add your vanilla extract—start with 1 to 2 teaspoons depending on your preference. At this stage, if your frosting feels too thick or dry, add a splash of milk or heavy cream (1 tablespoon at a time) and continue beating.
Crank up your mixer to high speed and whip the frosting for about 2–3 more minutes. You’re looking for a fluffy, smooth texture that spreads like a dream but is stiff enough to hold its shape if piped.
Bonus Add-Ins: Want a lemony zing? Add ½ tsp lemon zest. Want a mocha twist? Try 1 tsp instant espresso powder mixed with a bit of cream.
Once you’re satisfied with the consistency and flavor, your buttercream is ready to use. Whether you’re slathering it on a sheet cake or piping elegant swirls onto cupcakes, this frosting is sure to impress.
Pro Tips for Perfect Buttercream
Avoiding Common Mistakes
Even though buttercream seems simple, there are a few common pitfalls that can make or break your results:
- Butter too cold or too warm: Cold butter won’t blend properly, and melted butter makes greasy frosting.
- Too much sugar too fast: It creates lumps and makes the frosting harder to whip properly.
- Overbeating: Yes, you can overmix. If you beat the frosting too long, it can start to break down or separate.
- Skipping the taste test: Always taste your frosting as you go. Everyone’s sweetness preference is different!
Fixing a mistake is usually possible:
- Too sweet? Add a pinch of salt or a few tablespoons of cream cheese.
- Too thick? Add milk, a tablespoon at a time.
- Too runny? Add more powdered sugar or chill the frosting slightly.
Adjusting Consistency
Buttercream consistency depends on how you plan to use it. Here’s how to tweak it to perfection:
- For spreading: You want a medium consistency—soft, spreadable, but not runny.
- For piping: Go for a thicker texture. It should hold its shape when squeezed through a piping bag.
- For filling cakes: Something in between piping and spreading usually works best.
If your frosting is too soft, pop it in the fridge for 10–15 minutes, then give it a quick whip before using. If it’s too stiff, mix in milk or cream a tablespoon at a time.
The beauty of buttercream is how forgiving it is. Once you understand the basics and play around a bit, you’ll feel confident whipping it up for any occasion.
Buttercream Flavor Variations
How to Create Different Flavors
Once you’ve nailed the classic vanilla buttercream, the flavor possibilities are endless. You can transform your frosting to suit any theme, season, or craving. Here are a few tried-and-true favorites:
- Chocolate Buttercream: Add ½ to ¾ cup of unsweetened cocoa powder to the base recipe. You can also melt and cool dark or semi-sweet chocolate to mix in for a richer flavor.
- Strawberry Buttercream: Use freeze-dried strawberry powder or a few tablespoons of strawberry puree. The freeze-dried option gives intense flavor without watering down the frosting.
- Lemon Buttercream: Add 1 tablespoon of lemon zest and 1–2 tablespoons of lemon juice. For a stronger flavor, add a drop or two of lemon extract.
- Mocha Buttercream: Dissolve 1 tablespoon of instant espresso powder in 1 tablespoon of hot water and add it to the mix along with cocoa powder.
Each variation only requires minor tweaks to the base recipe, and the results are worth it. Remember to adjust the amount of sugar and liquid depending on the flavor add-ins you use.
Natural vs Artificial Flavors
Natural flavorings like real fruit, citrus zest, and spices give a fresher, more authentic taste. However, artificial extracts can still be useful—especially when color or consistency is a concern. Just make sure to start with a small amount and taste as you go.
Storing and Making Ahead
How to Store Buttercream Frosting
Buttercream stores surprisingly well, which makes it perfect for prepping in advance. Here’s how to keep it fresh:
- At Room Temperature: Buttercream can sit out for 2–3 days (covered) if your kitchen isn’t too warm.
- In the Fridge: Store in an airtight container for up to 1 week. Let it come to room temperature and re-whip before using.
- In the Freezer: Freeze for up to 3 months. Thaw in the fridge overnight, then bring to room temp and re-whip.
Always label your container with the date and type of buttercream. When re-whipping, add a splash of cream or milk if the texture feels stiff.
Making Ahead for Events
If you’re baking for a party or wedding, buttercream is your best friend. You can make a large batch ahead of time, store it properly, and have it ready to go when it’s decorating time. You can even color and flavor it in advance—just be sure to re-whip it until fluffy before use.
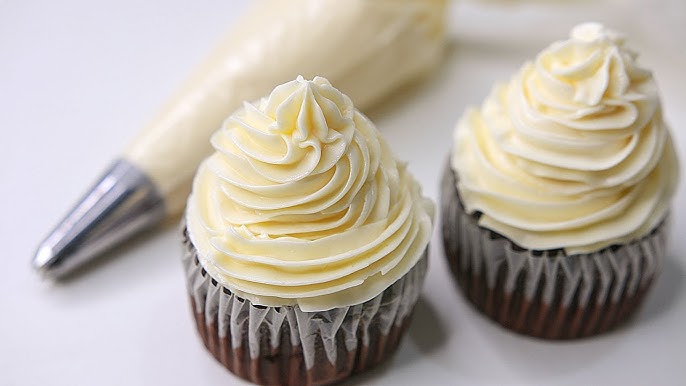
Buttercream for Piping and Decorating
Mastering the Art of Piping
Buttercream isn’t just tasty—it’s also ideal for creating stunning cake decorations. To get that perfect swirl or rosette, follow these tips:
- Use the right piping tip: Start with a Wilton 1M or 2D for cupcakes. For borders or writing, use round tips like #3 or #5.
- Practice pressure control: Use consistent pressure for even piping. Practice on parchment paper before decorating your cake.
- Keep it cool: If your frosting gets too soft while piping, refrigerate it for 5–10 minutes to firm it up.
Decorating Like a Pro
You can use buttercream to create:
- Rosettes
- Ruffles
- Borders
- Scrolls
- Flowers (with a little practice!)
For sharp edges and smooth finishes, try the “hot spatula” trick: Dip your offset spatula in hot water, wipe it dry, then smooth the buttercream for a polished look.
Troubleshooting Buttercream Issues
What to Do When Things Go Wrong
Even pros face buttercream disasters. But most issues are fixable. Here’s a quick guide to save your frosting:
| Problem | Cause | Fix |
|---|---|---|
| Too runny | Butter too soft, too much liquid | Chill in fridge, add powdered sugar |
| Too stiff | Too much sugar, not enough liquid | Add milk/cream one tsp at a time |
| Gritty texture | Didn’t sift sugar, used granulated sugar | Re-whip with a splash of cream, always use sifted powdered sugar |
| Separation | Overmixing or under-creamed butter | Re-whip on medium speed, add a little sugar or cream to help it come back |
If your frosting tastes off, try adding a pinch of salt, a splash of vanilla, or a spoonful of cream cheese to round out the flavor.
FAQs about Buttercream Frosting Recipe
1. Can I make buttercream without a mixer?
Yes, but be prepared for a workout! Mixing by hand is possible, though it’s tough to achieve the same fluffy texture. A hand mixer is a solid investment if you plan to bake often.
2. How do I color buttercream without making it watery?
Use gel or paste food coloring instead of liquid. It gives vibrant color without affecting the consistency.
3. Can I use salted butter for buttercream?
You can, but it may alter the flavor. If using salted butter, reduce or omit any added salt in the recipe.
4. Why does my buttercream taste too sweet?
American buttercream can be sweet by nature. Add a pinch of salt or a spoonful of cream cheese to cut the sweetness.
5. How much buttercream do I need for a cake?
Roughly 3–4 cups of buttercream will frost a two-layer 8-inch cake. Double that for detailed piping or layered decorations.
Conclusion
Buttercream frosting is more than just a sweet topping—it’s the crown jewel of any homemade dessert. Whether you’re layering a birthday cake, decorating cupcakes, or just whipping up a treat to eat by the spoonful (no judgment here), this versatile, customizable recipe has your back.
With just a few simple ingredients and the tips in this guide, you can create buttercream that’s light, fluffy, and full of flavor. Once you master the basics, the flavor combinations and decorating possibilities are endless. So grab that mixer, stock up on butter, and get ready to whip up the best buttercream frosting you’ve ever tasted!