Berry Crisp Recipe: A berry crisp is one of those comforting, soul-satisfying desserts that’s a cross between a cobbler and a crumble. Think juicy, sweet berries baked to bubbling perfection beneath a golden, buttery topping made of oats, brown sugar, flour, and just a hint of cinnamon. The result? A dessert that’s crispy on the outside and gooey on the inside—basically, the ultimate treat for berry lovers.
Unlike pies that demand rolling out dough and all the fuss that comes with it, a berry crisp is straightforward. No crusts to deal with, no fancy pastry techniques—just pure, rustic goodness. It’s especially popular during the summer months when berries are in season, but the beauty is, it can be made year-round using frozen berries too. This dessert is also highly adaptable. Swap out the berries, tweak the spices, or even make it vegan or gluten-free without losing the magic.
Why It’s a Favorite Dessert
So, what makes berry crisp such a beloved dessert? First off, it’s easy. Like, “you can make it while chatting on the phone” easy. With just a handful of pantry staples and some fresh or frozen berries, you can whip up something that tastes like it came out of a fancy bakery.
Second, it’s comforting. There’s something about warm fruit topped with a buttery crumble that just hits the spot—especially with a scoop of vanilla ice cream on top. And let’s not forget versatility. You can use whatever berries you have on hand: blueberries, strawberries, raspberries, blackberries, or a mix of them all. Add a splash of lemon for brightness or cinnamon for warmth, and you’ve got yourself a winner.
Lastly, it’s a crowd-pleaser. Whether you’re making it for a weeknight dessert, a potluck, or a holiday gathering, berry crisp never disappoints. It’s simple, nostalgic, and always delicious.
Ingredients You’ll Need
Fresh vs. Frozen Berries
Here’s the deal: both fresh and frozen berries work beautifully in a crisp. If it’s berry season and your farmer’s market is overflowing with vibrant, juicy berries, go fresh. They’ll give your crisp a naturally sweet, juicy filling that’s hard to beat.
But if you’re craving berry crisp in the dead of winter, frozen berries have your back. Just make sure to thaw and drain them a bit before using—frozen berries hold a lot of water and can make your crisp soggy if you’re not careful. You can also toss them with a tablespoon of cornstarch to help thicken the filling as it bakes.
Ideal berry choices include:
- Blueberries (sweet and juicy)
- Raspberries (slightly tart)
- Blackberries (bold flavor)
- Strawberries (bright and sweet)
Mix and match for a colorful and flavorful combo.
Key Ingredients for Topping and Filling
Let’s break it down:
For the Filling:
- 4 cups of mixed berries (fresh or frozen)
- 1/4 cup granulated sugar (adjust depending on berry sweetness)
- 1 tablespoon cornstarch or flour (to thicken)
- 1 teaspoon vanilla extract
- 1/2 teaspoon lemon zest (optional for brightness)
For the Crisp Topping:
- 3/4 cup rolled oats
- 1/2 cup all-purpose flour
- 1/2 cup brown sugar (for that caramel-like sweetness)
- 1/2 teaspoon ground cinnamon
- 1/4 teaspoon salt
- 1/2 cup unsalted butter (cold and cut into cubes)
The crisp topping is what makes this dessert shine. It should be crumbly, buttery, and golden once baked. Some folks like to add chopped nuts like pecans or almonds for extra crunch—totally up to you!
Optional Add-ins for Extra Flavor
Want to level up your berry crisp game? Try these tasty additions:
- Nuts: Add 1/3 cup chopped pecans or walnuts to the topping.
- Spices: A pinch of nutmeg or cardamom adds warmth.
- Citrus: A dash of orange zest gives it a sunny twist.
- Liqueur: A splash of Chambord or Grand Marnier in the filling for adult vibes.
- Coconut: Mix in shredded coconut for a tropical touch.
These small tweaks can elevate a basic berry crisp into something truly special.
Essential Tools for Making Berry Crisp
Kitchen Equipment Checklist
Here’s what you’ll need to make berry crisp like a pro:
- Mixing bowls (at least two)
- A pastry cutter or fork (for the topping)
- Measuring cups and spoons
- Wooden spoon or spatula
- Citrus zester (if using lemon zest)
- Oven mitts (because safety first!)
No need for anything fancy here—just your basic kitchen essentials. The simplicity of this recipe is part of its charm.
Choosing the Right Baking Dish
Your baking dish plays a surprisingly important role. A 9×9-inch square dish or an oval 2-quart casserole dish works perfectly. Glass or ceramic dishes are great because they heat evenly and let you see that gorgeous bubbling berry action.
Avoid metal pans if you can—they tend to heat too fast and may overcook the topping before the berries are fully tender. If you’re making a bigger batch for a party, simply double the ingredients and use a 9×13-inch pan instead.
Step-by-Step Guide to Making Berry Crisp
Step 1: Prepping the Berries
Start by rinsing your fresh berries gently under cool water, then pat them dry. If you’re using frozen berries, give them a quick thaw and drain off any excess moisture to avoid a watery filling.
Toss your berries in a large bowl with the sugar, cornstarch (or flour), vanilla extract, and lemon zest. Mix until the berries are well-coated. This simple mixture will turn into a luscious, jammy filling as it bakes.
Step 2: Making the Crisp Topping
Now let’s get into the fun part—the topping. In a separate mixing bowl, combine the rolled oats, all-purpose flour, brown sugar, cinnamon, and salt. Mix everything together so the dry ingredients are well incorporated.
Next, add in the cold, cubed butter. This part is key. The butter should be straight from the fridge because cold butter melts slowly, which helps create that perfect crispy topping. Use a pastry cutter, two forks, or your fingertips to work the butter into the dry mixture. You’re aiming for a crumbly texture with little pea-sized pieces of butter throughout.
If you’re adding extras like chopped nuts or shredded coconut, now’s the time to fold them in. The goal is a rustic, crumbly mixture that will bake into a golden, crunchy layer on top of those juicy berries. Once your topping is ready, set it aside for the grand finale.
Step 3: Assembling the Crisp
This is where things start to come together. Lightly grease your baking dish with a bit of butter or non-stick spray to prevent sticking and make cleanup a breeze.
Pour your berry mixture into the dish, spreading it out evenly. It should be a colorful, fragrant layer of goodness that almost makes you want to eat it raw (but don’t—patience is key).
Now, take your crisp topping and sprinkle it generously over the berries. Don’t worry about making it perfect—this dessert is all about that homemade, rustic charm. Make sure the entire surface is covered so every bite has that satisfying crunch.
Once assembled, your berry crisp is officially ready to bake. It’s a thing of beauty already, but just wait until it hits the oven.
Step 4: Baking it to Perfection
Preheat your oven to 350°F (175°C), and once it’s hot, place your crisp on the middle rack. Bake for 35–40 minutes, or until the topping is golden brown and the berry filling is bubbling up around the edges.
Your kitchen is going to smell absolutely amazing—warm cinnamon, sweet berries, buttery oat topping—it’s basically a candle you’ll wish existed. Keep an eye on it during the last 5–10 minutes to make sure the top doesn’t burn. If it’s getting too dark too quickly, you can loosely tent it with foil.
The bubbling is your signal that the fruit has thickened properly, thanks to the cornstarch or flour. Don’t rush it—undercooked crisp means a runny filling and soggy topping, and nobody wants that.
Step 5: Cooling and Serving Suggestions
Once your berry crisp is out of the oven, let it cool for at least 15–20 minutes. This helps the filling set up a bit, making it easier to serve and giving it that perfect, gooey-but-not-runny texture.
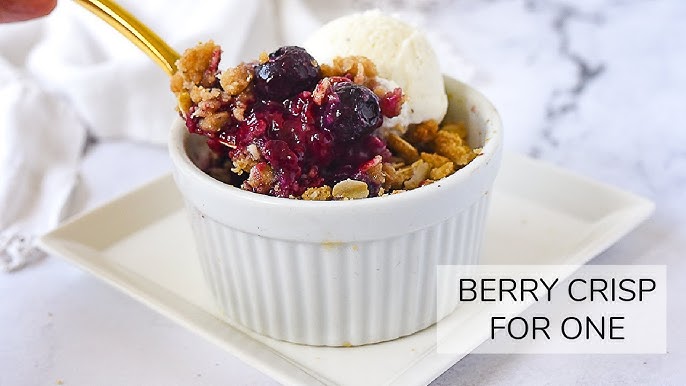
Now comes the best part—serving it up. You can go classic with a scoop of vanilla ice cream, or get creative with:
- A dollop of whipped cream
- A drizzle of heavy cream
- A spoonful of Greek yogurt or crème fraîche
- Even a scoop of lemon sorbet for a bright contrast
Berry crisp is just as good served warm as it is at room temperature. Leftovers (if you have any!) can be stored in the fridge for 3–4 days and reheated in the oven or microwave.
It’s also fantastic for breakfast the next day—just say it’s a fruit and oat “bake” and you’re good to go.
Tips for the Perfect Berry Crisp
Making it Gluten-Free or Vegan
If you’re catering to dietary needs, don’t worry—this recipe is super flexible.
To make it gluten-free:
- Use gluten-free all-purpose flour or almond flour.
- Make sure your oats are certified gluten-free (some are processed in facilities that handle wheat).
To make it vegan:
- Swap the butter for coconut oil or a vegan butter alternative.
- Double-check your sugar is vegan (some white sugars are processed with bone char).
With these swaps, you won’t sacrifice flavor or texture—your crisp will still be dreamy and delicious.
Common Mistakes to Avoid
Even though berry crisp is pretty forgiving, a few small missteps can turn a perfect dessert into a meh experience. Here are some common mistakes and how to avoid them:
1. Using too much liquid: If you don’t drain frozen berries or add too much sugar, you might end up with a runny filling. Berries release juices as they cook, so be conservative with liquids and consider using cornstarch to help thicken things up.
2. Skimping on the topping: Let’s be honest—the crisp is half the reason we’re here. Don’t be shy with the topping! Spread it evenly and generously so every bite is crunchy and satisfying.
3. Overbaking or underbaking: Overbaking can burn the top while underbaking can leave the filling too loose. You’re looking for golden brown topping and bubbling berries around the edges. Usually, 35–40 minutes is the sweet spot.
4. Not letting it cool: This might be the hardest part, but you’ve got to let it rest. Hot out of the oven, the filling will be lava-like. Letting it cool for 15–20 minutes helps it set and makes it much easier to serve.
5. Forgetting the salt: Even in sweet recipes, a pinch of salt goes a long way in bringing out the flavors. Don’t skip it—it balances the sweetness and enhances the overall taste.
Remember, berry crisp isn’t about perfection—it’s about flavor and comfort. Make it your own and don’t stress too much over the details.
Storing and Reheating Tips
Got leftovers? Lucky you! Berry crisp stores really well and makes for an excellent next-day treat.
To store:
- Let the crisp cool completely.
- Cover it tightly with foil or transfer to an airtight container.
- Store in the refrigerator for up to 4 days.
To reheat:
- For best results, reheat in the oven at 350°F (175°C) for 10–15 minutes. This keeps the topping crisp.
- In a hurry? Microwave individual servings for 30–60 seconds, but note the topping might soften a bit.
Freezing tips:
- You can freeze unbaked berry crisp (assembled but not baked) for up to 3 months. Cover it tightly with plastic wrap and foil.
- When ready to bake, don’t thaw—just add 10–15 extra minutes to the bake time.
- Baked crisp can also be frozen, though the topping may lose some crunch after thawing.
Bonus tip: Make individual portions in ramekins, freeze them, and bake straight from the freezer for quick, single-serve desserts.
FAQs about Berry Crisp Recipe
1. What is a berry crisp?
A berry crisp is a baked dessert made with fresh or frozen berries topped with a crumbly mixture of flour, oats, sugar, and butter. It’s similar to a crumble but often includes oats for extra texture.
2. Can I use frozen berries for berry crisp?
Yes! Frozen berries work just as well as fresh ones. Just add them straight from the freezer—no need to thaw. You may need to bake a few minutes longer.
3. What berries work best in a berry crisp?
Blueberries, strawberries, raspberries, and blackberries are all excellent choices. You can use a mix of your favorites for a burst of flavor.
4. How do I keep the berry filling from being too runny?
Add a tablespoon or two of cornstarch or flour to the berry mixture. This helps thicken the juices as the crisp bakes.
5. Can I make berry crisp ahead of time?
Absolutely. Assemble the crisp and refrigerate it for up to 24 hours before baking. You can also bake it ahead and reheat before serving.
6. Is berry crisp the same as berry cobbler?
No, a berry cobbler has a biscuit or cake-like topping, while a crisp has a crunchy, crumbly topping made from oats and flour.
7. Can I make berry crisp gluten-free?
Yes! Use gluten-free oats and substitute all-purpose flour with almond flour or a gluten-free flour blend.
8. How do I store leftover berry crisp?
Store leftovers covered in the fridge for up to 4 days. Reheat in the oven or microwave until warm.
9. Can I freeze berry crisp?
Yes, you can freeze it baked or unbaked. Wrap it tightly and freeze for up to 2 months. Bake or reheat directly from frozen, adding extra time as needed.
10. What’s the best way to serve berry crisp?
Serve it warm with a scoop of vanilla ice cream or a dollop of whipped cream for the ultimate dessert experience!
Conclusion
Berry crisp is everything a good dessert should be—simple, comforting, and absolutely delicious. Whether you’re using a mix of berries from your garden or a frozen bag from the store, this dessert delivers big flavor with minimal effort. The golden oat topping paired with warm, jammy berries is pure heaven in every bite.
What makes berry crisp even better? It’s endlessly customizable. Add spices, switch up the fruit, or make it vegan or gluten-free without sacrificing that classic homey flavor. Plus, it’s the kind of recipe you can memorize, tweak, and make your own.
So next time you’re craving something sweet, skip the complicated cakes or finicky pies. Make a berry crisp instead—it’s easy, satisfying, and guaranteed to impress.