Beef Nachos Recipe: Let’s be honest – nothing screams comfort like a hot tray of beef nachos straight out of the oven. Whether it’s game night, a family gathering, or a quick weeknight dinner, beef nachos hit all the right spots. They’re crunchy, cheesy, savory, and you can load them up with all your favorite toppings. The beauty of this dish is in its versatility – it’s a full meal or a party snack depending on how you serve it.
Nachos have Mexican origins, but over time, they’ve become a global sensation. What started as a simple combination of tortilla chips, cheese, and jalapeños has evolved into a full-on loaded platter of deliciousness. Adding seasoned ground beef takes nachos from a simple appetizer to a hearty main course.
The best part? You don’t need to be a kitchen wizard to whip up a fantastic batch of beef nachos. This step-by-step guide breaks it all down so you can make the perfect nachos every time.
Why You’ll Love This Recipe
- Easy to follow – No complicated techniques, just straightforward steps.
- Customizable – Add what you like and skip what you don’t.
- Crowd-pleaser – Everyone loves nachos. Seriously.
- Quick prep time – From start to finish, you can have these ready in under 30 minutes.
- Budget-friendly – Uses ingredients that are affordable and easy to find.
So let’s get into the nitty-gritty and turn your kitchen into a nacho haven.
Ingredients You’ll Need
For the Beef Mixture
The heart of this recipe is the seasoned beef. Here’s what you’ll need:
- 1 lb (450g) ground beef
- 1 small onion, finely chopped
- 2 cloves garlic, minced
- 1 tbsp olive oil or vegetable oil
- 1 tsp ground cumin
- 1 tsp chili powder
- 1/2 tsp smoked paprika
- 1/2 tsp oregano
- Salt and pepper to taste
- 1/4 cup tomato sauce or salsa (adds moisture and flavor)
You can also opt for a taco seasoning packet if you’re short on time, but making your own spice blend gives you better control over flavor.
For the Nachos Assembly
To build those irresistible layers, you’ll need:
- Tortilla chips – Choose sturdy, thick chips that can hold toppings without turning soggy.
- Shredded cheese – A mix of cheddar and Monterey Jack melts beautifully.
- Jalapeño slices – Fresh or pickled, for a spicy kick.
Optional Toppings for Extra Flavor
These are where your nachos can really shine:
- Sour cream
- Guacamole
- Sliced black olives
- Fresh cilantro
- Chopped tomatoes
- Green onions
- Lime wedges
- Salsa or pico de gallo
Mix and match based on your preferences and what you’ve got on hand.
Tools and Equipment Required
Before you start cooking, make sure you’ve got the right tools for the job. Here’s what you’ll need:
- Large skillet or frying pan – For browning the beef and cooking the onion/garlic mixture.
- Baking sheet or oven-safe dish – Preferably rimmed to hold everything together.
- Parchment paper or aluminum foil – For easy cleanup.
- Spatula or wooden spoon – To stir the beef and spices.
- Oven mitts – Don’t forget safety!
- Knife and cutting board – For prepping onions, garlic, and other toppings.
- Serving spatula or tongs – Makes it easy to lift the loaded nachos onto plates.
Having everything in place before you start cooking makes the process smoother and stress-free. Think of it like setting up your stage before the performance – nacho-making is an art, after all.
Step-by-Step Cooking Instructions
Step 1: Prepare the Ground Beef
Start by heating a tablespoon of oil in your skillet over medium heat. Once hot, add your chopped onion and sauté for about 2-3 minutes until it becomes soft and translucent. Then, toss in your minced garlic and cook for another 30 seconds – don’t let it burn!
Next, add in your ground beef. Break it up with a spoon or spatula as it cooks. Cook until the beef is no longer pink, about 5-7 minutes. Drain any excess fat if needed.
Now it’s time to season! Sprinkle in cumin, chili powder, smoked paprika, oregano, salt, and pepper. Stir it all up so the beef gets evenly coated. Add the tomato sauce or salsa and let it simmer for 3–4 more minutes. This not only infuses the beef with flavor but also keeps it juicy and perfect for nachos.
Once done, remove from heat and set aside. Your kitchen will already be smelling incredible!
Step 2: Layer the Chips and Beef
This step is where the magic begins. Get your oven preheated to 375°F (190°C) while you start layering.
First, line your baking sheet with parchment paper or foil. Spread a generous layer of tortilla chips across the pan — try not to overlap them too much, or the ones underneath won’t get crispy. Now spoon the beef mixture evenly over the chips. Don’t dump it all in one spot — make sure every chip gets a little love!
If you’re going for the ultimate experience, add a second layer: chips, beef, and cheese again. Think of it like a nacho lasagna — layers = flavor. This prevents you from ending up with a pile of plain chips underneath all the good stuff.
A bonus tip: Sprinkle some cheese on the chips before you add the beef. This helps “glue” everything together and keeps the chips crisp beneath the meat.
Cheese: The More, The Merrier
Here’s where things get melty. Cover the beef and chips with a generous amount of shredded cheese. A combo of cheddar and Monterey Jack offers the best balance — sharpness from the cheddar and ooey-gooey melt from the Jack. If you want an ultra-creamy texture, sprinkle in some mozzarella too.
Want it spicy? Toss in some pepper jack cheese or a few slices of fresh jalapeños. If you’re a cheese fanatic (and who isn’t?), go ahead and double up — you won’t regret it.
Step 3: Add Cheese and Bake
Once your nachos are layered and loaded, it’s time to bake. Place the tray in the center of your oven and let it bake for 10–12 minutes, or until the cheese is melted and bubbling.
Don’t walk away just yet — oven times vary, and you don’t want your nachos to go from golden brown to burned. Keep a close eye on them, especially if your oven runs hot. The edges should be crispy, the cheese should be fully melted, and you might see some little golden spots on top — that’s perfection.
Want an even crispier finish? Turn on the broiler for the last 1–2 minutes, but don’t blink! Broiling happens fast, and it’s easy to overdo it.
Once baked, remove your nachos from the oven and let them sit for a minute or two — this allows everything to settle and prevents burns from molten cheese.
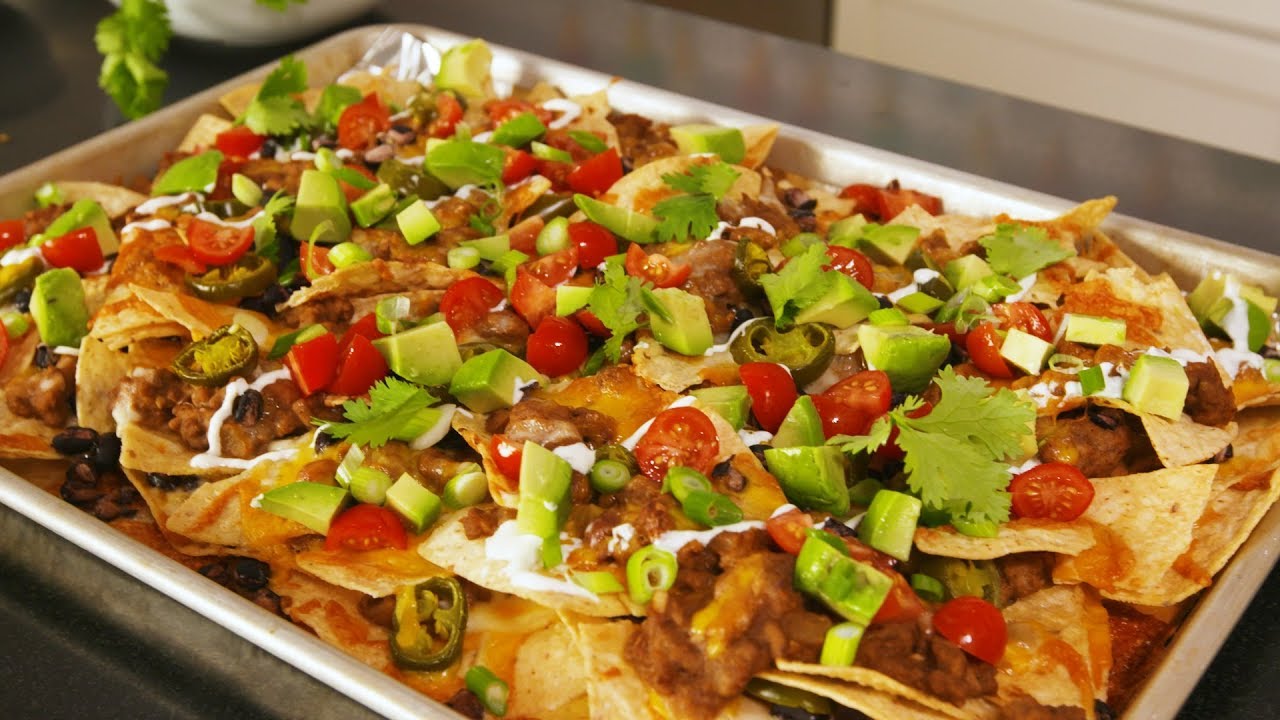
Step 4: Top It Off and Serve
Now comes the fun part: loading on the fresh toppings. This is where your nachos get their final burst of color and flavor. Grab your sour cream, guac, diced tomatoes, green onions, cilantro, and whatever else your heart desires.
Here’s a tip: Don’t just plop everything in the center. Spread the toppings evenly across the tray so every chip gets a mix of textures and tastes.
Feeling fancy? Add a drizzle of lime crema or chipotle mayo on top. Want it extra crunchy? Sprinkle some crushed tortilla chips over the toppings. Craving freshness? A quick pico de gallo made with chopped tomatoes, onions, cilantro, and lime juice can take your nachos to the next level.
Once your nachos are dressed and ready, serve them up hot with your favorite salsa, hot sauce, or dip on the side. Whether you eat them right off the tray or scoop them onto individual plates — these nachos are ready to disappear fast.
Tips for Perfect Nachos Every Time
Let’s be real: bad nachos are a tragedy. Here’s how to avoid common pitfalls and make sure your nachos are top-tier every single time:
1. Use sturdy chips
Flimsy chips can’t handle the toppings. Go for thick, restaurant-style tortilla chips — they’re built for the job.
2. Don’t overload with wet toppings
Add things like salsa, sour cream, and guac after baking to avoid soggy chips.
3. Layer evenly
The key to nacho perfection is balance. Each chip should get a fair share of beef, cheese, and toppings.
4. Preheat your oven
Never put nachos in a cold oven — they’ll dry out before the cheese melts.
5. Serve immediately
Nachos are best hot and fresh. If they sit too long, the chips can get chewy, and the cheese hardens.
6. Use freshly grated cheese
Pre-shredded cheese often has anti-caking agents that stop it from melting as smoothly. Grate it fresh for that glorious cheese pull.
With these tips, you’ll be whipping up restaurant-quality beef nachos right in your own kitchen.
Best Sides and Drinks to Serve With Beef Nachos
Nachos are awesome on their own, but if you’re turning them into a full meal or party platter, pairing them with the right sides and drinks makes it even better.
Top Side Dishes:
- Mexican Street Corn (Elote): Creamy, cheesy, and slightly spicy – the perfect match.
- Refried Beans or Black Beans: Serve on the side or spoon over the nachos.
- Spanish Rice: Flavored with tomato and spices, it complements the beef perfectly.
- Salad with Lime Vinaigrette: Light and fresh to balance the richness of the nachos.
Best Drinks:
- Classic Margarita: Sweet, tangy, and refreshing.
- Mexican Beer: Like Modelo, Corona, or Pacifico.
- Agua Fresca: Great non-alcoholic option in flavors like hibiscus or tamarind.
- Sparkling Lime Water: Simple but super refreshing.
With the right sides and sips, your nacho night becomes an unforgettable fiesta.
Storing and Reheating Leftovers
Let’s be honest — leftover nachos are rare. But if you’ve made a big batch or just couldn’t finish them, don’t worry. You can store and reheat them without turning everything into a soggy mess.
How to Store Leftover Nachos:
- Separate the toppings – If possible, scrape off cold toppings like sour cream, guacamole, or salsa before storing. These add moisture and make the chips soggy.
- Use an airtight container – Place the leftover nachos in a single layer or between paper towels in a sealable container.
- Refrigerate immediately – Keep them cold to prevent spoilage, especially if they’ve been sitting out.
Stored properly, beef nachos can last up to 2 days in the fridge.
Reheating Tips:
- Oven method (Best for crispiness): Preheat oven to 350°F (175°C). Spread nachos on a baking sheet and reheat for 10–12 minutes. This helps re-crisp the chips and melt the cheese again.
- Skillet method: Heat a dry skillet over medium heat and add the nachos. Cover with a lid and let them warm through for 5–7 minutes.
- Microwave (Last resort): Use only if you’re in a rush. Place nachos on a microwave-safe plate and cover lightly with a paper towel. Microwave in short 30-second bursts until warm. Just be aware: the chips will be soft, not crunchy.
Pro tip: Add fresh toppings after reheating to bring back that vibrant flavor and texture.
Common Mistakes to Avoid
Making nachos might seem foolproof, but even the easiest recipes can go wrong without a few precautions. Here’s what to watch out for:
1. Using flimsy chips
This is the number one rookie mistake. Thin chips get soggy and break apart under the weight of toppings. Always choose thick-cut tortilla chips for structural integrity.
2. Overloading with toppings before baking
Yes, we all love loaded nachos, but wet toppings like salsa, sour cream, and guac should go on after baking. Otherwise, they’ll make your chips mushy and unevenly heated.
3. Uneven layering
Dumping all the beef in one spot and a mountain of cheese in another? That’s nacho disaster. Spread ingredients evenly so that every chip gets a good bite.
4. Using pre-shredded cheese
Pre-grated cheese contains anti-caking agents that prevent smooth melting. Take the extra 2 minutes to grate your own cheese — it’s worth it.
5. Not watching the oven
A few minutes can mean the difference between golden, gooey nachos and burnt, bitter disappointment. Stay close when baking and broiling.
Avoiding these simple mistakes will take your nacho game from good to next-level amazing.
Healthier Swaps Without Losing Flavor
Craving nachos but trying to keep things on the healthier side? You don’t have to give up flavor to lighten up your dish. Here’s how to enjoy guilt-free beef nachos that still hit the spot.
1. Use lean ground beef or turkey
Swap 80/20 ground beef with leaner versions or ground turkey. You’ll cut back on saturated fat without sacrificing taste.
2. Skip the heavy chips
Try baked tortilla chips or even thinly sliced sweet potato chips for a crunch with fewer calories. You can also use mini bell peppers as chip substitutes for a low-carb option.
3. Cheese alternatives
Use less cheese or opt for reduced-fat versions. Nutritional yeast can also be sprinkled on top to give a cheesy flavor with fewer calories.
4. Load up on veggies
Balance the richness of beef and cheese with toppings like diced tomatoes, shredded lettuce, corn, onions, and fresh herbs.
5. Go light on the sour cream
Swap sour cream for Greek yogurt — it’s tangy, creamy, and adds a protein boost.
Healthy beef nachos don’t have to be boring — it’s all about making smart swaps that still satisfy.
Beef Nachos for Meal Prep
Nachos might not seem like a typical meal prep item, but if you prep the components ahead of time, you can have fresh, hot nachos ready in minutes throughout the week.
Prep Tips:
- Cook beef in bulk – Double or triple your seasoned beef mixture and refrigerate or freeze portions.
- Chop toppings ahead – Store onions, cilantro, tomatoes, and jalapeños in separate airtight containers.
- Grate cheese in advance – Store it in resealable bags to save time during assembly.
How to Store:
Keep each component separate in the fridge. When it’s time to eat, just layer your chips, beef, and cheese, bake, and add the fresh toppings. Quick, easy, and way better than fast food.
This is especially great for busy parents, students, or anyone who wants to save time without sacrificing flavor.
FAQs about Beef Nachos Recipe
1. Can I make beef nachos without an oven?
Absolutely! You can use a skillet or even the microwave, though the oven gives the best crispy finish.
2. What cheese melts best for nachos?
A mix of cheddar and Monterey Jack is ideal, but mozzarella, pepper jack, and queso fresco are also great choices.
3. How do I keep nachos from getting soggy?
Avoid adding wet toppings before baking. Add salsa, sour cream, and guac after the chips come out of the oven.
4. Can I use leftover taco meat for nachos?
Yes! Leftover taco meat is perfect for nachos. Just reheat and layer as usual.
5. How long should I bake nachos?
Bake at 375°F (190°C) for about 10–12 minutes, or until the cheese is fully melted and bubbly.
Conclusion
Beef nachos are the ultimate comfort food — quick, easy, and endlessly customizable. Whether you’re hosting friends, feeding your family, or just indulging in a solo snack session, nachos never disappoint.
From picking the right ingredients to layering like a pro and adding those perfect finishing touches, you now have all the tools to make nachos that are not just good, but unforgettable.
So grab that bag of tortilla chips, heat up the oven, and get ready to create a masterpiece that’ll have everyone asking for seconds.


