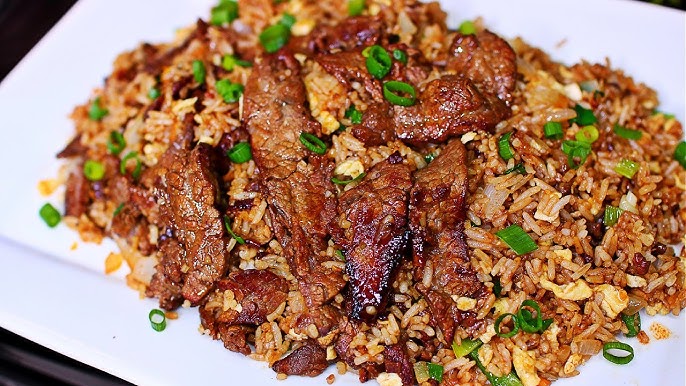
Beef Fried Rice Recipe: Beef fried rice is one of those classic takeout-style dishes that you can easily recreate at home—and dare we say, even better. It’s packed with juicy, savory beef, fluffy rice, crispy veggies, and a medley of sauces that bring it all together. The beauty of this dish lies in its simplicity and versatility. Whether you’re trying to whip up a quick weeknight dinner or impress guests with your cooking skills, beef fried rice never disappoints.
One of the main reasons people fall in love with this dish is its comforting flavor and texture. The rice gets slightly crispy from the pan-frying, the beef is tender and juicy, and the vegetables add a pop of freshness and crunch. Add in some soy sauce, garlic, and sesame oil, and you’ve got an aromatic, satisfying meal that hits all the right notes.
Another huge bonus? It’s incredibly budget-friendly. You can use leftover rice and any vegetables hanging around in your fridge. Plus, the entire recipe comes together in under 30 minutes, making it perfect for busy schedules.
A Quick History of Fried Rice
Fried rice originated in China during the Sui Dynasty, primarily as a way to prevent food waste by repurposing leftover rice and other ingredients. Over the centuries, it evolved and spread throughout Asia, with each country putting its own unique twist on the dish.
In Japanese teppanyaki, Thai basil fried rice, and Indonesian nasi goreng, you’ll find variations that reflect different local flavors and traditions. American Chinese cuisine also popularized fried rice, especially in takeout culture. Beef fried rice, specifically, became a go-to comfort food, thanks to its rich flavor and satisfying texture.
Today, it’s a global favorite that adapts well to dietary needs, ingredient availability, and regional spices, which is why it’s such a beloved staple in kitchens everywhere.
Ingredients You’ll Need
Essential Ingredients
To get that authentic takeout-style beef fried rice, you don’t need anything fancy. Here’s what you’ll absolutely need:
- Cooked rice (preferably a day old) – 3 cups
- Beef (thinly sliced steak or sirloin) – 1/2 pound
- Eggs – 2 large
- Garlic (minced) – 3 cloves
- Green onions (chopped) – 3 stalks
- Carrots (diced) – 1/2 cup
- Peas – 1/2 cup (frozen or fresh)
- Soy sauce – 3 tbsp
- Oyster sauce – 1 tbsp (optional but recommended)
- Sesame oil – 1 tsp
- Vegetable oil – 2 tbsp
- Salt and pepper – to taste
This list covers the essentials. You can easily find these at your local grocery store, and most are pantry staples.
Optional Add-ins for Extra Flavor
Want to spice things up or make your fried rice even heartier? Try adding any of these:
- Chili flakes or Sriracha for heat
- Bell peppers for color and crunch
- Mushrooms for umami
- Broccoli for a healthier twist
- Pineapple chunks for a sweet-and-savory combo
You can truly customize this dish to your taste, which is one of the reasons it’s such a popular recipe.
Tools and Equipment Required
Kitchen Tools Checklist
You don’t need any fancy gadgets to make this meal, just a few kitchen basics:
- Wok or large nonstick skillet – This is key for high-heat stir-frying.
- Cutting board and sharp knife – For prepping your ingredients.
- Mixing bowls – For marinating beef and beating the eggs.
- Spatula or wooden spoon – To stir and mix the rice.
- Measuring spoons – For getting your sauce ratios right.
If you have a wok, great—its curved shape allows for better heat distribution and gives that restaurant-style sear. But a deep skillet works just as well.
Preparing the Ingredients
Choosing the Right Beef
The star of this dish is the beef, so it’s worth choosing the right cut. Go for something tender like:
- Sirloin
- Ribeye
- Flank steak
- Skirt steak
Slice it thinly against the grain for the best texture. If your meat is too thick, it won’t cook evenly or quickly, and you risk chewy bites. A good tip is to partially freeze the beef for 15-20 minutes before slicing—it makes the cutting much easier and more precise.
To take it up a notch, marinate the beef with a mix of soy sauce, sesame oil, garlic, and a pinch of sugar. Let it sit for at least 15-30 minutes to soak in all that flavor.
Prepping the Vegetables
A great fried rice has a balance of texture and color. Carrots, peas, and green onions are classics, but don’t stop there. Chop everything uniformly so it cooks evenly. Dice your carrots small enough to soften quickly, and always rinse frozen peas before adding them to the pan.
Green onions are typically added at the end for a fresh bite, while harder veggies go in earlier to get tender-crisp. Keep everything prepped and ready because once you start cooking, things move fast.
Cooking the Rice Ahead
This part is crucial: use day-old rice if possible. Freshly cooked rice is too soft and will clump in the pan, turning your fried rice into a sticky mess.
If you’re in a pinch and need to cook rice the same day, spread it out on a baking sheet and refrigerate for at least 30 minutes. The goal is to dry it out a bit so it can crisp up in the pan.
Step-by-Step Cooking Instructions
Step 1: Marinate the Beef
This is where flavor-building begins. Start by slicing your beef into thin, even strips. Then, in a mixing bowl, combine:
- 1 tablespoon soy sauce
- 1 teaspoon sesame oil
- 1 minced garlic clove
- A pinch of black pepper
- 1/2 teaspoon cornstarch (optional, for tenderness)
Mix the beef well with the marinade and let it sit for at least 15–30 minutes. The cornstarch helps the beef stay tender and adds a silkiness that you’ll recognize from restaurant-style stir-fries. If you have more time, marinate for up to an hour in the fridge for deeper flavor.
Marinating isn’t just about taste—it also helps create that golden-brown crust on the beef when you sear it, which adds tons of umami flavor to your dish.
Step 2: Cook the Eggs
Heat your wok or skillet over medium heat and add a teaspoon of oil. Beat the eggs in a bowl and pour them into the pan. Scramble them gently until they’re just set, then remove and set them aside.
Don’t overcook the eggs—they’ll continue cooking when added back to the rice later. Keeping them soft and fluffy ensures your final dish isn’t dry. The eggs add richness and an extra layer of texture that really elevates the fried rice.
This step also adds another layer of seasoning to your pan, which contributes to the overall flavor of the dish. Every step builds on the last.
Step 3: Stir-Fry the Beef
Now turn the heat up to high. Add a tablespoon of oil to your pan, then toss in your marinated beef. Spread it out into a single layer and let it sear for 1–2 minutes without touching it.
This helps caramelize the outside of the beef and lock in juices. Once it starts to brown, stir-fry quickly until just cooked through—about 3–4 minutes total. Remove and set aside.
At this point, your kitchen should be smelling amazing. The beef should be tender, juicy, and packed with that umami-rich flavor from the marinade. Avoid overcrowding the pan or cooking it too long—dry beef is a no-go for this dish.
Step 4: Add Veggies and Combine Everything
With the beef out of the pan, add a little more oil if needed and toss in your carrots and peas. Stir-fry for 2–3 minutes until they’re slightly tender but still vibrant.
Now it’s time to add the garlic and green onions. Stir everything around for another 30 seconds—this step helps release the aromatics and creates that classic fried rice scent we all love.
Return the cooked beef and scrambled eggs to the pan, and stir everything together so the ingredients are evenly distributed.
This stage is all about balance. You want a little bit of everything in every bite: the savory beef, sweet veggies, fluffy eggs, and aromatic garlic all working together.
Step 5: Add Rice and Final Touches
The final step is adding your day-old rice. Break it up with your hands if it’s clumped together. Add it to the pan and stir-fry over medium-high heat for about 3–5 minutes, mixing constantly to prevent sticking.
Once the rice is heated through, pour in your sauce mix:
- 2 tablespoons soy sauce
- 1 tablespoon oyster sauce
- A splash of sesame oil
Stir well so the sauce coats every grain of rice. Let the rice sit undisturbed for 30 seconds to crisp up, then toss again. Repeat this a couple of times for that perfect slightly crispy texture.
Taste and adjust seasoning—add more soy sauce, salt, or pepper if needed. Once it’s just right, serve immediately with extra green onions on top.
Tips and Tricks for Perfect Beef Fried Rice
Best Rice for Fried Rice
The single biggest game-changer for this dish is using the right rice. Ideally, you want long-grain rice like jasmine or basmati. Why? Because it’s less sticky than short-grain rice, and that helps you get the separated, fluffy texture that defines great fried rice.
If you’ve got freshly cooked rice, spread it out on a plate or tray and refrigerate it for at least 30 minutes. This helps it firm up and prevents it from becoming mushy when stir-fried.
Want it extra crispy? Let the rice sit in the hot pan undisturbed for short intervals before stirring. This gives you those golden, slightly crunchy bits that make fried rice irresistible.
Common Mistakes to Avoid
Even a simple dish like fried rice has its pitfalls. Here are some common ones to steer clear of:
- Using wet or fresh rice – This leads to mushy texture and clumping.
- Overcrowding the pan – It cools the pan down, making everything steam instead of fry.
- Skipping the marinade – The beef won’t be as flavorful or tender.
- Adding sauce too early – This makes everything soggy. Always add it after the rice is in the pan.
- Low heat cooking – You need high heat for proper stir-frying and caramelization.
Avoiding these mistakes will take your dish from decent to restaurant-level in no time.
Storing and Reheating Leftovers
How to Store Properly
If you’ve made extra (and trust me, you’ll want to), storing your beef fried rice correctly is crucial. Let it cool completely, then transfer it to an airtight container. Store in the fridge for up to 3–4 days.
Never leave fried rice at room temperature for too long—it can become unsafe quickly due to its moisture and protein content. If you want to freeze it, use freezer-safe containers or zip-top bags and keep it for up to 2 months.
Best Reheating Methods
For best results, reheat your leftovers in a hot skillet or wok. Add a splash of water or a tiny bit of oil to rehydrate the rice, and stir constantly until it’s steaming hot.
Microwave also works in a pinch. Place the rice in a microwave-safe bowl, cover with a damp paper towel, and heat in 30-second intervals, stirring in between.
Avoid reheating more than once—it dries out the rice and makes the beef rubbery.
Customizing Your Beef Fried Rice
Healthier Alternatives
Looking to make your beef fried rice a bit healthier without sacrificing flavor? No problem—there are several easy swaps you can make to lighten things up:
- Use brown rice instead of white rice. It adds fiber and a nutty flavor.
- Lean cuts of beef like sirloin tip or eye of round reduce fat content.
- More vegetables, less rice – bulk up the dish with mushrooms, broccoli, spinach, or zucchini.
- Low-sodium soy sauce keeps salt levels in check.
- Swap oil for a non-stick spray or reduce the amount to limit added fat.
You can also experiment with cauliflower rice for a low-carb option. It won’t give you quite the same texture, but with the right seasoning, it’s still super satisfying.
The key is balancing flavor and nutrition. With just a few adjustments, you can make this takeout favorite a regular, guilt-free meal in your weekly rotation.
Flavor Variations
Beef fried rice is incredibly adaptable. Once you’ve nailed the base recipe, try spicing things up with these flavor twists:
- Korean-style: Add gochujang (Korean chili paste) and kimchi for bold, spicy flavor.
- Thai-style: Use Thai basil and a splash of fish sauce for an herby punch.
- Teriyaki beef rice: Swap soy sauce for teriyaki and throw in pineapple for a sweet-and-savory combo.
- Garlic butter style: Mix in melted garlic butter for a rich, indulgent twist.
Each variation brings its own personality to the dish. Once you get comfortable, don’t be afraid to get creative with what’s in your pantry or fridge.
FAQs about Beef Fried Rice Recipe
1. Can I use freshly cooked rice for fried rice?
You can, but it’s not ideal. Fresh rice is too soft and steamy, which can lead to a mushy dish. If using fresh rice, cool it on a tray in the fridge for at least 30 minutes before stir-frying.
2. What cut of beef is best for fried rice?
Tender cuts like sirloin, flank steak, or ribeye work best. Slice them thinly against the grain for the best texture.
3. Can I make this dish ahead of time?
Yes! You can prep the ingredients or even cook the entire dish ahead. Store in an airtight container in the fridge for up to 3 days and reheat in a skillet for best results.
4. Is it possible to make beef fried rice gluten-free?
Absolutely. Use gluten-free soy sauce or tamari, and double-check that your oyster sauce and other seasonings are gluten-free.
5. What other proteins can I use in place of beef?
You can swap beef with chicken, shrimp, tofu, or even pork. Just adjust cooking times accordingly to avoid overcooking.
Final Thoughts
There you have it—a complete, foolproof, and downright delicious beef fried rice recipe that brings the taste of your favorite takeout straight to your kitchen. It’s fast, it’s flavorful, and it’s fully customizable. From weekday dinners to casual entertaining, this dish checks all the boxes.
The beauty of fried rice lies in its simplicity. With a handful of pantry staples, some leftover rice, and a little bit of love, you can create a dish that feels indulgent but is surprisingly easy to make. Mastering beef fried rice opens the door to countless variations, making it a reliable recipe for any cook to have in their back pocket.
So the next time you’re craving something savory, comforting, and satisfying, skip the delivery and whip up this homemade beef fried rice instead—you won’t regret it.