Banana and Choc Chip Bread Recipe: There’s just something so comforting about the smell of banana bread baking in the oven, right? It’s warm, sweet, and feels like a hug in food form. Now add chocolate chips to the mix, and boom—you’ve got a treat that’s impossible to resist.
Whether you’re a seasoned baker or a total newbie, this step-by-step guide will walk you through everything you need to make the ultimate banana and choc chip bread. Let’s get baking!
Ingredients You’ll Need
The best banana and choc chip bread starts with simple ingredients, most of which you probably already have in your kitchen. It’s not about using anything fancy—it’s about how you bring these everyday staples together to create something truly delicious.
Basic Ingredients
Let’s break down the essentials:
- 3 ripe bananas (mashed) – The riper, the better. Those brown spots mean extra sweetness and moisture.
- 2 cups all-purpose flour – This gives your bread structure.
- 1 teaspoon baking soda – Helps the bread rise and stay fluffy.
- 1/2 teaspoon baking powder – Adds an extra lift.
- 1/2 teaspoon salt – Balances the sweetness and enhances flavor.
- 1/2 cup unsalted butter (softened) or 1/2 cup oil – Either works, depending on if you want a rich or lighter texture.
- 3/4 cup sugar (white or brown, or a mix) – Brown sugar adds a deeper flavor, while white sugar gives a cleaner sweetness.
- 2 large eggs – They hold everything together.
- 1 teaspoon vanilla extract – Adds warmth and depth.
Chocolate Choices
This is the magic touch.
- 1 cup semi-sweet chocolate chips – The go-to classic.
- Optional: 1/2 cup dark chocolate chunks – For a more grown-up taste and gooey pockets of chocolate.
Optional Add-ins
Want to level it up? Try these:
- 1/2 cup chopped walnuts or pecans – Adds crunch.
- 1/2 teaspoon cinnamon or nutmeg – Brings cozy vibes.
- 2 tablespoons Greek yogurt or sour cream – Makes the bread incredibly moist and tender.
Equipment Checklist
Before you get started, make sure you have the right tools. You don’t need a lot—just the basics:
- 2 mixing bowls (one for wet, one for dry)
- Measuring cups and spoons
- Fork or potato masher (for the bananas)
- Hand mixer or whisk
- Spatula or wooden spoon
- Loaf pan (preferably 9×5 inches)
- Oven and kitchen timer
- Parchment paper (optional, for lining the pan)
Having everything laid out before you start makes the process way smoother—and a little more fun too!
Step-by-Step Guide for Banana and Choc Chip Bread
Now that you’ve got all your ingredients and tools ready, it’s time to roll up your sleeves and start baking. Follow these steps carefully, and you’ll have a loaf of banana and choc chip bread that’s moist, sweet, and loaded with melty chocolate in every bite.
Step 1: Preheat Your Oven
This step might seem small, but it’s crucial. Preheating your oven to 350°F (175°C) ensures that your bread bakes evenly from the get-go. If the oven isn’t hot enough, your loaf could end up dense or undercooked in the middle. Turn on your oven first so it’s ready by the time you’re done mixing the batter.
Tip: Avoid opening the oven too often during baking—heat loss can affect the final result.
Step 2: Prepare the Loaf Pan
Grease your 9×5-inch loaf pan with butter, oil, or non-stick spray. You can also line it with parchment paper for super easy removal after baking. Make sure the paper hangs over the edges slightly—this acts like a handle to lift the bread out later without damaging its shape.
Alternative: If you don’t have parchment paper, sprinkle a bit of flour into the greased pan and shake it around to coat the sides lightly. Tap out the excess.
Step 3: Mash the Bananas
Place your ripe bananas in a large bowl. Use a fork or potato masher to smash them into a thick, smooth paste. Don’t worry if a few small lumps remain—they’ll add to the texture and give you little bursts of banana flavor.
The riper the bananas, the better. Dark brown or even black-skinned bananas are perfect. They may look scary, but they’re at peak sweetness and make the bread incredibly moist.
Want a deeper flavor? Let your mashed bananas sit for 10 minutes before mixing them in. It helps intensify the natural sugars.
Step 4: Mix the Wet Ingredients
In the same bowl as your mashed bananas, add the following:
- 1/2 cup softened butter (or oil)
- 3/4 cup sugar
- 2 large eggs
- 1 teaspoon vanilla extract
Use a whisk or electric hand mixer to beat everything until well combined. The mixture should be smooth and creamy.
Note: If you’re using butter, make sure it’s softened to room temperature—not melted. This helps trap air when mixing, making the bread lighter.
For added moisture, now is the time to mix in your 2 tablespoons of Greek yogurt or sour cream if you’re using it.
Step 5: Combine Dry Ingredients
In a separate bowl, whisk together:
- 2 cups all-purpose flour
- 1 tsp baking soda
- 1/2 tsp baking powder
- 1/2 tsp salt
- Optional: 1/2 tsp cinnamon or nutmeg
Whisking helps distribute the leavening agents evenly so you don’t end up with weird lumps or uneven rising. If you’re feeling fancy, you can sift the dry ingredients—but it’s not mandatory.
This is also the time to stir in chopped nuts if you’re using them.
Step 6: Fold Everything Together
Pour the dry ingredients into the wet banana mixture a little at a time. Use a spatula or wooden spoon to gently fold them together. Don’t overmix!
Here’s the deal: Overmixing develops the gluten in the flour, which can make your bread dense and chewy instead of soft and tender. Stir until just combined—when you don’t see any more dry flour, you’re done.
It’s totally normal if your batter looks a little thick and lumpy. That’s a good thing.
Step 7: Add Chocolate Chips and Extras
Now comes the fun part—chocolate chips! Gently fold in 1 cup of semi-sweet chocolate chips to your batter. Make sure they’re evenly distributed so every slice gets a good amount of chocolate.
Want to level it up? Add:
- ½ cup dark chocolate chunks for rich gooey bites
- ½ cup chopped walnuts or pecans for a nutty crunch
Pro tip: To stop your chocolate chips from sinking to the bottom, toss them in a spoonful of flour before mixing them into the batter. This gives them a little grip in the mixture and helps them stay suspended.
If you’re adding any extras like cinnamon or Greek yogurt and haven’t done so already, now is your last chance to get them into the mix!
Step 8: Pour Batter into Pan
Pour the finished batter into your greased or lined loaf pan. Use your spatula to smooth out the top and make sure it’s evenly spread—this helps the loaf bake level and look beautiful when it rises.
Want a little flair? Sprinkle a few more chocolate chips or nuts over the top before baking. Not only does it look pretty, but it also gives you that bakery-style finish.
Make sure to tap the pan gently on the counter a couple of times. This gets rid of any air bubbles and helps settle the batter evenly.
Step 9: Bake the Bread
Slide your pan into the preheated 350°F (175°C) oven and let the magic happen. Bake for 50–60 minutes, but start checking at the 50-minute mark.
To test if it’s done:
- Insert a toothpick or skewer into the center.
- If it comes out clean or with just a few crumbs (not wet batter), it’s ready.
- If it’s still sticky, bake for another 5-10 minutes and test again.
Important tip: Every oven is different. Keep an eye on your loaf without opening the door too often, or the temp will drop and mess with the bake.
If the top is browning too fast but the middle isn’t done, loosely cover it with foil for the last 10–15 minutes of baking.
Step 10: Cool and Remove from Pan
Once baked, take the pan out and let your banana choc chip bread cool in the pan for about 10–15 minutes. This helps it firm up a little so it doesn’t fall apart when you remove it.
Then, run a knife around the edges (if you didn’t use parchment paper), gently lift it out, and place it on a wire rack to cool completely—about 1 hour.
Yes, we know it’s tempting to cut into it right away (and you totally can!), but waiting will give you cleaner slices and better texture.
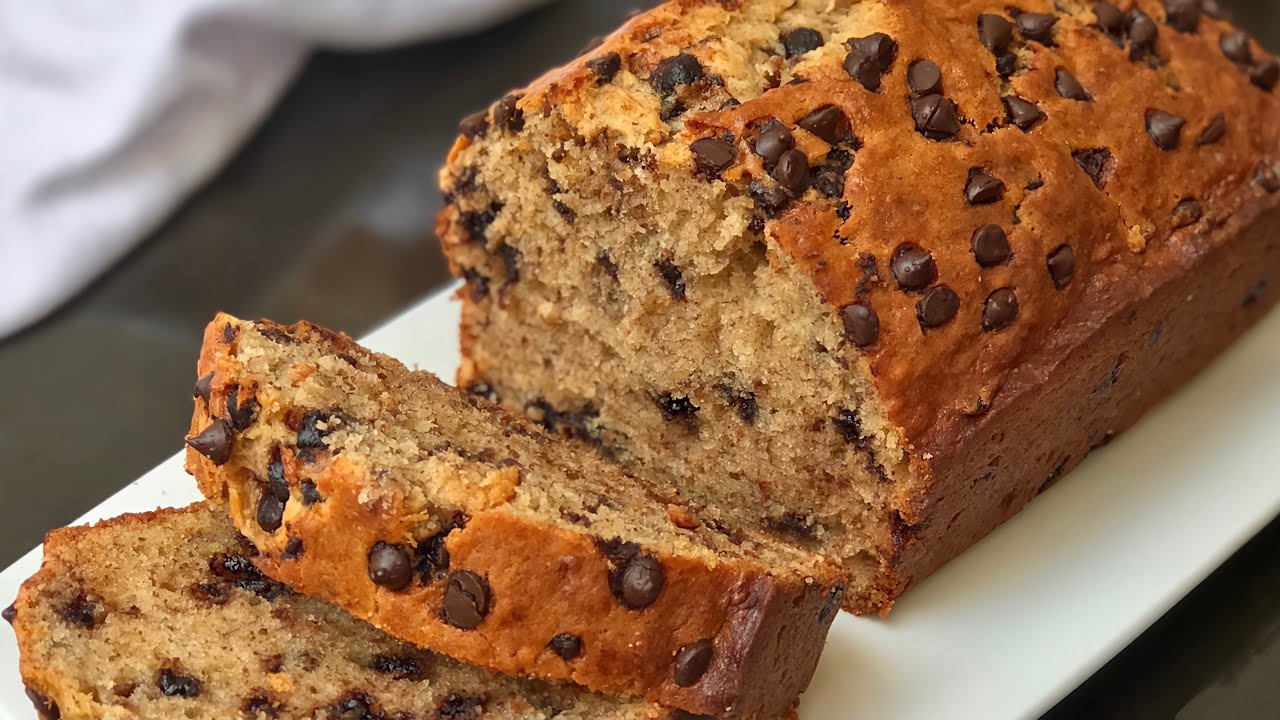
Once cool, slice it up and admire those gooey chocolate chips running through the soft banana crumb. Absolute perfection.
Serving Suggestions
Banana and choc chip bread is one of those treats that works for just about any occasion—breakfast, snack, dessert, or even a cheeky midnight bite. Here are some tasty ways to enjoy it:
- Warm and buttered: Toast a slice and spread a little butter over it—pure comfort food.
- Drizzled with honey or maple syrup: For a sweet breakfast twist.
- With a scoop of vanilla ice cream: Turn your loaf into a full-blown dessert.
- Paired with coffee or tea: The rich banana flavor balances perfectly with a hot drink.
- As French toast: Yes, seriously! Dip slices in egg and cook them up like French toast for an indulgent weekend brunch.
You can even crumble it into yogurt or use it as the base for a trifle. Once you make it, you’ll find tons of ways to enjoy every last bite.
Storage Tips
You’ve baked it, you’ve sliced it, and now… what if you have leftovers? Don’t worry—banana and choc chip bread stores like a dream. Here’s how to keep it fresh and delicious for as long as possible.
On the Counter
If you plan to eat the bread within a few days, store it at room temperature. Wrap it tightly in plastic wrap, foil, or place it in an airtight container. It’ll stay soft and tasty for up to 3–4 days this way.
Keep it in a cool, dry spot away from sunlight or heat—this prevents it from getting soggy or drying out.
In the Fridge
Want it to last a bit longer? Pop it in the fridge. Wrap it tightly or use an airtight container to prevent it from drying out or absorbing other food smells. It should keep well for up to a week.
Before eating, you can warm slices in the microwave for 10–15 seconds to bring back that soft, melty texture.
In the Freezer
Got leftovers you want to save for a rainy day? Banana bread freezes beautifully.
How to freeze it:
- Let the bread cool completely.
- Wrap individual slices or the whole loaf tightly in plastic wrap.
- Add an extra layer of foil or place in a freezer-safe zip-top bag.
It can stay fresh in the freezer for up to 3 months. When you’re ready to enjoy it, let it thaw overnight in the fridge or at room temp for a few hours.
Microwave slices straight from frozen for a quick treat on the go.
Troubleshooting Common Mistakes
Even the best bakers have off days. If your banana choc chip bread didn’t turn out exactly right, don’t stress. Here’s how to fix the most common baking issues:
1. My Bread Is Too Dense
- You may have overmixed the batter, which overdevelops gluten.
- Or, your bananas weren’t ripe enough—they need to be soft and spotty for the best texture and sweetness.
2. It Didn’t Rise Properly
- Make sure your baking soda and baking powder are fresh. Old leavening agents won’t give your loaf the lift it needs.
- Double-check that you didn’t use too much banana or liquid, which can weigh down the batter.
3. It’s Too Wet in the Middle
- Your loaf might not have baked long enough. Always do the toothpick test in the center of the loaf.
- Also, check your oven temp with a thermometer—some ovens run cooler or hotter than they say.
4. Chocolate Chips Sank to the Bottom
- Toss them in a spoonful of flour before mixing into the batter. This helps keep them suspended while baking.
5. The Top Is Too Dark or Burnt
- Your oven might run hot. Cover the top with aluminum foil during the last 10–15 minutes of baking.
- Make sure the rack is positioned in the middle of the oven—not too high or low.
Baking is a science, but it’s also a learning process. The more you bake this recipe, the better it will turn out each time. And hey, even “flawed” banana bread still tastes pretty great, right?
Why You’ll Love This Recipe
Let’s be real—there are a million banana bread recipes out there. So why should this one be your go-to?
- It’s foolproof: Whether you’re a beginner or a seasoned baker, the step-by-step instructions make it easy to follow.
- It’s versatile: Add nuts, skip the chocolate, swap flour types—make it your own.
- It’s a crowd-pleaser: Kids love it. Adults love it. It’s great for school lunches, office snacks, or just for treating yourself.
- It’s freezer-friendly: Bake now, save for later. Perfect for busy weeks or unexpected guests.
- It’s just plain delicious: Moist, tender, sweet, and packed with chocolatey goodness in every bite.
Once you try this banana and choc chip bread recipe, you’ll understand why it’s a favorite in kitchens everywhere. It’s simple, satisfying, and always hits the spot.
FAQs about Banana and Choc Chip Bread Recipe
1. Can I use frozen bananas for this recipe?
Yes! Just let them thaw completely and drain any extra liquid before mashing. Frozen bananas tend to be extra sweet and perfect for baking.
2. Can I make this banana bread vegan?
Absolutely. Swap the eggs for flax eggs (1 tbsp flaxseed + 3 tbsp water per egg), use plant-based butter or oil, and choose dairy-free chocolate chips.
3. How do I keep the chocolate chips from sinking?
Toss them in a spoonful of flour before mixing them into the batter. This gives them a little grip and helps keep them evenly distributed.
4. Can I turn this recipe into muffins?
Definitely! Just pour the batter into muffin tins (lined or greased) and bake at 350°F for 18–22 minutes, or until a toothpick comes out clean.
5. How long does banana and choc chip bread last?
Stored properly at room temp, it lasts 3–4 days. In the fridge, up to a week. Freeze it for up to 3 months and enjoy later.
Conclusion
There you have it—a complete, no-fail guide to making banana and choc chip bread that’s soft, moist, and packed with flavor. With just a handful of ingredients, a little bit of time, and a lot of love, you can create something amazing right in your own kitchen.
Whether you’re baking for your family, meal prepping for the week, or simply craving something sweet and cozy, this recipe delivers every time.
So go ahead—grab those ripe bananas off the counter and get baking. You’ve got this!