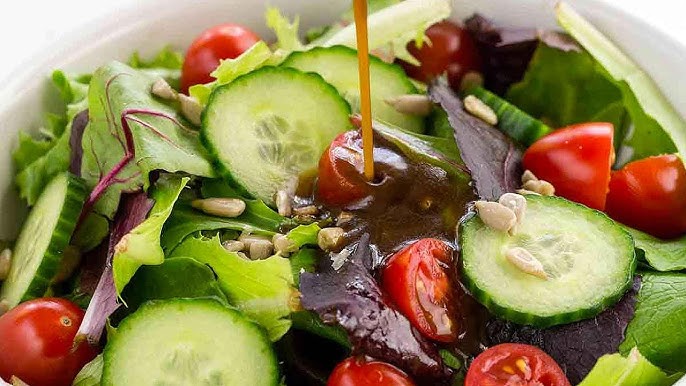
Balsamic Dressing Recipe: Balsamic dressing is more than just a condiment—it’s the heart of many kitchen creations. This rich, tangy, and slightly sweet dressing transforms a basic salad into a gourmet delight. But its magic doesn’t stop there. Drizzle it over grilled veggies, marinate your favorite proteins, or even enhance roasted potatoes—the versatility is endless. What makes balsamic dressing so irresistible? It’s all about that perfect harmony of acidity from the vinegar balanced by the smooth richness of olive oil. It’s like a culinary yin and yang. Whether you’re a home cook or a seasoned chef, this dressing is a must-have in your recipe arsenal.
Balsamic dressing also carries a sophisticated flavor profile. The tanginess of the vinegar, the earthiness of the oil, and the subtle kick from seasonings like mustard, garlic, and honey combine to create something truly memorable. And let’s be real, homemade dressing always beats store-bought. No preservatives, no mystery ingredients—just pure, delicious simplicity.
So, why not master it yourself? With a few pantry staples and less than 10 minutes, you can whip up a dressing that elevates your meals to a whole new level.
Health Benefits of Balsamic Vinegar
You might think balsamic vinegar is just for flavor, but it brings more to the table—literally. First off, it’s rich in antioxidants, which help fight cell damage and boost your immune system. Then there’s its ability to help regulate blood sugar levels. Yes, balsamic vinegar has been shown to improve insulin sensitivity and reduce spikes after meals. That’s great news if you’re watching your blood sugar or trying to eat more consciously.
Another major perk? Balsamic vinegar can support weight loss. Its acetic acid content helps with appetite control and may even boost metabolism slightly. Plus, it’s fat-free and low in calories—talk about a guilt-free flavor bomb. It’s also known to aid in digestion. Traditional balsamic vinegar, made from reduced grape must, contains probiotics that help your gut flora thrive.
And let’s not forget heart health. Studies suggest that balsamic vinegar can lower cholesterol and blood pressure. Combine it with olive oil—another heart-healthy ingredient—and you’ve got a powerhouse dressing that does more than just taste good. It nourishes your body while satisfying your taste buds.
Ingredients You’ll Need
Basic Ingredients for Classic Balsamic Dressing
The beauty of balsamic dressing lies in its simplicity. To get started, you only need a handful of ingredients—most of which are probably already in your pantry. Here’s what you’ll need:
- Balsamic Vinegar – The star of the show. Choose a high-quality, aged vinegar for the best flavor.
- Extra Virgin Olive Oil – Adds richness and depth.
- Dijon Mustard – Acts as an emulsifier and adds a bit of tang.
- Honey or Maple Syrup – Balances the acidity with a hint of sweetness.
- Garlic – Minced or crushed for a flavor punch.
- Salt & Black Pepper – To taste.
This combination is the foundation. It creates a balanced, silky dressing that pairs with virtually any salad or grilled dish.
Optional Add-ins to Enhance Flavor
Once you’ve nailed the basics, feel free to get creative. Balsamic dressing is super customizable. Here are a few ingredients you can experiment with:
- Shallots or Red Onion – Finely minced for added complexity.
- Herbs – Basil, oregano, thyme, or rosemary can give your dressing a Mediterranean vibe.
- Parmesan Cheese – A small amount adds umami richness.
- Lemon Juice or Zest – Brightens up the flavor profile.
- Chili Flakes or Mustard Seeds – For a little heat and texture.
Mix and match until you find your perfect blend. Just remember—less is more. Start small and adjust as needed to avoid overpowering the dressing’s base flavor.
Tools and Equipment Required
Simple Kitchen Tools for Making Dressing
You don’t need fancy kitchen gadgets to make a killer balsamic dressing. In fact, all you really need are:
- A Mixing Bowl – Medium-sized and preferably non-reactive (glass or stainless steel).
- Whisk – Helps emulsify the ingredients into a smooth, consistent blend.
- Measuring Spoons & Cups – Accuracy is key, especially when balancing acid and oil.
- Mason Jar or Bottle – Ideal for shaking, storing, and pouring.
- Garlic Press or Microplane – For finely mincing garlic.
If you want to go the extra mile, a blender or food processor can give your dressing an ultra-smooth texture. But honestly, a whisk does the job just fine for everyday needs.
Step-by-Step Guide to Making Balsamic Dressing
Step 1: Gather Your Ingredients
Before you begin, make sure all your ingredients are ready and measured out. This isn’t just about being neat—it’s about precision and efficiency. Having your olive oil, balsamic vinegar, mustard, garlic, sweetener, and spices at your fingertips will save time and prevent mistakes.
Use high-quality ingredients where possible. Aged balsamic vinegar can completely change the game with its thick, syrupy consistency and deep flavor. When it comes to olive oil, choose extra virgin—it’s less processed and retains more of its natural flavor. Mustard should be smooth Dijon for that classic zing, but if you like a little grain, whole grain mustard adds nice texture. Garlic should be fresh and finely minced or grated for best results. And for sweetness, go with raw honey or pure maple syrup—no pancake syrup allowed here.
Set everything on the counter. Smell them. Taste if you like. This prep phase is like a warm-up before the main event. Get in the zone—it’s dressing time.
Step 2: Mixing the Base – Vinegar and Oil
In a medium bowl, start with your balsamic vinegar. About ¼ cup is a solid base for a batch that serves four. Slowly add ½ cup of olive oil. The classic ratio is one part vinegar to two parts oil, but feel free to adjust this based on your taste. Some prefer more tang, others lean towards a silkier, mellow flavor.
Now here’s where the magic begins: emulsification. This is when oil and vinegar—two natural enemies—come together in harmony. You can either whisk vigorously, use a blender, or shake them together in a sealed jar. The mustard will act as your best friend here—it binds the oil and vinegar so they don’t separate quickly.
Pouring the oil in slowly as you whisk can help the mixture emulsify better. Take your time. This isn’t just a step—it’s the secret to that creamy, well-blended consistency you want in a dressing.
Step 3: Adding Emulsifiers and Flavor Enhancers
Once your oil and vinegar are mixed, it’s time to level things up. Add a teaspoon of Dijon mustard. This not only boosts flavor but stabilizes the emulsion, helping your dressing stay smooth longer. Next, stir in your sweetener. One teaspoon of honey or maple syrup adds just the right touch of sweetness to cut through the acidity.
Now toss in the minced garlic. One small clove should do it unless you’re a serious garlic lover. Add a pinch of salt and freshly ground black pepper to taste. At this point, your kitchen is probably starting to smell amazing.
You can also consider a dash of soy sauce for umami, or a spoonful of Greek yogurt if you’re going for a creamier version. Want a hint of citrus? A squeeze of lemon juice adds freshness and brightness that’s hard to beat.
The idea here is balance. You want the dressing to be flavorful without any one ingredient dominating the rest. This takes a bit of practice, so don’t be afraid to adjust quantities until it feels just right.
Step 4: Whisking to Perfection
Now that all your flavor elements are in the bowl, it’s time to bring them together. This is more than just stirring—it’s about blending everything into a harmonious whole. Use a balloon whisk and whip the dressing in a steady, circular motion. You’ll notice the mixture thickening slightly and turning a rich, glossy brown. That’s the emulsion doing its job.
This step is crucial because it gives the dressing that velvety texture. If you’re using a jar with a lid, give it a solid 30 seconds of vigorous shaking. It’s fun, easy, and surprisingly effective.
If you’ve opted for a blender or immersion blender, pulse for about 15-20 seconds. The speed helps the dressing emulsify beautifully, giving you a silky smooth finish that coats greens like a dream.
Once you’re done whisking, let the dressing rest for a minute. This allows all the flavors to meld. You’ll be amazed at how much difference that tiny pause makes.
Step 5: Tasting and Adjusting Seasonings
You’ve reached the final—and arguably most important—step: tasting. This is your chance to fine-tune the dressing to match your preferences. Dip a clean spoon into the bowl or jar and take a small taste.
Ask yourself: Is it too tart? Add a bit more honey or oil. Too oily? Splash in a touch more vinegar. Not enough depth? Try a pinch of sea salt or a twist of black pepper. If it’s lacking that wow factor, consider adding a hint of minced shallot, a sprinkle of herbs, or a touch of citrus zest.
Don’t rush this part. Adjusting the seasoning might take one or two tweaks, but the payoff is worth it. Great balsamic dressing should hit multiple notes—sweet, tangy, savory, and slightly peppery. When it does, you’ll know it. Trust your taste buds.
Once satisfied, pour the dressing into a clean glass jar or bottle. Label it and refrigerate. It’ll keep well for up to a week—if it lasts that long!
Tips for the Best Homemade Balsamic Dressing
Storing Your Dressing for Maximum Freshness
After crafting the perfect balsamic dressing, you’ll want to keep it fresh for as long as possible. Storage plays a key role in maintaining both flavor and texture. So what’s the secret? Use the right container and store it properly.
Glass is your best friend here. Opt for a tightly sealed glass jar or bottle with a lid. Avoid plastic if you can—balsamic vinegar can react with some plastics and absorb unwanted flavors. Mason jars are a great go-to, and they’re easy to shake up again before serving.
Store your dressing in the refrigerator. While balsamic vinegar and olive oil are shelf-stable on their own, once combined with other fresh ingredients like garlic or herbs, refrigeration becomes essential. Cold temps keep your dressing safe and prevent spoilage.
Now, don’t be surprised if your dressing thickens or separates in the fridge—that’s totally normal. Olive oil can solidify slightly when cold. To bring it back to life, let it sit at room temperature for 10–15 minutes before using, then give it a good shake or whisk to re-emulsify.
Generally, homemade balsamic dressing will last about 7–10 days when stored properly. If it contains fresh ingredients like garlic, use it within a week for best results. Always check for any off smells or mold before using if it’s been stored a while.
Creative Ways to Customize the Recipe
Sure, the classic balsamic dressing is amazing. But why stop there? With a little creativity, you can tailor this dressing to suit different dishes, cuisines, or flavor moods. Let’s look at some fun and easy ways to remix your balsamic dressing:
- Add Citrus – A squeeze of lemon, lime, or orange brightens the flavor. Great for summer salads or seafood.
- Go Herbal – Add chopped fresh basil, oregano, or thyme. Perfect for Italian-inspired dishes.
- Creamy Version – Whisk in a spoonful of Greek yogurt, mayonnaise, or even tahini for a creamy consistency.
- Spicy Twist – A dash of chili flakes or a squirt of Sriracha adds heat. Ideal for grilled chicken or hearty grain bowls.
- Umami Boost – A splash of soy sauce or Worcestershire sauce takes the flavor to a deeper level.
- Sweet Upgrade – Try swapping honey for a fruit preserve like fig, raspberry, or apricot for a gourmet flair.
These tweaks don’t just change the flavor—they can change the entire vibe of your dish. Think of your balsamic dressing as a flavor canvas. Don’t be afraid to experiment and have fun with it.
Another pro tip? Make a double batch and split it in two. Keep one classic, and turn the other into something bold and unique. It’s a great way to keep mealtime exciting without doing a ton of extra work.
FAQs About Balsamic Dressing Recipe
1. What is balsamic dressing made of?
Balsamic dressing typically includes balsamic vinegar, olive oil, Dijon mustard, garlic, honey or maple syrup (for sweetness), salt, and pepper. These ingredients are whisked together to create a tangy, slightly sweet vinaigrette.
2. Is balsamic dressing healthy?
Yes, balsamic dressing can be healthy when made at home with quality ingredients. It’s low in calories and rich in antioxidants, especially when using extra virgin olive oil and natural sweeteners.
3. How long does homemade balsamic dressing last?
When stored in an airtight container in the refrigerator, homemade balsamic dressing can last up to 1–2 weeks. Always shake well before each use.
4. Can I use balsamic dressing as a marinade?
Absolutely! Balsamic dressing works great as a marinade for meats, tofu, or vegetables. Its acidity helps tenderize proteins while adding flavor.
5. What can I use if I don’t have balsamic vinegar?
If you’re out of balsamic vinegar, you can substitute with a mix of red wine vinegar and a touch of honey or brown sugar to mimic the sweetness and acidity.
6. Is balsamic dressing gluten-free?
Most homemade balsamic dressings are naturally gluten-free. However, always double-check labels on store-bought ingredients like mustard or vinegar to ensure they’re certified gluten-free.
7. Can I make a vegan version of balsamic dressing?
Yes! To make it vegan, use maple syrup or agave nectar instead of honey and ensure all other ingredients are plant-based.
8. What’s the best way to emulsify balsamic dressing?
Whisking the ingredients vigorously or blending them helps emulsify the oil and vinegar, creating a smooth, well-combined dressing that doesn’t separate quickly.
9. How do I store balsamic dressing?
Store it in a glass jar or bottle with a tight lid in the refrigerator. Shake well before serving, as the oil and vinegar may separate over time.
10. What dishes pair well with balsamic dressing?
Balsamic dressing is perfect on salads with mixed greens, goat cheese, berries, nuts, or grilled vegetables. It also enhances grilled chicken, roasted veggies, or even fresh tomato and mozzarella salads.
Conclusion
With just a few pantry staples and about 10 minutes of your time, you can create a dressing that transforms simple salads into gourmet experiences. You’ve learned how to balance acidity with sweetness, how to emulsify like a pro, and how to customize the recipe to suit your taste buds.
Whether you stick with the classic version or explore endless variations, one thing’s for sure: your meals are about to get a serious flavor upgrade.
So next time you reach for a bottle of dressing, pause. Open your pantry. Grab your whisk. And make something magical.