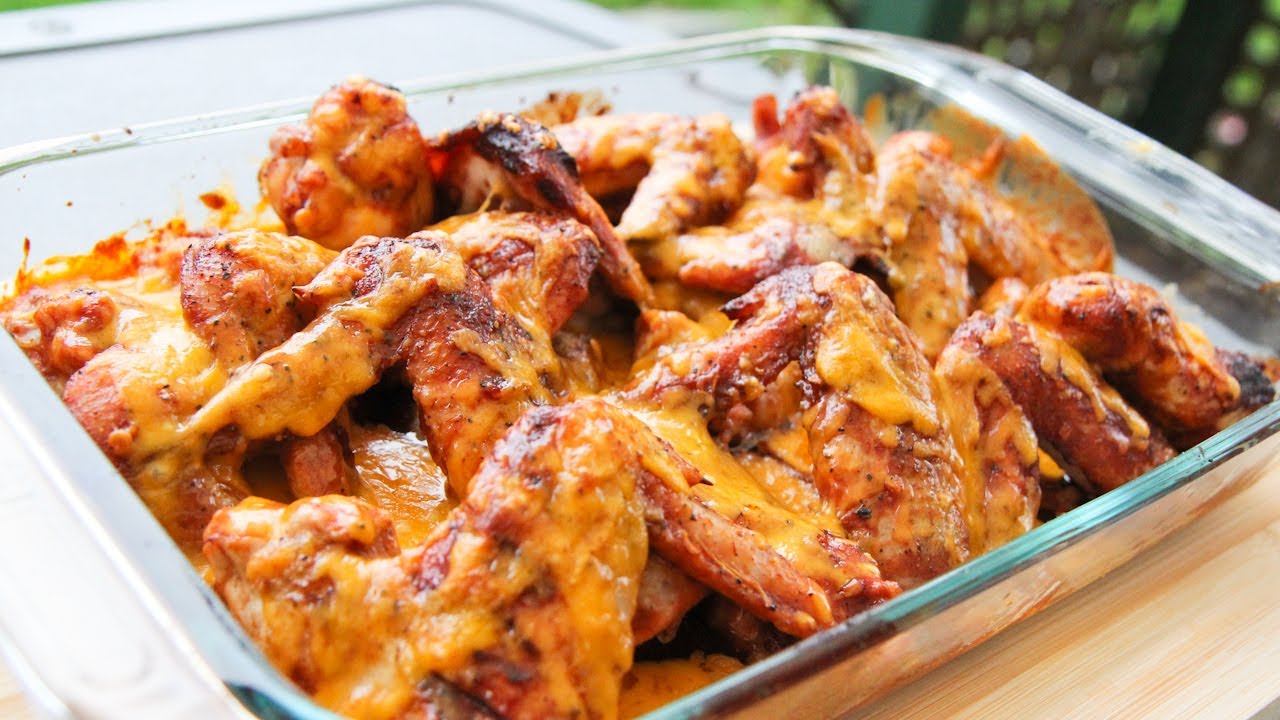
Baked Wings Recipe: Craving something crispy, juicy, and loaded with flavor? Baked chicken wings are the answer! These little bites of heaven are not only easy to make but are also a healthier alternative to fried wings. Whether you’re planning a game-day snack, a party appetizer, or a casual dinner, baked wings fit the bill perfectly. You don’t need a deep fryer, gallons of oil, or a culinary degree to make these. Just some simple ingredients, a good oven, and a bit of patience will reward you with wings that are tender on the inside and perfectly crispy on the outside.
Baked wings have become a go-to for foodies and health-conscious eaters alike. They’re less messy to prepare, lighter on the calories, and just as satisfying as their fried cousins. And the best part? You can customize them with any sauce or spice mix you like – from classic Buffalo to tangy BBQ or zesty lemon pepper. This step-by-step guide will walk you through everything you need to know to whip up a batch of irresistible baked chicken wings right in your kitchen.
Why Choose Baked Over Fried?
Let’s face it – fried food is delicious, but it comes with baggage. Baked wings, on the other hand, offer a guilt-free indulgence. Here’s why you should make the switch:
- Healthier Option: Baking significantly reduces the amount of oil used, lowering the calorie and fat content without sacrificing flavor or texture.
- Less Mess: No greasy stovetop, no deep fryer cleanup. Just pop the wings in the oven and let them do their thing.
- Crispy Skin Without the Oil: When done right, baked wings can achieve that perfect crisp thanks to high oven heat and a few pro tips (we’ll cover those later).
- Customizable Cooking: Want to add some herbs, toss in a dry rub, or glaze them in honey garlic sauce? Baking gives you total control over flavor.
Plus, baking lets you make a big batch all at once. Perfect for parties or meal prep!
Essential Ingredients for Baked Wings
Before you fire up the oven, let’s talk ingredients. The beauty of baked wings is that you don’t need a long list of fancy items. Simplicity is key – but quality matters.
Chicken Wing Selection Tips
Start with fresh or thawed wings. Look for whole wings if you prefer to separate them yourself into flats and drumettes, or buy them pre-cut for convenience. Make sure the skin is intact – this helps them crisp up beautifully in the oven.
A good rule of thumb: 1.5 to 2 pounds of wings serve about 4 people as an appetizer or 2 people as a main course.
Key Spices and Sauces
Here’s a basic lineup of what you’ll need:
- Salt and black pepper – the foundation of all great wings.
- Garlic powder and onion powder – adds depth and savory notes.
- Paprika (smoked or sweet) – brings a mild heat and color.
- Baking powder (aluminum-free) – the secret ingredient for crispy skin.
- Olive oil or avocado oil – helps bind spices and crisp the skin.
- Optional sauces – Buffalo, BBQ, teriyaki, honey mustard, or anything you love.
Want to take it up a notch? Add cayenne for heat, or herbs like thyme and rosemary for a more aromatic flavor.
Kitchen Tools You’ll Need
You don’t need a fancy kitchen setup, just a few essentials:
- Baking sheet – preferably with a rim to catch juices.
- Wire rack – helps air circulate under the wings for even crisping.
- Mixing bowls – for seasoning and tossing.
- Tongs – to flip and toss the wings.
- Parchment paper or foil – makes cleanup a breeze.
With these tools and ingredients ready, you’re all set to start cooking!
Step-by-Step Baked Wings Recipe
Step 1: Prepping the Wings
Rinse and pat the chicken wings completely dry with paper towels – this is key to getting them crispy. Any moisture left on the skin will steam them instead of baking them crispy.
If you’re working with whole wings, separate them into drumettes and flats by cutting through the joint using a sharp knife. Discard the wing tips or save them for making chicken stock.
Next, preheat your oven to 425°F (220°C) and line a baking sheet with foil or parchment paper. Set a wire rack on top.
Step 2: Making the Marinade
In a large bowl, combine:
- 2 tablespoons olive oil
- 1 teaspoon salt
- 1 teaspoon black pepper
- 1 teaspoon garlic powder
- 1 teaspoon onion powder
- 1 teaspoon paprika
- 1 tablespoon baking powder (aluminum-free)
Whisk it all together until well mixed. The oil helps the spices stick, and the baking powder helps the skin crisp up by raising its pH and breaking down proteins.
Step 3: Seasoning the Wings
Add the wings to the bowl and toss thoroughly to coat every piece evenly. Use your hands or tongs to really work in the seasoning. Let them rest for 5–10 minutes to absorb the flavors.
Place the seasoned wings skin-side up on the wire rack. Make sure they’re spaced apart so the hot air can circulate freely around them.
Step 4: Baking the Wings
Bake the wings for 45–50 minutes, flipping them halfway through. This helps them cook evenly and get that golden, crispy skin on all sides.
If you want ultra-crispy skin, turn on the broiler for the last 2–3 minutes. Watch them carefully so they don’t burn.
Once done, the wings should be golden brown with a crisp exterior and juicy inside.
Step 5: Tossing in Sauce (Optional)
If you love saucy wings, toss the hot wings in your favorite sauce immediately after baking. Place them in a large bowl, pour over the sauce, and toss to coat.
Return to the oven for 5 minutes if you want the sauce to caramelize slightly.
Tips for Extra Crispy Baked Wings
Let’s be honest—no one wants soggy wings. You’re here for the crunch. Thankfully, there are several tricks to getting that restaurant-level crisp without pulling out a deep fryer.
- Pat Those Wings Dry: Moisture is the enemy of crispiness. Before seasoning, use paper towels to blot the wings dry thoroughly. If you’ve got time, let them air-dry uncovered in the fridge for a few hours or overnight.
- Use Baking Powder (Not Baking Soda): This is the golden trick. Baking powder raises the skin’s pH level, breaking down the proteins and enhancing browning. Just make sure it’s aluminum-free to avoid a bitter taste.
- Cook on a Wire Rack: Elevating the wings lets hot air circulate all around them, ensuring they get evenly crispy on all sides. Don’t skip this step!
- High Oven Temp: Bake your wings at 425°F (220°C) or even up to 450°F. The high heat helps the skin crisp up faster without drying out the meat inside.
- Don’t Crowd the Pan: Leave space between the wings. Overcrowding leads to steam, which will ruin that coveted crunch.
- Flip Midway: Turning the wings halfway through the cooking process helps both sides develop that golden, crispy texture.
If you follow these methods, you’ll be amazed at how crunchy your baked wings turn out. People might even ask which takeout spot you ordered from!
Flavor Variations You Can Try
Why settle for plain wings when you can have a world of flavor on your plate? Here are some irresistible flavor combinations you can easily whip up:
1. Buffalo Style
- Classic and tangy with a hint of heat.
- Mix melted butter and hot sauce (like Frank’s RedHot), then toss baked wings in it.
2. Honey Garlic
- Sweet and savory with a garlicky punch.
- Combine soy sauce, honey, minced garlic, and a dash of sesame oil in a saucepan. Simmer, then coat the wings.
3. Lemon Pepper
- Zesty and peppery, perfect for those who like bold, bright flavors.
- Mix melted butter with lemon zest, black pepper, and a pinch of salt. Toss freshly baked wings for a dry rub-style flavor.
4. BBQ Bliss
- Smoky, sweet, and sticky—BBQ lovers rejoice!
- Use your favorite BBQ sauce or make your own with ketchup, molasses, vinegar, and spices.
5. Asian-Inspired
- Sweet, spicy, and umami-rich.
- Blend soy sauce, ginger, garlic, brown sugar, and a touch of chili paste. Toss wings post-baking and sprinkle with sesame seeds.
Want to go global? Try Jamaican jerk, tandoori, or Cajun-style seasoning for something totally different. The sky’s the limit!
What to Serve with Baked Wings
Wings are awesome on their own, but when paired with the right sides, they become a full-blown feast. Whether you’re feeding guests or just treating yourself, consider these perfect wing companions:
Classic Sides
- Celery and Carrot Sticks: They’re not just for Buffalo wings. These crunchy veggies cool your palate and add a healthy contrast.
- Ranch or Blue Cheese Dressing: For dipping, dunking, or drizzling. You can’t go wrong.
Comfort Food Favorites
- Mac and Cheese: Creamy and cheesy, this side balances the bold flavors of wings.
- Cornbread or Biscuits: Slightly sweet and buttery, ideal for soaking up extra sauce.
- Potato Wedges or Fries: No explanation needed. It’s a classic combo.
Healthier Options
- Garden Salad: Crisp greens and vinaigrette make a refreshing partner.
- Coleslaw: Tangy and creamy slaw contrasts perfectly with spicy wings.
- Roasted Veggies: Zucchini, bell peppers, and sweet potatoes make a great low-carb option.
No matter how you serve them, these sides make sure your baked wings shine even brighter.
How to Store and Reheat Leftovers
So you made a giant batch of wings—great move! Now what? Let’s make sure none of those flavorful bites go to waste.
Storing Wings
- Refrigerator: Store in an airtight container for up to 4 days.
- Freezer: Wrap wings tightly and place them in freezer bags or containers. They’ll keep well for up to 3 months.
Reheating Wings
To keep them crispy and not rubbery, avoid the microwave. Instead:
- Oven Method: Preheat to 375°F (190°C). Spread wings on a baking sheet and heat for 10-15 minutes, flipping halfway.
- Air Fryer: Set to 360°F and heat for 5–8 minutes. Quick and effective!
- Skillet Method: Add a splash of oil to a skillet and sear the wings over medium heat until heated through.
If you freeze them, thaw overnight in the fridge before reheating. Trust me—future you will be thankful for this tasty leftover treat.
Nutritional Breakdown
Let’s break it down—baked chicken wings may still be indulgent, but they’re a smarter choice when you want to enjoy flavorful comfort food without going overboard. Here’s what you need to know about their nutritional profile:
Basic Nutritional Facts (Per 100g of Baked Chicken Wings):
| Nutrient | Amount |
|---|---|
| Calories | ~203 kcal |
| Protein | 24g |
| Fat | 13g |
| Carbohydrates | 0g |
| Fiber | 0g |
| Sodium | Depends on seasoning |
Keep in mind, these values can vary based on the sauces or marinades you use. For example, adding BBQ or honey garlic sauce will increase sugar and calorie content, while dry rubs typically add fewer calories.
Health Benefits:
- High in Protein: Great for muscle maintenance and repair.
- Low in Carbs: Perfect for keto or low-carb diets.
- Customizable Nutrition: Adjust fat, sodium, and calories by changing cooking oil, skin removal, or opting for low-sodium seasoning.
Potential Drawbacks:
- Sodium Levels: Store-bought sauces can be high in salt.
- Fat Content: Even baked wings contain saturated fat, especially with skin.
If you’re watching your intake, opt for homemade seasonings and skip the skin or fatty dips.
Common Mistakes to Avoid
Even experienced home cooks can make mistakes that turn perfect wings into dry or soggy disappointments. Avoid these common errors:
1. Not Drying the Wings Properly
Moisture = steamed skin. Always pat the wings dry before seasoning to ensure crispiness.
2. Overcrowding the Pan
This causes steam to get trapped, preventing the wings from crisping up. Leave some breathing room between pieces.
3. Skipping the Rack
Wings need airflow around them to crisp evenly. Direct contact with a baking sheet can lead to soggy bottoms.
4. Using Baking Soda Instead of Baking Powder
They are not interchangeable! Baking soda will leave a metallic, bitter taste. Use aluminum-free baking powder only.
5. Underseasoning
Wings thrive on bold flavors. Don’t be shy—use generous amounts of spices or sauce.
6. Not Flipping the Wings
Halfway through baking, flip your wings to ensure they cook and crisp evenly on all sides.
7. Broiling for Too Long
While broiling adds crunch, it can also burn the wings fast. Set a timer and monitor closely.
Learning from these pitfalls can make the difference between “meh” and “mouthwatering” wings.
FAQs about Baked Wings Recipe
Q1: How long does it take to bake chicken wings in the oven?
A: Typically, chicken wings take about 40–45 minutes to bake at 400°F (200°C). For extra crispiness, you can broil them for an additional 2–3 minutes at the end.
Q2: Do I need to flip the wings while baking?
A: Yes! Flip the wings halfway through the baking time to ensure even cooking and a crispy texture on all sides.
Q3: Should I use parchment paper or foil?
A: Parchment paper is ideal because it prevents sticking and helps wings cook evenly without burning the bottom. Foil can also work, especially if lightly greased.
Q4: Can I make baked wings ahead of time?
A: Absolutely. You can bake and store them in the fridge for up to 3 days. Reheat in the oven at 375°F (190°C) for 10–15 minutes to restore crispiness.
Q5: How do I get crispy wings without frying?
A: Pat the wings dry before seasoning, toss them in baking powder, and bake on a wire rack. This allows air circulation, resulting in extra crispiness.
Q6: What sauces go best with baked wings?
A: Popular options include Buffalo sauce, BBQ sauce, garlic parmesan, and honey sriracha. Toss baked wings in your preferred sauce after they come out of the oven.
Q7: Can I bake frozen wings directly?
A: It’s best to thaw frozen wings before baking for even cooking. If baking from frozen, add an extra 15–20 minutes and ensure the internal temperature hits 165°F (74°C).
Conclusion
Baked chicken wings are the ultimate combination of convenience, flavor, and a touch of health-consciousness. Whether you’re a kitchen newbie or a seasoned cook, mastering this dish brings instant satisfaction and brag-worthy results. With a few basic ingredients, some simple steps, and the right techniques, you can serve up crispy, juicy wings that rival any restaurant’s offering.
From Buffalo to honey garlic and everything in between, baked wings are endlessly versatile. Want them spicy? Done. Prefer sweet and tangy? You got it. On a keto diet? No problem. This dish adapts to your cravings and dietary goals with ease.
So, next time you’re tempted to order takeout, try making your own batch of baked wings. It’s easy, satisfying, and will leave your kitchen smelling absolutely amazing. Plus, there’s nothing more rewarding than seeing people dive into something you made from scratch.