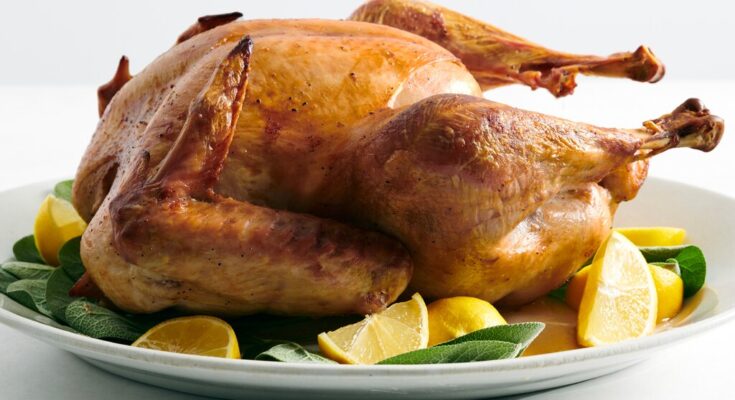
Baked Turkey Recipe: There’s something magical about a perfectly baked turkey. Whether it’s Thanksgiving, Christmas, or a family gathering, a golden-brown turkey sitting at the center of the table always steals the show. But let’s be honest—baking a turkey can feel intimidating if you haven’t done it before. Questions pop up: How long should I cook it? What temperature is best? Should I brine it or not? The truth is, with the right preparation and a clear step-by-step guide, baking a turkey becomes less of a stressful chore and more of a joyful tradition.
A well-baked turkey should be tender, juicy, and infused with flavor from the seasonings you use. When carved, the meat should practically melt in your mouth, and the aroma should fill the entire kitchen, making everyone’s stomach growl in anticipation. That’s exactly what this guide will help you achieve.
In this detailed recipe, we’ll break down everything—from the essential ingredients to prepping, baking, and even carving the turkey like a pro. By the end, you’ll not only know how to bake a turkey but also how to elevate it with tips and tricks chefs use to make their turkeys unforgettable.
So, let’s roll up our sleeves, tie on the apron, and get ready to master the art of baking a turkey step by step.
Ingredients You’ll Need
Before you begin, let’s talk ingredients. The beauty of a baked turkey is that you don’t need anything too fancy. However, the right combination of seasonings and herbs can transform your bird into something spectacular.
Main Ingredients
- Whole Turkey – Choose a fresh or frozen turkey, usually between 10–20 pounds depending on the size of your gathering.
- Unsalted Butter or Olive Oil – To coat the skin and keep it golden and crisp.
- Salt and Pepper – The foundation of seasoning.
Seasonings and Herbs
- Garlic (fresh cloves or powder) – Adds depth of flavor.
- Onion – Stuff inside or use as a roasting bed.
- Fresh Herbs (rosemary, thyme, sage, parsley) – The holy grail for turkey aroma.
- Paprika – Adds a mild smokiness and beautiful color.
- Lemon or Orange – A citrus touch brightens the flavor.
Optional Flavor Enhancers
- White Wine or Chicken Broth – For added moisture during roasting.
- Apple or Celery – Can be stuffed inside the cavity for extra aroma.
- Honey or Maple Syrup – For a sweet, caramelized glaze.
With these ingredients, you’ll have everything you need for a flavorful bird that’s guaranteed to impress.
Tools and Equipment Required
Having the right tools can make or break your turkey-baking experience. Sure, you can get by with the basics, but a few extras can save you time and ensure your turkey comes out just right.
Essential Kitchen Tools
- Roasting Pan with Rack – Keeps the turkey elevated so hot air circulates evenly.
- Meat Thermometer – The most reliable way to check doneness.
- Sharp Carving Knife – For clean, precise slices.
- Aluminum Foil – To tent the turkey if it browns too quickly.
- Basting Brush or Bulb Baster – To keep your turkey moist.
Recommended Extras for Best Results
- Kitchen Twine – For trussing (tying) the turkey legs together.
- Fat Separator – Makes it easier to prepare smooth gravy.
- Cutting Board with Juice Groove – Prevents mess while carving.
Having these items ready before you start baking ensures you won’t be scrambling around mid-cook.
Preparing the Turkey Before Baking
Preparation is where the magic begins. This stage is just as important as the baking itself because it determines how flavorful and juicy your turkey will turn out.
Thawing the Turkey Properly
If you’re working with a frozen turkey, plan ahead. Thawing takes time—typically 24 hours for every 4–5 pounds of turkey in the refrigerator. For example, a 16-pound turkey will need at least 4 days in the fridge. Never thaw at room temperature; it’s unsafe and encourages bacterial growth.
Cleaning and Trimming
Once thawed, remove the giblets and neck from inside the cavity. Rinse the turkey under cold water, then pat dry with paper towels. Trim any excess fat around the cavity openings.
Brining vs. Dry Rub – Which is Better?
- Brining: Soaking the turkey in a saltwater solution for 12–24 hours helps lock in moisture and adds flavor throughout the meat. You can add sugar, herbs, and citrus slices to the brine for extra taste.
- Dry Rub: If you’re short on time, a dry rub of salt, pepper, garlic powder, and herbs massaged directly onto the turkey can work wonders too.
Both methods are excellent—it all depends on how much time you have.
Step-by-Step Guide to Baking Turkey
Here’s where the fun begins—actually baking your turkey to perfection. Follow these steps carefully, and you’ll be rewarded with a beautifully golden, mouthwatering bird.
Preheating and Preparing the Oven
Set your oven to 325°F (165°C). This slow, steady heat ensures the turkey cooks evenly without drying out. Place your oven rack in the lower third so the turkey has plenty of space.
Stuffing or No Stuffing – What Works Best?
While stuffing adds flavor, it also increases cooking time and sometimes results in unevenly cooked turkey. A safer alternative is to bake stuffing separately and instead fill the cavity with aromatics like onion, garlic, lemon slices, and herbs.
Applying Seasonings and Butter Rub
Loosen the skin gently with your fingers and rub softened butter (or olive oil) under the skin and all over the surface. This keeps the meat moist and the skin crispy. Sprinkle salt, pepper, garlic, paprika, and herbs generously.
Placing Turkey in the Roasting Pan
Position the turkey breast-side up on a roasting rack. Add a cup of chicken broth, white wine, or water to the bottom of the pan to prevent drippings from burning.
Roasting Times by Weight
| Turkey Weight | Cooking Time at 325°F |
|---|---|
| 8–12 lbs | 2¾ – 3 hrs |
| 12–14 lbs | 3 – 3¾ hrs |
| 14–18 lbs | 3¾ – 4¼ hrs |
| 18–20 lbs | 4¼ – 4½ hrs |
| 20–24 lbs | 4½ – 5 hrs |
Basting Tips for Juiciness
Baste the turkey every 30–40 minutes with the juices from the pan. If the skin is browning too quickly, tent it with foil.
Checking Doneness with Thermometer
Insert a meat thermometer into the thickest part of the thigh (not touching bone). The turkey is safe to eat when it reaches 165°F (74°C).
Resting and Carving the Turkey
Once your turkey is out of the oven, don’t rush to carve it right away. Resting is one of the most overlooked but crucial steps in baking a turkey.
Why Resting is Crucial
When the turkey cooks, the juices move toward the outer layers of the meat. If you carve it immediately after baking, all those flavorful juices will spill out onto your cutting board, leaving your turkey dry. Resting gives the juices time to redistribute throughout the bird, ensuring every bite is moist and flavorful. Cover the turkey loosely with aluminum foil and let it rest for at least 20–30 minutes before carving.
Carving Techniques for Perfect Presentation
Carving a turkey can be intimidating, but with a few simple techniques, you can slice it neatly and impress your guests:
- Start with the legs and thighs – Cut through the skin between the leg and body, then pull the leg outward until the joint pops. Slice through to remove it completely.
- Separate the drumstick and thigh – Cut along the joint. Place them on your serving platter.
- Remove the wings – Pull each wing away from the body and slice through the joint.
- Carve the breast meat – Slice down along the breastbone, then cut horizontally to remove the entire breast half. Slice it into even strips against the grain.
- Arrange beautifully – Place slices on a platter in layers for a professional presentation.
A sharp carving knife makes all the difference here. You’ll not only get cleaner slices but also waste less meat.
Serving Suggestions
A turkey is only as good as what you serve with it. While the bird is the star, the side dishes and sauces complete the meal.
Side Dishes That Pair Perfectly
- Mashed Potatoes – Creamy, buttery potatoes balance the savory turkey.
- Roasted Vegetables – Carrots, Brussels sprouts, and parsnips add color and texture.
- Stuffing or Dressing – A holiday classic with herbs and bread cubes.
- Cranberry Sauce – Sweet and tangy, it complements the richness of the turkey.
- Green Bean Casserole – Creamy and topped with crispy onions, it’s a crowd favorite.
Sauces and Gravies to Elevate Flavor
Turkey without gravy feels incomplete. Use the drippings in your roasting pan to create a rich, velvety gravy. Skim off excess fat, whisk in some flour for thickening, and add chicken broth or wine for depth of flavor. For a twist, try a honey-mustard glaze or herb-infused butter sauce on the side.
Together, these dishes create a balanced, festive feast that everyone will remember.
Storage and Leftover Ideas
One of the best parts about baking a big turkey is the leftovers. With proper storage, you can enjoy turkey for days without it losing flavor.
Proper Storage Techniques
- Refrigerator: Store leftovers in airtight containers within 2 hours of carving. They’ll last up to 4 days.
- Freezer: Slice turkey into portions, wrap in foil or freezer bags, and freeze for up to 3 months.
Always reheat gently, either in the oven with a splash of broth or in the microwave covered with a damp paper towel to prevent drying out.
Creative Leftover Turkey Recipes
- Turkey Sandwiches – Classic option with lettuce, tomato, and cranberry sauce.
- Turkey Soup – Simmer bones and leftover meat with vegetables for a hearty broth.
- Turkey Pot Pie – Creamy filling topped with flaky pastry.
- Turkey Tacos – Season with spices and load with toppings for a fun twist.
- Turkey Salad – Mix with mayo, celery, and herbs for a refreshing meal.
These ideas ensure not a single bite of your delicious turkey goes to waste.
Common Mistakes to Avoid When Baking Turkey
Even experienced cooks slip up sometimes. Here are the most common turkey mistakes and how to avoid them:
- Not thawing properly – Rushing the thawing process can lead to uneven cooking. Always plan ahead.
- Skipping seasoning under the skin – This leaves the meat bland. Spread butter and spices under the skin for maximum flavor.
- Over-basting – Opening the oven too often drops the temperature, extending cooking time.
- Overcooking – Turkey dries out quickly past 165°F. Always use a thermometer.
- Carving too soon – Skipping the resting step leads to dry, flavorless slices.
By avoiding these mistakes, you’ll guarantee a turkey that’s juicy, flavorful, and beautifully cooked.
Tips and Tricks for the Best Baked Turkey
Want your turkey to turn out restaurant-quality? Here are some expert tips:
- Dry the skin before baking – Patting the turkey dry helps the skin crisp up.
- Use compound butter – Mix butter with garlic, herbs, and lemon zest, then spread under the skin.
- Roast upside down first – Start with the turkey breast-side down for the first hour, then flip it. This keeps the breast meat juicy.
- Don’t rely only on time – Always confirm doneness with a thermometer.
- Let it rest longer if big – For very large turkeys (20+ pounds), resting 45 minutes ensures even juiciness.
These small tweaks make a big difference in the final result.
Nutritional Information
Turkey isn’t just delicious; it’s also packed with nutrients that make it a healthier option compared to many other meats. Knowing the nutritional breakdown can help you appreciate what you’re putting on your plate.
A typical 3.5-ounce (100-gram) serving of roasted turkey breast (without skin) contains:
- Calories: 135
- Protein: 30 grams
- Fat: 1 gram
- Carbohydrates: 0 grams
- Cholesterol: 70 mg
- Sodium: 50 mg
Dark meat (such as thighs and drumsticks) has a slightly higher fat content but also provides more iron and zinc. Turkey is also a rich source of B vitamins (especially B6 and niacin), which help with energy production and brain function.
The key to keeping it healthy lies in the preparation. Avoid excess butter or sugary glazes if you’re watching calories. Opt for fresh herbs, lemon juice, and olive oil for a lighter yet flavorful dish. Pair it with roasted vegetables instead of heavy cream-based sides, and you’ll have a nutritious, well-balanced meal.
FAQs about Baked Turkey Recipe
1. What size turkey should I buy for my family?
Plan for about 1 to 1.5 pounds of turkey per person. If you want leftovers, go for the higher end of that range.
2. Can I bake a turkey without brining it?
Yes, absolutely. Brining helps add moisture, but seasoning generously under the skin and basting while roasting can achieve similar results.
3. Should I cover my turkey while it bakes?
Not the entire time. Keep it uncovered for most of the roasting so the skin crisps, but use foil to tent if it browns too quickly.
4. How do I keep my turkey from drying out?
Butter under the skin, roasting at 325°F, and using a meat thermometer are the best ways to ensure moist turkey. Resting after baking also locks in juices.
5. How long should leftovers last in the fridge?
Leftover turkey will stay fresh in the fridge for up to 4 days if stored properly in airtight containers.
Conclusion
From selecting fresh ingredients and seasoning under the skin to roasting at the right temperature and letting it rest before carving, every step matters. And the best part? Once you’ve mastered this baked turkey recipe, you’ll never look at holiday cooking the same way again. Instead of dreading it, you’ll look forward to the smiles, compliments, and full bellies that follow.
So, whether you’re making it for Thanksgiving, Christmas, or just a special family dinner, this recipe will guide you to turkey perfection. Trust the process, follow the tips, and your baked turkey will be remembered long after the plates are cleared.


