Baked Ribs Recipe: Who doesn’t love a plate full of fall-off-the-bone, sticky, smoky, flavorful ribs? Whether you’re throwing a backyard party, planning a cozy dinner, or just treating yourself, baked ribs are a timeless comfort food that never disappoints. And the best part? You don’t need a smoker or grill to achieve restaurant-quality ribs. Your oven can do all the magic if you follow the right steps.
Why Baked Ribs?
Baking ribs in the oven offers control over temperature and cooking time—two key factors for tenderness. Unlike grilling, which can lead to uneven cooking, baking ensures your ribs are cooked low and slow, evenly and thoroughly. You also get the chance to infuse deep layers of flavor through marinades, dry rubs, and sauces without the risk of flare-ups or burnt edges. Plus, it’s an all-season method. Rain, snow, or shine—you can enjoy perfect ribs straight from your kitchen.
The Secret to Tender and Juicy Ribs
Here’s the truth: the secret isn’t just in the rub or the sauce—it’s in the process. It starts with choosing quality meat, continues with prepping it right, seasoning it generously, baking it low and slow, and finishes with a saucy, sticky glaze. This step-by-step guide takes you through everything so you can replicate it in your own kitchen with total confidence.
Ingredients You’ll Need
Getting the ingredients right is the first step to flavor-packed ribs. While you can get creative with the seasonings, there are some essentials you just can’t skip.
Main Ingredients
Pork Ribs (Baby Back or Spare Ribs) – 2 to 3 pounds
Olive Oil – for coating
Dry Rub Mix:
- Brown sugar
- Paprika
- Onion powder
- Garlic powder
- Salt
- Black pepper
- Chili powder or cayenne (optional for heat)
BBQ Sauce – Homemade or your favorite brand
Optional Flavor Enhancers
- Mustard – to help the rub stick better
- Apple cider vinegar – for moisture and tang
- Liquid smoke – to mimic the smokiness of grilled ribs
- Honey or maple syrup – for sweetness in the glaze
- Crushed red pepper – for heat lovers
Choosing the Right Ribs
Picking the right kind of ribs makes a world of difference in flavor, tenderness, and cooking time. You have a couple of solid options, each with their own perks.
Baby Back vs Spare Ribs
- Baby Back Ribs: Leaner, more tender, and cook faster. These are a favorite for baking because they get super tender in the oven.
- Spare Ribs: Meatier and fattier, with a more intense pork flavor. They take a bit longer to cook but reward you with juicier bites.
If you’re new to ribs, go for baby back ribs—they’re more forgiving and easy to handle.
What to Look for When Buying Ribs
- Marbling: Look for even fat distribution. Fat equals flavor.
- Color: Bright pink or reddish meat indicates freshness.
- Packaging: Avoid ribs with too much liquid or weird smells—this could be a sign they’re not fresh.
Preparing the Ribs
This step is crucial. Skipping proper prep can ruin even the best seasoning or technique. Clean, well-prepped ribs are the foundation of an amazing baked rib dish.
Removing the Membrane
There’s a thin, silver skin on the back of the ribs that doesn’t break down when cooked. It turns rubbery and tough, ruining your bite. Slide a knife under it, lift it up, and then grip it with a paper towel to pull it off. Trust us, this is worth the extra minute.
Applying the Dry Rub
Rub the ribs down with olive oil or a thin layer of mustard first. This helps the seasoning stick. Then, coat both sides generously with your dry rub. Make sure you massage it in—don’t just sprinkle it. Let the ribs sit for at least 30 minutes at room temperature or overnight in the fridge for deeper flavor.
Marinating for Maximum Flavor
Marinating isn’t required, but if you want ribs that are bursting with flavor in every bite, this is a game-changer. You can marinate the ribs overnight in your dry rub or use a wet marinade with apple cider vinegar, garlic, herbs, and spices. Wrap them tightly in foil or place them in a ziplock bag in the fridge for at least 8 hours.
Baking the Ribs
Once your ribs are marinated or rubbed down and ready to go, it’s time to bake them. This is where the transformation happens—from raw meat to mouthwatering, fall-off-the-bone deliciousness.
Low and Slow Method
The golden rule for baking ribs? Low and slow. Preheat your oven to 275°F (135°C). This low temperature allows the fat to render slowly, breaking down the collagen in the meat, resulting in ribs that are tender and juicy. Place the ribs meat-side up on a baking sheet lined with foil or in a large baking dish. Cover the ribs tightly with aluminum foil to trap in the moisture.
Bake them for about 2.5 to 3 hours depending on the thickness. You’ll know they’re ready when a toothpick slides into the meat with no resistance. The meat should pull back slightly from the bone, but not fall apart entirely—that’s the sweet spot.
Wrapping for Moisture
If you want ultra-tender ribs, use the “Texas Crutch” method: wrap the ribs in foil during the bake. Before sealing them up, add a splash of apple juice, apple cider vinegar, or beer inside the foil packet. This creates a steam environment, helping to soften the ribs even more.
When you’re about 30 minutes from finishing, remove the foil and return the ribs to the oven uncovered. This allows the exterior to firm up a bit and preps the surface for the next big step—saucing.
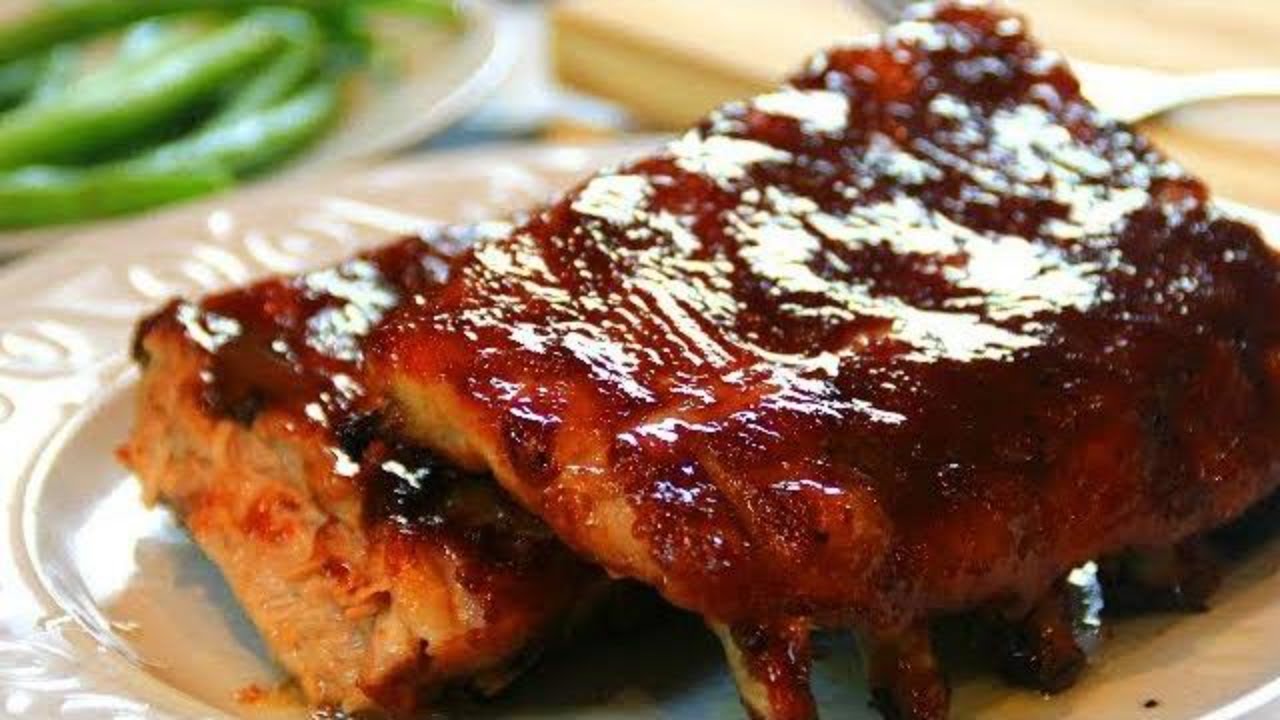
Adding the Sauce
No rib recipe is complete without that rich, sticky layer of BBQ sauce. It’s the signature finish that turns great ribs into a masterpiece.
Homemade BBQ Sauce vs Store-Bought
Sure, you can grab a bottle from the store—but making your own BBQ sauce isn’t as intimidating as it sounds. A basic version includes:
- Ketchup
- Brown sugar
- Apple cider vinegar
- Worcestershire sauce
- Mustard
- Garlic powder
- Smoked paprika
Simmer everything in a saucepan until thickened. You can tweak the spice and sweetness levels to your liking. Homemade BBQ sauce gives you full control and tastes fresher, but if you’re short on time, opt for a quality brand with natural ingredients.
When and How to Apply
Brush your sauce on during the last 30 minutes of baking. If you apply it too early, it could burn due to the sugar content. For maximum flavor and a beautiful glaze, apply a layer of sauce, return the ribs to the oven, let it set for 10 minutes, then repeat the process 2–3 times.
Pro tip: Turn on the broiler for the last 3–5 minutes to caramelize the sauce. Keep an eye on it though—this step can go from perfect to burnt in a flash.
Finishing Touches
Your ribs are almost there, but don’t rush to serve them straight out of the oven. A few final steps will elevate your dish from good to unforgettable.
Broiling for Crispiness
Want that sticky, charred finish like you get from a BBQ joint? After you’ve sauced the ribs and baked them a final time, place them under the broiler for a few minutes. This intensifies the flavor and texture by caramelizing the sugars in the sauce.
Make sure to broil on high, but keep the ribs on the middle rack and monitor constantly. You’re looking for bubbling sauce and slight browning—don’t walk away, or you might burn them.
Resting Before Serving
Once out of the oven, let the ribs rest for 10–15 minutes before slicing. This helps the juices redistribute throughout the meat, keeping every bite tender and moist. Slice between the bones, serve hot, and prepare for praise.
Serving Suggestions
Ribs on their own? Great. But ribs paired with the right sides and drinks? Game-changing.
Side Dishes That Pair Well
- Coleslaw: Crunchy and refreshing to balance the richness.
- Cornbread: Sweet, crumbly perfection.
- Baked Beans: Hearty and smoky, a classic combo.
- Mac and Cheese: Creamy, cheesy heaven next to those ribs.
- Grilled Corn on the Cob: Adds a charred, juicy bite.
Choose one or mix and match. The key is balance—some light, some rich, all delicious.
Beverage Pairings
- Beer: A cold lager or pale ale complements the smokiness.
- Sweet Tea or Lemonade: For a Southern-style feast.
- Red Wine: Try a Zinfandel or Shiraz for depth and spice.
- Iced Cocktails: Bourbon-based drinks or citrusy spritzers go wonderfully with BBQ flavors.
Storing and Reheating Leftovers
So, you went all in on those ribs and somehow—miraculously—have leftovers. Good news: baked ribs reheat beautifully if stored properly.
Storing Leftover Ribs:
Let the ribs cool down to room temperature before storing them. Wrap them tightly in aluminum foil or plastic wrap, or store in an airtight container. Pop them into the fridge, and they’ll stay good for 3 to 4 days.
If you want to store them longer, freezing is your best bet. Wrap each portion in foil, then place them in a freezer-safe bag or container. They’ll keep for up to 3 months. Just be sure to label them with the date so you remember when they were made.
Reheating Tips:
- Oven Method: The best way to reheat ribs without drying them out. Preheat the oven to 275°F, wrap the ribs in foil, and bake for 20–30 minutes. You can add a splash of broth or water to keep them moist.
- Microwave: Quick but can dry them out. Place the ribs in a microwave-safe dish with a damp paper towel on top. Heat in 30-second intervals until warm.
- Skillet: If you like a crispy edge, reheat the ribs in a hot skillet with a touch of oil or butter for a few minutes on each side.
Always make sure your ribs are heated through to the center before serving again.
Common Mistakes to Avoid
Even seasoned cooks mess up ribs sometimes. Here are a few common pitfalls to dodge:
- Skipping the Membrane Removal: This is one of the biggest mistakes. That chewy skin doesn’t break down with heat and ruins the texture.
- Overcooking or Undercooking: Ribs need to cook long enough to break down the connective tissue. Stick to the low and slow method.
- Adding BBQ Sauce Too Early: BBQ sauce burns fast due to its sugar content. Add it only in the last 30 minutes.
- Not Letting the Ribs Rest: Cutting too early lets the juices escape. Resting makes a huge difference in tenderness.
- Using Cold Ribs: Let your ribs come to room temperature before baking to ensure even cooking.
Avoid these, and you’ll be well on your way to mastering the baked rib game.
Tips for First-Timers
If this is your first rodeo with baked ribs, don’t sweat it. Here are some tried-and-true tips that can save you from rookie mistakes:
- Use a Meat Thermometer: Check for internal temperature of 190–203°F for ultra-tender ribs.
- Start Simple: Stick with a basic dry rub and one sauce before experimenting.
- Make It a Day Ahead: Baked ribs taste even better the next day as the flavors deepen.
- Use Foil Wisely: It locks in moisture during baking but remove it near the end to let the crust develop.
- Don’t Rush It: Good ribs are a labor of love. Give yourself at least 3–4 hours from prep to plate.
You’ve got this. And once you nail it, you’ll be known for your ribs—guaranteed.
FAQs about Baked Ribs Recipe
1. Can I bake ribs without foil?
Yes, you can, but wrapping them in foil helps retain moisture and tenderness. Without foil, you may end up with drier ribs, though they’ll be a bit crispier.
2. How do I make my ribs more tender?
Bake at a low temperature (275°F) for several hours and consider wrapping them in foil with a splash of apple juice or vinegar. The key is to cook them slowly so the connective tissue breaks down.
3. What’s the best temp for baking ribs?
275°F is the sweet spot for fall-off-the-bone tenderness. It’s hot enough to cook thoroughly and low enough to keep them moist.
4. Should I boil ribs before baking?
Boiling is not necessary and can actually strip the meat of flavor. Instead, use a slow oven bake and let the natural juices do their thing.
5. Can I freeze baked ribs?
Absolutely. Wrap tightly and freeze for up to 3 months. Thaw in the fridge overnight and reheat in the oven for best results.
Conclusion
Baking ribs in the oven is a foolproof way to achieve delicious, juicy, and tender meat without needing a grill or smoker. Whether you’re making them for a casual weeknight dinner or a big backyard bash, this method ensures flavorful results every single time. With the right rub, a good sauce, and some patience, you’ll turn a simple slab of ribs into a mouthwatering masterpiece. So roll up your sleeves, preheat the oven, and let your kitchen be filled with the irresistible smell of perfectly baked ribs. Trust me—your taste buds will thank you.