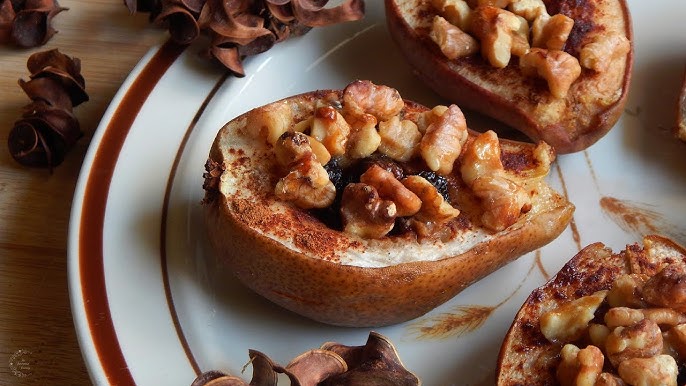
Baked Pears Recipe: Baked pears are like a hug in dessert form—warm, cozy, and deliciously fragrant. If you’ve never tried baking pears before, you’re in for a treat. These naturally sweet fruits take on a whole new depth of flavor when roasted, turning tender and caramelized with every minute in the oven. Whether you’re aiming to impress dinner guests or just indulge in a guilt-free weeknight dessert, baked pears are the perfect solution.
But let’s be honest—desserts can sometimes be overwhelming with all the sugar and fuss. That’s what makes baked pears such a standout. They’re simple, require minimal ingredients, and can be customized endlessly based on your cravings or what’s already in your pantry.
And the best part? They’re naturally sweet, which means you can skip the sugar overload and still get that dessert satisfaction. So, roll up your sleeves and grab a baking dish—it’s time to transform those pears into something extraordinary.
Why Baked Pears Are a Must-Try Dessert
You might be wondering, “Why should I bake pears instead of just eating them raw?” Good question. While fresh pears are undeniably juicy and tasty, baking them brings out a deep, rich flavor that’s hard to beat. The natural sugars in the fruit caramelize beautifully under heat, making them taste like a luxurious dessert with barely any effort.
Plus, they pair exceptionally well with spices like cinnamon, nutmeg, and cloves, not to mention ingredients like honey, nuts, and even cheese for the more adventurous foodies out there. You don’t have to be a gourmet chef to whip these up—if you can slice a pear and turn on an oven, you’re good to go.
Whether you’re aiming for an elegant dinner party finish or a healthy after-school snack for your kids, baked pears offer something for everyone. And let’s not forget—they make your kitchen smell absolutely divine.
Health Benefits of Pears
Beyond their sweet taste and culinary versatility, pears are a nutritional powerhouse. One medium pear provides about 6 grams of fiber, which is a significant chunk of your daily recommended intake. Fiber is great for digestion, helps lower cholesterol, and can even aid in weight management by keeping you fuller longer.
Pears are also packed with vitamins like C and K and offer a nice dose of antioxidants, which help your body fight inflammation and disease. And since they’re naturally low in calories and high in water content, they make an excellent choice for anyone trying to maintain a balanced diet.
Baking them doesn’t strip away those benefits, either. In fact, it’s a smart way to make a wholesome snack feel indulgent. So you’re not just treating your taste buds—you’re doing your body a favor, too.
Ingredients You’ll Need
Getting started with baked pears is delightfully easy, and you probably already have most of the ingredients at home. Here’s what you’ll need:
- 2–4 ripe but firm pears (like Bosc or Anjou)
- 1–2 tablespoons of honey or maple syrup
- 1 teaspoon ground cinnamon
- ¼ teaspoon nutmeg (optional)
- 1 teaspoon vanilla extract
- 2 tablespoons chopped nuts (walnuts, pecans, or almonds)
- A few pats of butter (optional but recommended)
- Pinch of sea salt
- Optional toppings: Greek yogurt, whipped cream, or ice cream
Feel free to double the recipe if you’re serving a crowd or want leftovers for tomorrow’s breakfast (yes, these are breakfast-worthy!).
Choosing the Right Type of Pear
Not all pears are created equal when it comes to baking. Some turn to mush, while others hold their shape beautifully. Your best bets are:
- Bosc Pears – Firm, slightly spicy, and great for baking.
- Anjou Pears – Sweet, juicy, and hold up well under heat.
- Concorde Pears – A cross between Conference and Comice, perfect for dessert dishes.
Avoid Bartlett pears if possible—they tend to get overly soft and lose their structure when baked.
Firmness is key here. You want pears that are ripe enough to eat but still firm to the touch. That way, they’ll soften just the right amount in the oven without falling apart.
Optional Ingredients for Extra Flavor
Once you’ve got the basic ingredients ready, it’s time to think about upping your flavor game. Baked pears are wonderfully versatile, meaning you can tweak the recipe to suit your taste buds or what you’ve got in the pantry. Want to make them taste like a gourmet dessert from a five-star restaurant? Just a few extras will do the trick.
Here are some optional add-ins to take your baked pears from simple to sensational:
- Dried fruits: A sprinkle of raisins, cranberries, or chopped dates can add a sweet-tart contrast.
- Citrus zest: Grated lemon or orange zest brings a bright pop of flavor.
- Liquor or wine: A splash of brandy, rum, or red wine adds depth and complexity.
- Fresh herbs: A sprig of rosemary or thyme baked alongside the pears adds an earthy aroma.
- Chocolate chips or shavings: Because, let’s face it, chocolate makes everything better.
- Coconut flakes: Adds a tropical twist to your dish.
These ingredients aren’t required, but they sure do elevate the dish. Feel free to experiment with different combos and find your personal favorite.
Step-by-Step Instructions
Let’s get down to business—the real star of the show. This step-by-step process is straightforward, and you’ll go from prep to plate in under an hour. Here’s how to create baked pears that are tender, caramelized, and full of flavor.
Step 1: Preparing the Pears
Start by washing and drying your pears. You don’t need to peel them—the skin helps the fruit hold its shape and adds fiber. Cut each pear in half lengthwise and scoop out the core using a melon baller or spoon. You can also trim the bottoms slightly so they sit flat in the baking dish.
If your pears have very small seeds or stems, remove those too. Place the halved pears cut-side up in a baking dish. Make sure there’s enough space between them so they cook evenly.
At this stage, you can brush the cut sides with a little lemon juice if you’re worried about browning. It also adds a subtle tang that balances the sweetness.
Step 2: Creating the Filling
In a small bowl, mix together your chopped nuts, honey or maple syrup, vanilla extract, cinnamon, and nutmeg. This will be your filling and topping, so feel free to make it as chunky or smooth as you like. If you’re going for a richer taste, add a tiny pat of butter to each pear half before adding the filling.
Spoon the mixture into the hollowed-out cores of each pear. Don’t worry if it spills over a bit—it’ll only add to the caramelized goodness in the baking dish.
Want a healthier version? Skip the butter and reduce the honey. Looking for decadence? Add dark chocolate chips or crushed gingersnap cookies into the mix.
Step 3: Assembling the Dish
Now that your pears are filled and ready, it’s time to build some flavor in the baking dish. Pour a few tablespoons of water, apple juice, or even wine around the pears—this helps keep them moist and prevents burning.
You can also sprinkle extra cinnamon or drizzle a little more honey across the tops. Cover the dish loosely with foil if you’re baking for longer or want softer pears, or leave it uncovered for a golden, caramelized top.
Make sure your oven is preheated to 375°F (190°C). Place the dish on the middle rack, and let the oven do its magic.
Step 4: Baking the Pears
Bake the pears for about 30 to 35 minutes, depending on the size and ripeness. You’ll know they’re ready when a knife slides easily into the flesh. If they need more time, give them another 5 to 10 minutes.
Halfway through baking, baste the pears with the juices in the bottom of the pan. This step adds moisture and intensifies the flavor.
If you want a more caramelized finish, remove the foil during the last 10 minutes. Watch closely to avoid burning the filling.
Once done, take them out and let them cool for a few minutes. The aroma will be irresistible, but letting them sit allows the flavors to settle.
Step 5: Serving Suggestions
Baked pears are incredibly versatile, and how you serve them is totally up to you. Want something elegant? Plate them with a dollop of mascarpone or crème fraîche. Craving comfort? Top with vanilla ice cream and a drizzle of caramel sauce.
Here are a few delicious serving ideas:
- Breakfast style: Serve warm with Greek yogurt, granola, and a splash of almond milk.
- Dessert mode: Top with whipped cream or ice cream and crushed nuts.
- Savory twist: Pair with blue cheese and toasted walnuts for an appetizer-style dish.
- Holiday flair: Garnish with pomegranate seeds and a dusting of powdered sugar.
These pears are best enjoyed warm, but they’re just as tasty chilled the next day. Store leftovers in an airtight container in the fridge for up to 3 days.
Tips for Perfect Baked Pears Every Time
Baking pears may seem foolproof—and for the most part, it is—but a few expert tricks can take your dish from good to unforgettable. Whether you’re new to baking or a seasoned home chef, these tips will help ensure flawless results every single time.
Avoiding Common Mistakes
- Don’t use overripe pears: While soft pears are great for smoothies, they’ll turn mushy when baked. Always go for firm, ripe pears that hold their shape.
- Avoid overcrowding: Give your pears space in the baking dish so heat can circulate evenly. If they’re too cramped, they’ll steam instead of roast.
- Watch the baking time: Ovens can vary, so check the pears after 25 minutes. You want them tender, not falling apart.
- Mind the liquid: Too much juice or water can make the dish soggy. You only need a few tablespoons to keep them moist.
- Don’t skip the filling: Even a simple drizzle of honey and sprinkle of cinnamon can elevate the flavor dramatically.
By steering clear of these pitfalls, you’ll ensure your pears turn out beautifully tender with just the right balance of sweetness and spice.
Flavor Enhancements
Want to create a gourmet-level dessert with little effort? Try these enhancements:
- Use browned butter: Browned butter adds a nutty richness that regular butter just can’t match.
- Drizzle with balsamic glaze: A sweet, tangy balsamic reduction pairs wonderfully with the natural sugars in pears.
- Serve with cheese: Pears and cheese are a match made in heaven. Try goat cheese for tang or brie for creaminess.
- Add a crunch element: A topping of toasted oats or a spoonful of granola adds a satisfying crunch and contrast.
The beauty of baked pears is that they’re like a blank canvas. You can go simple or sophisticated, traditional or bold—it’s all up to your palate.
Variations and Customizations
Let’s face it: not every diet or preference is the same. That’s why baked pears are such a hit—you can customize them in endless ways without sacrificing flavor. Whether you’re trying to cut dairy, please picky eaters, or create something Instagram-worthy, these variations have got you covered.
Vegan and Dairy-Free Options
Skip the butter and opt for coconut oil or vegan margarine. Maple syrup works beautifully as a sweetener, and dairy-free toppings like coconut whipped cream or almond yogurt are fantastic additions.
For a nut-free version, try sunflower seeds, pumpkin seeds, or even toasted oats for crunch. Want to make it even healthier? Ditch added sweeteners altogether and let the natural sugars in the pear shine.
Don’t be afraid to experiment. This recipe is forgiving, and even the simplest version will taste like something straight out of a fancy dessert menu.
Kid-Friendly Versions
Kids love sweet treats, and baked pears are a sneaky way to get them to eat more fruit. For a child-friendly version, stick to mild flavors:
- Skip the nuts if there’s an allergy risk.
- Add a sprinkle of cinnamon sugar on top.
- Serve with a scoop of vanilla ice cream or a drizzle of chocolate sauce.
- Let them decorate their own pear halves with toppings like raisins, granola, or mini chocolate chips.
Make it interactive—kids can help scoop out the cores or stir the filling. When they help make it, they’re more likely to enjoy it.
FAQs about Baked Pears Recipe
1. Can I prepare baked pears in advance?
Yes! You can prepare them up to a day ahead and reheat in the oven at 300°F for 10–15 minutes. They’re also tasty cold.
2. What’s the best type of pear for baking?
Bosc and Anjou pears are the best because they stay firm and hold their shape during baking.
3. Can I freeze baked pears?
Yes, but they may become softer after thawing. Freeze in an airtight container and reheat gently in the oven.
4. Are baked pears healthy?
Absolutely! They’re naturally sweet, high in fiber, and can be made with minimal added sugar.
5. Can I use apples instead of pears?
Yes, the same method works for apples—just adjust baking time depending on the apple variety.
Conclusion
Baked pears are proof that a few simple ingredients and a little oven time can yield a show-stopping dessert. They’re warm, flavorful, and endlessly customizable—ideal for casual family dinners or elegant dinner parties alike. Whether you’re baking them for health reasons or simply because you’ve got some ripe pears lying around, this recipe delivers every single time.
From their naturally sweet flavor to their soft, caramelized texture, baked pears are a celebration of what dessert should be: easy, wholesome, and absolutely delicious. Give this recipe a try, and don’t be surprised if it becomes a regular in your dessert rotation.