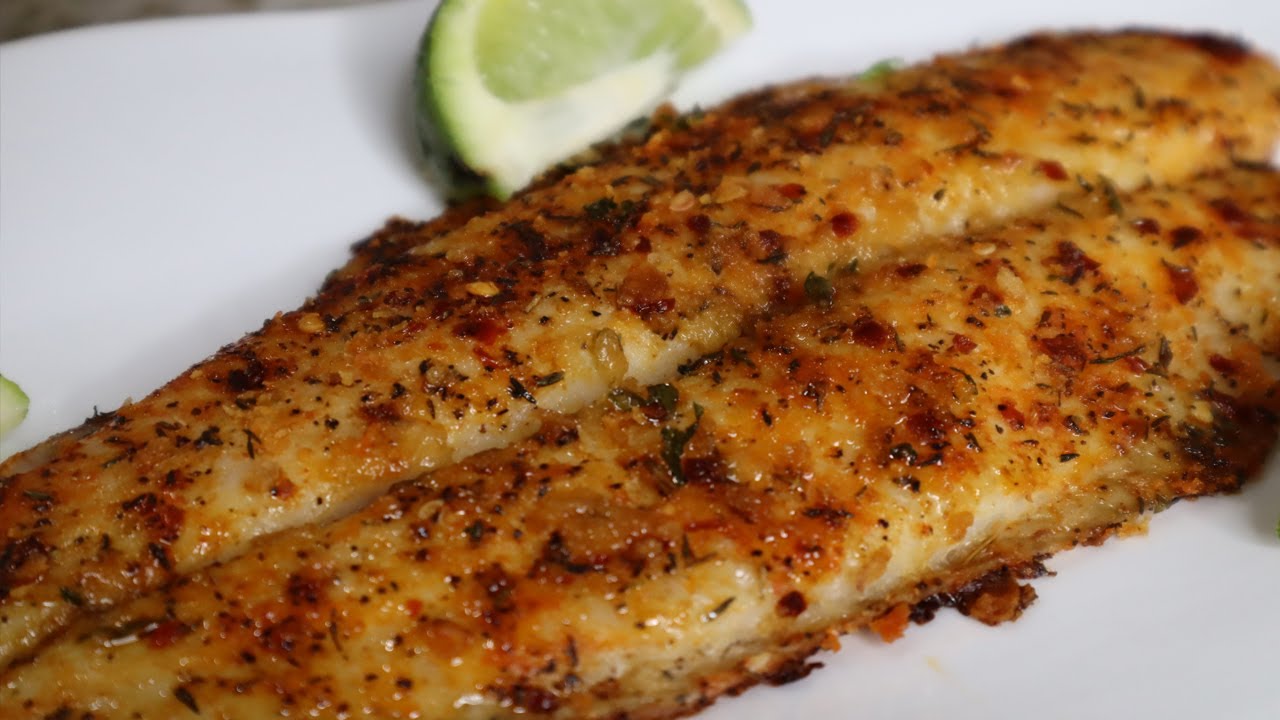
Baked Flounder Recipe: Looking for a healthy, delicious seafood dish that’s easy to make at home? Meet your new kitchen favorite—baked flounder. This mild, flaky fish is the unsung hero of weeknight dinners and special occasions alike. It cooks quickly, pairs well with a variety of sides, and absorbs flavors like a dream.
Why choose flounder? For one, it’s a lean source of protein, making it perfect for those keeping an eye on their calorie intake. Its delicate texture and light flavor also make it a versatile canvas for a range of herbs, spices, and sauces. Plus, baking—unlike frying—requires minimal oil, helping retain the nutritional benefits without sacrificing taste.
Baked flounder isn’t just easy—it’s practically foolproof. Whether you’re a beginner in the kitchen or an experienced home cook, this dish comes together in less than 30 minutes. You don’t need fancy techniques or obscure ingredients to impress with this recipe. Just a little prep, a sprinkle of seasoning, and a short bake in the oven, and you’re golden.
In this detailed, step-by-step guide, we’ll walk you through everything from selecting your fish to serving it on a plate. You’ll also pick up expert tips and tricks to elevate your dish from good to unforgettable. Let’s dive into this ocean-fresh culinary adventure!
Ingredients Needed for Baked Flounder
Before you start cooking, let’s make sure your kitchen is stocked with everything you need. The beauty of this baked flounder recipe is its simplicity. Most ingredients are pantry staples, so you probably already have them on hand.
Core Ingredients:
- 4 flounder fillets (about 6 oz each)
- 2 tablespoons olive oil or melted butter
- 2 cloves garlic, minced
- Juice of 1 lemon
- Zest of 1 lemon
- Salt and black pepper to taste
- 1 teaspoon paprika (for a subtle kick)
- 1 tablespoon chopped fresh parsley (for garnish)
Optional Add-Ons:
- 1/4 cup grated Parmesan cheese for a cheesy crust
- 1 teaspoon Italian seasoning or dried thyme
- A dash of cayenne pepper for heat
- Sliced onions or bell peppers for added texture
- Capers or olives for a briny, Mediterranean flavor
You can customize the recipe depending on your mood or what’s available in your pantry. Want something zesty and light? Stick to lemon and herbs. Craving something richer? Add Parmesan and butter. This flexibility makes baked flounder an ideal go-to meal, regardless of your dietary preferences.
Preparing the Flounder
If you’re buying pre-filleted flounder, you’re already ahead of the game. But if you’re starting with whole fish, here’s a quick guide to prepping it like a pro.
How to Clean and Fillet Flounder:
- Rinse Thoroughly: Rinse the fish under cold water and pat it dry with paper towels.
- Scale It (If Necessary): Use a fish scaler or the back of a knife to remove any remaining scales.
- Make an Incision: With a sharp knife, cut along the spine from head to tail.
- Lift the Fillet: Gently slide the knife under the flesh, staying close to the bones. Remove the fillet and repeat on the other side.
Not in the mood for DIY filleting? No worries—just ask your fishmonger to do it for you. When choosing fillets, look for firm, translucent flesh without any fishy odor. Freshness is key to flavor.
Tips for Buying the Best Fillets:
- Color Check: Fresh flounder should have a pearly white appearance with no browning.
- Smell Test: It should smell like the sea—not fishy or sour.
- Firmness: Press the fillet gently. It should spring back, not leave a dent.
Good preparation is half the battle. With your fillets ready, you’re all set to move to the fun part—baking!
Step-by-Step Instructions for Baking Flounder
Let’s get into the nitty-gritty of baking flounder. These steps are straightforward, but paying attention to detail can elevate your dish significantly.
Step 1: Preheat the Oven
Preheat your oven to 375°F (190°C). A consistent temperature ensures even cooking. If you’re using a convection oven, reduce the temperature slightly—about 350°F should do the trick. Preheating is a small step that makes a big difference. It prevents undercooking and helps develop that subtle, crispy edge.
Step 2: Prepare the Baking Dish
Lightly grease a glass or ceramic baking dish with olive oil or non-stick spray. Lay down a bed of sliced lemons or onions for added moisture and flavor. This simple trick not only prevents sticking but also infuses your fish with a delicate aroma as it bakes.
Alternatively, you can line the dish with parchment paper for easier cleanup.
Step 3: Season the Flounder
Place the flounder fillets in the dish, making sure they don’t overlap. Drizzle with olive oil or brush with melted butter for richness. Sprinkle minced garlic, salt, black pepper, paprika, and lemon zest over the top.
Want to jazz it up? Add a sprinkle of Parmesan or a pinch of Italian herbs. You can even drizzle a bit of white wine over the fish for a restaurant-style flair.
Step 4: Bake to Perfection
Slide your dish into the preheated oven. Bake for 12 to 15 minutes, or until the fish flakes easily with a fork. The internal temperature should reach 145°F (63°C). Keep an eye on it—flounder is delicate and overcooks fast.
If you’re using cheese, turn on the broiler for the last 2 minutes to brown the top.
Step 5: Garnish and Serve
Once done, remove the dish from the oven and let it rest for 2 minutes. Garnish with fresh parsley and a squeeze of lemon juice.
Serve immediately with your favorite sides—think steamed veggies, roasted potatoes, or a fresh garden salad. It’s light, flavorful, and satisfying.
Tips for Perfectly Baked Flounder
Perfecting your baked flounder isn’t rocket science, but a few expert tips can help elevate your dish from “good” to “absolutely mouthwatering.” If you’ve ever had dry or flavorless fish, chances are it was either overcooked or under-seasoned. Here’s how to avoid those rookie mistakes and get it just right.
1. Don’t Overcook It
Flounder is an extremely delicate fish. It only needs about 12–15 minutes in the oven at 375°F. The moment the flesh turns opaque and flakes easily with a fork, it’s done. Go beyond that, and you risk a rubbery texture that nobody enjoys.
Want to be extra sure? Use a meat thermometer. The internal temperature should read 145°F (63°C). This ensures the fish is fully cooked without going overboard.
2. Use Fresh Lemon and Herbs
It might seem like a small detail, but using fresh lemon juice and herbs (like parsley or dill) instead of dried ones can significantly boost the flavor. Fresh ingredients bring out the natural sweetness of the flounder, while dried ones can sometimes taste muted or bitter after baking.
Add lemon zest before baking and a squeeze of lemon juice right after it comes out of the oven. That burst of acidity brightens the dish and balances the richness of the butter or oil.
3. Season Both Sides
It’s easy to sprinkle your seasonings on just the top of the fish and call it a day. But for full-on flavor, lightly season both sides. A quick rub of salt, pepper, and your chosen spices on both the bottom and top of the fillet ensures every bite is seasoned to perfection.
4. Try a Light Crust
If you want something with a bit more texture, sprinkle a thin layer of seasoned breadcrumbs or grated Parmesan over the top of the fillets before baking. This adds a subtle crunch without overpowering the flounder’s delicate taste.
5. Add Moisture Boosters
Want even more flavor and moisture? Add thin slices of lemon or onion on top of the fish while it bakes. You could also bake the flounder in a light white wine and butter sauce. It creates a steamy environment that keeps the fish moist and flavorful throughout the cooking process.
6. Rest Before Serving
Once your flounder is out of the oven, give it a couple of minutes to rest before serving. This lets the juices redistribute evenly and helps avoid a watery plate. Resting also gives the garnishes like fresh herbs or a drizzle of sauce a better chance to cling to the fillet.
With these tips in your toolkit, your baked flounder will not only be easy but restaurant-worthy every time you make it.
Serving Suggestions for Baked Flounder
So your flounder is baked to perfection—now what? Presentation and pairing can transform your dish from a simple weeknight meal into a complete dining experience. Baked flounder is incredibly versatile, meaning you can serve it with a wide variety of sides, sauces, and beverages.
1. Classic Side Dishes
Sometimes, sticking with the classics is the best route. Here are a few go-to sides that complement the light, flaky texture of flounder beautifully:
- Steamed or sautéed vegetables – Think green beans, asparagus, or broccoli tossed with garlic and olive oil.
- Roasted potatoes – Golden, crispy potatoes seasoned with rosemary and sea salt add a hearty touch.
- Rice pilaf or couscous – These grains absorb sauces well and provide a neutral base to highlight the fish’s flavors.
2. Low-Carb Options
If you’re eating light or following a low-carb diet, baked flounder fits right in. Try pairing it with:
- Cauliflower mash – A creamy, satisfying alternative to mashed potatoes.
- Zoodles (zucchini noodles) – Toss them in olive oil and lemon for a fresh, veggie-rich dish.
- Kale or spinach salad – Add nuts, cranberries, and a citrus vinaigrette for a flavorful punch.
3. Sauces and Toppings
Although flounder doesn’t need much help in the flavor department, a simple sauce or topping can elevate it to something special:
- Garlic lemon butter sauce – Melt butter, mix in minced garlic and lemon juice, and drizzle it over the fillet.
- Herb cream sauce – Blend Greek yogurt or sour cream with dill, chives, and lemon zest.
- Pico de gallo or mango salsa – For a refreshing, slightly spicy twist.
4. Beverage Pairings
Wondering what to drink with baked flounder? Try these:
- White wine – Sauvignon Blanc, Pinot Grigio, or Chardonnay are excellent choices.
- Sparkling water with citrus – Keeps it refreshing and light.
- Light beer – A crisp lager or pilsner complements the delicate fish nicely.
Creating a balanced, beautiful plate doesn’t require a culinary degree. Just mix and match flavors and textures to suit your taste and enjoy the feast.
Health Benefits of Baked Flounder
Besides being delicious and easy to prepare, baked flounder is also a powerhouse of nutrition. If you’re trying to eat healthier or just want to feel good about your dinner, this dish checks all the right boxes.
1. Low in Calories and Fat
One of the biggest perks of flounder is that it’s naturally low in calories and fat. A 6-ounce serving has less than 200 calories, making it an excellent choice for weight-conscious eaters. When baked instead of fried, you avoid unnecessary oils and keep it even healthier.
2. High in Protein
Protein is essential for muscle repair, immune function, and energy. Flounder offers around 20 grams of high-quality protein per serving, helping you stay full and satisfied longer.
3. Rich in Omega-3 Fatty Acids
Though not as high in omega-3s as fatty fish like salmon, flounder still provides a moderate amount of these heart-healthy fats. Omega-3s help reduce inflammation, lower blood pressure, and improve brain function.
4. Packed with Vitamins and Minerals
Flounder is a good source of:
- Vitamin B12 – Important for energy and nervous system health.
- Selenium – A powerful antioxidant that supports thyroid and immune function.
- Phosphorus – Vital for strong bones and teeth.
Adding fresh herbs, lemon, and garlic not only enhances the flavor but also adds their own health-boosting properties like antioxidants and anti-inflammatory compounds.
5. Naturally Gluten-Free
If you’re gluten intolerant or have Celiac disease, baked flounder is a safe and satisfying meal. Just make sure any additional ingredients (like breadcrumbs or sauces) are gluten-free.
Eating healthy doesn’t mean sacrificing taste. With baked flounder, you get the best of both worlds: nourishing ingredients and mouthwatering flavor in every bite.
Common Mistakes to Avoid When Baking Flounder
Even though baked flounder is a beginner-friendly recipe, there are still a few pitfalls that can derail your culinary plans. Here are the most common mistakes to avoid—and how to fix them—so your flounder comes out perfect every single time.
1. Overbaking the Fish
This is the #1 mistake. Flounder fillets are thin and delicate, so they cook very quickly. Leaving them in the oven for even 5 extra minutes can turn them dry and tough. Always monitor the fish closely during the last few minutes of baking, and check for doneness by gently pressing with a fork.
2. Not Preheating the Oven
Some people think preheating the oven is optional—it’s not. Putting flounder into a cold or unevenly heated oven can affect the cooking time and texture. Always preheat your oven to the specified temperature before sliding in your dish.
3. Using Too Much Liquid
While a splash of lemon juice or white wine can add flavor and moisture, too much liquid in the baking dish can lead to soggy, watery fish. Aim for just enough to enhance the flavor without drowning the fillets.
4. Forgetting to Season the Underside
It’s easy to season just the top and forget the rest. Lightly seasoning the underside of the fillet helps ensure even flavor throughout. You don’t need to go overboard—just a pinch of salt and pepper will do.
5. Skipping the Resting Time
Letting the fish rest for a minute or two after baking allows the juices to redistribute, making every bite moist and flavorful. Cutting into the flounder too soon can result in dry spots and less cohesive flavor.
6. Using Dull Knives for Prep
If you’re filleting your own flounder, a dull knife can butcher the job—literally. Always use a sharp, flexible fillet knife for cleaner cuts and safer handling.
7. Not Tasting Before Serving
Seasonings can vary based on personal preference, so always give a quick taste before you serve the dish. Adjust salt, acidity (lemon), or herbs if needed to suit your palate.
By being aware of these potential blunders, you can avoid disappointment and ensure your flounder turns out tender, flavorful, and irresistibly good every time.
Storing and Reheating Leftovers
So you’ve got some baked flounder left—lucky you! Knowing how to properly store and reheat it can make all the difference between a satisfying second meal and a rubbery mess.
How to Store Baked Flounder:
- Refrigerator: Store leftovers in an airtight container within two hours of cooking. Properly stored, flounder will last for up to 3 days in the fridge.
- Freezer: If you want to keep it longer, you can freeze it. Wrap each fillet tightly in plastic wrap or foil, then place it in a freezer-safe bag or container. It will stay good for up to 3 months.
Best Reheating Methods:
- Oven (Best Option): Preheat to 275°F, place the fish in a baking dish with a splash of water or broth, and cover with foil. Heat for about 10–15 minutes.
- Microwave (Quick Fix): Place on a microwave-safe plate, cover with a damp paper towel, and reheat on medium power for 1–2 minutes. Be careful not to overheat.
- Stovetop: Heat in a non-stick pan over low heat with a little oil or butter. Flip gently and cook until warm.
Pro Tip: Add a bit of fresh lemon juice or herbs after reheating to revive the flavor.
Avoid reheating more than once. The more you reheat fish, the more the texture and flavor will deteriorate. Store and reheat smartly for meals that are just as delicious the next day.
FAQs About Baked Flounder Recipe
Q1: What is the best temperature to bake flounder?
A: The ideal temperature to bake flounder is 375°F (190°C). This allows the fish to cook evenly and retain its moisture without drying out.
Q2: How long should I bake flounder in the oven?
A: Bake flounder for 12–15 minutes, depending on the thickness of the fillet. It’s done when the fish flakes easily with a fork and is opaque throughout.
Q3: Should I cover flounder while baking?
A: It’s not necessary to cover flounder while baking unless you want it extra moist. Leaving it uncovered gives it a nice, slightly crispy top.
Q4: What spices go well with baked flounder?
A: Popular seasonings include lemon pepper, garlic powder, paprika, dill, parsley, and a touch of salt and black pepper. A squeeze of lemon juice enhances flavor too.
Q5: Can I bake flounder from frozen?
A: Yes, you can bake flounder from frozen. Just add 5–10 extra minutes to the cooking time and ensure the internal temperature reaches 145°F (63°C).
Q6: Is baked flounder healthy?
A: Absolutely! Baked flounder is low in fat, high in protein, and a great source of omega-3 fatty acids. Baking it with minimal oil makes it even healthier.
Q7: What side dishes go well with baked flounder?
A: Baked flounder pairs wonderfully with steamed vegetables, rice pilaf, roasted potatoes, or a fresh garden salad.
Q8: Can I use foil when baking flounder?
A: Yes, baking flounder in aluminum foil helps lock in moisture and makes for easy cleanup. It’s great for adding herbs, butter, or lemon slices for extra flavor.
Conclusion
Baked flounder is the kind of dish that checks all the right boxes: it’s quick, healthy, delicious, and surprisingly versatile. Whether you’re looking to whip up a fast weeknight meal or impress guests at a dinner party, this step-by-step guide gives you everything you need to succeed.
With the right ingredients, a few smart techniques, and a dash of creativity, you can transform a simple piece of fish into a gourmet experience. Don’t be afraid to experiment with spices, sides, and sauces—baked flounder is your canvas, and you’re the artist.
So preheat that oven, grab your flounder fillets, and get ready to enjoy a seafood sensation that’s sure to become a staple in your home. Bon appétit!