Baked Chicken Drumstick Recipe: There’s something truly comforting about biting into a perfectly baked chicken drumstick—crispy on the outside, tender and juicy on the inside. Whether you’re making a weeknight dinner, meal-prepping for the week, or hosting a small gathering, baked drumsticks never disappoint. Unlike fried chicken, which can be greasy and heavy, baked drumsticks give you the same rich flavor and satisfying crunch but in a healthier, guilt-free way.
The beauty of this dish lies in its simplicity. With just a few basic seasonings, some pantry staples, and an oven, you can whip up a delicious meal in under an hour. It’s versatile, customizable, and appeals to both kids and adults alike. No matter your cooking skill level, you’ll find this recipe easy to follow—and once you master it, you can get creative with different marinades and spices.
So, if you’re ready to turn a simple pack of chicken drumsticks into a mouthwatering masterpiece, let’s dive into this step-by-step guide that will make your baked chicken drumsticks a crowd favorite every single time.
Why Choose Drumsticks?
When it comes to chicken, every cut has its charm—but drumsticks are hands down one of the best options for home cooks. Here’s why:
- Affordable – Compared to chicken breast or wings, drumsticks are much cheaper while still delivering amazing flavor. You can easily cook for a family without breaking the bank.
- Flavorful & Juicy – Thanks to the bone and dark meat, drumsticks naturally stay moist and flavorful. Unlike chicken breast, which can dry out quickly, drumsticks are forgiving even if you bake them a little longer.
- Easy for Beginners – If you’re new to cooking, drumsticks are perfect. They don’t require fancy techniques, and they almost always come out delicious as long as you season them properly and cook them through.
- Versatile – From classic garlic butter to fiery hot marinades, drumsticks pair beautifully with almost any seasoning. You can go mild for kids or kick it up with spices for adults.
- Perfect for Any Occasion – Whether it’s a casual weeknight meal, a backyard BBQ, or even meal prep for the week, drumsticks adapt easily. They taste just as good fresh out of the oven as they do reheated the next day.
In short, drumsticks are the ultimate “beginner-friendly yet chef-approved” cut of chicken. Once you bake them right, you’ll wonder why you didn’t make them sooner.
Ingredients You’ll Need
To make baked chicken drumsticks, you don’t need a long grocery list. In fact, the beauty of this recipe lies in how a handful of simple ingredients can transform into something so flavorful. Here’s everything you’ll need:
Main Ingredients
- 8–10 chicken drumsticks (skin-on for best flavor)
- 2 tablespoons olive oil (or melted butter for richer flavor)
Seasonings
- 1 teaspoon salt
- 1 teaspoon black pepper
- 1 teaspoon garlic powder
- 1 teaspoon onion powder
- 1 teaspoon smoked paprika (adds color and smoky taste)
- ½ teaspoon dried oregano or thyme (optional for herby flavor)
Optional Add-ons for Extra Flavor
- 1 tablespoon soy sauce (for a savory punch)
- 1 tablespoon honey or brown sugar (for a touch of sweetness)
- ½ teaspoon cayenne pepper or chili flakes (for heat)
- Fresh lemon juice (to brighten up the flavor)
This base seasoning mix will give you delicious drumsticks, but feel free to experiment. For example, if you love spicy food, toss in extra chili powder. If you’re cooking for kids, keep it mild with garlic and herbs.
The trick is balance—combine salty, savory, smoky, and just a hint of spice, and you’ll have chicken drumsticks that taste like they came straight from a restaurant kitchen.
Kitchen Tools You’ll Need
Before you jump into cooking, make sure you’ve got the right tools ready. The good news? You don’t need anything fancy—just basic kitchen equipment you probably already own.
Must-Have Equipment
- Baking sheet or roasting pan – A sturdy tray to hold your drumsticks.
- Wire rack (optional but recommended) – Helps air circulate around the chicken, making the skin extra crispy.
- Aluminum foil or parchment paper – Makes cleanup much easier.
- Mixing bowl – For tossing drumsticks with oil and spices.
- Tongs – To handle the drumsticks without burning your fingers.
Helpful Extras
- Meat thermometer – Ensures the chicken is cooked to perfection (safe internal temperature: 165°F / 74°C).
- Basting brush – Useful if you’re adding sauces or glazes halfway through.
- Cooling rack – If you want the skin to stay crispy after baking.
Having these tools on hand makes the cooking process smoother and more enjoyable. Trust me—nothing feels better than pulling out a tray of golden-brown, sizzling drumsticks that look like they belong in a cookbook photo.
Step-by-Step Guide to Baked Chicken Drumsticks
Now that you’ve got your ingredients and tools ready, let’s walk through the cooking process step by step.
Step 1: Preheat the Oven
Set your oven to 400°F (200°C). This temperature strikes the perfect balance—hot enough to crisp the skin while keeping the inside juicy.
Step 2: Prepare the Drumsticks
Pat the chicken drumsticks dry with paper towels. This step is crucial for getting that golden, crispy skin—if they’re too wet, they’ll steam instead of bake.
Step 3: Season the Chicken
In a large mixing bowl, combine olive oil with all your spices. Toss the drumsticks in the mixture until they’re fully coated. Make sure every nook and cranny is covered so each bite is flavorful.
Step 4: Arrange on Baking Sheet
Line your baking sheet with foil or parchment paper. Place the drumsticks in a single layer, leaving space between each piece. If you’re using a wire rack, set it over the tray and place the drumsticks on top for extra crispiness.
Step 5: Bake to Perfection
Place the tray in the preheated oven and bake for 35–40 minutes, flipping the drumsticks halfway through. This ensures even cooking and browning.
Step 6: Check for Doneness
Use a meat thermometer to check if the internal temperature has reached 165°F (74°C). If you don’t have one, cut into the thickest drumstick—the juices should run clear, not pink.
Step 7: Let Them Rest
Remove from the oven and let the drumsticks rest for 5 minutes before serving. This helps the juices redistribute, keeping the meat moist.
And there you have it—crispy, juicy baked chicken drumsticks ready to be devoured.
Tips for Perfectly Baked Chicken Drumsticks
Cooking chicken drumsticks may sound simple, but there are a few tricks that separate good drumsticks from great ones. These tips will help you achieve tender, juicy meat with irresistibly crispy skin every single time.
1. Pat Them Dry Before Seasoning
Moisture is the enemy of crispiness. Always use paper towels to thoroughly pat dry your drumsticks before adding oil and seasonings. This small step makes a huge difference in texture.
2. Don’t Skip the Oil
A little oil goes a long way. Whether you choose olive oil, avocado oil, or melted butter, it helps the seasonings stick and promotes even browning in the oven. Without it, the spices may burn or fall off.
3. Use a Wire Rack if Possible
Placing the drumsticks on a wire rack allows hot air to circulate underneath, ensuring they cook evenly and the skin crisps up beautifully. If you don’t have one, just flip them halfway through cooking.
4. Season Generously
Don’t be afraid of seasoning! Chicken has a mild flavor, so it needs a good dose of spices to shine. Rub the seasoning under the skin as well for deeper flavor.
5. Avoid Overcrowding the Pan
If the drumsticks are too close together, they’ll steam instead of roast, leaving the skin soft. Always leave space between each piece for proper airflow.
6. Flip for Even Cooking
Turning the drumsticks halfway through baking ensures that both sides get equal heat and crispiness.
7. Rest Before Serving
It’s tempting to dig in right away, but letting the drumsticks rest for a few minutes keeps the juices locked inside. Bite too soon, and you’ll lose that moisture on the plate instead of in your mouth.
By following these simple yet powerful tips, you’ll be able to master the art of baking chicken drumsticks and enjoy restaurant-quality results at home.
Different Marinade Ideas
One of the best things about chicken drumsticks is how versatile they are. A basic seasoning mix is delicious on its own, but marinades can take the flavor to the next level. Here are some irresistible marinade ideas you can try:
1. Classic Garlic Butter Marinade
- Melted butter
- Minced garlic
- Lemon juice
- Fresh parsley
This combination creates a rich, savory flavor with a refreshing hint of citrus. Perfect for family dinners.
2. Spicy Chili Marinade
- Olive oil
- Chili powder
- Paprika
- Cayenne pepper
- Lime juice
This one’s for spice lovers. It delivers a smoky, fiery kick that pairs wonderfully with cooling dips like ranch or sour cream.
3. Honey Mustard Glaze
- Dijon mustard
- Honey
- Olive oil
- Black pepper
This marinade balances sweet and tangy flavors beautifully, making it a kid-friendly yet flavorful option.
4. Asian-Inspired Soy-Ginger Mix
- Soy sauce
- Fresh ginger
- Garlic
- Sesame oil
- A touch of honey
This blend gives your drumsticks a savory-sweet, umami-packed flavor that pairs perfectly with rice or stir-fried veggies.
5. Mediterranean Herb Marinade
- Olive oil
- Oregano
- Rosemary
- Lemon zest
- Garlic
Fresh, zesty, and aromatic—this one tastes like a sunny Mediterranean holiday.
Pro tip: Marinate for at least 30 minutes, but if you want deeper flavor, leave the chicken in the fridge overnight. Just don’t exceed 24 hours, as the acidity can break down the meat too much.
Oven Temperature and Cooking Time
Cooking drumsticks may sound straightforward, but oven temperature and timing are key to nailing that perfect balance between juicy meat and crispy skin.
Ideal Oven Temperature
The sweet spot is 400°F (200°C). This temperature is high enough to crisp up the skin without drying out the inside.
- Lower temperatures (like 350°F / 175°C) will cook the chicken but may leave the skin soft.
- Higher temperatures (425°F / 220°C or more) can make the outside too dark before the inside is fully cooked.
Cooking Time
- At 400°F (200°C): 35–40 minutes
- At 375°F (190°C): 40–45 minutes
- At 425°F (220°C): 30–35 minutes
Always flip the drumsticks halfway through to ensure even browning.
Using a Meat Thermometer
The safest and most accurate way to know your chicken is ready is to check with a meat thermometer. Insert it into the thickest part of the drumstick (without touching the bone). Once it reads 165°F (74°C), your chicken is perfectly cooked.
If you don’t own a thermometer, look for clear juices when cutting into the thickest part. Pink or red juices mean it needs more time.
By getting the temperature and timing right, you’ll never have to worry about undercooked or overcooked chicken again.
How to Get Crispy Skin Without Frying
Everyone loves crispy chicken skin, but frying isn’t the only way to achieve it. With a few clever tricks, you can make oven-baked drumsticks just as crunchy as their deep-fried cousins.
1. Dry the Skin Well
Excess moisture is the number one reason chicken skin doesn’t crisp up. Always pat your drumsticks dry with paper towels before seasoning.
2. Add a Touch of Baking Powder
This is a secret trick many chefs use. Tossing drumsticks with a little baking powder (not baking soda!) along with your seasonings helps the skin blister and crisp beautifully in the oven.
3. Use High Heat at the End
Bake at 400°F for most of the time, then increase the oven temperature to 425–450°F for the last 5–10 minutes. This final blast of heat crisps up the skin without drying out the meat.
4. Don’t Cover While Baking
Foil traps steam, which keeps the chicken skin soggy. Bake uncovered to let the skin roast properly.
5. Use a Wire Rack
If you place the drumsticks directly on the pan, they may sit in their own juices, softening the skin. A wire rack keeps them elevated, allowing air circulation all around for an even crunch.
With these methods, you’ll get that irresistible crispy texture—without the oil splatters and extra calories of frying.
What to Serve with Baked Chicken Drumsticks
Baked chicken drumsticks are delicious on their own, but pairing them with the right sides can elevate the entire meal. Whether you want something light, hearty, or indulgent, here are some ideas that work beautifully with this dish.
1. Classic Comfort Sides
- Mashed Potatoes – Creamy, buttery mashed potatoes balance the crispy chicken perfectly.
- Mac and Cheese – A cheesy, gooey side dish that makes any chicken dinner feel like soul food.
- Cornbread – Slightly sweet and crumbly, it’s a Southern favorite alongside baked chicken.
2. Healthy & Light Options
- Steamed Vegetables – Broccoli, carrots, or green beans add freshness and nutrition.
- Garden Salad – A crisp salad with vinaigrette brings a refreshing contrast.
- Quinoa or Brown Rice – Nutty, wholesome grains make the meal more filling without being heavy.
3. Flavorful Additions
- Coleslaw – Creamy or vinegar-based slaw adds crunch and tanginess.
- Roasted Vegetables – Tossed with olive oil and herbs, they complement the savory chicken.
- Garlic Bread – Perfect for soaking up any juices or sauces.
4. Dips & Sauces
- Ranch Dressing – Always a crowd-pleaser.
- Honey Mustard Sauce – Sweet and tangy, a great match for crispy drumsticks.
- BBQ Sauce – Smoky and rich, perfect for dipping or brushing on halfway through baking.
By mixing and matching these sides, you can serve your drumsticks as part of a quick weekday dinner, a fancy meal, or even a party platter that everyone will rave about.
Storage and Reheating Tips
Sometimes you’ll have leftovers—and the good news is that baked chicken drumsticks store and reheat beautifully if done right. Here’s how to keep them tasting fresh and delicious:
Storage
- Refrigerator: Place cooled drumsticks in an airtight container. They’ll last 3–4 days.
- Freezer: Wrap each drumstick individually in foil or plastic wrap, then place them in a freezer-safe bag. They’ll stay good for up to 3 months.
Reheating
- Oven Method (Best for Crispiness): Preheat to 375°F (190°C). Place drumsticks on a baking sheet and warm for 15–20 minutes. This method keeps the skin crispy.
- Microwave (Quick but Soft Skin): Heat on medium power for 2–3 minutes. The meat will be warm, but the skin won’t be crispy.
- Air Fryer: Reheat at 375°F for 5–7 minutes. This is a fantastic way to restore crunchiness.
Pro Tip
Always reheat gently instead of blasting them with high heat. Otherwise, the meat can dry out. Adding a small cup of water in the oven while reheating also helps retain moisture.
With proper storage and reheating, your drumsticks will taste almost as good as when they first came out of the oven.
Nutritional Value of Baked Chicken Drumsticks
Baked chicken drumsticks aren’t just tasty—they’re also a smart choice if you’re looking for a balanced, protein-packed meal. Here’s a breakdown of their nutritional profile (per medium drumstick, skin-on, without extra sauces):
| Nutrient | Amount | Benefit |
|---|---|---|
| Calories | 120–130 | Great for a filling yet moderate-calorie meal |
| Protein | 13–15g | Supports muscle growth and repair |
| Fat | 7–8g | Provides energy and flavor |
| Carbs | 0g | Perfect for low-carb diets |
| Iron | 5% DV | Helps transport oxygen in the blood |
| Zinc | 7% DV | Boosts immunity |
| Vitamin B6 | 15% DV | Aids metabolism and brain health |
Why Baked Is Healthier Than Fried
- Uses less oil → fewer calories and less unhealthy fat
- Retains more nutrients compared to deep-frying
- Easier on digestion while still being flavorful
Keto & Low-Carb Friendly
Since drumsticks are naturally carb-free, they’re perfect for keto, paleo, or low-carb meal plans. Pair them with roasted veggies or a salad for a nutrient-dense dinner.
So, not only are baked drumsticks delicious, but they also fit into a wide variety of diets and healthy eating goals.
Common Mistakes to Avoid
Even though baked chicken drumsticks are beginner-friendly, there are some mistakes that can ruin them. Here’s what you should watch out for:
1. Not Drying the Chicken
Wet chicken equals soggy skin. Always pat dry before seasoning.
2. Under-Seasoning
Chicken can be bland if you don’t season enough. Don’t just sprinkle a little—make sure every piece is well coated.
3. Overcrowding the Pan
If drumsticks are crammed together, they’ll steam instead of bake. Use a large baking sheet or cook in batches.
4. Skipping the Flip
If you don’t turn them halfway through, one side may end up crispier while the other stays pale.
5. Overcooking
Dry, stringy chicken is the result of baking too long. Always check internal temperature instead of guessing.
6. Covering with Foil
Covering traps steam and softens the skin. Bake uncovered for the best results.
By avoiding these pitfalls, you’ll ensure your baked drumsticks are consistently juicy, crispy, and flavorful.
Variations of Baked Drumsticks Around the World
One of the most exciting things about chicken is how every culture has its own spin on it. Drumsticks, in particular, are a global favorite. Let’s take a quick trip around the world through baked drumstick recipes:
1. American BBQ Style
Coated in smoky BBQ sauce and baked until caramelized. Sweet, tangy, and sticky—perfect with cornbread and coleslaw.
2. Asian Soy-Ginger Glaze
Marinated in soy sauce, garlic, ginger, and sesame oil. Served with rice and stir-fried vegetables for a savory-sweet meal.
3. Mediterranean Herb Blend
Seasoned with olive oil, oregano, rosemary, and lemon. Light, fresh, and perfect with roasted veggies.
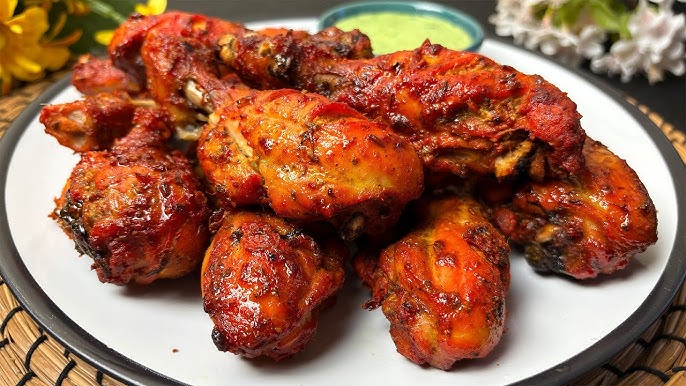
4. Indian Tandoori-Inspired
Marinated in yogurt, turmeric, cumin, and garam masala. Vibrant, aromatic, and full of spice without being overwhelmingly hot.
5. Latin Spiced Drumsticks
Rubbed with cumin, paprika, lime juice, and cilantro. Zesty and bold, often served with rice and beans.
Each variation brings something unique to the table, proving just how versatile baked drumsticks can be.
FAQs about Baked Chicken Drumstick Recipe
1. Can I bake frozen drumsticks?
Yes, but it’s best to thaw them first for even cooking. If baking from frozen, add an extra 15–20 minutes to the cooking time.
2. Do I need to marinate overnight?
Not always. Even 30 minutes of marinating adds flavor, but overnight marination deepens the taste.
3. Can I use an air fryer instead?
Absolutely! Air fry at 375°F (190°C) for 25–30 minutes, flipping halfway. The skin gets extra crispy.
4. How do I make them spicy?
Add cayenne pepper, chili powder, or hot sauce to your marinade or seasoning mix for an extra kick.
5. How long do leftovers last?
In the fridge, baked drumsticks last 3–4 days. In the freezer, up to 3 months.
Conclusion
Baked chicken drumsticks are more than just an easy dinner option—they’re a flavorful, versatile dish that can be customized to suit any taste or occasion. With the right seasonings, oven temperature, and a few pro tips, you’ll never have to worry about dry or bland chicken again.
From simple garlic butter to spicy chili marinades, the possibilities are endless. Pair them with classic sides like mashed potatoes or keep it light with a fresh salad—the choice is yours. And the best part? They’re budget-friendly, family-approved, and healthier than fried alternatives.
So the next time you’re craving comfort food that’s both delicious and easy to make, give baked chicken drumsticks a try. Once you master the basics, you’ll have a recipe that’s on repeat in your kitchen for years to come.