Baked Cauliflower Recipe: Craving something healthy, flavorful, and insanely easy to make? Let’s talk about baked cauliflower. This veggie doesn’t get nearly enough credit for how versatile and downright delicious it can be when baked to golden perfection.
Whether you’re looking to cut carbs, eat more veggies, or just switch things up from your usual sides, baked cauliflower is your new go-to.
Why Baked Cauliflower is the Perfect Side or Main
Here’s the thing: cauliflower is like a culinary chameleon. You can mash it, rice it, or in this case, bake it until it’s crispy on the outside and tender on the inside. It’s light but filling, healthy but comforting. It pairs beautifully with just about anything—grilled meats, rice bowls, pasta dishes, or it can stand alone as a main dish if you jazz it up right.
Plus, it’s a fantastic way to sneak more vegetables into your meals without feeling like you’re forcing it. Kids love it. Adults devour it. And your body? It’s going to thank you.
Health Benefits of Cauliflower
Before we dig into the oven details, let’s appreciate this cruciferous vegetable. Cauliflower is low in calories and carbs but high in fiber, vitamins C, K, and B6, and antioxidants. It supports digestion, reduces inflammation, and even helps with weight loss. This is one of those foods where the taste doesn’t scream “healthy,” but your body knows it is.
Roasting it also brings out its natural sweetness and nuttiness, giving it a complex flavor that boiling or steaming just can’t match. So not only are you eating better—you’re actually enjoying it too.
Ingredients Needed
Basic Ingredients for Classic Baked Cauliflower
You don’t need a long grocery list to make this magic happen. Here’s what you’ll need:
- 1 large head of cauliflower
- 2–3 tablespoons of olive oil
- 1 teaspoon of salt
- 1/2 teaspoon of black pepper
- 1 teaspoon garlic powder
- 1 teaspoon paprika (for that color and smoky flavor)
Simple, right? These ingredients are probably already in your kitchen. And if they’re not—go get ’em, they’re pantry staples for a reason.
Optional Add-ons and Flavor Boosters
Want to get creative? Here are a few extras you can toss in:
- Parmesan cheese (sprinkle before or after baking)
- Red pepper flakes (for a spicy kick)
- Lemon zest (brightens the flavor)
- Fresh parsley or cilantro (for garnish)
- A dash of cumin or curry powder (adds a deep flavor profile)
- Panko breadcrumbs (for crunch)
Make it your own! That’s the beauty of this dish—you can keep it classic or turn it gourmet with just a few tweaks.
Equipment You’ll Need
Don’t worry, no fancy kitchen gadgets required here:
- Sharp knife
- Cutting board
- Mixing bowl
- Baking sheet (lined with parchment paper or foil for easy cleanup)
- Oven (obviously)
And maybe a spatula to toss or flip the florets halfway through baking. That’s about it!
Step-by-Step Guide to Making Baked Cauliflower
Let’s walk through this together, step by step. You’ll be surprised how simple it is.
Step 1: Preheat the Oven
Preheat your oven to 425°F (220°C). A high temperature is key to getting that perfect caramelization—crispy on the edges, soft inside. Don’t skip this step. A hot oven makes all the difference.
Step 2: Wash and Cut the Cauliflower
Wash your cauliflower thoroughly, then pat it dry. You don’t want excess moisture messing with the baking process. Cut the cauliflower into bite-sized florets. Try to keep them roughly the same size so they cook evenly.
Pro tip: don’t throw away the stem! It’s totally edible and delicious roasted.
Step 3: Seasoning the Cauliflower
Place your florets into a large mixing bowl. Drizzle with olive oil and toss until everything is coated. Then sprinkle your spices—salt, pepper, garlic powder, paprika—and give it another good mix. Make sure every piece is evenly seasoned. You want those flavors in every bite.
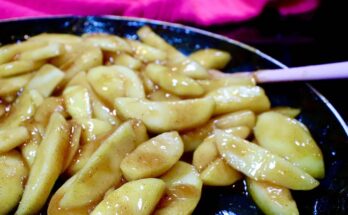
Step 4: Baking the Cauliflower to Perfection
Spread the seasoned cauliflower on your lined baking sheet in a single layer. Avoid overcrowding the pan—give those florets room to breathe so they roast, not steam.
Pop it in the oven and bake for 25–30 minutes. Halfway through, take them out and flip the pieces so they cook evenly. You’re looking for golden brown edges and a tender center.
If you’re adding cheese or breadcrumbs, sprinkle them on during the last 10 minutes of baking.
Step 5: Serving Suggestions
Once they’re done, remove from the oven and let cool slightly. Then serve them up!
Here are a few serving ideas:
- As a side with grilled chicken or steak
- Tossed into a grain bowl with quinoa and chickpeas
- Drizzled with tahini or garlic aioli
- Wrapped in a tortilla for a veggie taco
- On their own with a dipping sauce (ranch, hummus, or yogurt-based dips are amazing here)
Tips for Best Results
Baked cauliflower might be simple to make, but a few expert tricks can take it from “pretty good” to “absolutely delicious.” If you want that restaurant-style flavor and texture, don’t skip these tips:
- Dry it thoroughly after washing: Excess moisture will make the florets steam instead of roast, which means you’ll end up with mushy cauliflower instead of crispy, golden bites.
- Use high heat: As mentioned earlier, 425°F is your friend. It’s hot enough to give you that delicious caramelized crust without drying the inside.
- Don’t overcrowd the pan: Spread the cauliflower in a single layer with space between each floret. If you pile them on top of each other, they’ll steam, not roast.
- Toss halfway through: This ensures even browning and a more consistent texture.
- Experiment with oils: Olive oil is a classic, but avocado oil has a higher smoke point and can create an even crispier finish.
- Add fresh herbs at the end: Don’t bake fresh parsley, cilantro, or basil—sprinkle them on after baking for a pop of color and flavor.
- Roast on parchment paper or foil: This prevents sticking and makes cleanup a breeze.
And finally, always taste and adjust. Need more salt? A little more heat? Go for it. Cooking is part science, part art—make it yours.
Variations You Can Try
Feeling adventurous? There are so many ways to tweak baked cauliflower based on what you’re craving or what you have on hand. Let’s break down a few tasty variations that will breathe new life into this humble veggie.
Cheesy Baked Cauliflower
Who doesn’t love melted cheese? To make it cheesy:
- Prepare the cauliflower as usual.
- About 20 minutes into baking, sprinkle shredded cheddar, mozzarella, or Parmesan on top.
- Pop it back in the oven for another 5–10 minutes until the cheese is melty and golden.
Bonus: Add a few breadcrumbs with the cheese for an irresistible crunchy-cheesy combo. Serve it as a comforting side dish or even as a low-carb “mac and cheese” substitute.
Spicy Roasted Cauliflower
If you’re into bold, fiery flavors, spice things up:
- Add 1/2 teaspoon cayenne pepper or red chili flakes to your seasoning mix.
- Toss with hot sauce or sriracha before baking.
- Or serve with a spicy dip like chipotle aioli or spicy ranch.
This version is a hit for game day snacks or as a vegetarian alternative to buffalo wings.
Baked Cauliflower with Herbs
Want something more refined and earthy? Herb it up:
- Add a mix of dried or fresh herbs like rosemary, thyme, oregano, or dill.
- A splash of lemon juice or zest adds brightness and cuts through the richness.
- Drizzle with garlic-infused olive oil for gourmet vibes.
Perfect as a side for roasted meats or served chilled as a salad with couscous or quinoa.
Nutritional Value
Here’s the best part: baked cauliflower is as good for your body as it is for your taste buds. One cup of roasted cauliflower (without cheese or heavy toppings) contains:
| Nutrient | Amount per Cup |
|---|---|
| Calories | ~70 |
| Carbohydrates | 8g |
| Protein | 3g |
| Fat | 4g |
| Fiber | 3g |
| Vitamin C | 77% DV |
| Vitamin K | 20% DV |
| Folate | 15% DV |
It’s keto-friendly, gluten-free, vegan (if you skip the cheese), and low in calories. Plus, it’s packed with antioxidants that support your immune system and fight inflammation.
Whether you’re on a weight-loss journey, trying to eat cleaner, or just want to add more veggies to your plate, baked cauliflower checks all the boxes.
FAQs About Baked Cauliflower Recipe
1. Can I use frozen cauliflower for this recipe?
Yes, but make sure to thaw and pat it dry first to avoid soggy results. Fresh cauliflower gives the crispiest texture, though.
2. How long does baked cauliflower last in the fridge?
Store leftovers in an airtight container for up to 3 days. Reheat in the oven or air fryer to keep it crispy.
3. What seasonings go well with baked cauliflower?
Garlic powder, paprika, cumin, parmesan, turmeric, and chili flakes all bring bold flavor. Don’t be afraid to get creative!
4. Is baked cauliflower healthy?
Absolutely! It’s low in calories, high in fiber, and packed with vitamins. It’s a guilt-free snack or side dish.
5. Can I make this recipe vegan?
Yes! Just skip the cheese or use a plant-based alternative. Olive oil and your favorite spices are all you really need.
6. What’s the best dipping sauce for baked cauliflower?
Ranch, garlic aioli, spicy mayo, or even buffalo sauce all pair beautifully. Go wild.
7. Do I need to boil the cauliflower before baking?
Nope! Just toss it with oil and seasoning and bake it raw—no pre-boiling necessary.
Conclusion
Baked cauliflower is one of those rare dishes that hits the sweet spot between healthy, tasty, and ridiculously easy. It’s the kind of recipe that works on a busy weeknight or for a dinner party with friends. With just a few basic ingredients and a little oven time, you’ll have a dish that’s crispy, savory, and endlessly customizable.
And honestly, once you try it, you might find yourself making it on repeat. It’s that good. So preheat that oven, grab a cauliflower, and get baking. Your taste buds (and your body) will thank you.