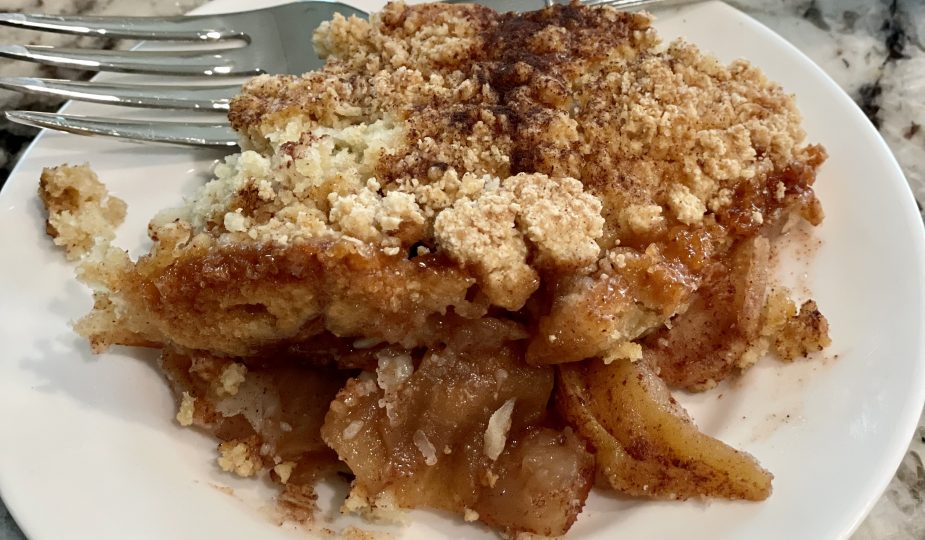
Award Winning Apple Crisp Recipe: Who doesn’t love a warm, golden, bubbling apple crisp fresh from the oven? There’s something so comforting about the mix of tender spiced apples and that irresistibly crunchy topping. But this isn’t just any apple crisp — this is an award-winning apple crisp recipe, crafted to perfection through years of family gatherings, fall bake-offs, and holiday dinners.
What makes it “award-winning”? It’s all in the details — the perfect blend of spices, the contrast of textures, and just the right sweetness level. Whether you’re a beginner or a seasoned baker, this guide walks you through each step so your apple crisp turns out flawless every single time.
Let’s not just aim for good — let’s go for the best apple crisp you’ve ever tasted. Grab your apron, and let’s get started!
Ingredients You’ll Need
Before diving into the process, let’s gather all the essential ingredients. A great apple crisp starts with quality components — fresh apples, warm spices, and that signature crumbly topping. Here’s everything you’ll need:
For the Apple Filling
- Fresh Apples – About 6 to 8 medium apples (around 2½ to 3 pounds). Granny Smith, Honeycrisp, or a mix work great.
- Granulated Sugar – ¼ to ½ cup, depending on your apple variety and how sweet you like it.
- Brown Sugar – Adds depth of flavor, especially when paired with spices.
- Cinnamon – 1 teaspoon, the backbone of the apple spice combo.
- Nutmeg – ¼ teaspoon, just a hint goes a long way.
- Lemon Juice – 1 tablespoon to balance the sweetness and keep the apples fresh.
For the Crisp Topping
- Old-Fashioned Rolled Oats – 1 cup for that perfect chewy crunch.
- All-Purpose Flour – ¾ cup to hold the topping together.
- Brown Sugar – ⅔ cup packed, gives a caramelized finish.
- Unsalted Butter – ½ cup (1 stick), cold and cubed.
- Cinnamon – 1 teaspoon, because you can never have too much.
- Salt – A pinch, to enhance all the flavors.
- Optional Add-ins:
- Chopped nuts (like pecans or walnuts)
- Coconut flakes
- A dash of vanilla extract
Pro Tip: Always use cold butter for the topping. It helps create that signature crumbly texture when baked.
Best Apples for Apple Crisp
Not all apples are created equal, especially when it comes to baking. Some apples turn to mush, while others hold their shape beautifully. For the best results, go with firm, slightly tart apples that balance well with the sweetness of the topping.
Best Apple Varieties for Crisp:
- Granny Smith – Tart, firm, and holds up beautifully during baking.
- Honeycrisp – Sweet and crisp, perfect when paired with a tart variety.
- Braeburn – Juicy and aromatic, holds shape well.
- Pink Lady – Tangy-sweet with a nice texture.
- Fuji or Gala – Can be used, but better when mixed with a tart variety.
Want the best of both worlds? Use a blend of apples to create a layered flavor profile and varied texture. Trust me — it makes a difference.
Avoid apples like Red Delicious, which tend to turn mushy and bland when baked.
Kitchen Tools You’ll Need
Making an apple crisp doesn’t require fancy gadgets, but having the right tools makes the process smoother and faster. Here’s what you’ll need:
Essential Tools:
- Peeler – To quickly remove apple skins.
- Paring Knife or Apple Corer/Slicer – For cutting uniform slices.
- Mixing Bowls – At least two (one for filling, one for topping).
- Pastry Cutter or Fork – To cut butter into the dry topping ingredients.
- Measuring Cups & Spoons – For precise ingredient ratios.
- 9×13 Baking Dish – The perfect size for a family-style dessert.
- Oven Mitts – Because safety first.
Optional but Helpful:
- Microplane Grater – For fresh nutmeg.
- Food Processor – Speeds up topping prep (just pulse gently).
- Cooling Rack – Allows the crisp to rest evenly after baking.
With everything ready to go, it’s time to start cooking!
Step-by-Step Guide to Making Apple Crisp
Let’s break this into bite-sized steps. You don’t need to be a professional baker to master this recipe — just follow each step carefully, and you’ll have a crisp that tastes like it came straight out of grandma’s kitchen (or a blue-ribbon fair).
Step 1 – Prepping the Apples
Start with firm, fresh apples. Wash, peel, core, and slice them evenly. Aim for about ¼-inch thick slices — not too thin, not too chunky.
Tips for the best apple prep:
- Peeling is key. Leaving the skin on can create a leathery texture.
- Uniform slices ensure even cooking.
- Toss sliced apples in lemon juice right away. This prevents browning and adds a fresh zing to balance the sweetness.
You can use an apple corer/slicer for speed, but be careful — uneven slices might not cook uniformly. Take your time here. It’s worth it.
Step 2 – Making the Filling
Once your apples are prepped and tossed in lemon juice, it’s time to layer in the flavor. Think of this step as creating the foundation of your dessert — it’s all about getting those warm spices just right.
In a large mixing bowl, add:
- ¼ to ½ cup of granulated sugar (adjust based on how sweet your apples are)
- ¼ cup of brown sugar for that rich, caramelized note
- 1 teaspoon ground cinnamon
- ¼ teaspoon ground nutmeg
- A pinch of salt
Toss the apple slices in this mixture until they are well coated. The sugar will begin to draw out the natural juices of the apples, creating a syrupy base that bakes into a luscious filling.
Optional Add-ins:
- 1 tablespoon of all-purpose flour or cornstarch can be added to the filling to thicken it while baking.
- A splash of vanilla extract enhances the overall flavor.
Transfer this coated apple mixture into a greased 9×13-inch baking dish, spreading it evenly.
Pro Tip: Give the dish a few gentle taps on the counter to settle the apples into an even layer. This ensures a consistent bake and makes for a picture-perfect scoop.
Step 3 – Preparing the Crisp Topping
This is where the magic happens. The contrast between the soft apple base and the crisp, buttery topping is what elevates this dessert to award-winning status.
In a medium bowl, combine:
- 1 cup rolled oats
- ¾ cup all-purpose flour
- ⅔ cup packed brown sugar
- 1 teaspoon ground cinnamon
- A pinch of salt
Mix these dry ingredients well. Then, take ½ cup of cold, cubed unsalted butter and cut it into the mixture. This can be done with a pastry cutter, two forks, or even your fingers — the goal is to break the butter into pea-sized bits that hold the dry ingredients together.
You’re looking for a crumbly texture — think wet sand with buttery chunks. Don’t overwork it; you want the topping to stay light and crunchy, not doughy.
Optional Add-ins for a Gourmet Twist:
- ½ cup chopped pecans or walnuts for added crunch
- 2 tablespoons shredded coconut for a tropical twist
- A few dashes of ground ginger or cardamom for a spiced-up variation
Set the topping aside while you prepare to assemble your masterpiece.
Step 4 – Assembling the Crisp
Now that your apples are layered in the baking dish and your topping is ready, it’s time to combine the two — and this step is more important than it sounds.
Here’s how to assemble perfectly:
- Gently sprinkle the crisp topping evenly over the apple mixture.
- Do not press the topping down. Let it sit loosely — this is what helps it crisp up during baking.
- Make sure there are no large gaps or clumps. Even coverage ensures a uniform crunch in every bite.
If your baking dish is particularly shallow, place it on a baking sheet lined with foil to catch any bubbling juices. Trust me — it saves you from a messy oven cleanup!
Pro Tip: Give the top a light sprinkle of coarse sugar (like turbinado) for an extra golden, sparkly finish.
Step 5 – Baking Instructions
Preheat your oven to 350°F (175°C). This is the sweet spot — hot enough to soften the apples and caramelize the topping without burning it.
Place the assembled apple crisp on the middle oven rack and bake for 45 to 55 minutes. Here’s what to watch for:
- The topping should be golden brown and crisp.
- The apple filling should be bubbling around the edges.
- A toothpick or fork should slide through the apples easily when tested in the center.
Important Notes:
- If the topping browns too quickly, loosely tent the dish with foil around the 35-minute mark.
- Let the crisp cool for at least 15-20 minutes before serving. This gives the juices time to settle and thickens the filling beautifully.
And there you have it — the base of your award-winning apple crisp is complete! Time to move on to the finishing touches and bonus tips to perfect your dessert even further.
Tips for the Perfect Apple Crisp
There’s a reason some crisps come out perfect while others fall a little flat — it all comes down to technique. These tips will take your apple crisp from good to unforgettable.
1. Don’t Overmix the Topping
When making the crumble topping, be gentle. Overmixing or using melted butter instead of cold butter will result in a dough-like layer instead of a crisp crumble. Cold butter cut into small chunks keeps the texture light and crispy.
Quick trick: After assembling, chill the whole crisp in the fridge for 15 minutes before baking. This helps solidify the butter again for an extra crispy finish.
2. Use a Mix of Apple Varieties
Combining sweet and tart apples (like Granny Smith and Honeycrisp) creates complexity in flavor and ensures the filling isn’t overly mushy or overly firm. It’s like adding depth to a good song — everything just harmonizes better.
3. Add a Thickener to the Filling
Don’t skip the flour or cornstarch in the apple filling! Apples release juice as they bake, and without a thickener, you’ll end up with a soupy mess. Just a tablespoon or two helps the juices turn into that perfect glossy, thick sauce.
4. Bake Until Bubbling
Baking time is crucial. You want to see the filling bubbling around the edges. That’s how you know the apples are fully cooked and the topping is done. If you remove it too early, the apples may still be firm, and the juices won’t have thickened.
5. Rest Before Serving
Yes, it’s tempting to dive in immediately — the aroma alone is enough to drive you crazy — but letting the crisp rest for 15–20 minutes makes a big difference. It allows the filling to set, preventing it from being too runny and giving better flavor development.
Serving Suggestions
You’ve pulled your masterpiece out of the oven — now it’s time to enjoy it to the fullest. Apple crisp is versatile, but these classic (and creative) serving ideas will elevate your experience.
1. Vanilla Ice Cream (Classic Choice)
The cold, creamy contrast of vanilla ice cream melting into warm apple crisp is pure dessert heaven. It’s the ultimate comfort combo.
2. Fresh Whipped Cream
Light, airy whipped cream adds just the right touch of richness without overpowering the delicate apple flavor. Add a splash of vanilla or cinnamon to the cream for a little something extra.
3. Caramel Drizzle
Want to take things over the top? A warm caramel drizzle adds a luxurious, decadent finish. Salted caramel works especially well — the salt enhances the sweet and tart balance in the apples.
4. Maple Syrup or Honey
For a rustic, natural sweetness, drizzle a little maple syrup or local honey over each serving. It adds complexity and pairs beautifully with the oat topping.
5. Add Crunch with Toasted Nuts
Top with a few chopped, toasted pecans or almonds before serving. Not only does it enhance texture, but it also brings out the nutty undertones in the topping.
Storage and Reheating Tips
One of the best things about apple crisp? It stores and reheats beautifully, making it perfect for leftovers (if there are any!).
How to Store:
- Refrigerator: Cover tightly with plastic wrap or foil and store in the fridge for up to 4 days.
- Freezer: Let the crisp cool completely, then wrap it tightly in plastic and foil. It can be frozen for up to 2 months. Thaw in the fridge overnight before reheating.
How to Reheat:
- Oven: Preheat to 350°F and bake uncovered for 15-20 minutes or until heated through. This keeps the topping crispy.
- Microwave: Reheat individual portions for 30-60 seconds, but be aware the topping may lose some of its crunch.
- Toaster Oven: Perfect for crisping up small portions without using your main oven.
Pro Tip: Sprinkle a little extra brown sugar on top before reheating in the oven to refresh the caramelized crunch.
Gluten-Free and Vegan Variations
Need to accommodate dietary restrictions? No worries — you can still enjoy a delicious, crowd-pleasing apple crisp with just a few substitutions.
Gluten-Free Version:
- Use gluten-free oats. Make sure they’re certified GF, as oats are often processed with wheat.
- Substitute the all-purpose flour with a 1:1 gluten-free flour blend or almond flour for a nutty twist.
- Add a tablespoon of cornstarch to help thicken the apple filling in the absence of regular flour.
Vegan Version:
- Replace butter with cold vegan butter or solidified coconut oil.
- Double-check sugars. Some brown sugars are processed with bone char, so choose organic or vegan-certified options.
- Add chopped nuts to give the topping a richer texture that mimics the buttery crumble.
These versions taste just as good and ensure everyone at the table gets to dig in.
Common Mistakes to Avoid
Even the best cooks can stumble when making apple crisp. Here are the most common pitfalls and how to avoid them:
1. Using the Wrong Apples
Soft apples like Red Delicious can turn to mush. Always go for firm, baking-friendly apples that hold their shape under heat.
2. Skipping the Thickener
No one wants watery crisp. Flour or cornstarch in the filling is a must — it turns juice into a delicious sauce.
3. Overmixing the Topping
Keep that topping crumbly, not pasty. Use cold butter and don’t overwork it.
4. Underbaking
If the apples aren’t bubbling and the topping isn’t browned, it’s not done. Give it the full bake time and check that the apples are tender.
5. Not Letting It Rest
Yes, it’s hard to wait — but resting the crisp for 15–20 minutes allows the filling to thicken and flavors to meld beautifully.
Nutritional Information
While apple crisp isn’t exactly a health food, it can still be part of a balanced dessert plan—especially when made with quality ingredients. Let’s break down what a typical serving (about 1 cup) might look like. Keep in mind these numbers are approximate and can vary based on the ingredients used.
Estimated Nutritional Values (Per Serving):
| Nutrient | Amount |
|---|---|
| Calories | 310–350 kcal |
| Total Fat | 12–15g |
| Saturated Fat | 7–9g |
| Carbohydrates | 50–55g |
| Sugars | 28–35g |
| Dietary Fiber | 4–5g |
| Protein | 2–4g |
| Sodium | 100–150mg |
Tips for a Healthier Apple Crisp:
- Reduce the sugar by 25–30% without compromising taste.
- Use whole-wheat flour or almond flour for added fiber and protein.
- Add chopped nuts like almonds or walnuts for healthy fats.
- Use coconut oil instead of butter for a dairy-free fat source.
- Serve with Greek yogurt instead of ice cream for a lighter topping.
Healthy doesn’t mean boring — with a few smart swaps, your apple crisp can still be indulgent without the guilt.
FAQs about Award Winning Apple Crisp Recipe
Can I freeze apple crisp?
Absolutely! You can freeze both baked and unbaked apple crisp. Wrap it tightly in plastic and foil, and freeze for up to 2 months. To reheat, thaw overnight in the fridge and bake at 350°F until warm and bubbly.
What’s the difference between apple crisp and apple crumble?
They’re often used interchangeably, but traditionally, apple crisp has oats in the topping, while apple crumble has a streusel-like topping without oats. Both are delicious, though!
Can I make it in advance?
Yes! You can assemble the entire crisp, cover it tightly, and refrigerate for up to 24 hours before baking. This is perfect for holiday prep or entertaining guests.
What if I don’t have oats?
No oats? No problem. You can replace them with extra flour and a few chopped nuts to replicate the texture. It’ll be more like a crumble, but still tasty.
Can I use canned apples or apple pie filling?
While fresh apples are best, you can use canned apple pie filling in a pinch. Just reduce the added sugar and spices in the recipe, as most fillings are already sweetened and flavored.
Final Thoughts
There’s something truly magical about the simplicity of a good apple crisp. It doesn’t require complex techniques or exotic ingredients — just humble apples, cozy spices, and a buttery crumble. Yet when baked just right, it can stand proudly beside even the fanciest desserts.
This award-winning apple crisp recipe is more than just a treat — it’s a celebration of fall, family traditions, and the kind of baking that warms your heart and fills your kitchen with joy. Whether you’re making it for a holiday table, a potluck, or just a cozy night in, this recipe is sure to impress.
So roll up your sleeves, slice those apples, and make something special. One bite, and you’ll see why this dish earns its blue-ribbon status every single time.


